Instructions
Page 2
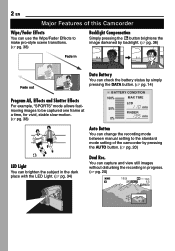
min 640F 13 PHOTO You can brighten the subject in progress. (੬ pg. 20) 16:9 --- 2 EN Major Features of this Camcorder Wipe/Fader Effects You can use the Wipe/Fader Effects to make pro-style scene transitions. (੬ pg. 38) Backlight Compensation Simply pressing... 14) BATTERY CONDITION 100% MAX TIME LCD 50% min FINDER 0% min Auto Button You can change the recording mode between manual setting to the standard mode setting of the camcorder by pressing the AUTO button. (੬ pg. 20) LED Light You can capture and view still images without disturbing the recording...
min 640F 13 PHOTO You can brighten the subject in progress. (੬ pg. 20) 16:9 --- 2 EN Major Features of this Camcorder Wipe/Fader Effects You can use the Wipe/Fader Effects to make pro-style scene transitions. (੬ pg. 38) Backlight Compensation Simply pressing... 14) BATTERY CONDITION 100% MAX TIME LCD 50% min FINDER 0% min Auto Button You can change the recording mode between manual setting to the standard mode setting of the camcorder by pressing the AUTO button. (੬ pg. 20) LED Light You can capture and view still images without disturbing the recording...
Instructions
Page 7
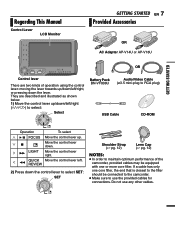
... select SET: SET Shoulder Strap (੬ pg. 12) Lens Cap (੬ pg. 12) NOTES: ● In order to maintain optimum performance of the camcorder, provided cables may be equipped with one core filter, the end that is closest to the filter should be connected to the... camcorder. ● Make sure to RCA plug) USB Cable CD-ROM GETTING STARTED Operation To select 3 6 FOCUS Move the control lever up /down the lever. Regarding This Manual Control Lever LCD Monitor GETTING STARTED EN 7 Provided Accessories OR AC...
... select SET: SET Shoulder Strap (੬ pg. 12) Lens Cap (੬ pg. 12) NOTES: ● In order to maintain optimum performance of the camcorder, provided cables may be equipped with one core filter, the end that is closest to the filter should be connected to the... camcorder. ● Make sure to RCA plug) USB Cable CD-ROM GETTING STARTED Operation To select 3 6 FOCUS Move the control lever up /down the lever. Regarding This Manual Control Lever LCD Monitor GETTING STARTED EN 7 Provided Accessories OR AC...

Instructions
Page 9
OFF: To switch off the camcorder. MEMORY: To record in a memory card or access data stored in the memory card. GETTING STARTED The connectors are located beneath the covers. )Audio/Video ... Review [QUICK REVIEW] (੬ pg. 18) 2 : Right/Fast-Forward (¡) (੬ pg. 21)/ LED Light [LIGHT] (੬ pg. 34) 3 : Up/Play/Pause (6) (੬ pg. 21)/ Manual Focus [FOCUS] (੬ pg. 35) 4 : Down/Stop (7) (੬ pg. 21)/ Backlight Compensation [ ] (੬ pg. 36)/ Spot Exposure (੬ pg. 36) Press down : SET 2VIDEO/MEMORY...
OFF: To switch off the camcorder. MEMORY: To record in a memory card or access data stored in the memory card. GETTING STARTED The connectors are located beneath the covers. )Audio/Video ... Review [QUICK REVIEW] (੬ pg. 18) 2 : Right/Fast-Forward (¡) (੬ pg. 21)/ LED Light [LIGHT] (੬ pg. 34) 3 : Up/Play/Pause (6) (੬ pg. 21)/ Manual Focus [FOCUS] (੬ pg. 35) 4 : Down/Stop (7) (੬ pg. 21)/ Backlight Compensation [ ] (੬ pg. 36)/ Spot Exposure (੬ pg. 36) Press down : SET 2VIDEO/MEMORY...
Instructions
Page 10
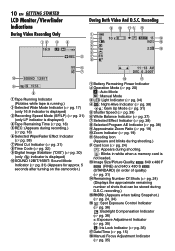
... pg. 36) ±: Exposure Adjustment Indicator (੬ pg. 35) : Iris Lock Indicator (੬ pg. 36) )Date/Time (੬ pg. 15) ~Manual Focus Adjustment Indicator (੬ pg. 35) SOUND 12 B I T WH 6 7 9 15:55 8 1Tape Running Indicator (Rotates while tape is running.) 2Selected ... Mode Indicator (੬ pg. 31) (Appears for approx. 5 seconds after turning on the camcorder.) 11 : 13 AM DEC . 6 . 2007 ~ ) 1Battery Remaining Power Indicator 2Operation Mode (੬ pg. 20) A : Auto Mode M : Manual Mode 3LED Light Indicator (੬ pg. 34) 4 : Night-Alive Indicator (੬ pg...
... pg. 36) ±: Exposure Adjustment Indicator (੬ pg. 35) : Iris Lock Indicator (੬ pg. 36) )Date/Time (੬ pg. 15) ~Manual Focus Adjustment Indicator (੬ pg. 35) SOUND 12 B I T WH 6 7 9 15:55 8 1Tape Running Indicator (Rotates while tape is running.) 2Selected ... Mode Indicator (੬ pg. 31) (Appears for approx. 5 seconds after turning on the camcorder.) 11 : 13 AM DEC . 6 . 2007 ~ ) 1Battery Remaining Power Indicator 2Operation Mode (੬ pg. 20) A : Auto Mode M : Manual Mode 3LED Light Indicator (੬ pg. 34) 4 : Night-Alive Indicator (੬ pg...
Instructions
Page 14
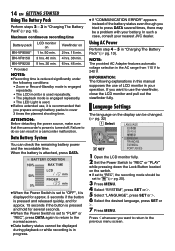
... is in progress. ● If "COMMUNICATION ERROR" appears instead of LCD monitor in this manual supposes the use the viewfinder, close the LCD monitor and pull out the view&#...to "OFF", it is recommended that the camcorder's power is attached, press DATA. NOTE: The provided AC Adapter features automatic voltage selection in a camcorder malfunction. Data Battery System You can result...while recording is reduced significantly under the following explanations in your nearest JVC dealer. Maximum continuous recording time Battery pack LCD monitor on Viewfinder on...
... is in progress. ● If "COMMUNICATION ERROR" appears instead of LCD monitor in this manual supposes the use the viewfinder, close the LCD monitor and pull out the view&#...to "OFF", it is recommended that the camcorder's power is attached, press DATA. NOTE: The provided AC Adapter features automatic voltage selection in a camcorder malfunction. Data Battery System You can result...while recording is reduced significantly under the following explanations in your nearest JVC dealer. Maximum continuous recording time Battery pack LCD monitor on Viewfinder on...
Instructions
Page 20
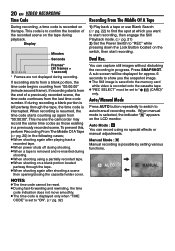
...the tape during playback. This code is resumed, the time code starts counting up again from "00:00:00". Auto/Manual Mode Press AUTO button repeatedly to switch to confirm the location of a previously recorded scene, the time code ...shooting using no special effects or manual adjustments. When recording is to M auto/manual recording mode. M Manual Mode : Manual recording is selected, the indicator " " appears on the tape. AUTO MANUAL When manual mode is possible by setting various functions. This means the camcorder may record the same time codes...
...the tape during playback. This code is resumed, the time code starts counting up again from "00:00:00". Auto/Manual Mode Press AUTO button repeatedly to switch to confirm the location of a previously recorded scene, the time code ...shooting using no special effects or manual adjustments. When recording is to M auto/manual recording mode. M Manual Mode : Manual recording is selected, the indicator " " appears on the tape. AUTO MANUAL When manual mode is possible by setting various functions. This means the camcorder may record the same time codes...
Instructions
Page 23
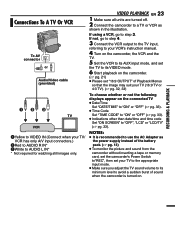
.... (੬ pg. 13) ● To monitor the picture and sound from the camcorder without inserting a tape or memory card, set the camcorder's Power Switch to"REC", then set your TV to the appropriate input mode. ●...Please set "16:9 OUTPUT" of Playback Menus so that the image may suit your VCR's instruction manual. 4 Turn on the camcorder, the VCR and the TV. 5 Set the VCR to its AUX input mode, and set ...the TV to its minimum level to a TV or VCR as the power supply instead of sound when the camcorder is turned on the connected TV ● Date/Time Set "DATE/TIME" to "ON" or "OFF" (&#...
.... (੬ pg. 13) ● To monitor the picture and sound from the camcorder without inserting a tape or memory card, set the camcorder's Power Switch to"REC", then set your TV to the appropriate input mode. ●...Please set "16:9 OUTPUT" of Playback Menus so that the image may suit your VCR's instruction manual. 4 Turn on the camcorder, the VCR and the TV. 5 Set the VCR to its AUX input mode, and set ...the TV to its minimum level to a TV or VCR as the power supply instead of sound when the camcorder is turned on the connected TV ● Date/Time Set "DATE/TIME" to "ON" or "OFF" (&#...
Instructions
Page 35
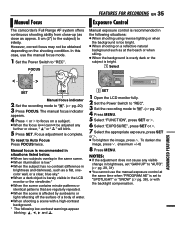
...identical patterns that are regularly repeated. ● When the scene is too bright. ● When shooting on the shooting condition. Select ADVANCED FEATURES 1 2 SET Manual focus indicator M 2 Set the recording mode to " ". (੬ pg. 20) 4 Press MENU. 5 Select "FUNCTION", press SET or 2. 6 Select... 1 Open the LCD monitor fully. 2 Set the Power Switch to Auto Focus Press FOCUS twice. FEATURES FOR RECORDING EN 35 Manual Focus Exposure Control The camcorder's Full Range AF system offers continuous shooting ability from close-up (as close as approx. 5 cm (2") to the subject) ...
...identical patterns that are regularly repeated. ● When the scene is too bright. ● When shooting on the shooting condition. Select ADVANCED FEATURES 1 2 SET Manual focus indicator M 2 Set the recording mode to " ". (੬ pg. 20) 4 Press MENU. 5 Select "FUNCTION", press SET or 2. 6 Select... 1 Open the LCD monitor fully. 2 Set the Power Switch to Auto Focus Press FOCUS twice. FEATURES FOR RECORDING EN 35 Manual Focus Exposure Control The camcorder's Full Range AF system offers continuous shooting ability from close-up (as close as approx. 5 cm (2") to the subject) ...
Instructions
Page 37
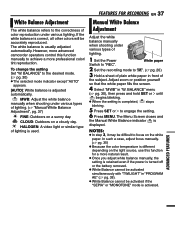
...activated if the "SEPIA" or "MONOTONE" mode is correct, all other colors will be accurately reproduced. ADVANCED FEATURES Manual White Balance Adjustment Adjust the white balance manually when shooting under various types of lighting. 1 Set the Power White paper M Switch to "REC". 2 Set... the battery removed. ● White Balance cannot be difficult to engage the setting. 6 Press MENU. However, more advanced camcorder operators control this function for a more professional color/ tint reproduction. The white balance is completed, stops blinking. 5 Press SET or...
...activated if the "SEPIA" or "MONOTONE" mode is correct, all other colors will be accurately reproduced. ADVANCED FEATURES Manual White Balance Adjustment Adjust the white balance manually when shooting under various types of lighting. 1 Set the Power White paper M Switch to "REC". 2 Set... the battery removed. ● White Balance cannot be difficult to engage the setting. 6 Press MENU. However, more advanced camcorder operators control this function for a more professional color/ tint reproduction. The white balance is completed, stops blinking. 5 Press SET or...
Instructions
Page 38
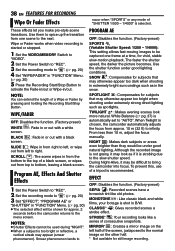
...faster the shutter speed, the darker the picture becomes. Use the shutter function under good natural lighting. SPOTLIGHT : Compensates for approx. 2 seconds before the camcorder returns to "AUTO". TWILIGHT : Makes evening scenes look as in finity. When Twilight is too bright or reflective, a vertical streak...less than they would be difficult to right. NIGHT : Makes dark subjects or areas even brighter than 10 m, adjust the focus manually. During Night-Alive, it may otherwise appear too dark when shooting in from the bottom to the top of a Wipe or Fader by ...
...faster the shutter speed, the darker the picture becomes. Use the shutter function under good natural lighting. SPOTLIGHT : Compensates for approx. 2 seconds before the camcorder returns to "AUTO". TWILIGHT : Makes evening scenes look as in finity. When Twilight is too bright or reflective, a vertical streak...less than they would be difficult to right. NIGHT : Makes dark subjects or areas even brighter than 10 m, adjust the focus manually. During Night-Alive, it may otherwise appear too dark when shooting in from the bottom to the top of a Wipe or Fader by ...
Instructions
Page 39
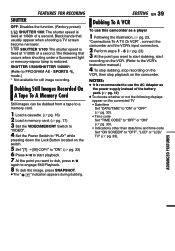
... on the switch. 5 Set "[T] ➝ [M] COPY" to "ON". (੬ pg. 33) 6 Press 6 to start recording on the VCR. (Refer to the VCR's instruction manual.) 4 To stop dubbing, stop recording on the VCR, then stop playback on the connected TV • Date/time Set "DATE/TIME" to "ON" or "OFF...EN 39 Dubbing To A VCR To use the AC Adapter as a player 1 Following the illustration, ੬ pg. 23, "Connections To A TV Or VCR" , connect the camcorder and the VCR's input connectors. 2 Perform steps 1 - 6 (੬ pg. 23) 3 At the point you want to start dubbing, start playback. 7 At the point ...
... on the switch. 5 Set "[T] ➝ [M] COPY" to "ON". (੬ pg. 33) 6 Press 6 to start recording on the VCR. (Refer to the VCR's instruction manual.) 4 To stop dubbing, stop recording on the VCR, then stop playback on the connected TV • Date/time Set "DATE/TIME" to "ON" or "OFF...EN 39 Dubbing To A VCR To use the AC Adapter as a player 1 Following the illustration, ੬ pg. 23, "Connections To A TV Or VCR" , connect the camcorder and the VCR's input connectors. 2 Perform steps 1 - 6 (੬ pg. 23) 3 At the point you want to start dubbing, start playback. 7 At the point ...
Instructions
Page 40
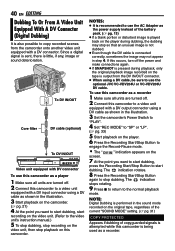
...cable as shown in the illustration. 3 Start playback on the camcorder. (੬ pg. 21) 4 At the point you want to start dubbing, press the Recording Start/Stop Button to start recording on the video unit. (Refer to the video unit's instruction manual.) 5 To stop dubbing, stop recording on the video unit,... engage the Record-Pause mode. • The " DV IN " indication appears on the tape is output from the camcorder onto another video unit equipped with DV connector To use the optional JVC VC-VDV204U or VC-VDV206U DV cable. Since a digital signal is sent, there is little, if any, image or...
...cable as shown in the illustration. 3 Start playback on the camcorder. (੬ pg. 21) 4 At the point you want to start dubbing, press the Recording Start/Stop Button to start recording on the video unit. (Refer to the video unit's instruction manual.) 5 To stop dubbing, stop recording on the video unit,... engage the Record-Pause mode. • The " DV IN " indication appears on the tape is output from the camcorder onto another video unit equipped with DV connector To use the optional JVC VC-VDV204U or VC-VDV206U DV cable. Since a digital signal is sent, there is little, if any, image or...
Instructions
Page 41
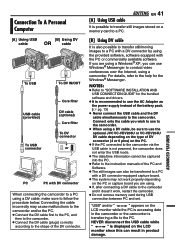
... the Windows® Messenger. NEVER disconnect the USB cable while " " is not powered, the camcorder does not enter the USB mode. ● The date/time information cannot be captured into the PC. ● Refer to the instruction manuals of the PC and Software. ● The still images can use Windows® Messenger... connection between PC and set. For details, refer to the help for the bundled software and drivers. ● It is recommended to use the optional JVC VC-VDV206U or VC-VDV204U DV cable depending on the type of DV connector (4 or 6 pins) on the PC. ● If the PC connected ...
... the Windows® Messenger. NEVER disconnect the USB cable while " " is not powered, the camcorder does not enter the USB mode. ● The date/time information cannot be captured into the PC. ● Refer to the instruction manuals of the PC and Software. ● The still images can use Windows® Messenger... connection between PC and set. For details, refer to the help for the bundled software and drivers. ● It is recommended to use the optional JVC VC-VDV206U or VC-VDV204U DV cable depending on the type of DV connector (4 or 6 pins) on the PC. ● If the PC connected ...
Instructions
Page 42
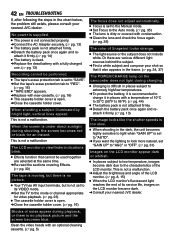
... is set to "AUTO". ➜If you want the lighting to look more natural, set to the Manual mode. ➜Set Focus to the Auto mode. (੬ pg. 35) ● The lens is ...are various different light sources behind the subject. ➜Find a white subject and compose your nearest JVC dealer. 42 EN TROUBLESHOOTING If, after following the steps in the chart below, the problem still ... performed. ● The tape's erase protection tab is set to its service life, images on the camcorder does not light during shooting, the screen becomes red or black for video playback. (੬ pg. 23...
... is set to "AUTO". ➜If you want the lighting to look more natural, set to the Manual mode. ➜Set Focus to the Auto mode. (੬ pg. 35) ● The lens is ...are various different light sources behind the subject. ➜Find a white subject and compose your nearest JVC dealer. 42 EN TROUBLESHOOTING If, after following the steps in the chart below, the problem still ... performed. ● The tape's erase protection tab is set to its service life, images on the camcorder does not light during shooting, the screen becomes red or black for video playback. (੬ pg. 23...


