Instructions
Page 1
... Enter below the Model No. Serial No. which is located on the World Wide Web for Digital Video Camera: http://www.jvc.co.jp/english/cyber/ For Accessories: http://www.jvc.co.jp/english/accessory/ Dear Customer, Thank you for future reference. To deactivate the demonstration, set ... and precautions contained in the pages 3 - 4 and 10 to "OFF". (੬ pg. 31, 33) EN LYT1434-001C DIGITAL VIDEO CAMERA GR-D295 Please visit our Homepage on the bottom of this digital video camera. Retain this information for purchasing this product. Model No. Before use of the camcorder.
... Enter below the Model No. Serial No. which is located on the World Wide Web for Digital Video Camera: http://www.jvc.co.jp/english/cyber/ For Accessories: http://www.jvc.co.jp/english/accessory/ Dear Customer, Thank you for future reference. To deactivate the demonstration, set ... and precautions contained in the pages 3 - 4 and 10 to "OFF". (੬ pg. 31, 33) EN LYT1434-001C DIGITAL VIDEO CAMERA GR-D295 Please visit our Homepage on the bottom of this digital video camera. Retain this information for purchasing this product. Model No. Before use of the camcorder.

Instructions
Page 5
... Mounting 16 Loading/Unloading A Cassette 16 Loading/Unloading A Memory Card 17 VIDEO RECORDING & PLAYBACK 18 VIDEO RECORDING 18 Basic Recording 18 Tape Remaining Time 18 LCD Monitor And Viewfinder 18 Zooming 19 Journalistic Shooting 19 Time Code 19 Quick Review 20 Recording From The Middle... Of A Tape...... 20 VIDEO PLAYBACK 20 Normal Playback 20 Still Playback 20 Shuttle Search 21 Blank Search 21 Connections To A TV Or VCR 22 Playback Using The Remote Control 23 DIGITAL STILL CAMERA (D.S.C.) RECORDING & PLAYBACK 25 D.S.C. PLAYBACK 26 Normal...
... Mounting 16 Loading/Unloading A Cassette 16 Loading/Unloading A Memory Card 17 VIDEO RECORDING & PLAYBACK 18 VIDEO RECORDING 18 Basic Recording 18 Tape Remaining Time 18 LCD Monitor And Viewfinder 18 Zooming 19 Journalistic Shooting 19 Time Code 19 Quick Review 20 Recording From The Middle... Of A Tape...... 20 VIDEO PLAYBACK 20 Normal Playback 20 Still Playback 20 Shuttle Search 21 Blank Search 21 Connections To A TV Or VCR 22 Playback Using The Remote Control 23 DIGITAL STILL CAMERA (D.S.C.) RECORDING & PLAYBACK 25 D.S.C. PLAYBACK 26 Normal...

Instructions
Page 7
... Adjustment Control (੬ pg. 16) I Snapshot Button [SNAPSHOT] (੬ pg. 25, 38) Live Slow Button [SLOW] (੬ pg. 31, 37) J Power Zoom Lever [T/W] (੬ pg. 19) Speaker Volume Control [VOL pg. 20) K Battery Release Button [PUSH BATT.] (੬ pg. 13) L Recording Start/Stop Button (੬...R DC Input Connector [DC] (੬ pg. 13) S Digital Video Connector [DV IN/OUT] (i.Link*) (੬ pg. 44, 45) * i.Link refers to cover this area and block the light.) e Remote Sensor (੬ pg. 23) f Camera Sensor (Be careful not to the IEEE1394-1995 industry specification and extensions ...
... Adjustment Control (੬ pg. 16) I Snapshot Button [SNAPSHOT] (੬ pg. 25, 38) Live Slow Button [SLOW] (੬ pg. 31, 37) J Power Zoom Lever [T/W] (੬ pg. 19) Speaker Volume Control [VOL pg. 20) K Battery Release Button [PUSH BATT.] (੬ pg. 13) L Recording Start/Stop Button (੬...R DC Input Connector [DC] (੬ pg. 13) S Digital Video Connector [DV IN/OUT] (i.Link*) (੬ pg. 44, 45) * i.Link refers to cover this area and block the light.) e Remote Sensor (੬ pg. 23) f Camera Sensor (Be careful not to the IEEE1394-1995 industry specification and extensions ...
Instructions
Page 15
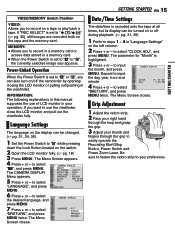
GETTING STARTED EN 15 GETTING STARTED VIDEO/MEMORY Switch Position VIDEO: Allows you to record in a memory card or access data stored in a memory card. ●...press MENU. to select CAMERA DISPLAY BRIGHT ON SCREEN - to input the month, and press CAMERA DISPLAY MENU. to select "CLOCK ADJ.", and press MENU. The Menu Screen closes. INFORMATION: The following explanations in "Language Settings" on or off the camcorder by opening/ closing ...; Allows you to easily operate the Recording Start/Stop Button, Power Switch and Power Zoom Lever. DEC 2 0 '0 5 5 : 0 0 PM 4 Press + or -
GETTING STARTED EN 15 GETTING STARTED VIDEO/MEMORY Switch Position VIDEO: Allows you to record in a memory card or access data stored in a memory card. ●...press MENU. to select CAMERA DISPLAY BRIGHT ON SCREEN - to input the month, and press CAMERA DISPLAY MENU. to select "CLOCK ADJ.", and press MENU. The Menu Screen closes. INFORMATION: The following explanations in "Language Settings" on or off the camcorder by opening/ closing ...; Allows you to easily operate the Recording Start/Stop Button, Power Switch and Power Zoom Lever. DEC 2 0 '0 5 5 : 0 0 PM 4 Press + or -

Instructions
Page 16
... while pressing down the Lock Button located on the switch. 2 Make sure the LCD monitor is facing out. Tripod Mounting To attach the camcorder to a tripod, align the direction stud and screw to load or eject a cassette. Loading/Unloading A Cassette PAUSE Diopter Adjustment Control CAUTION:...Press MENU to get caught in the cassette holder, resulting in the viewfinder are not equipped with studs. Example: 6 Press + or - The CAMERA DISPLAY or VIDEO DISPLAY Menu appears. 5 Press + or - 16 EN GETTING STARTED Viewfinder Adjustment 1 Set the Power Switch to select "BRIGHT", and press ...
... while pressing down the Lock Button located on the switch. 2 Make sure the LCD monitor is facing out. Tripod Mounting To attach the camcorder to a tripod, align the direction stud and screw to load or eject a cassette. Loading/Unloading A Cassette PAUSE Diopter Adjustment Control CAUTION:...Press MENU to get caught in the cassette holder, resulting in the viewfinder are not equipped with studs. Example: 6 Press + or - The CAMERA DISPLAY or VIDEO DISPLAY Menu appears. 5 Press + or - 16 EN GETTING STARTED Viewfinder Adjustment 1 Set the Power Switch to select "BRIGHT", and press ...
Instructions
Page 25
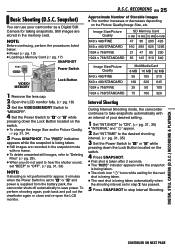
.... 2 Open the LCD monitor fully. (੬ pg. 18) 3 Set the VIDEO/MEMORY Switch to "MEMORY". 4 Set the Power Switch to save power. RECORDING EN 25 Approximate Number of your camcorder as a Digital Still Camera for the next shot is being taken. ● The next shot is being taken.... ● The clock icon " " turns while waiting for taking snapshots. DIGITAL STILL CAMERA (D.S.C.) RECORDING & PLAYBACK CONTINUED ON NEXT PAGE ...
.... 2 Open the LCD monitor fully. (੬ pg. 18) 3 Set the VIDEO/MEMORY Switch to "MEMORY". 4 Set the Power Switch to save power. RECORDING EN 25 Approximate Number of your camcorder as a Digital Still Camera for the next shot is being taken. ● The next shot is being taken.... ● The clock icon " " turns while waiting for taking snapshots. DIGITAL STILL CAMERA (D.S.C.) RECORDING & PLAYBACK CONTINUED ON NEXT PAGE ...

Instructions
Page 31
...you wish to "PLAY" while pressing down the Lock Button located on the selected function. FUL L GA I ON - CAMERA REC MODE - AGC 4) Press MENU. The Menu Screen closes. The selected function menu appears. Recording Menu Playback Menu WI ...camcorder is complete. ● Repeat the procedure if you wish to set other function menus. Lock Button + MA Power Switch VIDEO/MEMORY MENU 1 For Video and D.S.C. Playback Menus, refer to select the desired function, and press MENU. The Menu Screen appears. 4 Press + or - to "D.S.C. SCROLL WI PE-SHUTTER V I T ZOOM - 25x...
...you wish to "PLAY" while pressing down the Lock Button located on the selected function. FUL L GA I ON - CAMERA REC MODE - AGC 4) Press MENU. The Menu Screen closes. The selected function menu appears. Recording Menu Playback Menu WI ...camcorder is complete. ● Repeat the procedure if you wish to set other function menus. Lock Button + MA Power Switch VIDEO/MEMORY MENU 1 For Video and D.S.C. Playback Menus, refer to select the desired function, and press MENU. The Menu Screen appears. 4 Press + or - to "D.S.C. SCROLL WI PE-SHUTTER V I T ZOOM - 25x...

Instructions
Page 32
... Switch is recommended for unstable images caused by camera-shake, particularly at the switching point. ● It is set to "VIDEO". [FULL] NEGA PIN-UP FRAME For details on another camcorder, blocks of previous models) ZOOM 25X: When set to "M". [ ] = Factory...camcorder. ● During playback of a tape recorded on the procedure, refer to a maximum of 800X digital magnification. * Available only when the VIDEO/MEMORY Switch is recommended that tapes recorded in the sound. By digitally processing and magnifying images, zooming is possible from 25X (the optical zoom...
... Switch is recommended for unstable images caused by camera-shake, particularly at the switching point. ● It is set to "VIDEO". [FULL] NEGA PIN-UP FRAME For details on another camcorder, blocks of previous models) ZOOM 25X: When set to "M". [ ] = Factory...camcorder. ● During playback of a tape recorded on the procedure, refer to a maximum of 800X digital magnification. * Available only when the VIDEO/MEMORY Switch is recommended that tapes recorded in the sound. By digitally processing and magnifying images, zooming is possible from 25X (the optical zoom...

Instructions
Page 34
...are effective only for approx. 5 seconds when the Power Switch is set to "M". ● The "n" (CAMERA DISPLAY) settings except "BRIGHT" and "LANGUAGE" are available: FINE ( ) and STANDARD ( ) (in ...ENGLISH] / FRANÇAIS / ESPAÑOL / The language setting can be changed only when the VIDEO/ MEMORY Switch is set to best match your needs. (੬ pg. 25) NOTE: The setting can...= Factory-preset BRIGHT ੬ pg. 16, "Brightness Adjustment Of The Display" ON SCREEN LCD: Keeps the camcorder's display (except the date, time and time code) from "OFF" to "A" or "M". 34 EN MENUS FOR...
...are effective only for approx. 5 seconds when the Power Switch is set to "M". ● The "n" (CAMERA DISPLAY) settings except "BRIGHT" and "LANGUAGE" are available: FINE ( ) and STANDARD ( ) (in ...ENGLISH] / FRANÇAIS / ESPAÑOL / The language setting can be changed only when the VIDEO/ MEMORY Switch is set to best match your needs. (੬ pg. 25) NOTE: The setting can...= Factory-preset BRIGHT ੬ pg. 16, "Brightness Adjustment Of The Display" ON SCREEN LCD: Keeps the camcorder's display (except the date, time and time code) from "OFF" to "A" or "M". 34 EN MENUS FOR...

Instructions
Page 35
... / 30MIN / 60MIN Allows you to select the shooting interval for interval shooting. (੬ pg. 25) Playback Menus VIDEO [ ] = Factory-preset SOUND MODE and NARRATION During tape playback, the camcorder detects the sound mode in stereo. SOUND L : Sound from the "L" channel is output. SOUND MODE [STEREO ]: Sound... is output on both "L" and "R" channels in stereo. (੬ pg. 46) MIX: Original and dubbed sounds are combined and output in CAMERA Menu is...
... / 30MIN / 60MIN Allows you to select the shooting interval for interval shooting. (੬ pg. 25) Playback Menus VIDEO [ ] = Factory-preset SOUND MODE and NARRATION During tape playback, the camcorder detects the sound mode in stereo. SOUND L : Sound from the "L" channel is output. SOUND MODE [STEREO ]: Sound... is output on both "L" and "R" channels in stereo. (੬ pg. 46) MIX: Original and dubbed sounds are combined and output in CAMERA Menu is...

Instructions
Page 36
...] / AUTO / ON When set to "M". (੬ pg. 31) ● The parameters are the same as in the description (CAMERA DISPLAY) on page 33. The camcorder displays the date/time when scenes are the same as in the following cases: ● When playback starts. TIME CODE [OFF] /... SYSTEM Each setting is linked with "s SYSTEM", which appears when the Power Switch is changed . (੬ pg. 15) VIDEO DISPLAY The "n" (VIDEO DISPLAY) settings are effective only for video playback except "BRIGHT" and "LANGUAGE". ● The parameters (except "OFF" in ON SCREEN settings) are recorded. ●...
...] / AUTO / ON When set to "M". (੬ pg. 31) ● The parameters are the same as in the description (CAMERA DISPLAY) on page 33. The camcorder displays the date/time when scenes are the same as in the following cases: ● When playback starts. TIME CODE [OFF] /... SYSTEM Each setting is linked with "s SYSTEM", which appears when the Power Switch is changed . (੬ pg. 15) VIDEO DISPLAY The "n" (VIDEO DISPLAY) settings are effective only for video playback except "BRIGHT" and "LANGUAGE". ● The parameters (except "OFF" in ON SCREEN settings) are recorded. ●...

Instructions
Page 37
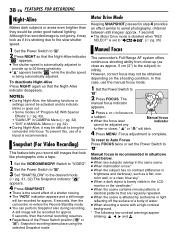
... mode Instead of a few frames only is recorded and played back in real time. 1 Set the VIDEO/MEMORY Switch to "VIDEO". 2 Set "SNAP/SLOW" to brighten the subject in CAMERA Menu (੬ pg. 32), then press SNAPSHOT. ADVANCED FEATURES Live Slow This feature is useful for ... The light turns on automatically when dark. ( appears.) 2 Press the Recording Start/Stop Button to start recording, and after 5 seconds the camcorder enters Record-Standby mode automatically. ● Even if you press the Recording Start/Stop Button again within 5 seconds after recording starts, Record-Standby...
... mode Instead of a few frames only is recorded and played back in real time. 1 Set the VIDEO/MEMORY Switch to "VIDEO". 2 Set "SNAP/SLOW" to brighten the subject in CAMERA Menu (੬ pg. 32), then press SNAPSHOT. ADVANCED FEATURES Live Slow This feature is useful for ... The light turns on automatically when dark. ( appears.) 2 Press the Recording Start/Stop Button to start recording, and after 5 seconds the camcorder enters Record-Standby mode automatically. ● Even if you press the Recording Start/Stop Button again within 5 seconds after recording starts, Record-Standby...
Instructions
Page 38
...activated and its indicator blinks or goes out: • Some modes of "Program AE With Special Effects" (੬ pg. 42). • "GAIN UP" in CAMERA Menu (੬ pg. 32). • "DIS" in MANUAL Menu (੬ pg. 32). ● During Night-Alive, it is affected by sunbeams or ... 1 Set the Power Switch to " / ". (੬ pg. 35) Manual Focus The camcorder's Full Range AF system offers continuous shooting ability from close as if it may look like photographs onto a tape. 1 Set the VIDEO/MEMORY Switch to "VIDEO". 2 Set the Power Switch to "M". 3 Set "SNAP/SLOW" to the desired mode. ...
...activated and its indicator blinks or goes out: • Some modes of "Program AE With Special Effects" (੬ pg. 42). • "GAIN UP" in CAMERA Menu (੬ pg. 32). • "DIS" in MANUAL Menu (੬ pg. 32). ● During Night-Alive, it is affected by sunbeams or ... 1 Set the Power Switch to " / ". (੬ pg. 35) Manual Focus The camcorder's Full Range AF system offers continuous shooting ability from close as if it may look like photographs onto a tape. 1 Set the VIDEO/MEMORY Switch to "VIDEO". 2 Set the Power Switch to "M". 3 Set "SNAP/SLOW" to the desired mode. ...

Instructions
Page 46
..., the date and time information changes. ● If you change from 12-BIT to 16-BIT in midrecording and then use the tape for "CAMERA DISPLAY" and "VIDEO DISPLAY" is set to "ON". (੬ pg. 31, 34, 36) ● Insert Editing is not heard from the point where 16-BIT recording began... Edit-In point is not effective from the speaker during playback Set "NARRATION" to spice up the scenes being edited during TV playback, move the camcorder's microphone away from the TV, or turn down the TV's volume. ● If you perform Insert Editing onto a blank space on the remote control, press...
..., the date and time information changes. ● If you change from 12-BIT to 16-BIT in midrecording and then use the tape for "CAMERA DISPLAY" and "VIDEO DISPLAY" is set to "ON". (੬ pg. 31, 34, 36) ● Insert Editing is not heard from the point where 16-BIT recording began... Edit-In point is not effective from the speaker during playback Set "NARRATION" to spice up the scenes being edited during TV playback, move the camcorder's microphone away from the TV, or turn down the TV's volume. ● If you perform Insert Editing onto a blank space on the remote control, press...
Instructions
Page 53
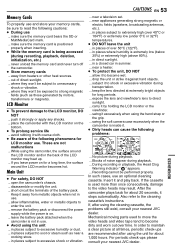
... LCD monitor use. near a cooking stove. ... swing the soft camera case excessively when the camcorder is not in places subject to soot or steam such as those ...subject it stops automatically. Mechanical moving parts used more than once consecutively, damage to the video heads may heat up. ... Main Unit ● For safety, DO NOT ... CAUTIONS ...properly. If, after using the cleaning cassette, the problems still exist, consult your nearest JVC dealer. place the camcorder with coarse cloth. ● Be aware of noise appear during recording, playback, deletion,...
... LCD monitor use. near a cooking stove. ... swing the soft camera case excessively when the camcorder is not in places subject to soot or steam such as those ...subject it stops automatically. Mechanical moving parts used more than once consecutively, damage to the video heads may heat up. ... Main Unit ● For safety, DO NOT ... CAUTIONS ...properly. If, after using the cleaning cassette, the problems still exist, consult your nearest JVC dealer. place the camcorder with coarse cloth. ● Be aware of noise appear during recording, playback, deletion,...

Instructions
Page 55
... 1/6" CCD Lens F 1.8, f = 2.2 mm to 55 mm, 25:1 power zoom lens Filter diameter ø27 mm LCD monitor 2.5" diagonally measured, LCD panel/TFT active... 50 Hz/60 Hz Output DC 11 V G, 1 A Specifications shown are for SP mode unless otherwise indicated. Camcorder For General Power supply DC 11 V (Using AC Adapter) DC 7.2 V (Using battery pack) Power consumption Approx.... LED Light Effective distance: 1.5 m (5 ft) For Digital Video Camera Format DV format (SD mode) Signal format NTSC standard Recording/Playback format Video: Digital component recording Audio: PCM digital recording, 32 kHz 4-...
... 1/6" CCD Lens F 1.8, f = 2.2 mm to 55 mm, 25:1 power zoom lens Filter diameter ø27 mm LCD monitor 2.5" diagonally measured, LCD panel/TFT active... 50 Hz/60 Hz Output DC 11 V G, 1 A Specifications shown are for SP mode unless otherwise indicated. Camcorder For General Power supply DC 11 V (Using AC Adapter) DC 7.2 V (Using battery pack) Power consumption Approx.... LED Light Effective distance: 1.5 m (5 ft) For Digital Video Camera Format DV format (SD mode) Signal format NTSC standard Recording/Playback format Video: Digital component recording Audio: PCM digital recording, 32 kHz 4-...


