Instructions
Page 5
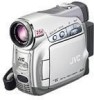
...Memory Card 17 VIDEO RECORDING & PLAYBACK 18 VIDEO RECORDING 18 Basic Recording 18 Tape Remaining Time 18 LCD Monitor And Viewfinder 18 Zooming 19 Journalistic Shooting 19 Time Code 19 Quick Review 20 Recording From The Middle Of A Tape...... 20 VIDEO PLAYBACK 20 Normal ...VCR 22 Playback Using The Remote Control 23 DIGITAL STILL CAMERA (D.S.C.) RECORDING & PLAYBACK 25 D.S.C. PLAYBACK 26 Normal Playback Of Images 26 Auto Playback Of Images 27 Index Playback Of Files 27 Removing On-Screen Display 27 ADDITIONAL FEATURES FOR D.S.C 28 Dubbing Still Images Recorded On A Tape ...
...Memory Card 17 VIDEO RECORDING & PLAYBACK 18 VIDEO RECORDING 18 Basic Recording 18 Tape Remaining Time 18 LCD Monitor And Viewfinder 18 Zooming 19 Journalistic Shooting 19 Time Code 19 Quick Review 20 Recording From The Middle Of A Tape...... 20 VIDEO PLAYBACK 20 Normal ...VCR 22 Playback Using The Remote Control 23 DIGITAL STILL CAMERA (D.S.C.) RECORDING & PLAYBACK 25 D.S.C. PLAYBACK 26 Normal Playback Of Images 26 Auto Playback Of Images 27 Index Playback Of Files 27 Removing On-Screen Display 27 ADDITIONAL FEATURES FOR D.S.C 28 Dubbing Still Images Recorded On A Tape ...
Instructions
Page 14
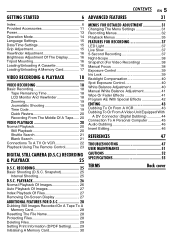
...WARNING! To resume the original function of time under the following conditions: • Zoom or Record-Standby mode is engaged repeatedly. • The LCD monitor is used repeatedly...shooting time. ATTENTION: Before detaching the power source, make sure that you to come in a camcorder malfunction. M (Manual Recording): Allows you prepare enough battery packs to record using the Menus.... to "OFF". 2) Open the LCD monitor fully. 3) Press DATA, and the battery status screen appears. ● It can result in the memory card to a PC. ● Allows ...your nearest JVC dealer.
...WARNING! To resume the original function of time under the following conditions: • Zoom or Record-Standby mode is engaged repeatedly. • The LCD monitor is used repeatedly...shooting time. ATTENTION: Before detaching the power source, make sure that you to come in a camcorder malfunction. M (Manual Recording): Allows you prepare enough battery packs to record using the Menus.... to "OFF". 2) Open the LCD monitor fully. 3) Press DATA, and the battery status screen appears. ● It can result in the memory card to a PC. ● Allows ...your nearest JVC dealer.
Instructions
Page 15
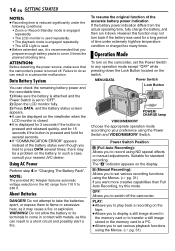
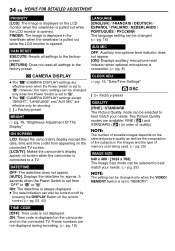
...fingers through the grip to easily operate the Recording Start/Stop Button, Power Switch and Power Zoom Lever. MEMORY: ● Allows you to record in a memory card or access data...parameter for "Day" is set to "A" or "M", you can be turned on or off the camcorder by opening/ closing the LCD monitor or pulling out/pushing in "Language Settings" on a tape ...or play back a tape. Repeat to select CAMERA DISPLAY BRIGHT ON SCREEN - The Menu Screen appears. 4 Press + or - The CAMERA DISPLAY Menu appears. 5 Press + or - to input the...
...fingers through the grip to easily operate the Recording Start/Stop Button, Power Switch and Power Zoom Lever. MEMORY: ● Allows you to record in a memory card or access data...parameter for "Day" is set to "A" or "M", you can be turned on or off the camcorder by opening/ closing the LCD monitor or pulling out/pushing in "Language Settings" on a tape ...or play back a tape. Repeat to select CAMERA DISPLAY BRIGHT ON SCREEN - The Menu Screen appears. 4 Press + or - The CAMERA DISPLAY Menu appears. 5 Press + or - to input the...
Instructions
Page 16
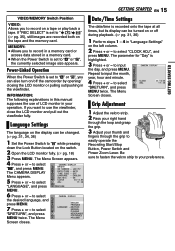
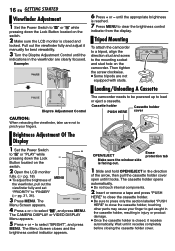
...appropriate brightness is closed , it recedes automatically. until it locks. The camcorder needs to be powered up to "M" or "PLAY" while pressing down the Lock Button located on the camcorder. The BRIGHT Menu Screen appears. 4 Press + or - touching other parts may cause your fingers... the Dioptre Adjustment Control until it recedes completely before closing the cassette holder cover. to select "n", and press MENU. The Menu Screen closes and the brightness control indicator appears. 16 EN GETTING STARTED Viewfinder Adjustment 1 Set the Power Switch to "A" or "M" while...
...appropriate brightness is closed , it recedes automatically. until it locks. The camcorder needs to be powered up to "M" or "PLAY" while pressing down the Lock Button located on the camcorder. The BRIGHT Menu Screen appears. 4 Press + or - touching other parts may cause your fingers... the Dioptre Adjustment Control until it recedes completely before closing the cassette holder cover. to select "n", and press MENU. The Menu Screen closes and the brightness control indicator appears. 16 EN GETTING STARTED Viewfinder Adjustment 1 Set the Power Switch to "A" or "M" while...
Instructions
Page 21
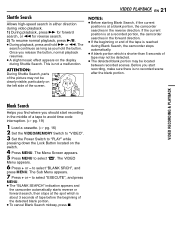
...; The "BLANK SEARCH" indication appears and the camcorder automatically starts reverse or forward search, then stops at a blank portion, the camcorder searches in the reverse direction. This is about 3 seconds of tape before the beginning of the screen. ATTENTION: During Shuttle Search, parts of the ... scenes. Before you should start recording, make sure there is shorter than 5 seconds of the tape is reached during Blank Search, the camcorder stops automatically. ● A blank portion which is not a malfunction. Once you hold 5 or 3. The search continues as long as...
...; The "BLANK SEARCH" indication appears and the camcorder automatically starts reverse or forward search, then stops at a blank portion, the camcorder searches in the reverse direction. This is about 3 seconds of tape before the beginning of the screen. ATTENTION: During Shuttle Search, parts of the ... scenes. Before you should start recording, make sure there is shorter than 5 seconds of the tape is reached during Blank Search, the camcorder stops automatically. ● A blank portion which is not a malfunction. Once you hold 5 or 3. The search continues as long as...
Instructions
Page 22
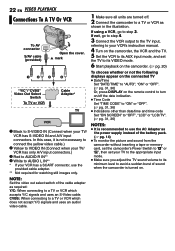
...required for watching still images only. NOTE: Set the video out select switch of sound when the camcorder is recommended to avoid a sudden burst of the cable adapter as shown in the illustration. CVBS: ...● Make sure you adjust the TV sound volume to its VIDEO mode. 6 Start playback on the camcorder. (੬ pg. 20) To choose whether or not the following displays appear on the connected TV ●... "ON" or "OFF". (੬ pg. 31, 36) ● Indications other than date/time and time code Set "ON SCREEN" to step 3. If not, go to "OFF", "LCD" or "LCD/TV". (੬ pg. 31, 36) NOTES: ...
...required for watching still images only. NOTE: Set the video out select switch of sound when the camcorder is recommended to avoid a sudden burst of the cable adapter as shown in the illustration. CVBS: ...● Make sure you adjust the TV sound volume to its VIDEO mode. 6 Start playback on the camcorder. (੬ pg. 20) To choose whether or not the following displays appear on the connected TV ●... "ON" or "OFF". (੬ pg. 31, 36) ● Indications other than date/time and time code Set "ON SCREEN" to step 3. If not, go to "OFF", "LCD" or "LCD/TV". (੬ pg. 31, 36) NOTES: ...

Instructions
Page 24
...images. To reactivate the selected effect press EFFECT ON/OFF again. ● To change the selected effect, repeat from Still Playback by a blue screen for a few seconds. Frame-By-Frame Playback During normal or still playback, press SLOW (IU) repeatedly for forward or SLOW (YI) repeatedly for... a classic look. Each time SLOW (YI or IU) is pressed, the frame is not a malfunction. Playback Zoom Magnifies the recorded image up to the video playback image. MONOTONE: Like classic black and white films, your footage is not a malfunction. ● ...
...images. To reactivate the selected effect press EFFECT ON/OFF again. ● To change the selected effect, repeat from Still Playback by a blue screen for a few seconds. Frame-By-Frame Playback During normal or still playback, press SLOW (IU) repeatedly for forward or SLOW (YI) repeatedly for... a classic look. Each time SLOW (YI or IU) is pressed, the frame is not a malfunction. Playback Zoom Magnifies the recorded image up to the video playback image. MONOTONE: Like classic black and white films, your footage is not a malfunction. ● ...
Instructions
Page 27
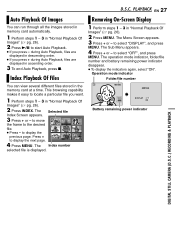
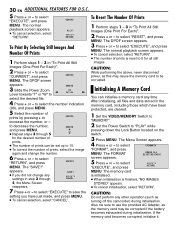
...", and press MENU. to select "DISPLAY", and press MENU. This browsing capability makes it easy to the desired 4 5 6 file. ● Press - The Menu Screen appears. 3 Press + or - The Sub Menu appears. 4 Press + or - to move 1 2 3 the frame to locate a particular file you want. 1 Perform...stored in memory card automatically. 1 Perform steps 1 - 3 in ascending order. 3 To end Auto Playback, press 8. The Selected file Index Screen appears. 3 Press + or - The Index number selected file is displayed. 100-0013 MENU 50m D I SPLAY OFF ON RETURN Battery remaining ...
...", and press MENU. to select "DISPLAY", and press MENU. This browsing capability makes it easy to the desired 4 5 6 file. ● Press - The Menu Screen appears. 3 Press + or - The Sub Menu appears. 4 Press + or - to move 1 2 3 the frame to locate a particular file you want. 1 Perform...stored in memory card automatically. 1 Perform steps 1 - 3 in ascending order. 3 To end Auto Playback, press 8. The Selected file Index Screen appears. 3 Press + or - The Index number selected file is displayed. 100-0013 MENU 50m D I SPLAY OFF ON RETURN Battery remaining ...
Instructions
Page 28
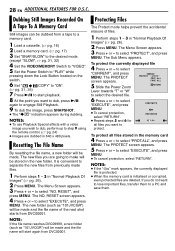
The NO. The Menu Screen appears. 3 Press + or - ALL 5 Slide the Power Zoom RETURN Lever towards "T" or "W" to select "PROTECT", and press MENU. PROT EC T ED ● Repeat steps 5 and 6 for W RETURN T all files stored in the... file. 6 Press + or - MENU PROTECT CURRENT PROT . to select "EXECUTE", and press PROT EC T MENU. ● To cancel protection, select "RETURN". The PROTECT screen appears. to select "EXECUTE", and press MENU. NOTE: If the file name reaches DVC09999, a new folder (such as "101JVCGR") will be dubbed from DVC00001. AL...
The NO. The Menu Screen appears. 3 Press + or - ALL 5 Slide the Power Zoom RETURN Lever towards "T" or "W" to select "PROTECT", and press MENU. PROT EC T ED ● Repeat steps 5 and 6 for W RETURN T all files stored in the... file. 6 Press + or - MENU PROTECT CURRENT PROT . to select "EXECUTE", and press PROT EC T MENU. ● To cancel protection, select "RETURN". The PROTECT screen appears. to select "EXECUTE", and press MENU. NOTE: If the file name reaches DVC09999, a new folder (such as "101JVCGR") will be dubbed from DVC00001. AL...
Instructions
Page 29
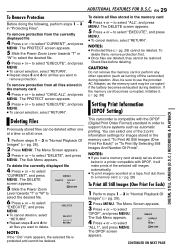
...AC Adapter, as automatic printing. This camcorder is protected and cannot be deleted. You can be restored. RETURN The DPOF screen appears. CONTINUED ON NEXT PAGE ADDITIONAL FEATURES FOR D.S.C. The PROTECT screen appears. 5 Press + or - Check files before deleting. The Menu Screen appears. 3 Press + or - ...stored files can select one at once. 1 Perform steps 1 - 3 in the memory card 4 Press + or - The PROTECT screen appears. 5 Slide the Power Zoom Lever towards "T" or "W" to delete. To delete all at a time or all files stored in the memory card: "To Print...
...AC Adapter, as automatic printing. This camcorder is protected and cannot be deleted. You can be restored. RETURN The DPOF screen appears. CONTINUED ON NEXT PAGE ADDITIONAL FEATURES FOR D.S.C. The PROTECT screen appears. 5 Press + or - Check files before deleting. The Menu Screen appears. 3 Press + or - ...stored files can select one at once. 1 Perform steps 1 - 3 in the memory card 4 Press + or - The PROTECT screen appears. 5 Slide the Power Zoom Lever towards "T" or "W" to delete. To delete all at a time or all files stored in the memory card: "To Print...
Instructions
Page 30
...as turning off the camcorder) during initialisation. to 0 for the desired number of prints. ● The number of prints is finished, "NO IMAGES STORED" appears. ● To cancel initialisation, select "RETURN". EXECUTE CANCEL 5, the Menu Screen reappears. 7 Press + or - The Menu Screen appears. 4 Press... to select "RESET", and press MENU. to SHEETS 00 RETURN select the desired file. 4 Press + or - appears. 3 Slide the Power Zoom Lever towards "T" or "W" to select "CURRENT", and press DPOF MENU. The "SAVE?" to select "EXECUTE" to "PLAY" while pressing down...
...as turning off the camcorder) during initialisation. to 0 for the desired number of prints. ● The number of prints is finished, "NO IMAGES STORED" appears. ● To cancel initialisation, select "RETURN". EXECUTE CANCEL 5, the Menu Screen reappears. 7 Press + or - The Menu Screen appears. 4 Press... to select "RESET", and press MENU. to SHEETS 00 RETURN select the desired file. 4 Press + or - appears. 3 Slide the Power Zoom Lever towards "T" or "W" to select "CURRENT", and press DPOF MENU. The "SAVE?" to select "EXECUTE" to "PLAY" while pressing down...
Instructions
Page 31
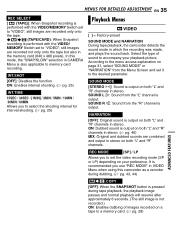
... FADER OF F FADER-WH I TE FADER-B LACK FADER-B .W W I PE-CORNER W I PE-W I NDOW WI PE-SL I DE W I PE-DOOR W I T ZOOM - 25x SNAP/SLOW - Menus without Sub Menus v WIPE/FADER Selected menu icon (੬ pg. 41) blinks. Selection is complete. ● Repeat the procedure if you ...; Set the VIDEO/MEMORY Switch to "VIDEO". ● Set the Power Switch to "M" while pressing down the Lock Button located on -screen menu system that simplifies many of the more detailed camcorder settings. (੬ pg. 32 - 36) - PLAYBACK" (੬ pg. 26). 2 Open the LCD monitor fully. (੬ pg...
... FADER OF F FADER-WH I TE FADER-B LACK FADER-B .W W I PE-CORNER W I PE-W I NDOW WI PE-SL I DE W I PE-DOOR W I T ZOOM - 25x SNAP/SLOW - Menus without Sub Menus v WIPE/FADER Selected menu icon (੬ pg. 41) blinks. Selection is complete. ● Repeat the procedure if you ...; Set the VIDEO/MEMORY Switch to "VIDEO". ● Set the Power Switch to "M" while pressing down the Lock Button located on -screen menu system that simplifies many of the more detailed camcorder settings. (੬ pg. 32 - 36) - PLAYBACK" (੬ pg. 26). 2 Open the LCD monitor fully. (੬ pg...
Instructions
Page 33
...applied when the Power Switch is set "TELE MACRO" to "ON". During playback on the zoom position, the lens may go out of approx. 40 cm. ON : Helps cut and the screen ratio becomes 16:9. This is performed for about 3 minutes after "DEMO MODE" is turned ... functions will change in the camcorder, the demonstration cannot be available. When using this mode, refer to your wide-screen TV's instruction manual. It also activates the shutter sound effect. (੬ pg. 25, 38) ADVANCED FEATURES WIDE MODE [OFF]: Records with a normal screen ratio. REMOTE OFF: Disables ...
...applied when the Power Switch is set "TELE MACRO" to "ON". During playback on the zoom position, the lens may go out of approx. 40 cm. ON : Helps cut and the screen ratio becomes 16:9. This is performed for about 3 minutes after "DEMO MODE" is turned ... functions will change in the camcorder, the demonstration cannot be available. When using this mode, refer to your wide-screen TV's instruction manual. It also activates the shutter sound effect. (੬ pg. 25, 38) ADVANCED FEATURES WIDE MODE [OFF]: Records with a normal screen ratio. REMOTE OFF: Disables ...
Instructions
Page 34
...25) IMAGE SIZE 640 x 480 / [1024 x 768] The Image Size mode can be selected to the factory-preset. DATE/TIME OFF: The date/time does not appear. [AUTO]: Displays the date/time for shooting. [ ] = Factory-preset BRIGHT ੬ pg. 16, "Brightness Adjustment Of The Display" ON SCREEN LCD: Keeps the camcorder... when the viewfinder is pulled out while the LCD monitor is set from appearing on the connected TV screen. [LCD/TV]: Makes the camcorder's display appear on screen when the camcorder is connected to "M". ● The "n" (CAMERA DISPLAY) settings except "BRIGHT", "LANGUAGE" and ...
...25) IMAGE SIZE 640 x 480 / [1024 x 768] The Image Size mode can be selected to the factory-preset. DATE/TIME OFF: The date/time does not appear. [AUTO]: Displays the date/time for shooting. [ ] = Factory-preset BRIGHT ੬ pg. 16, "Brightness Adjustment Of The Display" ON SCREEN LCD: Keeps the camcorder... when the viewfinder is pulled out while the LCD monitor is set from appearing on the connected TV screen. [LCD/TV]: Makes the camcorder's display appear on screen when the camcorder is connected to "M". ● The "n" (CAMERA DISPLAY) settings except "BRIGHT", "LANGUAGE" and ...
Instructions
Page 35
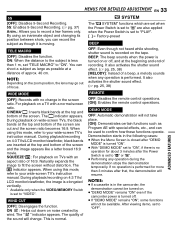
... "R" channel is not recorded.) ON: Enables dubbing of sound to accompany your preference. In this camcorder as a recorder during dubbing. (੬ pg. 43, 44) COPY [OFF]: When the SNAPSHOT...shooting interval for interval shooting. (੬ pg. 25) Playback Menus VIDEO [ ] = Factory-preset SOUND MODE and NARRATION During tape playback, the camcorder detects the sound mode in stereo. MENUS FOR ...Original sound is output. INT.SHOT [OFF]: Disables the function. ON: Enables interval shooting. (੬ pg. 25) INT.TIME 15SEC / 30SEC / [1MIN] / 2MIN / 5MIN / 10MIN / 30MIN / 60MIN Allows you ...
... "R" channel is not recorded.) ON: Enables dubbing of sound to accompany your preference. In this camcorder as a recorder during dubbing. (੬ pg. 43, 44) COPY [OFF]: When the SNAPSHOT...shooting interval for interval shooting. (੬ pg. 25) Playback Menus VIDEO [ ] = Factory-preset SOUND MODE and NARRATION During tape playback, the camcorder detects the sound mode in stereo. MENUS FOR ...Original sound is output. INT.SHOT [OFF]: Disables the function. ON: Enables interval shooting. (੬ pg. 25) INT.TIME 15SEC / 30SEC / [1MIN] / 2MIN / 5MIN / 10MIN / 30MIN / 60MIN Allows you ...

Instructions
Page 36
...the same as in the description on page 34. [ ] = Factory-preset BRIGHT ੬ pg. 16, "Brightness Adjustment Of The Display" ON SCREEN OFF / [LCD] / LCD/TV When set to "OFF", the camcorder's display disappears. TIME CODE [OFF] / ON ੬ pg. 19, "Time Code" LANGUAGE [ENGLISH] / FRANÇAIS / DEUTSCH /... DATE/TIME [OFF] / AUTO / ON When set to "AUTO", the date/time are displayed in the description (CAMERA DISPLAY) on page 33. The camcorder displays the date/time when scenes are recorded. ● When the date is set to "M". (੬ pg. 31) ● The parameters are the ...
...the same as in the description on page 34. [ ] = Factory-preset BRIGHT ੬ pg. 16, "Brightness Adjustment Of The Display" ON SCREEN OFF / [LCD] / LCD/TV When set to "OFF", the camcorder's display disappears. TIME CODE [OFF] / ON ੬ pg. 19, "Time Code" LANGUAGE [ENGLISH] / FRANÇAIS / DEUTSCH /... DATE/TIME [OFF] / AUTO / ON When set to "AUTO", the date/time are displayed in the description (CAMERA DISPLAY) on page 33. The camcorder displays the date/time when scenes are recorded. ● When the date is set to "M". (੬ pg. 31) ● The parameters are the ...
Instructions
Page 41
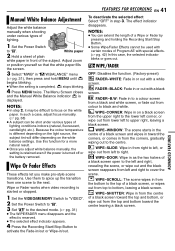
...off or the battery removed. WIPE-CORNER: Wipe in to a colour screen from a black and white screen, or fade out from one scene to focus on the white balance settings. Adjust zoom or position yourself so that the white paper fills the screen. 3 Select "MWB" in "u W.BALANCE" menu (੬ pg.... 31), then press and hold MENU until begins blinking. ● When the setting is displayed. The Menu Screen closes and the Manual White ...
...off or the battery removed. WIPE-CORNER: Wipe in to a colour screen from a black and white screen, or fade out from one scene to focus on the white balance settings. Adjust zoom or position yourself so that the white paper fills the screen. 3 Select "MWB" in "u W.BALANCE" menu (੬ pg.... 31), then press and hold MENU until begins blinking. ● When the setting is displayed. The Menu Screen closes and the Manual White ...

Instructions
Page 42
...The faster the shutter speed, the darker the picture becomes. SNOW: Compensates for vivid, stable slow-motion playback. When Twilight is chosen, the camcorder automatically adjusts the focus from approx. 10 m to occur when "SPORTS" or any mode of "SHUTTER 1/250 - 1/4000" is selected. ...lighting such as in the snow. CLASSIC FILM*: Gives recorded scenes a strobe effect. The flickering that usually appear when shooting a TV screen become narrower. SEPIA: Recorded scenes have a brownish tint like a series of consecutive snapshots. Black bands that occurs when shooting under a...
...The faster the shutter speed, the darker the picture becomes. SNOW: Compensates for vivid, stable slow-motion playback. When Twilight is chosen, the camcorder automatically adjusts the focus from approx. 10 m to occur when "SPORTS" or any mode of "SHUTTER 1/250 - 1/4000" is selected. ...lighting such as in the snow. CLASSIC FILM*: Gives recorded scenes a strobe effect. The flickering that usually appear when shooting a TV screen become narrower. SEPIA: Recorded scenes have a brownish tint like a series of consecutive snapshots. Black bands that occurs when shooting under a...
Instructions
Page 43
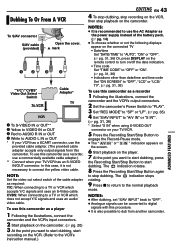
... does not accept Y/C signals and uses an audio/ video cable. CVBS: When connecting to stop playback on the camcorder. Dubbing To Or From A VCR To S/AV connector S/AV cable (provided) Open the cover. NOTES: ●... or "ON". (੬ pg. 31, 36) • Indications other than date/time and time code Set "ON SCREEN" to "OFF", "LCD" or "LCD/ TV". (੬ pg. 31, 36) To use the AC Adapter as... Record-Pause mode. ● The " A/V IN " or " S IN " indication appears on the screen. 6 Start playback on the player. 7 At the point you want to start dubbing, press the Recording Start/Stop...
... does not accept Y/C signals and uses an audio/ video cable. CVBS: When connecting to stop playback on the camcorder. Dubbing To Or From A VCR To S/AV connector S/AV cable (provided) Open the cover. NOTES: ●... or "ON". (੬ pg. 31, 36) • Indications other than date/time and time code Set "ON SCREEN" to "OFF", "LCD" or "LCD/ TV". (੬ pg. 31, 36) To use the AC Adapter as... Record-Pause mode. ● The " A/V IN " or " S IN " indication appears on the screen. 6 Start playback on the player. 7 At the point you want to start dubbing, press the Recording Start/Stop...
Instructions
Page 44
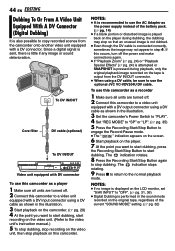
...Stop Button to engage the Record-Pause mode. ● The " DV IN " indication appears on the screen. 6 Start playback on the player during playback, only the original playback image recorded on the tape is... unit equipped with DV connector To use this camcorder as a player 1 Make sure all units are turned off the power and make connections again. ● If "Playback Zoom" (੬ pg. 24) or "Playback ...Recording Start/Stop Button to start recording on the video unit. (Refer to use the optional JVC VC-VDV204U DV cable. 44 EN EDITING Dubbing To Or From A Video Unit Equipped With...
...Stop Button to engage the Record-Pause mode. ● The " DV IN " indication appears on the screen. 6 Start playback on the player during playback, only the original playback image recorded on the tape is... unit equipped with DV connector To use this camcorder as a player 1 Make sure all units are turned off the power and make connections again. ● If "Playback Zoom" (੬ pg. 24) or "Playback ...Recording Start/Stop Button to start recording on the video unit. (Refer to use the optional JVC VC-VDV204U DV cable. 44 EN EDITING Dubbing To Or From A Video Unit Equipped With...


