User Manual
Page 1
... ENGLISH Automatic Demonstration 8 DIGITAL VIDEO CAMERA GR-DVM96 GETTING STARTED 9 GR-DVM76 Please visit our Homepage on the bottom of the GR-DVM96. INSTRUCTIONS For Customer Use: Enter below the Model No. Retain this instruction manual are of the camcorder. Model No. which is located on... the World Wide Web and answer our Consumer Survey (in VIDEO RECORDING & PLAYBACK 18 English only): http://www.jvc-...
... ENGLISH Automatic Demonstration 8 DIGITAL VIDEO CAMERA GR-DVM96 GETTING STARTED 9 GR-DVM76 Please visit our Homepage on the bottom of the GR-DVM96. INSTRUCTIONS For Customer Use: Enter below the Model No. Retain this instruction manual are of the camcorder. Model No. which is located on... the World Wide Web and answer our Consumer Survey (in VIDEO RECORDING & PLAYBACK 18 English only): http://www.jvc-...

User Manual
Page 10
... battery is attached to the right, remove it is finished. 7 Unplug the AC Adapter from the AC outlet. 8 Disconnect the AC Adapter from the camcorder, then try charging again. ● If the battery operation time remains extremely short even after a long storage period, the CHARGE Lamp may not light.... BN-V312U (optional) Approx. 2 hr. 40 min. Approximate recording time For GR-DVM96: Battery pack LCD monitor on Viewfinder on BN-V306U* 50 min. 1 hr. 05 min. BN-V856U 8 hr. 10 min. 10 hr. 10 min....
... battery is attached to the right, remove it is finished. 7 Unplug the AC Adapter from the AC outlet. 8 Disconnect the AC Adapter from the camcorder, then try charging again. ● If the battery operation time remains extremely short even after a long storage period, the CHARGE Lamp may not light.... BN-V312U (optional) Approx. 2 hr. 40 min. Approximate recording time For GR-DVM96: Battery pack LCD monitor on Viewfinder on BN-V306U* 50 min. 1 hr. 05 min. BN-V856U 8 hr. 10 min. 10 hr. 10 min....

User Manual
Page 26
RECORDING 27 Basic Shooting (D.S.C. PLAYBACK 28 Normal Playback Of Images 28 Auto Playback Of Images 28 Playback Of Video Clips (GR-DVM96 only 29 Playback Of Digital Sound Effects (GR-DVM96 only 29 Index Playback Of Files 30 Viewing File Information 30 Removing On-Screen Display 31 Protecting Files 31 Deleting Files 33 Making A New Folder 34 Setting Print Information (DPOF Setting 34 Initializing A Memory Card 36 Snapshot 27 D.S.C. 26 EN DIGITAL STILL CAMERA (D.S.C.) RECORDING & PLAYBACK CONTENTS D.S.C.
RECORDING 27 Basic Shooting (D.S.C. PLAYBACK 28 Normal Playback Of Images 28 Auto Playback Of Images 28 Playback Of Video Clips (GR-DVM96 only 29 Playback Of Digital Sound Effects (GR-DVM96 only 29 Index Playback Of Files 30 Viewing File Information 30 Removing On-Screen Display 31 Protecting Files 31 Deleting Files 33 Making A New Folder 34 Setting Print Information (DPOF Setting 34 Initializing A Memory Card 36 Snapshot 27 D.S.C. 26 EN DIGITAL STILL CAMERA (D.S.C.) RECORDING & PLAYBACK CONTENTS D.S.C.
User Manual
Page 28
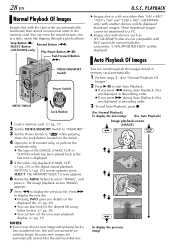
... Images shot in a file size other than "640 x 480", "1024 x 768" and "1280 x 960" (GR-DVM96 only) with the camcorder are automatically stored after playing back a low-numbered one, this camcorder; Press 5 to display the next file. ● Pressing INFO gives you details on the displayed file. (੬ ...display. (੬ pg. 31) NOTES: ● Even if you press 5 during Auto Playback, files are not compatible with devices (such as JVC GR-DVM70) that are displayed in the memory card. 28 EN D.S.C. The MEMORY SELECT screen appears. 6 Rotate the MENU Wheel to display the previous ...
... Images shot in a file size other than "640 x 480", "1024 x 768" and "1280 x 960" (GR-DVM96 only) with the camcorder are automatically stored after playing back a low-numbered one, this camcorder; Press 5 to display the next file. ● Pressing INFO gives you details on the displayed file. (੬ ...display. (੬ pg. 31) NOTES: ● Even if you press 5 during Auto Playback, files are not compatible with devices (such as JVC GR-DVM70) that are displayed in the memory card. 28 EN D.S.C. The MEMORY SELECT screen appears. 6 Rotate the MENU Wheel to display the previous ...

User Manual
Page 29
...play back to the sound effect, press 4/9. ● All the sounds are pre-stored in the provided memory card. Playback Of Digital Sound Effects (GR-DVM96 only) 12 sound effects are played back in ascending order. You can listen to select the previous file. The MEMORY SELECT screen appears. 6 ...for the desired file using Index Screen. (੬ pg. 30) 8 To start playback, press 4/9. 9 To stop playback, press 8. EN 29 Playback Of Video Clips (GR-DVM96 only) You can view video clips (੬ pg. 60) stored in the memory card. 1 Load a memory card. (੬ pg. 17) 2 Set the...
...play back to the sound effect, press 4/9. ● All the sounds are pre-stored in the provided memory card. Playback Of Digital Sound Effects (GR-DVM96 only) 12 sound effects are played back in ascending order. You can listen to select the previous file. The MEMORY SELECT screen appears. 6 ...for the desired file using Index Screen. (੬ pg. 30) 8 To start playback, press 4/9. 9 To stop playback, press 8. EN 29 Playback Of Video Clips (GR-DVM96 only) You can view video clips (੬ pg. 60) stored in the memory card. 1 Load a memory card. (੬ pg. 17) 2 Set the...

User Manual
Page 30
...file is displayed. ● Pressing INFO gives you want. 1 For Index Playback of sound files, perform 1 - 6 in "Playback Of Video Clips (GR-DVM96 only)" (੬ pg. 29). The Index Screen of the selected type of video clip files, perform 1 - 6 in "Playback Of Digital Sound Effects... (GR-DVM96 only)" (੬ pg. 29). 2 Press INDEX. Selected file Index number 1 2 3 Index Screen 4 5 6 7 8 9 D.S.C. For Index Playback of file appears. ...
...file is displayed. ● Pressing INFO gives you want. 1 For Index Playback of sound files, perform 1 - 6 in "Playback Of Video Clips (GR-DVM96 only)" (੬ pg. 29). The Index Screen of the selected type of video clip files, perform 1 - 6 in "Playback Of Digital Sound Effects... (GR-DVM96 only)" (੬ pg. 29). 2 Press INDEX. Selected file Index number 1 2 3 Index Screen 4 5 6 7 8 9 D.S.C. For Index Playback of file appears. ...

User Manual
Page 31
... Protecting Files The Protect mode helps prevent the accidental erasure of "Normal Playback Of Images" (੬ pg. 28). 2 Press the MENU Wheel in . SELECT Button (GR-DVM96 only) Rewind Button (3) Fast-Forward Button (5) VIDEO/MEMORY Switch Power Switch PLAY OFF A M MENU D I SPLAY OFF ON RETURN MENU Wheel Lock Button 1 Load a memory...
... Protecting Files The Protect mode helps prevent the accidental erasure of "Normal Playback Of Images" (੬ pg. 28). 2 Press the MENU Wheel in . SELECT Button (GR-DVM96 only) Rewind Button (3) Fast-Forward Button (5) VIDEO/MEMORY Switch Power Switch PLAY OFF A M MENU D I SPLAY OFF ON RETURN MENU Wheel Lock Button 1 Load a memory...

User Manual
Page 33
... appears. 10 Rotate the MENU Wheel to select "CURRENT", and press it . ● To cancel deletion, select "RETURN". Check files before deleting. SELECT Button (GR-DVM96 only) Rewind Button (3) Fast-Forward Button (5) VIDEO/MEMORY Switch Power Switch PLAY OFF A M MENU Wheel Lock Button 1 Load a memory card. (੬ ...3 Set the Power Switch to select "ALL", and press it . If not, go to use the provided AC Adapter, as turning off the camcorder) during deletion. Also, be sure to step 5. CAUTION: Do not remove the memory card or perform any other operation (such as the memory ...
... appears. 10 Rotate the MENU Wheel to select "CURRENT", and press it . ● To cancel deletion, select "RETURN". Check files before deleting. SELECT Button (GR-DVM96 only) Rewind Button (3) Fast-Forward Button (5) VIDEO/MEMORY Switch Power Switch PLAY OFF A M MENU Wheel Lock Button 1 Load a memory card. (੬ ...3 Set the Power Switch to select "ALL", and press it . If not, go to use the provided AC Adapter, as turning off the camcorder) during deletion. Also, be sure to step 5. CAUTION: Do not remove the memory card or perform any other operation (such as the memory ...
User Manual
Page 37
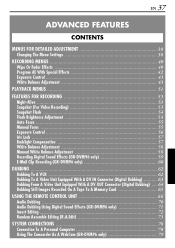
... Exposure Control 56 Iris Lock 57 Backlight Compensation 57 White Balance Adjustment 58 Manual White Balance Adjustment 58 Recording Digital Sound Effects (GR-DVM96 only 59 E-Mail Clip Recording (GR-DVM96 only 60 DUBBING 62 Dubbing To A VCR 62 Dubbing To A Video Unit Equipped With A DV IN Connector (Digital ... Recorded On A Tape To A Memory Card 65 USING THE REMOTE CONTROL UNIT 66 Audio Dubbing 70 Audio Dubbing Using Digital Sound Effects (GR-DVM96 only 71 Insert Editing 72 Random Assemble Editing [R.A.Edit 73 SYSTEM CONNECTIONS 78 Connection To A Personal Computer 78 Using The...
... Exposure Control 56 Iris Lock 57 Backlight Compensation 57 White Balance Adjustment 58 Manual White Balance Adjustment 58 Recording Digital Sound Effects (GR-DVM96 only 59 E-Mail Clip Recording (GR-DVM96 only 60 DUBBING 62 Dubbing To A VCR 62 Dubbing To A Video Unit Equipped With A DV IN Connector (Digital ... Recorded On A Tape To A Memory Card 65 USING THE REMOTE CONTROL UNIT 66 Audio Dubbing 70 Audio Dubbing Using Digital Sound Effects (GR-DVM96 only 71 Insert Editing 72 Random Assemble Editing [R.A.Edit 73 SYSTEM CONNECTIONS 78 Connection To A Personal Computer 78 Using The...
User Manual
Page 43
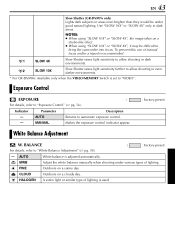
AUTO White balance is set to "VIDEO". SLOW 10X Slow Shutter raises light sensitivity further to bring the camcorder into focus. Exposure Control EXPOSURE ( For details, refer to "White Balance Adjustment" (੬ pg. 58). ( : Factory-preset) - White Balance Adjustment...Indicator Parameter Description - AUTO Returns to allow shooting in even darker environments. * For GR-DVM96: Available only when the VIDEO/MEMORY Switch is adjusted automatically. EN 43 Slow Shutter (GR-DVM76 only) Lights dark subjects or areas even brighter than they would be difficult to ...
AUTO White balance is set to "VIDEO". SLOW 10X Slow Shutter raises light sensitivity further to bring the camcorder into focus. Exposure Control EXPOSURE ( For details, refer to "White Balance Adjustment" (੬ pg. 58). ( : Factory-preset) - White Balance Adjustment...Indicator Parameter Description - AUTO Returns to allow shooting in even darker environments. * For GR-DVM96: Available only when the VIDEO/MEMORY Switch is adjusted automatically. EN 43 Slow Shutter (GR-DVM76 only) Lights dark subjects or areas even brighter than they would be difficult to ...
User Manual
Page 46
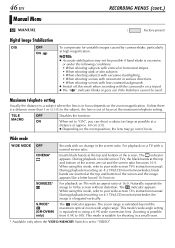
...you can shoot a subject as large as possible at the top and bottom of focus. Wide mode WIDE MODE OFF CINEMA* SQUEEZE* S.WIDE* (GR-DVM96 only) Records with a normal screen ratio. Inserts black bands at the top and bottom of focus at the maximum telephoto setting. TELE MACRO OFF... telephoto setting Usually the distance to a subject where the lens is set to your wide-screen TV's instruction manual. For playback on TVs with the camcorder on wide-screen TVs, the black bands at a distance of approx. 60 cm (2 ft). ● Depending on 4:3 TVs/LCD monitor/viewfinder, ...
...you can shoot a subject as large as possible at the top and bottom of focus. Wide mode WIDE MODE OFF CINEMA* SQUEEZE* S.WIDE* (GR-DVM96 only) Records with a normal screen ratio. Inserts black bands at the top and bottom of focus at the maximum telephoto setting. TELE MACRO OFF... telephoto setting Usually the distance to a subject where the lens is set to your wide-screen TV's instruction manual. For playback on TVs with the camcorder on wide-screen TVs, the black bands at a distance of approx. 60 cm (2 ft). ● Depending on 4:3 TVs/LCD monitor/viewfinder, ...

User Manual
Page 49
EN 49 Sound input (GR-DVM96 only) SOUND IN MIC D.SOUND Enables sound input from appearing on screen when the camcorder is executed. "MIC" appears on the provided memory card, when Audio Dubbing (੬ pg. 71) is connected to "A" or "M". ● When playback starts. ...Does not reset the settings to the factory-preset. "D.SOUND" appears on the connected TV. Allows you to set from "OFF" to a TV. The camcorder displays the date/time when scenes are not displayed during playback. Frame numbers are recorded. ● When the date is executed. Display Menu DISPLAY ( :...
EN 49 Sound input (GR-DVM96 only) SOUND IN MIC D.SOUND Enables sound input from appearing on screen when the camcorder is executed. "MIC" appears on the provided memory card, when Audio Dubbing (੬ pg. 71) is connected to "A" or "M". ● When playback starts. ...Does not reset the settings to the factory-preset. "D.SOUND" appears on the connected TV. Allows you to set from "OFF" to a TV. The camcorder displays the date/time when scenes are not displayed during playback. Frame numbers are recorded. ● When the date is executed. Display Menu DISPLAY ( :...

User Manual
Page 50
... Storable Images The numbers in parentheses are available: FINE and STANDARD (in the images and the type of quality). Two Picture Quality modes are for GR-DVM76. Image Size/Picture Quality 8 MB** SD Memory Card 8 MB 16 MB 32 MB 64 MB MultiMediaCard 8 MB* 16 MB 32 MB 640 x 480/FINE... (320) 1280 x 960/FINE*** 11 12 28 62 120 16 32 64 1280 x 960/STANDARD*** 37 44 98 205 405 50 100 200 * Provided with GR-DVM76 only ** Provided with the VIDEO/MEMORY Switch set to "VIDEO", still images are recorded only onto the tape. When Snapshot recording is performed with...
... Storable Images The numbers in parentheses are available: FINE and STANDARD (in the images and the type of quality). Two Picture Quality modes are for GR-DVM76. Image Size/Picture Quality 8 MB** SD Memory Card 8 MB 16 MB 32 MB 64 MB MultiMediaCard 8 MB* 16 MB 32 MB 640 x 480/FINE... (320) 1280 x 960/FINE*** 11 12 28 62 120 16 32 64 1280 x 960/STANDARD*** 37 44 98 205 405 50 100 200 * Provided with GR-DVM76 only ** Provided with the VIDEO/MEMORY Switch set to "VIDEO", still images are recorded only onto the tape. When Snapshot recording is performed with...
User Manual
Page 59
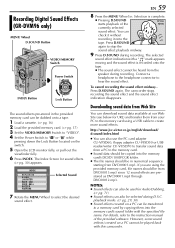
... recording. The selected sound effect indication with the specified file name. Recording Digital Sound Effects (GR-DVM96 only) MENU Wheel D.SOUND Button VIDEO/MEMORY Switch Power Switch PLAY OFF A M INDEX... starting from Web Site You can also be transferred to hear the sound effect. The camcorder stops recording the sound effect and the sound effect indication disappears. Press D.SOUND again. ...the memory card using the provided memory card, file names should be in . http://www.jvc-victor.co.jp/english/download/ d-sound/index.html ● You can be selected during ...
... recording. The selected sound effect indication with the specified file name. Recording Digital Sound Effects (GR-DVM96 only) MENU Wheel D.SOUND Button VIDEO/MEMORY Switch Power Switch PLAY OFF A M INDEX... starting from Web Site You can also be transferred to hear the sound effect. The camcorder stops recording the sound effect and the sound effect indication disappears. Press D.SOUND again. ...the memory card using the provided memory card, file names should be in . http://www.jvc-victor.co.jp/english/download/ d-sound/index.html ● You can be selected during ...

User Manual
Page 60
... i n e 00 : 15 REC Shooting starts when the Recording Start/Stop Button is displayed, then the camcorder re-enters the E-Mail Clip RecordStandby mode. 7 Press E-MAIL to "Playback Of Video Clips (GR-DVM96 only)" (੬ pg. 29). To delete unwanted video clips stored in a memory card as files...● "COMPLETED" is pressed. COMP L E T ED Shooting stops when the Recording Start/Stop Button is complete. 60 EN E-Mail Clip Recording (GR-DVM96 only) You can be conveniently sent via E-Mail. To view video clips stored in a memory card... The normal screen reappears. Refer to engage ...
... i n e 00 : 15 REC Shooting starts when the Recording Start/Stop Button is displayed, then the camcorder re-enters the E-Mail Clip RecordStandby mode. 7 Press E-MAIL to "Playback Of Video Clips (GR-DVM96 only)" (੬ pg. 29). To delete unwanted video clips stored in a memory card as files...● "COMPLETED" is pressed. COMP L E T ED Shooting stops when the Recording Start/Stop Button is complete. 60 EN E-Mail Clip Recording (GR-DVM96 only) You can be conveniently sent via E-Mail. To view video clips stored in a memory card... The normal screen reappears. Refer to engage ...

User Manual
Page 61
... displayed, then the camcorder re-enters the E-Mail Clip RecordStandby mode. 9 Press E-MAIL to end E-Mail Clip Recording. The normal screen reappears. Refer to "Deleting Files" (੬ pg. 33). To view video clips stored in a memory card... Refer to "Playback Of Video Clips (GR-DVM96 only)" (੬...; pg. 29). Some MPEG4 files stored with other devices cannot be played back with this camcorder. ● Video noise may appear while viewing video clips in the LCD monitor or ...
... displayed, then the camcorder re-enters the E-Mail Clip RecordStandby mode. 9 Press E-MAIL to end E-Mail Clip Recording. The normal screen reappears. Refer to "Deleting Files" (੬ pg. 33). To view video clips stored in a memory card... Refer to "Playback Of Video Clips (GR-DVM96 only)" (੬...; pg. 29). Some MPEG4 files stored with other devices cannot be played back with this camcorder. ● Video noise may appear while viewing video clips in the LCD monitor or ...

User Manual
Page 70
.... 3 Press PLAY (U), then begin "narrating". Make sure you only edit recorded areas. ● If feedback or howling occurs during TV playback, move the camcorder's microphone away from the TV, or turn down the TV's volume. ● If you dub onto a blank space on the tape, the sound may be...EN USING THE REMOTE CONTROL UNIT (cont.) Audio Dubbing The audio track can be disrupted. To hear sound, connect optional headphones to the headphone connector. (GR-DVM96 only) ● When editing onto a tape that was recorded at 12-bit, the old and new soundtracks are recorded separately. ● If...
.... 3 Press PLAY (U), then begin "narrating". Make sure you only edit recorded areas. ● If feedback or howling occurs during TV playback, move the camcorder's microphone away from the TV, or turn down the TV's volume. ● If you dub onto a blank space on the tape, the sound may be...EN USING THE REMOTE CONTROL UNIT (cont.) Audio Dubbing The audio track can be disrupted. To hear sound, connect optional headphones to the headphone connector. (GR-DVM96 only) ● When editing onto a tape that was recorded at 12-bit, the old and new soundtracks are recorded separately. ● If...

User Manual
Page 71
... Menu Screen appears. 3 Rotate the MENU Wheel to select "s SYSTEM", and press it . 9 Press PLAY (U) to begin Audio Dubbing. Audio Dubbing Using Digital Sound Effects (GR-DVM96 only) D.SOUND Button MENU Wheel Remote sensor EN 71 5 Rotate the MENU Wheel to select "D.SOUND", and 9D D.SOUND press it. 6 Rotate the MENU...
... Menu Screen appears. 3 Rotate the MENU Wheel to select "s SYSTEM", and press it . 9 Press PLAY (U) to begin Audio Dubbing. Audio Dubbing Using Digital Sound Effects (GR-DVM96 only) D.SOUND Button MENU Wheel Remote sensor EN 71 5 Rotate the MENU Wheel to select "D.SOUND", and 9D D.SOUND press it. 6 Rotate the MENU...
User Manual
Page 79
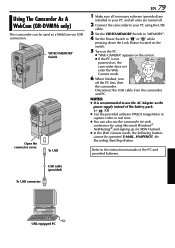
...PC. ● "Web CAMERA" appears on the screen. ● If the PC is recommended to use the camcorder for web conference by using the USB cable. 3 Set the VIDEO/MEMORY Switch to "MEMORY". 4 Set the... Power Switch to capture video in your PC and all units are turned off. 2 Connect the camcorder to your PC using Microsoft Windows® NetMeeting® and signing up for MSN Hotmail. ● In the...supply instead of the PC and provided Software. Using The Camcorder As A WebCam (GR-DVM96 only) This camcorder can also use the AC Adapter as a WebCam via USB connection.
...PC. ● "Web CAMERA" appears on the screen. ● If the PC is recommended to use the camcorder for web conference by using the USB cable. 3 Set the VIDEO/MEMORY Switch to "MEMORY". 4 Set the... Power Switch to capture video in your PC and all units are turned off. 2 Connect the camcorder to your PC using Microsoft Windows® NetMeeting® and signing up for MSN Hotmail. ● In the...supply instead of the PC and provided Software. Using The Camcorder As A WebCam (GR-DVM96 only) This camcorder can also use the AC Adapter as a WebCam via USB connection.

User Manual
Page 81
... to the type of the battery pack. ● To avoid interference with reception, do not use . The "T" indicator starts rotating when the camcorder actually starts recording. ● The time required to calculate and display the remaining tape length, and the accuracy of the calculation, may vary according... the LCD monitor outdoors in this happens, use the viewfinder instead. ● The cassette holder cannot be difficult to the headphone connector. (GR-DVM96 only) The sound volume is at its end, and the power goes off automatically if left in direct sunlight, the LCD monitor may...
... to the type of the battery pack. ● To avoid interference with reception, do not use . The "T" indicator starts rotating when the camcorder actually starts recording. ● The time required to calculate and display the remaining tape length, and the accuracy of the calculation, may vary according... the LCD monitor outdoors in this happens, use the viewfinder instead. ● The cassette holder cannot be difficult to the headphone connector. (GR-DVM96 only) The sound volume is at its end, and the power goes off automatically if left in direct sunlight, the LCD monitor may...


