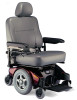

Owners Manual
Page 3
...PARAMETERS 10 SECTION 1-GENERAL GUIDELINES 11 Controller Settings/Repair or Service 11 Accessories Information ...11 Operation Information ...11 Batteries...13 Charging Batteries ...13 Grounding Instructions ...14 Rain Test...14 Weight Training ...14 Weight Limitation...14 SECTION 2-EMI INFORMATION 15 SECTION... w/PSS or SPJ+ w/ACC Joysticks 25 MPJ+, PSR+, PSF+ Joysticks or Displays 27 Checking Battery Charge Level...29 Part No 1122145 3 Pronto® M94™ Backward ...22 SECTION 4-SAFETY INSPECTION/TROUBLESHOOTING 23 Safety Inspection Checklists...23 Inspect/Adjust Initially ......
...PARAMETERS 10 SECTION 1-GENERAL GUIDELINES 11 Controller Settings/Repair or Service 11 Accessories Information ...11 Operation Information ...11 Batteries...13 Charging Batteries ...13 Grounding Instructions ...14 Rain Test...14 Weight Training ...14 Weight Limitation...14 SECTION 2-EMI INFORMATION 15 SECTION... w/PSS or SPJ+ w/ACC Joysticks 25 MPJ+, PSR+, PSF+ Joysticks or Displays 27 Checking Battery Charge Level...29 Part No 1122145 3 Pronto® M94™ Backward ...22 SECTION 4-SAFETY INSPECTION/TROUBLESHOOTING 23 Safety Inspection Checklists...23 Inspect/Adjust Initially ......
Owners Manual
Page 6
Ensuring long-term maintenance and servicing of registering include: 1. Pronto® M94™ 6 Part No 1122145 Register ONLINE at warranty.invacare.com Please have your model number and purchase date available to Charge Batteries ...75 SPJ+ Joysticks ...75 MPJ+ Joystick...76 Battery Charger Operation...76 On-Board Battery Charger...76 Independent Charger ...78 GLOBAL LIMITED WARRANTY (EXCLUDING...
Ensuring long-term maintenance and servicing of registering include: 1. Pronto® M94™ 6 Part No 1122145 Register ONLINE at warranty.invacare.com Please have your model number and purchase date available to Charge Batteries ...75 SPJ+ Joysticks ...75 MPJ+ Joystick...76 Battery Charger Operation...76 On-Board Battery Charger...76 Independent Charger ...78 GLOBAL LIMITED WARRANTY (EXCLUDING...
Owners Manual
Page 10
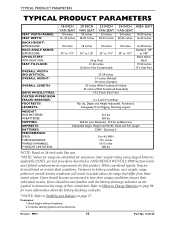
Users should become accustomed to Charge Batteries on page 98 for range that differ from these stated values. Back height without headrest. 2. Includes seating systems and accessories. Pronto® M94™ 10 Part No 1122145 Refer to When to how their ... WIDTH (NO JOYSTICK): OVERALL HEIGHT: OVERALL LENGTH: DRIVE WHEELS/TIRES: CASTER W/PRECISION SEALED BEARINGS: FOOTRESTS/ LEGRESTS: WEIGHT2: W/O BATTERIES: W/BATTERIES: SHIPPING: ARMRESTS: BATTERIES: PERFORMANCE: SPEED: TURNING RADIUS: *RANGE (VARIABLE): **WEIGHT LIMITATION: 18-INCH VAN SEAT 18 inches 16 -18 inches 20-INCH...
Users should become accustomed to Charge Batteries on page 98 for range that differ from these stated values. Back height without headrest. 2. Includes seating systems and accessories. Pronto® M94™ 10 Part No 1122145 Refer to When to how their ... WIDTH (NO JOYSTICK): OVERALL HEIGHT: OVERALL LENGTH: DRIVE WHEELS/TIRES: CASTER W/PRECISION SEALED BEARINGS: FOOTRESTS/ LEGRESTS: WEIGHT2: W/O BATTERIES: W/BATTERIES: SHIPPING: ARMRESTS: BATTERIES: PERFORMANCE: SPEED: TURNING RADIUS: *RANGE (VARIABLE): **WEIGHT LIMITATION: 18-INCH VAN SEAT 18 inches 16 -18 inches 20-INCH...
Owners Manual
Page 13
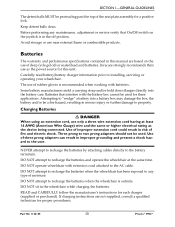
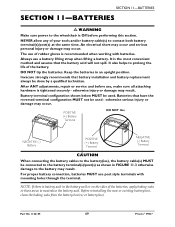
Invacare strongly recommends their use of rubber gloves is recommended when working with batteries. Some battery manufacturers mold a carrying strap and/or hold down flanges directly into a battery box may damage the box, the battery and/or be used . Batteries ...Pronto® M94™ Attempting to two prong adapters should not be protruding past the top of improper extension cord could result in the off position. Use of the seat plate assembly for these applications. Use of deep cycle gel cell or sealed lead acid batteries. Three prong to "wedge" a battery into the battery...
Invacare strongly recommends their use of rubber gloves is recommended when working with batteries. Some battery manufacturers mold a carrying strap and/or hold down flanges directly into a battery box may damage the box, the battery and/or be used . Batteries ...Pronto® M94™ Attempting to two prong adapters should not be protruding past the top of improper extension cord could result in the off position. Use of the seat plate assembly for these applications. Use of deep cycle gel cell or sealed lead acid batteries. Three prong to "wedge" a battery into the battery...

Owners Manual
Page 14
... it is not torn or cracked where water can enter and that the RED and BLACK battery terminal caps are the same number, size, and shape as a weight training apparatus. Rain Test Invacare has tested its wheelchairs as those on some equipment. This provides the end user or his... /her assistant sufficient time to prematurely rust or may damage the upholstery. DO NOT store power wheelchair in a damp area for Invacare products. Pronto® M94™ 14 Part No 1122145 Some devices are secure at all electrical connections are equipped with or for an extended period of any...
... it is not torn or cracked where water can enter and that the RED and BLACK battery terminal caps are the same number, size, and shape as a weight training apparatus. Rain Test Invacare has tested its wheelchairs as those on some equipment. This provides the end user or his... /her assistant sufficient time to prematurely rust or may damage the upholstery. DO NOT store power wheelchair in a damp area for Invacare products. Pronto® M94™ 14 Part No 1122145 Some devices are secure at all electrical connections are equipped with or for an extended period of any...

Owners Manual
Page 19
...Ensure that driving surfaces, ramps, lifts, elevators, etc. Invacare recommends using a stairway to the wheelchair. Follow this procedure, refer to use good body mechanics. Refer to avoid injury. Part No 1122145 19 Pronto® M94™ These must NEVER be used to move all wheelchair...to reassembly. 1. It is necessary: NOTE: When using two assistants and making thorough preparations. Use proper lifting techniques (lift with batteries and without the user is 290 lbs. DO NOT attempt to 800 lbs). are capable of supporting combined weight of user and ...
...Ensure that driving surfaces, ramps, lifts, elevators, etc. Invacare recommends using a stairway to the wheelchair. Follow this procedure, refer to use good body mechanics. Refer to avoid injury. Part No 1122145 19 Pronto® M94™ These must NEVER be used to move all wheelchair...to reassembly. 1. It is necessary: NOTE: When using two assistants and making thorough preparations. Use proper lifting techniques (lift with batteries and without the user is 290 lbs. DO NOT attempt to 800 lbs). are capable of supporting combined weight of user and ...

Owners Manual
Page 26
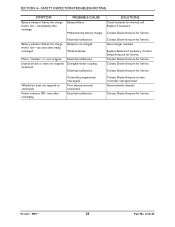
... is off . battery charge. Charge the batteries. Contact Invacare/Dealer for service. Contact Invacare/Dealer for service. Contact Invacare/Dealer for service. Contact Invacare/Dealer for service. Contact Invacare/Dealer for service. Fewer than three LEDs on page 70. Battery charge is flashing. ming, inhibit and/or charg- All LEDs are off . If necessary, replace batteries. Pronto® M94™ 26...
... is off . battery charge. Charge the batteries. Contact Invacare/Dealer for service. Contact Invacare/Dealer for service. Contact Invacare/Dealer for service. Contact Invacare/Dealer for service. Contact Invacare/Dealer for service. Fewer than three LEDs on page 70. Battery charge is flashing. ming, inhibit and/or charg- All LEDs are off . If necessary, replace batteries. Pronto® M94™ 26...

Owners Manual
Page 27
...FWD TOO LARGE ᾦ JS LFT TOO LARGE or ᾦ JS RGT TOO LARGE displays and the wheelchair does not drive. Part No 1122145 27 Pronto® M94™ SECTION 4-SAFETY INSPECTION/TROUBLESHOOTING MPJ+, PSR+, PSF+ Joysticks or Displays SYMPTOM ƽ SPM L Park Brake Fault or ƽ SPM R Park... between the joystick or display and the controller. CHARGER PLUGGED IN displays. SOLUTIONS Engage motor lock levers. Refer to Installing/ Removing the Batteries on page 66. Contact Dealer/Invacare for shorted cell. PROBABLE CAUSE Motor lock levers disengaged (Error code E9 or E10).
...FWD TOO LARGE ᾦ JS LFT TOO LARGE or ᾦ JS RGT TOO LARGE displays and the wheelchair does not drive. Part No 1122145 27 Pronto® M94™ SECTION 4-SAFETY INSPECTION/TROUBLESHOOTING MPJ+, PSR+, PSF+ Joysticks or Displays SYMPTOM ƽ SPM L Park Brake Fault or ƽ SPM R Park... between the joystick or display and the controller. CHARGER PLUGGED IN displays. SOLUTIONS Engage motor lock levers. Refer to Installing/ Removing the Batteries on page 66. Contact Dealer/Invacare for shorted cell. PROBABLE CAUSE Motor lock levers disengaged (Error code E9 or E10).
Owners Manual
Page 28
... low - Weak batteries. Joystick erratic or does not respond as desired. Electrical malfunction. Contact Dealer/Invacare for Service. Replace batteries if necessary. Contact Dealer/Invacare for Service. Wheelchair does not respond to have controller reprogrammed. even after recharging. Controller programmed improperly. Poor battery terminal connection. Electrical malfunction. Contact Dealer/Invacare to commands. Pronto® M94™ 28 Part...
... low - Weak batteries. Joystick erratic or does not respond as desired. Electrical malfunction. Contact Dealer/Invacare for Service. Replace batteries if necessary. Contact Dealer/Invacare for Service. Wheelchair does not respond to have controller reprogrammed. even after recharging. Controller programmed improperly. Poor battery terminal connection. Electrical malfunction. Contact Dealer/Invacare to commands. Pronto® M94™ 28 Part...

Owners Manual
Page 29
... or maintenance without first reading this manual when selecting a battery or charger. Follow recommendations in an area that accompanies a battery and charger before cleaning termiteries in this manual. Don't put new batteries into service before using. Use a carrying strap to the... a high charge level and extend battery life. Recharge as frequently as possible to a work area before operating the wheelchair. tery spills. Fully charge a new battery before charging. Part No 1122145 29 Pronto® M94™ Push battery clamps on clamps and terminals with tools...
... or maintenance without first reading this manual when selecting a battery or charger. Follow recommendations in an area that accompanies a battery and charger before cleaning termiteries in this manual. Don't put new batteries into service before using. Use a carrying strap to the... a high charge level and extend battery life. Recharge as frequently as possible to a work area before operating the wheelchair. tery spills. Fully charge a new battery before charging. Part No 1122145 29 Pronto® M94™ Push battery clamps on clamps and terminals with tools...
Owners Manual
Page 33
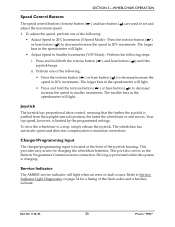
... hold the tortoise button ( ) or hare button ( ) to Service Indicator Light Diagnostics on page 34 for charging the wheelchair batteries. ii. This provides easy access for a listing of the joystick housing. The smaller bars in the speedometer will light when an...) position, the faster the wheelchair or seat moves. Refer to decrease/ increase the speed in smaller increments. Part No 1122145 33 Pronto® M94™ Joystick The joystick has proportional drive control, meaning that the further the joystick is charging. The larger bars in the speedometer will...
... hold the tortoise button ( ) or hare button ( ) to Service Indicator Light Diagnostics on page 34 for charging the wheelchair batteries. ii. This provides easy access for a listing of the joystick housing. The smaller bars in the speedometer will light when an...) position, the faster the wheelchair or seat moves. Refer to decrease/ increase the speed in smaller increments. Part No 1122145 33 Pronto® M94™ Joystick The joystick has proportional drive control, meaning that the further the joystick is charging. The larger bars in the speedometer will...
Owners Manual
Page 34
... a control need or situation. Selecting the Drive Mode 1. DRIVE 3 ( ) will return to the neutral position after a selection is On. 2. Pronto® M94™ 34 Part No 1122145 RED LEDs are lit, indicating batteries are independent of those used for the diagnostic indications of DRIVE 1 and DRIVE 2. The DRIVE 1 program uses performance values which...
... a control need or situation. Selecting the Drive Mode 1. DRIVE 3 ( ) will return to the neutral position after a selection is On. 2. Pronto® M94™ 34 Part No 1122145 RED LEDs are lit, indicating batteries are independent of those used for the diagnostic indications of DRIVE 1 and DRIVE 2. The DRIVE 1 program uses performance values which...

Owners Manual
Page 35
... the front of the joystick housing. To slow the wheelchair to the programmed max speed. 2. This provides easy access for charging the wheelchair batteries. Part No 1122145 35 Pronto® M94™ Charger/Programming Input The charger/programming input is limited by the programmed settings. Rotate the knob clockwise (forward) to increase the...
... the front of the joystick housing. To slow the wheelchair to the programmed max speed. 2. This provides easy access for charging the wheelchair batteries. Part No 1122145 35 Pronto® M94™ Charger/Programming Input The charger/programming input is limited by the programmed settings. Rotate the knob clockwise (forward) to increase the...

Owners Manual
Page 36
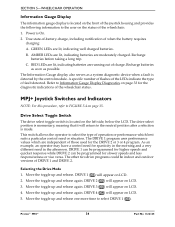
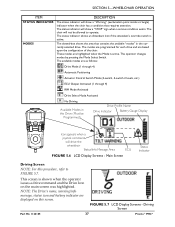
... this procedure, refer to FIGURE 5.6 on every screen. This area displays status or instructions. This symbol shows the Battery Level and will progressively disappear until no segments appear between E (Empty) and F (Full). Pronto® M94™ 36 Part No 1122145 Actual drive names may display differently. FIGURE 5.5 LCD Display Screens - The Information Center...
... this procedure, refer to FIGURE 5.6 on every screen. This area displays status or instructions. This symbol shows the Battery Level and will progressively disappear until no segments appear between E (Empty) and F (Full). Pronto® M94™ 36 Part No 1122145 Actual drive names may display differently. FIGURE 5.5 LCD Display Screens - The Information Center...
Owners Manual
Page 37
...NOTE: For this screen. Driving Screen Part No 1122145 37 Pronto® M94™ The operator changes modes by pressing the Mode Select Switch. NOTE: The Drive's name, warning/info message, status icon and battery indicator are based upon the configuration of the chair. FIGURE ... indicator shows an Attendant Icon if the attendant's override switch is active. The chair will not be Programmed) Drive Profile Name Drive Indicator Battery Gauge Display Icon appears when a joystick command will show a "Warning" (exclamation point inside a triangle) indicator when the chair has ...
...NOTE: For this screen. Driving Screen Part No 1122145 37 Pronto® M94™ The operator changes modes by pressing the Mode Select Switch. NOTE: The Drive's name, warning/info message, status icon and battery indicator are based upon the configuration of the chair. FIGURE ... indicator shows an Attendant Icon if the attendant's override switch is active. The chair will not be Programmed) Drive Profile Name Drive Indicator Battery Gauge Display Icon appears when a joystick command will show a "Warning" (exclamation point inside a triangle) indicator when the chair has ...
Owners Manual
Page 69
... position. Before reinstalling the new or existing battery(ies), clean the baking soda from the battery box(es) or battery(ies). Always use a battery lifting strap when lifting a battery. Invacare strongly recommends that have the reversed terminal configuration MUST not be done by a qualified technician. Part No 1122145 69 Pronto® M94™ The use of rubber gloves...
... position. Before reinstalling the new or existing battery(ies), clean the baking soda from the battery box(es) or battery(ies). Always use a battery lifting strap when lifting a battery. Invacare strongly recommends that have the reversed terminal configuration MUST not be done by a qualified technician. Part No 1122145 69 Pronto® M94™ The use of rubber gloves...
Owners Manual
Page 70
... without Built‐In Lifting Strap ‐ Use the battery lifting strap to carpeting or floor covering. 2. Batteries without risking damage to position battery into the battery tray. 6. Remove the top shroud. Repeat STEP 6 to the front of FIGURE 11.1). 7. Batteries with the rear battery. Pronto® M94™ 70 Part No 1122145 Place the wheelchair in the...
... without Built‐In Lifting Strap ‐ Use the battery lifting strap to carpeting or floor covering. 2. Batteries without risking damage to position battery into the battery tray. 6. Remove the top shroud. Repeat STEP 6 to the front of FIGURE 11.1). 7. Batteries with the rear battery. Pronto® M94™ 70 Part No 1122145 Place the wheelchair in the...
Owners Manual
Page 71
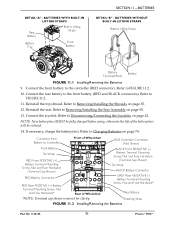
... from Battery to Charging Batteries on page 65. 12. BATTERIES WITH BUILT-IN LIFTING STRAPS Rear Battery Built-in Lifting Straps Battery Tray Front Battery SECTION 11-BATTERIES DETAIL"B" - Refer to FIGURE 11.2. 10. Retaining Strap FIGURE 11.2 Installing/Removing the Batteries Part No 1122145 71 Pronto® M94™ BATTERIES WITHOUT BUILT-IN LIFTING STRAPS Battery Lifting Straps Battery Terminals/Posts Battery FIGURE...
... from Battery to Charging Batteries on page 65. 12. BATTERIES WITH BUILT-IN LIFTING STRAPS Rear Battery Built-in Lifting Straps Battery Tray Front Battery SECTION 11-BATTERIES DETAIL"B" - Refer to FIGURE 11.2. 10. Retaining Strap FIGURE 11.2 Installing/Removing the Batteries Part No 1122145 71 Pronto® M94™ BATTERIES WITHOUT BUILT-IN LIFTING STRAPS Battery Lifting Straps Battery Terminals/Posts Battery FIGURE...

Owners Manual
Page 72
... starting with Built‐In Lifting Strap ‐ Use built in a well ventilated area where work can be installed prior to remove the battery from POSITIVE (+) RED battery cable/mounting screw. Pronto® M94™ 72 Part No 1122145 Move aside the motor leads and controller cable to allow unobstructed access to the front...
... starting with Built‐In Lifting Strap ‐ Use built in a well ventilated area where work can be installed prior to remove the battery from POSITIVE (+) RED battery cable/mounting screw. Pronto® M94™ 72 Part No 1122145 Move aside the motor leads and controller cable to allow unobstructed access to the front...
Owners Manual
Page 73
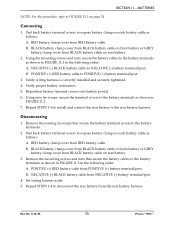
... battery. 3. Remove the existing tie‐wraps that secure the battery cables to the battery terminals as shown in FIGURE 11.3 in the following order: A. B. BLACK battery clamp cover from BLACK battery cable on front battery or GREY battery clamp cover from the rear battery harness. Repeat STEPS 1‐4 to POSITIVE (+) battery terminal/post. 3. Part No 1122145 73 Pronto® M94...
... battery. 3. Remove the existing tie‐wraps that secure the battery cables to the battery terminals as shown in FIGURE 11.3 in the following order: A. B. BLACK battery clamp cover from BLACK battery cable on front battery or GREY battery clamp cover from the rear battery harness. Repeat STEPS 1‐4 to POSITIVE (+) battery terminal/post. 3. Part No 1122145 73 Pronto® M94...


