
Owners Manual
Page 30
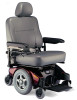
...OPERATION SECTION 5-WHEELCHAIR OPERATION ƽ WARNING After ANY adjustments, repair or service and before use, make sure that all attaching hardware is to be achieved by a qualified technician. SPJ+ Joysticks On/Off Button... MPJ+ Joystick On/Off Switch FIGURE 5.1 Turning the Power On/Off Pronto® M94™ 30 Part No 1122145 SPJ+ Press the On/Off button. JOYSTICK ACTION MPJ+ Move ...otherwise injury or damage may affect other activities of the following steps: MPJ™+ SPJ™+ JOYSTICK ACTION Move the On/Off switch Forward to the ...
...OPERATION SECTION 5-WHEELCHAIR OPERATION ƽ WARNING After ANY adjustments, repair or service and before use, make sure that all attaching hardware is to be achieved by a qualified technician. SPJ+ Joysticks On/Off Button... MPJ+ Joystick On/Off Switch FIGURE 5.1 Turning the Power On/Off Pronto® M94™ 30 Part No 1122145 SPJ+ Press the On/Off button. JOYSTICK ACTION MPJ+ Move ...otherwise injury or damage may affect other activities of the following steps: MPJ™+ SPJ™+ JOYSTICK ACTION Move the On/Off switch Forward to the ...
Owners Manual
Page 44
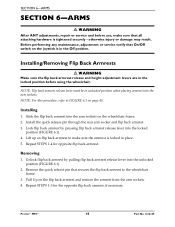
...For this procedure, refer to FIGURE 6.1 on flip back armrest to the wheelchair frame. 3. Lift up on page 45. Removing 1. Pronto® M94™ 44 Part No 1122145 SECTION 6-ARMS SECTION 6-ARMS ƽ WARNING After ANY adjustments, repair or service and before using the ... pulling flip back armrest release lever into the locked position (FIGURE 6.1). 4. Installing 1. Repeat STEPS 1‐3 for opposite flip back armrest. Installing/Removing Flip Back Armrests ƽ WARNING Make sure the flip back armrest release and height adjustment levers are in the Off position.
...For this procedure, refer to FIGURE 6.1 on flip back armrest to the wheelchair frame. 3. Lift up on page 45. Removing 1. Pronto® M94™ 44 Part No 1122145 SECTION 6-ARMS SECTION 6-ARMS ƽ WARNING After ANY adjustments, repair or service and before using the ... pulling flip back armrest release lever into the locked position (FIGURE 6.1). 4. Installing 1. Repeat STEPS 1‐3 for opposite flip back armrest. Installing/Removing Flip Back Armrests ƽ WARNING Make sure the flip back armrest release and height adjustment levers are in the Off position.
Owners Manual
Page 45
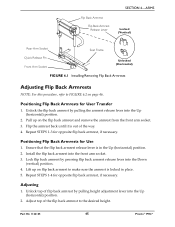
... Flip Back Armrests for opposite flip back armrest, if necessary. Install the flip back armrest into the Down (vertical) position. 4. Repeat STEPS 1‐4 for Use 1. Flip Back Armrest Flip Back Armrest Release Lever SECTION 6-ARMS Locked (Vertical) Rear Arm Socket Quick Release Pin ...flip back armrest by pulling the armrest release lever into the Up (horizontal) position. 2. Part No 1122145 45 Pronto® M94™ Lift up on flip back armrest to make sure the armrest is in place. 5. Unlock the flip back armrest by pressing flip back armrest release lever into the ...
... Flip Back Armrests for opposite flip back armrest, if necessary. Install the flip back armrest into the Down (vertical) position. 4. Repeat STEPS 1‐4 for Use 1. Flip Back Armrest Flip Back Armrest Release Lever SECTION 6-ARMS Locked (Vertical) Rear Arm Socket Quick Release Pin ...flip back armrest by pulling the armrest release lever into the Up (horizontal) position. 2. Part No 1122145 45 Pronto® M94™ Lift up on flip back armrest to make sure the armrest is in place. 5. Unlock the flip back armrest by pressing flip back armrest release lever into the ...

Owners Manual
Page 46
...to one of FIGURE 6.3 on flip back armrest to the seat frame assembly and tighten securely. Pronto® M94™ 46 Part No 1122145 Height Adjustment Lever Flip Back Armrest Release Lever Locked (Down -... NOTE: For this procedure, refer to Detail "B" of four positions. 3. Tighten the jam nut. 5. Loosen the jam nut. 3. Remove the socket screw that secures the armrest to make sure... adjusting the arm angle position. Repeat STEPS 1‐4 for opposite armrest, if necessary.
...to one of FIGURE 6.3 on flip back armrest to the seat frame assembly and tighten securely. Pronto® M94™ 46 Part No 1122145 Height Adjustment Lever Flip Back Armrest Release Lever Locked (Down -... NOTE: For this procedure, refer to Detail "B" of four positions. 3. Tighten the jam nut. 5. Loosen the jam nut. 3. Remove the socket screw that secures the armrest to make sure... adjusting the arm angle position. Repeat STEPS 1‐4 for opposite armrest, if necessary.
Owners Manual
Page 59
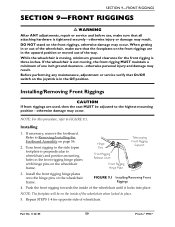
... Front Rigging Support 3. SECTION 9-FRONT RIGGINGS SECTION 9-FRONT RIGGINGS ƽ WARNING After ANY adjustments, repair or service and before use, make sure that the footplates on the wheelchair frame. otherwise injury or damage may result. If necessary, remove the footboard. Install the front rigging hinge... on the front riggings are used, then the seat MUST be on the joystick is three inches. Part No 1122145 59 Pronto® M94™ Repeat STEPS 1‐4 for the front rigging is in the upward position or moved out of wheelchair. While the wheelchair is tightened securely...
... Front Rigging Support 3. SECTION 9-FRONT RIGGINGS SECTION 9-FRONT RIGGINGS ƽ WARNING After ANY adjustments, repair or service and before use, make sure that the footplates on the wheelchair frame. otherwise injury or damage may result. If necessary, remove the footboard. Install the front rigging hinge... on the front riggings are used, then the seat MUST be on the joystick is three inches. Part No 1122145 59 Pronto® M94™ Repeat STEPS 1‐4 for the front rigging is in the upward position or moved out of wheelchair. While the wheelchair is tightened securely...


