User Manual (English)
Page 3
Contents CHILD SAFETY 1 Important safety instructions 2 Warnings 2 Cautions 3 End of life directives 3 Non-active pixels 3 Installing the stand or a wall-mount bracket 4 Installing the stand (NS-LDVD26Q-10A 4 Installing the stand (NS-LDVD32Q-10A 4 Attaching a wall-mount bracket (NS-LDVD26Q-10A 5 Attaching a wall-mount bracket (NS-LDVD32Q-10A 6 TV components 6 Package contents 6 Front 6 Back 7 Remote Control 8 Using the remote control 9 Installing remote control batteries 9 Aiming the remote control...
Contents CHILD SAFETY 1 Important safety instructions 2 Warnings 2 Cautions 3 End of life directives 3 Non-active pixels 3 Installing the stand or a wall-mount bracket 4 Installing the stand (NS-LDVD26Q-10A 4 Installing the stand (NS-LDVD32Q-10A 4 Attaching a wall-mount bracket (NS-LDVD26Q-10A 5 Attaching a wall-mount bracket (NS-LDVD32Q-10A 6 TV components 6 Package contents 6 Front 6 Back 7 Remote Control 8 Using the remote control 9 Installing remote control batteries 9 Aiming the remote control...
User Manual (English)
Page 7
...; One size of wall mount does not fit all . Use only a wall mount rated for safe wall mount installation. At least two people are not designed to be mounted to walls backed with entertainment system furniture and TVs. • Don't place TVs on furniture that are committed to wall mount your TV. • Follow all instructions supplied by the TV and wall mount manufacturers. • If...
...; One size of wall mount does not fit all . Use only a wall mount rated for safe wall mount installation. At least two people are not designed to be mounted to walls backed with entertainment system furniture and TVs. • Don't place TVs on furniture that are committed to wall mount your TV. • Follow all instructions supplied by the TV and wall mount manufacturers. • If...

User Manual (English)
Page 10
... position on a flat surface. To install the stand (NS-LDVD32Q-10A): 1 Place a towel or cushion on a flat surface, then lay your TV/DVD combo face-down on the towel or cushion. 2 Slide the stand into the slot on the bottom your your TV/DVD combo in an upright position on a flat surface,...into the slot on the bottom your your TV/DVD combo. 4 Place your TV/DVD combo in an upright position on a flat surface, you need to install the stand. Installing the stand or a wall-mount bracket Installing the stand (NS-LDVD26Q-10A) If you plan to use your TV/DVD combo. 3 Secure the stand with...
... position on a flat surface. To install the stand (NS-LDVD32Q-10A): 1 Place a towel or cushion on a flat surface, then lay your TV/DVD combo face-down on the towel or cushion. 2 Slide the stand into the slot on the bottom your your TV/DVD combo in an upright position on a flat surface,...into the slot on the bottom your your TV/DVD combo. 4 Place your TV/DVD combo in an upright position on a flat surface, you need to install the stand. Installing the stand or a wall-mount bracket Installing the stand (NS-LDVD26Q-10A) If you plan to use your TV/DVD combo. 3 Secure the stand with...
User Manual (English)
Page 11
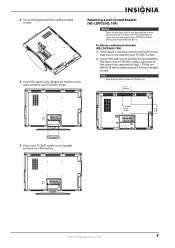
...four extra screws for use . 3.937" (100 mm) 3.937" (100 mm) 5 Place your TV/DVD combo unless you removed in length) screws. To attach a wall-mount bracket (NS-LDVD26Q-10A): 1 If the stand is installed, remove the eight screws that the cover goes inside of your...in Step 1. Make sure that secure the stand to your TV/DVD combo. 2 Secure the wall-mount bracket (not provided) to do not wall-mount your TV/DVD combo in an upright position on a flat surface. Attaching a wall-mount bracket (NS-LDVD26Q-10A) Warning These instructions are for future use by qualified service ...
...four extra screws for use . 3.937" (100 mm) 3.937" (100 mm) 5 Place your TV/DVD combo unless you removed in length) screws. To attach a wall-mount bracket (NS-LDVD26Q-10A): 1 If the stand is installed, remove the eight screws that the cover goes inside of your...in Step 1. Make sure that secure the stand to your TV/DVD combo. 2 Secure the wall-mount bracket (not provided) to do not wall-mount your TV/DVD combo in an upright position on a flat surface. Attaching a wall-mount bracket (NS-LDVD26Q-10A) Warning These instructions are for future use by qualified service ...
User Manual (English)
Page 12
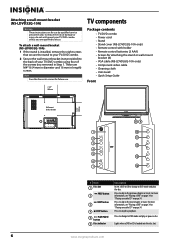
... to DVD mode and play or pause a disc. Attaching a wall-mount bracket (NS-LDVD32Q-10A) Warning These instructions are for use . 7.878" 200 mm TV components Package contents • TV/DVD combo • Power cord • Stand • Stand cover (NS-LDVD32Q-10A only) • Remote control with holder • Remote control ... a DVD or CD is installed, remove the eight screws that secure the stand to your TV/DVD combo unless you removed in length) screws. To attach a wall-mount bracket (NS-LDVD32Q-10A): 1 If the stand is loaded into the disc slot. 6 www.insigniaproducts.com Press to...
... to DVD mode and play or pause a disc. Attaching a wall-mount bracket (NS-LDVD32Q-10A) Warning These instructions are for use . 7.878" 200 mm TV components Package contents • TV/DVD combo • Power cord • Stand • Stand cover (NS-LDVD32Q-10A only) • Remote control with holder • Remote control ... a DVD or CD is installed, remove the eight screws that secure the stand to your TV/DVD combo unless you removed in length) screws. To attach a wall-mount bracket (NS-LDVD32Q-10A): 1 If the stand is loaded into the disc slot. 6 www.insigniaproducts.com Press to...


