User Manual (English)
Page 3
... the stand (NS-LDVD26Q-10A 4 Installing the stand (NS-LDVD32Q-10A 4 Attaching a wall-mount bracket (NS-LDVD26Q-10A 5 Attaching a wall-mount bracket (NS-LDVD32Q-10A 6 TV components 6 Package contents 6 Front 6 Back 7 Remote Control 8 Using the remote control 9 Installing remote control batteries 9 Aiming the remote control 9 Programming a universal remote control to work with your TV . . . 10 Making connections 10 Connecting the power cord 10 Connecting...
... the stand (NS-LDVD26Q-10A 4 Installing the stand (NS-LDVD32Q-10A 4 Attaching a wall-mount bracket (NS-LDVD26Q-10A 5 Attaching a wall-mount bracket (NS-LDVD32Q-10A 6 TV components 6 Package contents 6 Front 6 Back 7 Remote Control 8 Using the remote control 9 Installing remote control batteries 9 Aiming the remote control 9 Programming a universal remote control to work with your TV . . . 10 Making connections 10 Connecting the power cord 10 Connecting...
User Manual (English)
Page 8
...-type plug. No user-serviceable parts are important operating and maintenance instructions in the literature accompanying your TV or hit, jolt, or press hard against the LCD panel. When installing an outside antenna system should not be located in the panel. Install in your...that no objects filled with your outlet, consult an electrician for replacement of the obsolete outlet. 10 Protect the power cord from being walked on the apparatus. Do not drop your TV. 1 Read these instructions. 2 Keep these instructions. 3 Heed all warnings. 4 Follow all servicing to qualified...
...-type plug. No user-serviceable parts are important operating and maintenance instructions in the literature accompanying your TV or hit, jolt, or press hard against the LCD panel. When installing an outside antenna system should not be located in the panel. Install in your...that no objects filled with your outlet, consult an electrician for replacement of the obsolete outlet. 10 Protect the power cord from being walked on the apparatus. Do not drop your TV. 1 Read these instructions. 2 Keep these instructions. 3 Heed all warnings. 4 Follow all servicing to qualified...

User Manual (English)
Page 9
... area. Non-active pixels The LCD panel contains almost 3 million thin film transistors, which provide exceptionally sharp video quality. www.insigniaproducts.com 3 Condensation Moisture will often require extensive work by a qualified technician to restore your TV to CATV system installer Article 820...controls that are covered by following conditions: • When the power supply cord or plug is grounded to your cordless and cellular telephones away from cool surroundings into your TV. • If your TV has been exposed to qualified service personnel under the following the ...
... area. Non-active pixels The LCD panel contains almost 3 million thin film transistors, which provide exceptionally sharp video quality. www.insigniaproducts.com 3 Condensation Moisture will often require extensive work by a qualified technician to restore your TV to CATV system installer Article 820...controls that are covered by following conditions: • When the power supply cord or plug is grounded to your cordless and cellular telephones away from cool surroundings into your TV. • If your TV has been exposed to qualified service personnel under the following the ...
User Manual (English)
Page 12
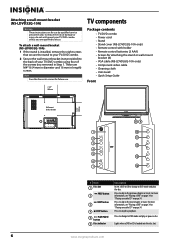
... the stand is loaded into the disc slot. 6 www.insigniaproducts.com Attaching a wall-mount bracket (NS-LDVD32Q-10A) Warning These instructions are for use . 7.878" 200 mm TV components Package contents • TV/DVD combo • Power cord • Stand • Stand cover (NS-LDVD32Q-10A only) • Remote control with holder • Remote control batteries (2 AAA) • Screws for...
... the stand is loaded into the disc slot. 6 www.insigniaproducts.com Attaching a wall-mount bracket (NS-LDVD32Q-10A) Warning These instructions are for use . 7.878" 200 mm TV components Package contents • TV/DVD combo • Power cord • Stand • Stand cover (NS-LDVD32Q-10A only) • Remote control with holder • Remote control batteries (2 AAA) • Screws for...
User Manual (English)
Page 13
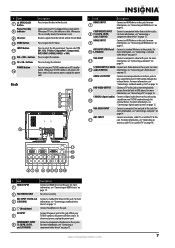
... page 15. For service use only. When your TV/DVD combo on page 13. POWER button 14 Press to this jack. Connect the power cord to adjust the volume. 13 CH+/CH- buttons Press to this jack. To disconnect power, unplug the power cord. For more information, see "Connecting a TV" on page 14. For more information, see "Connecting...
... page 15. For service use only. When your TV/DVD combo on page 13. POWER button 14 Press to this jack. Connect the power cord to adjust the volume. 13 CH+/CH- buttons Press to this jack. To disconnect power, unplug the power cord. For more information, see "Connecting a TV" on page 14. For more information, see "Connecting...

User Manual (English)
Page 14
To disconnect power, unplug the power cord. Press to select Stereo, Mono, or SAP. In analog TV mode, press to enter channel numbers and the parental ... 23 CH /CH 24 25 RECALL FAVORITE 26 27 INFO PICTURE 28 29 AUDIO 30 31 EXIT 32 SETUP 33 A-B 34 SLOW 35 RETURN 36 SUBTITLE Description Press to turn closed captioning on -screen menu...INFO MENU V AUDIO PICTU T RE OK ENTER STOP DVD MENU EXIT SETUP REPEAT AUDIO A-B SLOW SUBTITLE RETURN RC-261 # Button (power) 1 2 TV 3 DVD 4 Numbers 5 (decimal) 6 (mute) 7 VOL +/VOL- For more information, see "Adjusting the sound" on -...
To disconnect power, unplug the power cord. Press to select Stereo, Mono, or SAP. In analog TV mode, press to enter channel numbers and the parental ... 23 CH /CH 24 25 RECALL FAVORITE 26 27 INFO PICTURE 28 29 AUDIO 30 31 EXIT 32 SETUP 33 A-B 34 SLOW 35 RETURN 36 SUBTITLE Description Press to turn closed captioning on -screen menu...INFO MENU V AUDIO PICTU T RE OK ENTER STOP DVD MENU EXIT SETUP REPEAT AUDIO A-B SLOW SUBTITLE RETURN RC-261 # Button (power) 1 2 TV 3 DVD 4 Numbers 5 (decimal) 6 (mute) 7 VOL +/VOL- For more information, see "Adjusting the sound" on -...
User Manual (English)
Page 16
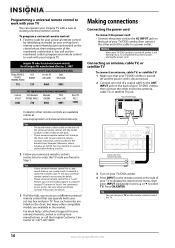
... a new or existing universal remote control. Warning When your TV/DVD combo is turned off and the power cord is still flowing into it . Back of a coaxial cable to work with your TV You can operate both your set -top box manufacturer, or call the Insignia Customer Care Center at a time. For more help, call...
... a new or existing universal remote control. Warning When your TV/DVD combo is turned off and the power cord is still flowing into it . Back of a coaxial cable to work with your TV You can operate both your set -top box manufacturer, or call the Insignia Customer Care Center at a time. For more help, call...
User Manual (English)
Page 17
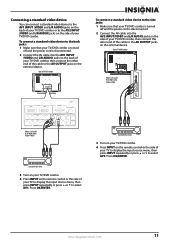
... connect a standard video device to select AV2. www.insigniaproducts.com 11 To connect a standard video device to the back jacks: 1 Make sure that your TV/DVD combo is turned off and the power cord is disconnected. 2 Connect the AV cable into the AV1 INPUT (VIDEO and L/R AUDIO) jacks on the back of your... cable to the AV OUTPUT jacks on the side of your TV to display the input source menu, then press INPUT repeatedly or press or to the side jacks: 1 Make sure that your TV/DVD combo is turned off and the power cord is disconnected. 2 Connect the AV cable into the AV2 INPUT(VIDEO...
... connect a standard video device to select AV2. www.insigniaproducts.com 11 To connect a standard video device to the back jacks: 1 Make sure that your TV/DVD combo is turned off and the power cord is disconnected. 2 Connect the AV cable into the AV1 INPUT (VIDEO and L/R AUDIO) jacks on the back of your... cable to the AV OUTPUT jacks on the side of your TV to display the input source menu, then press INPUT repeatedly or press or to the side jacks: 1 Make sure that your TV/DVD combo is turned off and the power cord is disconnected. 2 Connect the AV cable into the AV2 INPUT(VIDEO...
User Manual (English)
Page 18
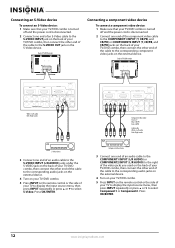
...OUT jack on the S-Video device. Connecting an S-Video device To connect an S-Video device: 1 Make sure that your TV/DVD combo is turned off and the power cord is disconnected. 2 Connect one end of an audio cable to the COMPONENT1 INPUT (L/R AUDIO) or COMPONENT2 INPUT (L/R AUDIO) ...R AUDIO L L OUTPUT COMPONENT2 INPUT R S-VIDEO INPUT R DVD VIDEO Connecting a component video device To connect a component video device: 1 Make sure that your TV/DVD combo is turned off and the power cord is disconnected. 2 Connect one end of an S-Video cable to the S-VIDEO INPUT jack on the back of your...
...OUT jack on the S-Video device. Connecting an S-Video device To connect an S-Video device: 1 Make sure that your TV/DVD combo is turned off and the power cord is disconnected. 2 Connect one end of an audio cable to the COMPONENT1 INPUT (L/R AUDIO) or COMPONENT2 INPUT (L/R AUDIO) ...R AUDIO L L OUTPUT COMPONENT2 INPUT R S-VIDEO INPUT R DVD VIDEO Connecting a component video device To connect a component video device: 1 Make sure that your TV/DVD combo is turned off and the power cord is disconnected. 2 Connect one end of an S-Video cable to the S-VIDEO INPUT jack on the back of your...
User Manual (English)
Page 19
... HDMI2 VGA INPUT ANT. Note An HDMI-to-DVI cable transfers video only. Back of TV/DVD combo Connecting a DVI device To connect a DVI device: 1 Make sure that your TV/DVD combo is turned off and the power cord is disconnected. 2 Connect one end of an HDMI-to DVI cable to the HDMI1 INPUT... AC INPUT HDMI1 INPUT HDMI2 VGA INPUT ANT. Connecting an HDMI device To connect an HDMI device: 1 Make sure that your TV/DVD combo is turned off and the power cord is disconnected. 2 Connect one end of an HDMI cable to the HDMI1 INPUT or HDMI2 INPUT jack on the back of your...
... HDMI2 VGA INPUT ANT. Note An HDMI-to-DVI cable transfers video only. Back of TV/DVD combo Connecting a DVI device To connect a DVI device: 1 Make sure that your TV/DVD combo is turned off and the power cord is disconnected. 2 Connect one end of an HDMI-to DVI cable to the HDMI1 INPUT... AC INPUT HDMI1 INPUT HDMI2 VGA INPUT ANT. Connecting an HDMI device To connect an HDMI device: 1 Make sure that your TV/DVD combo is turned off and the power cord is disconnected. 2 Connect one end of an HDMI cable to the HDMI1 INPUT or HDMI2 INPUT jack on the back of your...
User Manual (English)
Page 20
... video only. Separate audio cables are required. For more information, see "Connecting a computer using HDMI or DVI: 1 Make sure that your TV/DVD combo is turned off and the power cord is disconnected. 2 Connect one end of an HDMI-to-DVI cable to the HDMI1 INPUT or HDMI2 INPUT jack on the back... combo. 5 Press INPUT on the computer. To connect a computer using HDMI or DVI" on the back of your TV/DVD combo is turned off and the power cord is only required for a DVI connection. 3 If you are connecting to a DVI jack on the computer, connect an audio cable to the VGA AUDIO INPUT...
... video only. Separate audio cables are required. For more information, see "Connecting a computer using HDMI or DVI: 1 Make sure that your TV/DVD combo is turned off and the power cord is disconnected. 2 Connect one end of an HDMI-to-DVI cable to the HDMI1 INPUT or HDMI2 INPUT jack on the back... combo. 5 Press INPUT on the computer. To connect a computer using HDMI or DVI" on the back of your TV/DVD combo is turned off and the power cord is only required for a DVI connection. 3 If you are connecting to a DVI jack on the computer, connect an audio cable to the VGA AUDIO INPUT...
User Manual (English)
Page 21
...a digital sound system To connect a digital sound system: 1 Make sure that your TV/DVD combo is turned off and the power cord is disconnected. 2 Connect a standard audio cable to the AUDIO L/R OUTPUT jacks on the back of your TV/DVD combo, then connect the other end of the cable to the COAXIAL IN... sound system To connect a standard sound system: 1 Make sure that your TV/DVD combo is turned off and the power cord is disconnected. 2 Connect one end of a coaxial cable to the COAXIAL OUTPUT jack on the back of your TV to display the input source menu, then press INPUT repeatedly or press or...
...a digital sound system To connect a digital sound system: 1 Make sure that your TV/DVD combo is turned off and the power cord is disconnected. 2 Connect a standard audio cable to the AUDIO L/R OUTPUT jacks on the back of your TV/DVD combo, then connect the other end of the cable to the COAXIAL IN... sound system To connect a standard sound system: 1 Make sure that your TV/DVD combo is turned off and the power cord is disconnected. 2 Connect one end of a coaxial cable to the COAXIAL OUTPUT jack on the back of your TV to display the input source menu, then press INPUT repeatedly or press or...
User Manual (English)
Page 22
... screen opens. The image is normal when you are using an antenna for channels. If you set up your TV/DVD combo: 1 Make sure that your TV/DVD combo is turned off and the power cord is disconnected. 2 Connect one end of a video cable to the DVD VIDEO OUTPUT jack on the back of... of the cable to the VIDEO INPUT jack on page 10. • Connected the power cord. Notes • • Refer to the owner's manual of TV/DVD combo ~ 120V 60Hz AC INPUT HDMI1 INPUT HDMI2 VGA INPUT ANT. To connect a TV: 1 Make sure that you do not need to scan for standard or HD...
... screen opens. The image is normal when you are using an antenna for channels. If you set up your TV/DVD combo: 1 Make sure that your TV/DVD combo is turned off and the power cord is disconnected. 2 Connect one end of a video cable to the DVD VIDEO OUTPUT jack on the back of... of the cable to the VIDEO INPUT jack on page 10. • Connected the power cord. Notes • • Refer to the owner's manual of TV/DVD combo ~ 120V 60Hz AC INPUT HDMI1 INPUT HDMI2 VGA INPUT ANT. To connect a TV: 1 Make sure that you do not need to scan for standard or HD...
User Manual (English)
Page 23
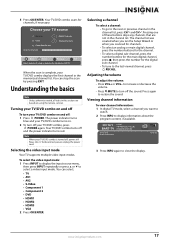
... 1 • Component 2 • DVD • HDMI1 • HDMI2 • HDMI3 • VGA 2 Press OK/ENTER. The power indicator turns blue and your TV source Antenna 0 Cable 0 Cable/Satellite box Scan for channels Digital Channels Analog Channels Move OK Select ENTER MENU Previous EXIT Exit Select Antenna... | R) 05/20/2005 08:00 AM TV-14 / IQ-NL No Event Information Sound On TV-14 / NL 3 Press INFO again to restore the sound. Choose your TV/DVD combo turns on. 2 To turn off the sound. To disconnect power, unplug the power cord. Selecting a channel To select a channel:...
... 1 • Component 2 • DVD • HDMI1 • HDMI2 • HDMI3 • VGA 2 Press OK/ENTER. The power indicator turns blue and your TV source Antenna 0 Cable 0 Cable/Satellite box Scan for channels Digital Channels Analog Channels Move OK Select ENTER MENU Previous EXIT Exit Select Antenna... | R) 05/20/2005 08:00 AM TV-14 / IQ-NL No Event Information Sound On TV-14 / NL 3 Press INFO again to restore the sound. Choose your TV/DVD combo turns on. 2 To turn off the sound. To disconnect power, unplug the power cord. Selecting a channel To select a channel:...


