User Manual (English)
Page 4
... Blocking movies 27 Blocking Canadian TV programs 28 Using downloaded rating information 29 Changing the password 29 Using closed captioning 30 Selecting the closed captioning mode 30 Setting closed captioning styles 30 Adjusting time settings 31 Manually setting the current date and time 32 Setting the sleep timer 32 Setting ...DVD menu 36 Changing the DVD audio language 36 Turning DVD captions on or off 36 Changing the DVD display mode 37 Setting up the TV output 38 Turning the screen saver on and off 38 Using DVD last memory 39 Setting up DVD speaker output 39 Setting up DVD ...
... Blocking movies 27 Blocking Canadian TV programs 28 Using downloaded rating information 29 Changing the password 29 Using closed captioning 30 Selecting the closed captioning mode 30 Setting closed captioning styles 30 Adjusting time settings 31 Manually setting the current date and time 32 Setting the sleep timer 32 Setting ...DVD menu 36 Changing the DVD audio language 36 Turning DVD captions on or off 36 Changing the DVD display mode 37 Setting up the TV output 38 Turning the screen saver on and off 38 Using DVD last memory 39 Setting up DVD speaker output 39 Setting up DVD ...
User Manual (English)
Page 7
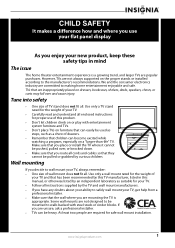
... enjoyable and safe. We and the consumer electronics industry are not always supported on a "larger-than-life" TV. Use only a TV stand rated for safe wall mount installation. TVs that children can become excited while watching a program, especially on the proper stands or installed according to walls ...for proper use your flat panel display As you enjoy your new product, keep these safety tips in this manual, or otherwise listed by an independent laboratory as a chest of your TV. • Carefully read and understand all cords and cables so that you place or install the...
... enjoyable and safe. We and the consumer electronics industry are not always supported on a "larger-than-life" TV. Use only a TV stand rated for safe wall mount installation. TVs that children can become excited while watching a program, especially on the proper stands or installed according to walls ...for proper use your flat panel display As you enjoy your new product, keep these safety tips in this manual, or otherwise listed by an independent laboratory as a chest of your TV. • Carefully read and understand all cords and cables so that you place or install the...
User Manual (English)
Page 16
..., Sylvania, or Zenith. Programming a universal remote control to work with your Insignia TV. Connecting an antenna, cable TV, or satellite TV To connect an antenna, cable TV, or satellite TV: 1 Make sure that matches your TV/DVD combo, then connect the other end of the numbered code below , then... INPUT on the chart, refer to enter the TV code you can operate both your set -top box manufacturer, or call the Insignia Customer Care Center at a time. You will use a different universal remote control that can manually program it . To completely disconnect power, unplug ...
..., Sylvania, or Zenith. Programming a universal remote control to work with your Insignia TV. Connecting an antenna, cable TV, or satellite TV To connect an antenna, cable TV, or satellite TV: 1 Make sure that matches your TV/DVD combo, then connect the other end of the numbered code below , then... INPUT on the chart, refer to enter the TV code you can operate both your set -top box manufacturer, or call the Insignia Customer Care Center at a time. You will use a different universal remote control that can manually program it . To completely disconnect power, unplug ...
User Manual (English)
Page 22
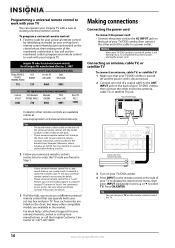
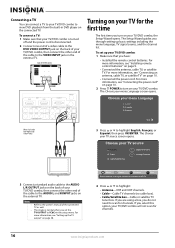
...to the VIDEO INPUT jack on the back of your TV source Antenna Cable Cable/Satellite box 0 Digital Channels 0 Analog Channels TV 3 Connect a standard audio cable to the AUDIO L/R OUTPUT jacks on the external TV. Notes • • Refer to the owner's manual of the cable to the AUDIO L and R ...INPUT jacks on the back of your TV/DVD combo will not scan for channels. The image is disconnected. 2 Connect one end ...
...to the VIDEO INPUT jack on the back of your TV source Antenna Cable Cable/Satellite box 0 Digital Channels 0 Analog Channels TV 3 Connect a standard audio cable to the AUDIO L/R OUTPUT jacks on the external TV. Notes • • Refer to the owner's manual of the cable to the AUDIO L and R ...INPUT jacks on the back of your TV/DVD combo will not scan for channels. The image is disconnected. 2 Connect one end ...
User Manual (English)
Page 27
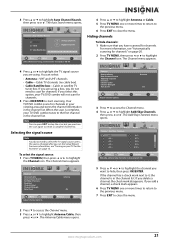
.... If you select this option, your viewing area and stores the channel information in the channel list. When the scan is in your TV/DVD combo tunes to create a complete channel list. The Add/Skip Channels menu opens. Picture Channel • Add/Skip Channels Audio Channel...Settings 4.1 ─ 4.2 ─ 4.3 ─ 4.4 ─ 4.5 ─ 4.6 ─ 4.7 ─ 4.8 ─ 4.9 ─ 4.10 ─ Move OK Select ENTER MENU Previous Manually add and skip channels in the channel list. Note You can select: • Antenna-VHF and UHF channels. • Cable-Cable...
.... If you select this option, your viewing area and stores the channel information in the channel list. When the scan is in your TV/DVD combo tunes to create a complete channel list. The Add/Skip Channels menu opens. Picture Channel • Add/Skip Channels Audio Channel...Settings 4.1 ─ 4.2 ─ 4.3 ─ 4.4 ─ 4.5 ─ 4.6 ─ 4.7 ─ 4.8 ─ 4.9 ─ 4.10 ─ Move OK Select ENTER MENU Previous Manually add and skip channels in the channel list. Note You can select: • Antenna-VHF and UHF channels. • Cable-Cable...

User Manual (English)
Page 37
...OK Select ENTER MENU Previous EXIT Exit If Automatic, options are automatically set by TV source. 4 Press or to highlight a setting, then press or to close the menu. For more information, see "Manually setting the current date and time" on page 32. • Time Zone-... Central, Mountain, Pacific, Alaska, or Hawaii. • Daylight Savings-You can select On or Off. • Time Format-You can manually set automatically using information from a digital channel that broadcasts time information. The Settings menu appears. Settings Parental Controls Time Menu Settings Input Labels ...
...OK Select ENTER MENU Previous EXIT Exit If Automatic, options are automatically set by TV source. 4 Press or to highlight a setting, then press or to close the menu. For more information, see "Manually setting the current date and time" on page 32. • Time Zone-... Central, Mountain, Pacific, Alaska, or Hawaii. • Daylight Savings-You can select On or Off. • Time Format-You can manually set automatically using information from a digital channel that broadcasts time information. The Settings menu appears. Settings Parental Controls Time Menu Settings Input Labels ...
User Manual (English)
Page 38
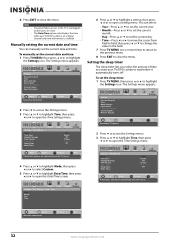
... Settings Input Labels Computer Settings Closed Caption Reset to Factory Picture Audio Channel Settings Move OK Select ENTER Set various TV options. The Settings menu appears. You can manually set the current day. • Time-Press or to move the cursor from field to field, then press ... Date / Time Year Month Day Time Channel Settings 6 Press or to highlight a setting, then press or to highlight the Settings icon. To manually set by TV source. 4 Press or to highlight Mode, then press or to select Custom. 5 Press or to highlight Date/Time, then press or to highlight...
... Settings Input Labels Computer Settings Closed Caption Reset to Factory Picture Audio Channel Settings Move OK Select ENTER Set various TV options. The Settings menu appears. You can manually set the current day. • Time-Press or to move the cursor from field to field, then press ... Date / Time Year Month Day Time Channel Settings 6 Press or to highlight a setting, then press or to highlight the Settings icon. To manually set by TV source. 4 Press or to highlight Mode, then press or to select Custom. 5 Press or to highlight Date/Time, then press or to highlight...


