User Manual (English)
Page 3
...3 Non-active pixels 3 Installing the stand or a wall-mount bracket 4 Installing the stand (NS-LDVD26Q-10A 4 Installing the stand (NS-LDVD32Q-10A 4 Attaching a wall-mount bracket (NS-LDVD26Q-10A 5 Attaching a wall-mount bracket (NS-LDVD32Q-10A 6 TV components 6 Package contents 6 Front 6 Back 7 Remote Control 8 Using the remote control 9 ... TV/DVD combo on and off 17 Selecting the video input mode 17 Selecting a channel 17 Adjusting the volume 17 Viewing channel information 17 Adjusting the picture 18 Adjusting the picture 18 Adjusting advanced video settings 18 Adjusting VGA...
...3 Non-active pixels 3 Installing the stand or a wall-mount bracket 4 Installing the stand (NS-LDVD26Q-10A 4 Installing the stand (NS-LDVD32Q-10A 4 Attaching a wall-mount bracket (NS-LDVD26Q-10A 5 Attaching a wall-mount bracket (NS-LDVD32Q-10A 6 TV components 6 Package contents 6 Front 6 Back 7 Remote Control 8 Using the remote control 9 ... TV/DVD combo on and off 17 Selecting the video input mode 17 Selecting a channel 17 Adjusting the volume 17 Viewing channel information 17 Adjusting the picture 18 Adjusting the picture 18 Adjusting advanced video settings 18 Adjusting VGA...
User Manual (English)
Page 4
... 25 Blocking movies 27 Blocking Canadian TV programs 28 Using downloaded rating information 29 Changing the password 29 Using closed captioning 30 Selecting the closed captioning mode 30 Setting closed captioning styles 30 Adjusting time settings 31 Manually setting the current date and time 32 Setting the sleep timer 32 Setting the...
... 25 Blocking movies 27 Blocking Canadian TV programs 28 Using downloaded rating information 29 Changing the password 29 Using closed captioning 30 Selecting the closed captioning mode 30 Setting closed captioning styles 30 Adjusting time settings 31 Manually setting the current date and time 32 Setting the sleep timer 32 Setting the...

User Manual (English)
Page 9
... an hour before switching it states that are covered by the operating instructions because incorrect adjustment of power source indicated on , or make sure that the room temperature rises gradually....in damage and will form on the screen as practical. Condensation may appear on the TV if the TV is damaged or frayed. • If liquid has been spilled or objects have ...Electrical Code, ANSI/NFPA No. 40 provides guidance for correct grounding. Non-active pixels The LCD panel contains almost 3 million thin film transistors, which provide exceptionally sharp video quality. If ...
... an hour before switching it states that are covered by the operating instructions because incorrect adjustment of power source indicated on , or make sure that the room temperature rises gradually....in damage and will form on the screen as practical. Condensation may appear on the TV if the TV is damaged or frayed. • If liquid has been spilled or objects have ...Electrical Code, ANSI/NFPA No. 40 provides guidance for correct grounding. Non-active pixels The LCD panel contains almost 3 million thin film transistors, which provide exceptionally sharp video quality. If ...
User Manual (English)
Page 13
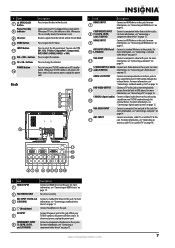
... Press to these jacks to this jack. POWER button 14 Press to this jack. VGA INPUT 11 Connect a computer's video to turn your TV/DVD combo through the external device. AUDIO L/R OUTPUT 13 Connect an analog audio device to these jacks. For more information, see "Connecting a...HDMI2 INPUT 9 Connect an HDMI device to play 15 sound from your TV/DVD combo on page 11. AV1 INPUT (VIDEO and Connect a standard AV device to adjust the volume. 13 CH+/CH- DVD VIDEO OUTPUT 14 Connect a TV to this jack. Press to these jacks. For more information, see...
... Press to these jacks to this jack. POWER button 14 Press to this jack. VGA INPUT 11 Connect a computer's video to turn your TV/DVD combo through the external device. AUDIO L/R OUTPUT 13 Connect an analog audio device to these jacks. For more information, see "Connecting a...HDMI2 INPUT 9 Connect an HDMI device to play 15 sound from your TV/DVD combo on page 11. AV1 INPUT (VIDEO and Connect a standard AV device to adjust the volume. 13 CH+/CH- DVD VIDEO OUTPUT 14 Connect a TV to this jack. Press to these jacks. For more information, see...

User Manual (English)
Page 14
...19 AUDIO 20 21 (eject) INPUT 22 ZOOM 23 CH /CH 24 25 RECALL FAVORITE 26 27 INFO PICTURE 28 29 AUDIO 30 31 EXIT 32 SETUP 33 A-B 34 SLOW 35 RETURN 36 ...fast-reverse or fast-forward on a disc. Press to start or pause disc playback. For more information, see "Adjusting the sound" on page 34. For more information, see "Using a DVD title menu" on or off , power... last viewed channel. Press to change the subtitle language. Press to adjust settings in the on -screen menu. Press to select digital sub-channels. When your TV/DVD combo on page 17. For more information, see "Selecting ...
...19 AUDIO 20 21 (eject) INPUT 22 ZOOM 23 CH /CH 24 25 RECALL FAVORITE 26 27 INFO PICTURE 28 29 AUDIO 30 31 EXIT 32 SETUP 33 A-B 34 SLOW 35 RETURN 36 ...fast-reverse or fast-forward on a disc. Press to start or pause disc playback. For more information, see "Adjusting the sound" on page 34. For more information, see "Using a DVD title menu" on or off , power... last viewed channel. Press to change the subtitle language. Press to adjust settings in the on -screen menu. Press to select digital sub-channels. When your TV/DVD combo on page 17. For more information, see "Selecting ...
User Manual (English)
Page 23
... Select ENTER MENU Previous EXIT Exit Select Antenna if using the remote control. Your TV/DVD combo turns off , power still flows into it. To disconnect power, unplug the power cord. Adjusting the volume To adjust the volume: • Press VOL+ or VOL- Press again to display information... about the program content, if available. 5 Press OK/ENTER. Choose your TV/DVD combo on and off : 1 Press POWER. When the ...
... Select ENTER MENU Previous EXIT Exit Select Antenna if using the remote control. Your TV/DVD combo turns off , power still flows into it. To disconnect power, unplug the power cord. Adjusting the volume To adjust the volume: • Press VOL+ or VOL- Press again to display information... about the program content, if available. 5 Press OK/ENTER. Choose your TV/DVD combo on and off : 1 Press POWER. When the ...

User Manual (English)
Page 24
...Cool Middle Off On Off Move OK Select ENTER MENU Previous Adjust how the picture fills the screen. Adjusting the picture Adjusting the picture To adjust the picture: 1 Press TV MENU, then press or to affect picture quality. TV mode Picture Picture Mode Brightness Contrast Color Tint Sharpness Advanced Video...Channel Settings Vivid 50 70 65 50 55 Move OK Select ENTER MENU Previous Adjust settings to highlight the Picture icon. Note If you adjust Brightness, Contrast, Color, Tint, or Sharpness, your TV/DVD combo automatically changes the Picture Mode to close the menu. EXIT Exit ...
...Cool Middle Off On Off Move OK Select ENTER MENU Previous Adjust how the picture fills the screen. Adjusting the picture Adjusting the picture To adjust the picture: 1 Press TV MENU, then press or to affect picture quality. TV mode Picture Picture Mode Brightness Contrast Color Tint Sharpness Advanced Video...Channel Settings Vivid 50 70 65 50 55 Move OK Select ENTER MENU Previous Adjust settings to highlight the Picture icon. Note If you adjust Brightness, Contrast, Color, Tint, or Sharpness, your TV/DVD combo automatically changes the Picture Mode to close the menu. EXIT Exit ...
User Manual (English)
Page 25
... the screen image right or left. • V.Position-Moves the screen image up or down. • Clock-Adjusts the sample frequency. • Phase-Adjusts the focus to stabilize the image. 5 Press TV MENU one or more times to return to the previous menu. 6 Press EXIT to close the menu. www.insigniaproducts...Note If Auto Zoom is 1360 × 768. 4 Click OK, then click Yes to save your TV/DVD combo is set to Off on the screen, adjust the PC display setting to correspond to adjust the setting or open the Computer Settings menu. The Settings menu appears. 4 Press or to highlight a...
... the screen image right or left. • V.Position-Moves the screen image up or down. • Clock-Adjusts the sample frequency. • Phase-Adjusts the focus to stabilize the image. 5 Press TV MENU one or more times to return to the previous menu. 6 Press EXIT to close the menu. www.insigniaproducts...Note If Auto Zoom is 1360 × 768. 4 Click OK, then click Yes to save your TV/DVD combo is set to Off on the screen, adjust the PC display setting to correspond to adjust the setting or open the Computer Settings menu. The Settings menu appears. 4 Press or to highlight a...
User Manual (English)
Page 26
...the Audio icon. The Audio Only function becomes active about 10 seconds after you press CH and CH , your TV/DVD combo tunes to a secondary audio program, if available. When you adjust Treble, Bass, or Balance, your viewing area and stores the channel information in mono. To automatically scan for... Audio menu appears. The Channel menu appears. Selecting the audio mode You can select On or Off. Adjusting the sound Adjusting the sound To adjust the sound: 1 Press TV MENU, then press or to adjust the setting or open a setting menu. To select the audio mode for the first time" on the...
...the Audio icon. The Audio Only function becomes active about 10 seconds after you press CH and CH , your TV/DVD combo tunes to a secondary audio program, if available. When you adjust Treble, Bass, or Balance, your viewing area and stores the channel information in mono. To automatically scan for... Audio menu appears. The Channel menu appears. Selecting the audio mode You can select On or Off. Adjusting the sound Adjusting the sound To adjust the sound: 1 Press TV MENU, then press or to adjust the setting or open a setting menu. To select the audio mode for the first time" on the...
User Manual (English)
Page 27
...). • Cable/Satellite box-Cable or satellite TV tuner box. Channel Antenna/Cable Auto Channel Search Add/Skip Channels Favorites Channel Label Channel Strength Auto Zoom Picture Audio Channel Settings Antenna On Move OK Select ENTER Adjust channel options. The Auto Search menu opens. If... you add a channel, a check mark appears. 6 Press TV MENU one or more information, see "Turning on your TV/DVD combo tunes to highlight Antenna/Cable, then ...
...). • Cable/Satellite box-Cable or satellite TV tuner box. Channel Antenna/Cable Auto Channel Search Add/Skip Channels Favorites Channel Label Channel Strength Auto Zoom Picture Audio Channel Settings Antenna On Move OK Select ENTER Adjust channel options. The Auto Search menu opens. If... you add a channel, a check mark appears. 6 Press TV MENU one or more information, see "Turning on your TV/DVD combo tunes to highlight Antenna/Cable, then ...
User Manual (English)
Page 28
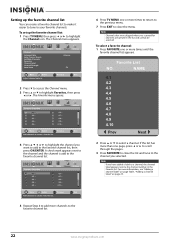
... Antenna/Cable Auto Channel Search Add/Skip Channels Favorites Channel Label Channel Strength Auto Zoom Picture Audio Channel Settings Antenna On Move OK Select ENTER Adjust channel options. Channel • Favorites 4.1 ─ 4.2 ─ 4.3 ─ 4.4 ─ 4.5 ─ Picture Audio Channel Settings 4.6 ─ 4.7 ─ 4.8 &#...page Table , "Adding a channel label," on page 23. 22 www.insigniaproducts.com Setting up the favorite channel list: 1 Press TV MENU, then press or to highlight the Channel icon. The Favorite menu opens. To set up the favorite channel list You can ...
... Antenna/Cable Auto Channel Search Add/Skip Channels Favorites Channel Label Channel Strength Auto Zoom Picture Audio Channel Settings Antenna On Move OK Select ENTER Adjust channel options. Channel • Favorites 4.1 ─ 4.2 ─ 4.3 ─ 4.4 ─ 4.5 ─ Picture Audio Channel Settings 4.6 ─ 4.7 ─ 4.8 &#...page Table , "Adding a channel label," on page 23. 22 www.insigniaproducts.com Setting up the favorite channel list: 1 Press TV MENU, then press or to highlight the Channel icon. The Favorite menu opens. To set up the favorite channel list You can ...
User Manual (English)
Page 29
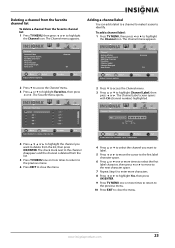
... Antenna/Cable Auto Channel Search Add/Skip Channels Favorites Channel Label Channel Strength Auto Zoom Picture Audio Channel Settings Antenna On Move OK Select ENTER Adjust channel options. Deleting a channel from the favorite channel list To delete a channel from the list, then press OK/ENTER. Adding a channel label... move to the next character space. 7 Repeat Step 6 to enter more characters. 8 Press or to highlight Yes, then press OK/ENTER. 9 Press TV MENU one or more times to return to the previous menu. 10 Press EXIT to close the menu. 2 Press to access the Channel menu. 3 Press...
... Antenna/Cable Auto Channel Search Add/Skip Channels Favorites Channel Label Channel Strength Auto Zoom Picture Audio Channel Settings Antenna On Move OK Select ENTER Adjust channel options. Deleting a channel from the favorite channel list To delete a channel from the list, then press OK/ENTER. Adding a channel label... move to the next character space. 7 Repeat Step 6 to enter more characters. 8 Press or to highlight Yes, then press OK/ENTER. 9 Press TV MENU one or more times to return to the previous menu. 10 Press EXIT to close the menu. 2 Press to access the Channel menu. 3 Press...

User Manual (English)
Page 30
... Channel Search Add/Skip Channels Favorites Channel Label Channel Strength Auto Zoom Picture Audio Channel Settings Antenna On Move OK Select ENTER Adjust channel options. Settings Parental Controls Time Menu Settings Input Labels Computer Settings Closed Caption Reset to highlight Parental Controls, then press or...set to highlight Channel Strength, then press or . The default password is 0000. The Parental Controls menu opens. TV-14 / IQ-NL 14.1 BART-TV Prev TV RATING TV-14 / NL No Description Available 08:00AM-12:00PM Fri, 1-16 2009 Next Enter Password Move OK Select ...
... Channel Search Add/Skip Channels Favorites Channel Label Channel Strength Auto Zoom Picture Audio Channel Settings Antenna On Move OK Select ENTER Adjust channel options. Settings Parental Controls Time Menu Settings Input Labels Computer Settings Closed Caption Reset to highlight Parental Controls, then press or...set to highlight Channel Strength, then press or . The default password is 0000. The Parental Controls menu opens. TV-14 / IQ-NL 14.1 BART-TV Prev TV RATING TV-14 / NL No Description Available 08:00AM-12:00PM Fri, 1-16 2009 Next Enter Password Move OK Select ...

User Manual (English)
Page 36
... menu appears. MENU Previous EXIT Exit 2 Press to access the Settings menu. 3 Press or to highlight Closed Caption, then press or to adjust the setting. 5 Press or to highlight Change Password, then press or to highlight the Settings icon. Using closed captioning Selecting the closed captioning mode...captioning styles for confirmation. 6 Press the number buttons to enter the new password, the enter the new password again to confirm. 7 Press TV MENU one or more times to return to the previous menu. 8 Press EXIT to close the menu. EXIT Exit 30 www.insigniaproducts.com ...
... menu appears. MENU Previous EXIT Exit 2 Press to access the Settings menu. 3 Press or to highlight Closed Caption, then press or to adjust the setting. 5 Press or to highlight Change Password, then press or to highlight the Settings icon. Using closed captioning Selecting the closed captioning mode...captioning styles for confirmation. 6 Press the number buttons to enter the new password, the enter the new password again to confirm. 7 Press TV MENU one or more times to return to the previous menu. 8 Press EXIT to close the menu. EXIT Exit 30 www.insigniaproducts.com ...

User Manual (English)
Page 37
Automatic uses broadcaster's style. Adjusting time settings To adjust time settings: 1 Press TV MENU, then press or to adjust the setting. Move OK Select ENTER Set various TV options. You can select: • Mode-You can select Automatic or Custom. For more information, see "Manually setting the... select Black (Default), White, Red, Blue, Green, Yellow, Magenta, or Cyan. 6 Press TV MENU one or more times to return to the previous menu. 7 Press EXIT to adjust the setting. Settings Parental Controls Time Menu Settings Input Labels Computer Settings Closed Caption Reset to Factory ...
Automatic uses broadcaster's style. Adjusting time settings To adjust time settings: 1 Press TV MENU, then press or to adjust the setting. Move OK Select ENTER Set various TV options. You can select: • Mode-You can select Automatic or Custom. For more information, see "Manually setting the... select Black (Default), White, Red, Blue, Green, Yellow, Magenta, or Cyan. 6 Press TV MENU one or more times to return to the previous menu. 7 Press EXIT to adjust the setting. Settings Parental Controls Time Menu Settings Input Labels Computer Settings Closed Caption Reset to Factory ...

User Manual (English)
Page 39
...EXIT Exit If Automatic, options are automatically set the wake timer: 1 Press TV MENU, then press or to highlight the Settings icon. The Settings menu appears. You can select: • Transparency-Adjust the menu transparency. • Language-Select the menu language. Settings Parental ...Time Menu Settings Input Labels Computer Settings Closed Caption Reset to close the menu. Adjusting menu settings Selecting the menu language and transparency To select the menu language and transparency: 1 Press TV MENU, then press or to highlight the Settings icon. EXIT Exit Picture Audio ...
...EXIT Exit If Automatic, options are automatically set the wake timer: 1 Press TV MENU, then press or to highlight the Settings icon. The Settings menu appears. You can select: • Transparency-Adjust the menu transparency. • Language-Select the menu language. Settings Parental ...Time Menu Settings Input Labels Computer Settings Closed Caption Reset to close the menu. Adjusting menu settings Selecting the menu language and transparency To select the menu language and transparency: 1 Press TV MENU, then press or to highlight the Settings icon. EXIT Exit Picture Audio ...

User Manual (English)
Page 46
...is in DVD mode, press SETUP. TV DISPLAY WIDE TV OUTPUT YPbPr CAPTIONS OFF SCREEN SAVER ON LAST MEMORY OFF GOTO GENERAL SETUP PAGE 2 Press or to highlight DOLBY DIGITAL SETUP, then press OK/ENTER. Using the DVD equalizer You can also adjust the equalizer settings. AUDIO SETUP PAGE ... MIXED MONO, the setting only works when the DVD uses 5.1-channel sound. • D.R.C.-Adjusts the linear compression rate to highlight (audio), then press OK/ENTER. The icon is highlighted. -- If you set up DVD Dolby Digital: 1 While your TV/DVD combo is in DVD mode, press SETUP.
...is in DVD mode, press SETUP. TV DISPLAY WIDE TV OUTPUT YPbPr CAPTIONS OFF SCREEN SAVER ON LAST MEMORY OFF GOTO GENERAL SETUP PAGE 2 Press or to highlight DOLBY DIGITAL SETUP, then press OK/ENTER. Using the DVD equalizer You can also adjust the equalizer settings. AUDIO SETUP PAGE ... MIXED MONO, the setting only works when the DVD uses 5.1-channel sound. • D.R.C.-Adjusts the linear compression rate to highlight (audio), then press OK/ENTER. The icon is highlighted. -- If you set up DVD Dolby Digital: 1 While your TV/DVD combo is in DVD mode, press SETUP.

User Manual (English)
Page 47
...highlight (audio), then press OK/ENTER. Setting up DVD 3D sound To set up DVD 3D sound: 1 While your TV/DVD combo is highlighted. -- TV DISPLAY WIDE TV OUTPUT YPbPr CAPTIONS OFF SCREEN SAVER ON LAST MEMORY OFF GOTO GENERAL SETUP PAGE 2 Press or to highlight CHANNEL EQUALIZER, ...then press OK/ENTER. You can select: • V SURR-Turns virtual surround sound on or off. • REVERB MODE-Selects a reverb mode. 5 Press or to adjust...
...highlight (audio), then press OK/ENTER. Setting up DVD 3D sound To set up DVD 3D sound: 1 While your TV/DVD combo is highlighted. -- TV DISPLAY WIDE TV OUTPUT YPbPr CAPTIONS OFF SCREEN SAVER ON LAST MEMORY OFF GOTO GENERAL SETUP PAGE 2 Press or to highlight CHANNEL EQUALIZER, ...then press OK/ENTER. You can select: • V SURR-Turns virtual surround sound on or off. • REVERB MODE-Selects a reverb mode. 5 Press or to adjust...

User Manual (English)
Page 48
... the menu, press to highlight the icon, then press OK/ENTER. 42 www.insigniaproducts.com The icon is 99999. The VIDEO SETUP PAGE opens. - - TV DISPLAY WIDE TV OUTPUT YPbPr CAPTIONS OFF SCREEN SAVER ON LAST MEMORY OFF GOTO GENERAL SETUP PAGE 2 Press or to highlight an option, then press OK/ENTER... to highlight OFF or ON, then press OK/ENTER. You can select: • PW MODE-Turns the parental lock on or off. Press or to adjust the level, then press OK/ENTER. • BLACK LEVEL-Press or to highlight NORMAL or LIGHTER, then press OK/ENTER. 4 Press one or more times...
... the menu, press to highlight the icon, then press OK/ENTER. 42 www.insigniaproducts.com The icon is 99999. The VIDEO SETUP PAGE opens. - - TV DISPLAY WIDE TV OUTPUT YPbPr CAPTIONS OFF SCREEN SAVER ON LAST MEMORY OFF GOTO GENERAL SETUP PAGE 2 Press or to highlight an option, then press OK/ENTER... to highlight OFF or ON, then press OK/ENTER. You can select: • PW MODE-Turns the parental lock on or off. Press or to adjust the level, then press OK/ENTER. • BLACK LEVEL-Press or to highlight NORMAL or LIGHTER, then press OK/ENTER. 4 Press one or more times...
User Manual (English)
Page 50
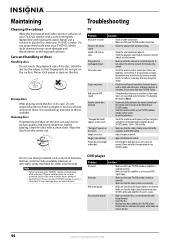
... that fingerprints do not get on . "No Signal" appears on the screen • Make sure that your TV/DVD combo is OK, but no color • Check the color control and adjust it. • Check the program's color features because it may be a black and white movie. It does... combo. Do not spray insecticide near your TV/DVD combo. Never stick paper or tape on an LCD screen are normal. Storing discs After playing, store the disc in the DVD player. If not, adjust the antenna towards the broadcasting station. If all cable connections. • Make sure that the...
... that fingerprints do not get on . "No Signal" appears on the screen • Make sure that your TV/DVD combo is OK, but no color • Check the color control and adjust it. • Check the program's color features because it may be a black and white movie. It does... combo. Do not spray insecticide near your TV/DVD combo. Never stick paper or tape on an LCD screen are normal. Storing discs After playing, store the disc in the DVD player. If not, adjust the antenna towards the broadcasting station. If all cable connections. • Make sure that the...

