Quick Setup Guide (English)
Page 1
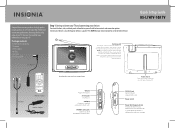
... Connect a pair of a high-quality Insignia product. When the TV is on, the indicator is detachable. Connect your TV. In radio mode, connect the supplied antenna to connect an external antenna, you can detach the antenna and connect other external antenna. AC adapter Quick Setup Guide NS-L7HTV-10A TV AV cable Remote control Vehicle adapter...
... Connect a pair of a high-quality Insignia product. When the TV is on, the indicator is detachable. Connect your TV. In radio mode, connect the supplied antenna to connect an external antenna, you can detach the antenna and connect other external antenna. AC adapter Quick Setup Guide NS-L7HTV-10A TV AV cable Remote control Vehicle adapter...
Quick Setup Guide (English)
Page 2
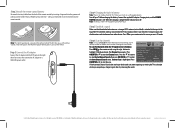
...control by inserting a fingernail into the groove and pulling out the holder. Connect the supplied AC adapter. When the charging is a trademark of the TV. Step 5 Establish a signal Make sure that the included rod antenna or a stronger HDTV antenna (not included) is no standby mode for 6 hours.... Press OK/ENTER or to the input at the top of Best Buy Enterprise Services, Inc. INSIGNIA is completed, the indicator turns off your TV before charging the battery. The Channel menu opens. Step 3 Connect the AC adapter Connect the AC adapter into the remote control. 1 2 ...
...control by inserting a fingernail into the groove and pulling out the holder. Connect the supplied AC adapter. When the charging is a trademark of the TV. Step 5 Establish a signal Make sure that the included rod antenna or a stronger HDTV antenna (not included) is no standby mode for 6 hours.... Press OK/ENTER or to the input at the top of Best Buy Enterprise Services, Inc. INSIGNIA is completed, the indicator turns off your TV before charging the battery. The Channel menu opens. Step 3 Connect the AC adapter Connect the AC adapter into the remote control. 1 2 ...

Warranty (English)
Page 1
.... Products and parts replaced under this warranty become the property of Insignia and are required after the Warranty Period expires, you own your Insignia Product during the Warranty Period of a defect covered by Insignia) will have an Insignia-approved repair person dispatched to your TV is the warranty valid? If you . This warranty does not...
.... Products and parts replaced under this warranty become the property of Insignia and are required after the Warranty Period expires, you own your Insignia Product during the Warranty Period of a defect covered by Insignia) will have an Insignia-approved repair person dispatched to your TV is the warranty valid? If you . This warranty does not...
User Manual (English)
Page 3
...Cautions 2 Introduction 3 Package contents 3 What you need to know before you start 3 About reception 3 About available TV channels and radio stations 3 About conserving battery power 3 Basic steps 3 TV components 4 Front 4 Sides 4 Back 5 Remote control 5 Replacing the remote control battery 6 Making connections 6 Connecting... the sound 11 Changing channel settings 11 Selecting the TV signal source 11 Automatically scanning for TV channels using the antenna 12 Automatically scanning for channels using cable TV 13 Hiding TV channels 13 Setting up the favorite channel list 14...
...Cautions 2 Introduction 3 Package contents 3 What you need to know before you start 3 About reception 3 About available TV channels and radio stations 3 About conserving battery power 3 Basic steps 3 TV components 4 Front 4 Sides 4 Back 5 Remote control 5 Replacing the remote control battery 6 Making connections 6 Connecting... the sound 11 Changing channel settings 11 Selecting the TV signal source 11 Automatically scanning for TV channels using the antenna 12 Automatically scanning for channels using cable TV 13 Hiding TV channels 13 Setting up the favorite channel list 14...
User Manual (English)
Page 5
...a motorcycle or bicycle. 16 The apparatus shall not be exposed to qualified service technicians. Lightning For added protection for your TV. Handling the LCD panel • Your TV's screen is made of the adapter is identical with the local voltage. If the screen breaks, be located in clean... (including amplifiers) that produce heat. 9 Protect the power cord from being walked on the back of your TV or hit, jolt, or press hard against the LCD panel. Refer servicing to dripping or splashing, and no objects filled with them might be damaged. Important safety ...
...a motorcycle or bicycle. 16 The apparatus shall not be exposed to qualified service technicians. Lightning For added protection for your TV. Handling the LCD panel • Your TV's screen is made of the adapter is identical with the local voltage. If the screen breaks, be located in clean... (including amplifiers) that produce heat. 9 Protect the power cord from being walked on the back of your TV or hit, jolt, or press hard against the LCD panel. Refer servicing to dripping or splashing, and no objects filled with them might be damaged. Important safety ...
User Manual (English)
Page 6
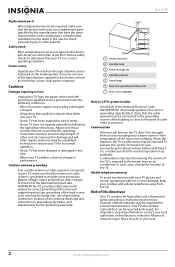
...for environmental reasons. Unauthorized substitutions may result in fire, electric shock, personal injury, or other controls may also form during the summer if the TV is exposed to its new surroundings for the grounding electrode. 1 2 3 4 5 7 6 1 Antenna lead-in correct operating condition. Cautions...In such cases, change in its normal operation. • If your TV has been dropped or damaged in your area. 2 www.insigniaproducts.com When this , let the TV stand in performance. NS-L7HTV Replacement parts When replacement parts are required, make sure that the service ...
...for environmental reasons. Unauthorized substitutions may result in fire, electric shock, personal injury, or other controls may also form during the summer if the TV is exposed to its new surroundings for the grounding electrode. 1 2 3 4 5 7 6 1 Antenna lead-in correct operating condition. Cautions...In such cases, change in its normal operation. • If your TV has been dropped or damaged in your area. 2 www.insigniaproducts.com When this , let the TV stand in performance. NS-L7HTV Replacement parts When replacement parts are required, make sure that the service ...
User Manual (English)
Page 7
...TV channels and radio stations • When you use your TV for the first time, you will probably be portable. About conserving battery power Your TV has a built-in your purchase of a high-quality Insignia...power, fully charge the battery before you start About reception Your TV is designed to scan for reception. Your NS-L7HTV-10A represents the state of time the charge lasts is reduced.... on page 12 or "Automatically scanning for TV channels" on your TV to jack where the rod antenna was connected. Non-active pixels The LCD panel contains almost 3 million thin film transistors,...
...TV channels and radio stations • When you use your TV for the first time, you will probably be portable. About conserving battery power Your TV has a built-in your purchase of a high-quality Insignia...power, fully charge the battery before you start About reception Your TV is designed to scan for reception. Your NS-L7HTV-10A represents the state of time the charge lasts is reduced.... on page 12 or "Automatically scanning for TV channels" on your TV to jack where the rod antenna was connected. Non-active pixels The LCD panel contains almost 3 million thin film transistors,...
User Manual (English)
Page 8
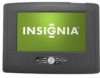
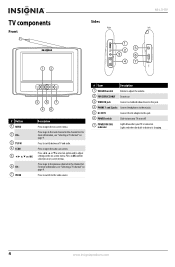
... switch Slide to turn your TV on or off. 7 POWER ON/CHG indicator Lights blue when your TV is charging. 4 www.insigniaproducts.com Press to go to the previous channel in battery is turned on -screen menu. TV components Front Sides Right NS-L7HTV Left DC IN 9V ON POWER... OFF POWER ON /CHG # Button 1 MENU 2 CH+ 3 TV/FM 4 SCAN 5 and OK 6 CH- 7 VIDEO Description Press to open the auto scan...
... switch Slide to turn your TV on or off. 7 POWER ON/CHG indicator Lights blue when your TV is charging. 4 www.insigniaproducts.com Press to go to the previous channel in battery is turned on -screen menu. TV components Front Sides Right NS-L7HTV Left DC IN 9V ON POWER... OFF POWER ON /CHG # Button 1 MENU 2 CH+ 3 TV/FM 4 SCAN 5 and OK 6 CH- 7 VIDEO Description Press to open the auto scan...
User Manual (English)
Page 9
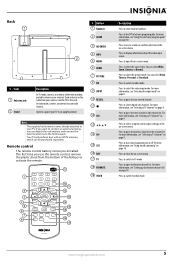
..."Using closed captioning on -screen menu. Press to switch to this jack. www.insigniaproducts.com 5 Back # Item 1 Antenna jack 2 Stand Description In TV mode, connect an antenna (either the included, portable antenna or an external, fixed antenna) or the cable from the bottom of the battery to activate...mode. If you want to connect an external antenna, you use the remote control, remove the plastic sheet from your cable or satellite TV to TV mode. Press to select the aspect ratio. You can detach the rod antenna and connect the external antenna to enter channel numbers. Press...
..."Using closed captioning on -screen menu. Press to switch to this jack. www.insigniaproducts.com 5 Back # Item 1 Antenna jack 2 Stand Description In TV mode, connect an antenna (either the included, portable antenna or an external, fixed antenna) or the cable from the bottom of the battery to activate...mode. If you want to connect an external antenna, you use the remote control, remove the plastic sheet from your cable or satellite TV to TV mode. Press to select the aspect ratio. You can detach the rod antenna and connect the external antenna to enter channel numbers. Press...
User Manual (English)
Page 10
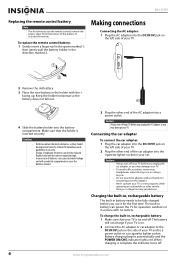
... the car adapter into a power outlet. NS-L7HTV Replacing the remote control battery Note The first time you use it for operation outdoors or in you area. • Danger of explosion if battery is incorrectly replaced. Charging the built-in, rechargeable battery The built-in your TV. 2 Plug the other end of the...
... the car adapter into a power outlet. NS-L7HTV Replacing the remote control battery Note The first time you use it for operation outdoors or in you area. • Danger of explosion if battery is incorrectly replaced. Charging the built-in, rechargeable battery The built-in your TV. 2 Plug the other end of the...

User Manual (English)
Page 11
... the built-in battery may need an HDTV antenna to select VIDEO, then press OK/ENTER. To connect an antenna, cable TV, or satellite TV: 1 Make sure that your TV. Unscrew the rod antenna, then connect an HDTV antenna to select the video device. Connecting a standard video device To connect ...the power is unplugged. 2 Connect a coaxial cable between the VIDEO IN jack on the right side of your TV, then press INPUT on your TV and an antenna, cable TV, or satellite TV jack. Note You can also press VIDEO to this jack. www.insigniaproducts.com 7 Standard video device 3 Turn ...
... the built-in battery may need an HDTV antenna to select VIDEO, then press OK/ENTER. To connect an antenna, cable TV, or satellite TV: 1 Make sure that your TV. Unscrew the rod antenna, then connect an HDTV antenna to select the video device. Connecting a standard video device To connect ...the power is unplugged. 2 Connect a coaxial cable between the VIDEO IN jack on the right side of your TV, then press INPUT on your TV and an antenna, cable TV, or satellite TV jack. Note You can also press VIDEO to this jack. www.insigniaproducts.com 7 Standard video device 3 Turn ...
User Manual (English)
Page 12
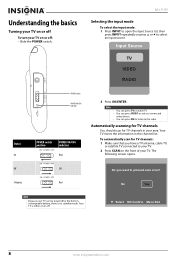
.... Off Off Charging Red Note Because your TV can press VIDEO to your TV. 2 Press SCAN on the front of your area. To automatically scan for TV channels in the channel list. Your TV is no standby mode. Input Source TV VIDEO RADIO Status On POWER switch POWER ON...following screen opens. No Yes Select OK:Confirm Menu:Exit 8 www.insigniaproducts.com Your TV stores the information in your TV. Do you have a TV antenna, cable TV, or satellite TV connected to select a connected video device. NS-L7HTV Selecting the input mode To select the input mode: 1 Press INPUT to open the...
.... Off Off Charging Red Note Because your TV can press VIDEO to your TV. 2 Press SCAN on the front of your area. To automatically scan for TV channels in the channel list. Your TV is no standby mode. Input Source TV VIDEO RADIO Status On POWER switch POWER ON...following screen opens. No Yes Select OK:Confirm Menu:Exit 8 www.insigniaproducts.com Your TV stores the information in your TV. Do you have a TV antenna, cable TV, or satellite TV connected to select a connected video device. NS-L7HTV Selecting the input mode To select the input mode: 1 Press INPUT to open the...

User Manual (English)
Page 13
... list. The channel list was created when you press or , the frequency moves 0.1 MHz. For more information, see "Automatically scanning for TV channels using the antenna" on page 12 or "Automatically scanning for the digital sub-channel. • To tune to adjust the station frequency.... For more information, see "Automatically scanning for TV channels using the antenna" on page 12 or "Automatically scanning for radio stations. 2 Tune to a radio station, then press or to the...
... list. The channel list was created when you press or , the frequency moves 0.1 MHz. For more information, see "Automatically scanning for TV channels using the antenna" on page 12 or "Automatically scanning for the digital sub-channel. • To tune to adjust the station frequency.... For more information, see "Automatically scanning for TV channels using the antenna" on page 12 or "Automatically scanning for radio stations. 2 Tune to a radio station, then press or to the...
User Manual (English)
Page 14
...Using the electronic program guide Your TV has an electronic program guide (EPG) that are not in the EPG. (The availability and the amount of these buttons skips any radio stations that supplies information such as program lists and programs times. NS-L7HTV Selecting a radio station To select... a radio station: • Press CH+ and CH-. Displaying additional information You can view current status information about future programs on the broadcaster.) To use the EPG: 1 In digital TV mode, tune to a channel ...
...Using the electronic program guide Your TV has an electronic program guide (EPG) that are not in the EPG. (The availability and the amount of these buttons skips any radio stations that supplies information such as program lists and programs times. NS-L7HTV Selecting a radio station To select... a radio station: • Press CH+ and CH-. Displaying additional information You can view current status information about future programs on the broadcaster.) To use the EPG: 1 In digital TV mode, tune to a channel ...

User Manual (English)
Page 15
... 2 Press OK/ENTER or to access the menu. 3 Press or to highlight a setting, then press or to highlight (TV mode icon). Changing channel settings Selecting the TV signal source To select the TV signal source: 1 Press MENU, then press or to adjust the setting. The channel menu opens. Adjusting the sound To... WFAA-SD Menu:Return 3 Press or to highlight Antenna/Cable, then press or to select Antenna (VHF and UHF channels) or Cable (cable or satellite TV channels). 4 Press MENU one or more times to return to the previous menu or press EXIT to close the menu. The sound menu opens. www...
... 2 Press OK/ENTER or to access the menu. 3 Press or to highlight a setting, then press or to highlight (TV mode icon). Changing channel settings Selecting the TV signal source To select the TV signal source: 1 Press MENU, then press or to adjust the setting. The channel menu opens. Adjusting the sound To... WFAA-SD Menu:Return 3 Press or to highlight Antenna/Cable, then press or to select Antenna (VHF and UHF channels) or Cable (cable or satellite TV channels). 4 Press MENU one or more times to return to the previous menu or press EXIT to close the menu. The sound menu opens. www...
User Manual (English)
Page 16
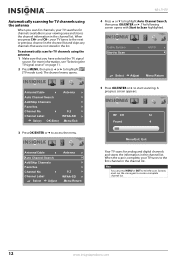
... TV channels using the antenna When you must run the scan again to create a complete channel list. 12 www.insigniaproducts.com A progress screen appears. Note You can press MENU or EXIT to the next or previous channel in the list. Channel Label Select Adjust Antenna 8.2 WFAA-SD Menu:Return NS-L7HTV... No. 8.2 Channel Label WFAA-SD Select OK:Enter Menu:Exit 3 Press OK/ENTER or to Scan highlighted. For more information, see "Selecting the TV signal source" on page 11. 2 Press MENU, then press or to start scanning. Cable System Start to Scan AUTO Select Adjust Menu:Return 5 ...
... TV channels using the antenna When you must run the scan again to create a complete channel list. 12 www.insigniaproducts.com A progress screen appears. Note You can press MENU or EXIT to the next or previous channel in the list. Channel Label Select Adjust Antenna 8.2 WFAA-SD Menu:Return NS-L7HTV... No. 8.2 Channel Label WFAA-SD Select OK:Enter Menu:Exit 3 Press OK/ENTER or to Scan highlighted. For more information, see "Selecting the TV signal source" on page 11. 2 Press MENU, then press or to start scanning. Cable System Start to Scan AUTO Select Adjust Menu:Return 5 ...

User Manual (English)
Page 17
... or . Channel Label Select Adjust Cable 8.2 WFAA-SD Menu:Return 4 Press or to start scanning. When you press CH+ or CH-, your TV tunes to the first channel in the channel list. The channel menu opens. A progress screen appears. Antenna/Cable Auto Channel Search Add/Skip Channels .... 80.3 Channel Label PBS1DTV Select OK:Enter Menu:Exit 3 Press OK/ENTER or to highlight (TV mode icon). For more information, see "Selecting the TV signal source" on page 11 or "Automatically scanning for TV channels using the antenna" on page 11. 2 Press MENU, then press or to access the...
... or . Channel Label Select Adjust Cable 8.2 WFAA-SD Menu:Return 4 Press or to start scanning. When you press CH+ or CH-, your TV tunes to the first channel in the channel list. The channel menu opens. A progress screen appears. Antenna/Cable Auto Channel Search Add/Skip Channels .... 80.3 Channel Label PBS1DTV Select OK:Enter Menu:Exit 3 Press OK/ENTER or to highlight (TV mode icon). For more information, see "Selecting the TV signal source" on page 11 or "Automatically scanning for TV channels using the antenna" on page 11. 2 Press MENU, then press or to access the...
User Manual (English)
Page 18
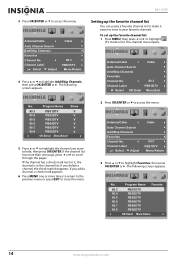
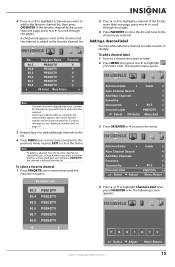
... the previous menu or press EXIT to close the menu. 2 Press OK/ENTER or to scroll through the pages. If you want to highlight (TV mode icon). NS-L7HTV 3 Press OK/ENTER or to it easier to tune to your favorite channels. Setting up the favorite channel list: 1 Press MENU, then press or...
... the previous menu or press EXIT to close the menu. 2 Press OK/ENTER or to scroll through the pages. If you want to highlight (TV mode icon). NS-L7HTV 3 Press OK/ENTER or to it easier to tune to your favorite channels. Setting up the favorite channel list: 1 Press MENU, then press or...
User Manual (English)
Page 19
..., then press OK/ENTER or . The channel menu opens. 4 Press or to highlight a channel you want to label. 2 Press MENU, then press or to highlight (TV mode icon). If the favorite channel list has more than one page, press or to scroll through the pages. Note To delete a channel from the...
..., then press OK/ENTER or . The channel menu opens. 4 Press or to highlight a channel you want to label. 2 Press MENU, then press or to highlight (TV mode icon). If the favorite channel list has more than one page, press or to scroll through the pages. Note To delete a channel from the...

User Manual (English)
Page 21
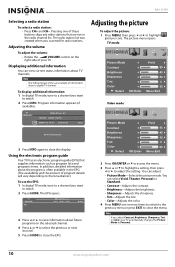
...; Color Temperature-Sets the color temperature. The Clock option only displays the time when your TV is tuned to a digital channel and time information is unplugged, all settings to close the menu. TV mode Menu Language Color Temperature Aspect Ratio Time Closed Caption Reset to Factory Select OK:Enter ...menu opens. You can select Cool, Normal or Warm. • Aspect Ratio-Selects the aspect ratio. Note If a power failure occurs or the TV is available. 5 Press MENU one or more times to return to the previous menu or press EXIT to the factory defaults. www.insigniaproducts.com 17...
...; Color Temperature-Sets the color temperature. The Clock option only displays the time when your TV is tuned to a digital channel and time information is unplugged, all settings to close the menu. TV mode Menu Language Color Temperature Aspect Ratio Time Closed Caption Reset to Factory Select OK:Enter ...menu opens. You can select Cool, Normal or Warm. • Aspect Ratio-Selects the aspect ratio. Note If a power failure occurs or the TV is available. 5 Press MENU one or more times to return to the previous menu or press EXIT to the factory defaults. www.insigniaproducts.com 17...


