
User Manual (English)
Page 1
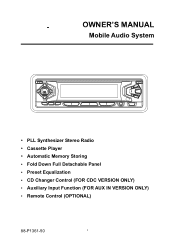
OWNER'S MANUAL Mobile Audio System y PLL Synthesizer Stereo Radio y Cassette Player y Automatic Memory Storing y Fold Down Full Detachable Panel y Preset Equalization y CD Changer Control (FOR CDC VERSION ONLY) y Auxiliary Input Function (FOR AUX IN VERSION ONLY) y Remote Control (OPTIONAL) 88-P1361-50 1
OWNER'S MANUAL Mobile Audio System y PLL Synthesizer Stereo Radio y Cassette Player y Automatic Memory Storing y Fold Down Full Detachable Panel y Preset Equalization y CD Changer Control (FOR CDC VERSION ONLY) y Auxiliary Input Function (FOR AUX IN VERSION ONLY) y Remote Control (OPTIONAL) 88-P1361-50 1
User Manual (English)
Page 2
CONTENTS Installation 3 DIN Front-Mount (Method A 3 DIN Rear-Mount (Method B 4 Using the Detachable Front Panel 5 Wiring Connection 6 4 x 25W or 4 x 40W system 6 4 x 7W or 2 x 25W system 6 2 x 7W system ...7 Operation 8 General Operation 8 Radio Operation 10 Cassette Operation 11 CD Changer Operation (For CD Changer Version Only 11 Specification 12 Trouble Shooting 13 Maintenance 14 Ignition and Interference Noise 15 Caution 15 88-P1361-50 2
CONTENTS Installation 3 DIN Front-Mount (Method A 3 DIN Rear-Mount (Method B 4 Using the Detachable Front Panel 5 Wiring Connection 6 4 x 25W or 4 x 40W system 6 4 x 7W or 2 x 25W system 6 2 x 7W system ...7 Operation 8 General Operation 8 Radio Operation 10 Cassette Operation 11 CD Changer Operation (For CD Changer Version Only 11 Specification 12 Trouble Shooting 13 Maintenance 14 Ignition and Interference Noise 15 Caution 15 88-P1361-50 2
User Manual (English)
Page 3
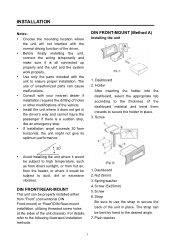
... stop, like an emergency stop. DIN FRONT-MOUNT (Method A) Installing the unit 1. Screw (5x25mm) 5. INSTALLATION Notes: y Choose the mounting location where the unit will not interfere with the normal driving function of the unit in place. y Before finally installing the unit, connect the wiring temporarily and make sure it would be subject to high temperature, such as from direct sunlight, or from hot air, from horizontal...
... stop, like an emergency stop. DIN FRONT-MOUNT (Method A) Installing the unit 1. Screw (5x25mm) 5. INSTALLATION Notes: y Choose the mounting location where the unit will not interfere with the normal driving function of the unit in place. y Before finally installing the unit, connect the wiring temporarily and make sure it would be subject to high temperature, such as from direct sunlight, or from hot air, from horizontal...
User Manual (English)
Page 4
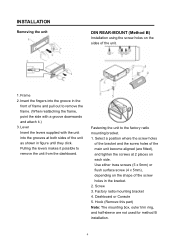
...unit as shown in figure until they click. Hook (Remove this part) Note: The mounting box, outer trim ring, and half-sleeve are fitted), and tighten the screws at both sides of the main unit become aligned (are not used for method B installation...front of the unit. 1. Dashboard or Console 5. Lever Insert the levers supplied with a groove downwards and attach it possible to the factory radio mounting bracket. 1. Pulling the levers makes it .) 3. Factory radio mounting bracket 4. INSTALLATION Removing the unit DIN REAR-MOUNT (Method B) Installation using the screw holes...
...unit as shown in figure until they click. Hook (Remove this part) Note: The mounting box, outer trim ring, and half-sleeve are fitted), and tighten the screws at both sides of the main unit become aligned (are not used for method B installation...front of the unit. 1. Dashboard or Console 5. Lever Insert the levers supplied with a groove downwards and attach it possible to the factory radio mounting bracket. 1. Pulling the levers makes it .) 3. Factory radio mounting bracket 4. INSTALLATION Removing the unit DIN REAR-MOUNT (Method B) Installation using the screw holes...
User Manual (English)
Page 5
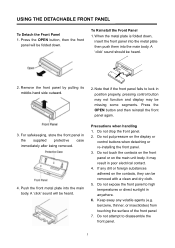
... main body. A 'click' sound will be folded down , insert the front panel into the metal plate then push them into the main body. USING THE DETACHABLE FRONT PANEL To Detach the Front Panel 1. Do not touch the contacts on the front panel or on the display or control buttons when detaching or re-installing the front panel. 3. Keep away any dirt...
... main body. A 'click' sound will be folded down , insert the front panel into the metal plate then push them into the main body. USING THE DETACHABLE FRONT PANEL To Detach the Front Panel 1. Do not touch the contacts on the front panel or on the display or control buttons when detaching or re-installing the front panel. 3. Keep away any dirt...

User Manual (English)
Page 6
WIRING CONNECTION 6
WIRING CONNECTION 6

User Manual (English)
Page 7
WIRING CONNECTION 7
WIRING CONNECTION 7

User Manual (English)
Page 8
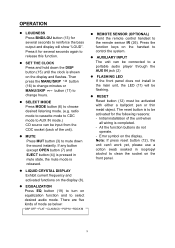
... of VFD. When system is possible to turn off the unit. Press it is on , press button (9) to adjust the desired sound quality. 8 z FACEPLATE RELEASE Press OPEN button (7) to select the desired adjustment mode. z SOUND ADJUSTMENT Press SEL button (10) shortly to fold down the front panel. The adjustment mode will change in the following order: Volume Bass Treble Balance Fader By rotating the AUDIO ADJ knob (10), it for several seconds...
... of VFD. When system is possible to turn off the unit. Press it is on , press button (9) to adjust the desired sound quality. 8 z FACEPLATE RELEASE Press OPEN button (7) to select the desired adjustment mode. z SOUND ADJUSTMENT Press SEL button (10) shortly to fold down the front panel. The adjustment mode will change in the following order: Volume Bass Treble Balance Fader By rotating the AUDIO ADJ knob (10), it for several seconds...
User Manual (English)
Page 9
... activated functions on the display. If any button (except OPEN button (7) and EJECT button (4)) is pressed in mute state, the mute mode is completed. - z RESET Reset button (12) must be flashing. Error symbol on the display (8). radio mode to cassette mode to CDC mode to AUX IN mode.) CD source can 't work yet, please use a cotton swab soaked in the main unit, the LED (11) will show "LOUD". Press the function keys on equalization function and to select desired audio mode. Initial installation...
... activated functions on the display. If any button (except OPEN button (7) and EJECT button (4)) is pressed in mute state, the mute mode is completed. - z RESET Reset button (12) must be flashing. Error symbol on the display (8). radio mode to cassette mode to CDC mode to AUX IN mode.) CD source can 't work yet, please use a cotton swab soaked in the main unit, the LED (11) will show "LOUD". Press the function keys on equalization function and to select desired audio mode. Initial installation...
User Manual (English)
Page 10
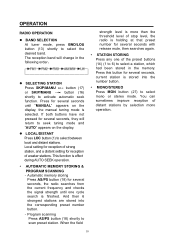
y AUTOMATIC MEMORY STORING & PROGRAM SCANNING - When the field strength level is more than the threshold level of stop level, the radio is effect during AUTO SEEK operation. You can sometimes improve reception of weaker stations. The reception band will return to seek tuning mode and "AUTO" appears on the display, the manual tuning mode is stored into the corresponding preset number button. - This function is holding at that preset number for several seconds...
y AUTOMATIC MEMORY STORING & PROGRAM SCANNING - When the field strength level is more than the threshold level of stop level, the radio is effect during AUTO SEEK operation. You can sometimes improve reception of weaker stations. The reception band will return to seek tuning mode and "AUTO" appears on the display, the manual tuning mode is stored into the corresponding preset number button. - This function is holding at that preset number for several seconds...

User Manual (English)
Page 11
... repeat all tracks on display. Track number shows on the current disc in random order. For Auto Reverse Version: Push down to the previous track or the following track. Press and hold RPT button (22) for several seconds of the tape. - OPERATION CASSETTE OPERATION z PROGRAM BUTTON (FOR AUTO- Press and hold SCN button (21) for several seconds to play mode. Press it again...
... repeat all tracks on display. Track number shows on the current disc in random order. For Auto Reverse Version: Push down to the previous track or the following track. Press and hold RPT button (22) for several seconds of the tape. - OPERATION CASSETTE OPERATION z PROGRAM BUTTON (FOR AUTO- Press and hold SCN button (21) for several seconds to play mode. Press it again...
User Manual (English)
Page 12
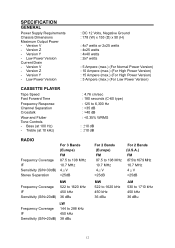
... watts : 2x7 watts : 5 Ampere (max.) (For Normal Power Version) : 10 Ampere (max.) (For High Power Version) : 15 Ampere (max.) (For High Power Version) : 3 Ampere (max.) (For Low Power Version) CASSETTE PLAYER Tape Speed Fast Forward Time Frequency Response Channel Separation Crosstalk Wow and Flutter Tone Controls - SPECIFICATION GENERAL Power Supply Requirements Chassis Dimensions Maximum Output Power - Low Power Version Current Drain - Version Y - Version Z - Version...
... watts : 2x7 watts : 5 Ampere (max.) (For Normal Power Version) : 10 Ampere (max.) (For High Power Version) : 15 Ampere (max.) (For High Power Version) : 3 Ampere (max.) (For Low Power Version) CASSETTE PLAYER Tape Speed Fast Forward Time Frequency Response Channel Separation Crosstalk Wow and Flutter Tone Controls - SPECIFICATION GENERAL Power Supply Requirements Chassis Dimensions Maximum Output Power - Low Power Version Current Drain - Version Y - Version Z - Version...
User Manual (English)
Page 13
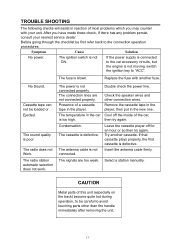
... the antenna cable firmly. Select a station manually. Before going through the checklist be first refer back to avoid touching parts other connection wires. The ignition switch is defective. The radio station automatic selection does not work. Check the speaker wires and other than the handle immediately after removing the unit. 13 then try again. Condensation. Try another fuse. TROUBLE SHOOTING The following checks will assist in reaction of most problems...
... the antenna cable firmly. Select a station manually. Before going through the checklist be first refer back to avoid touching parts other connection wires. The ignition switch is defective. The radio station automatic selection does not work. Check the speaker wires and other than the handle immediately after removing the unit. 13 then try again. Condensation. Try another fuse. TROUBLE SHOOTING The following checks will assist in reaction of most problems...
User Manual (English)
Page 14
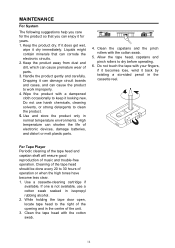
...work improperly. 4. While holding the tape door open, locate tape head to dry before operating. 6. Use and store the product only in the centre of the opening and in normal temperature environments. For Tape Player Periodic cleaning of the tape head... and capstan shaft will ensure good reproduction of the tape head should be done every 20 to keep it dry immediately. MAINTENANCE For System The following suggestions help you can enjoy it for the product so that can corrode the electronic circuits. 2. Keep the product dry. Cleaning of music and trouble-free operation...
...work improperly. 4. While holding the tape door open, locate tape head to dry before operating. 6. Use and store the product only in the centre of the opening and in normal temperature environments. For Tape Player Periodic cleaning of the tape head... and capstan shaft will ensure good reproduction of the tape head should be done every 20 to keep it dry immediately. MAINTENANCE For System The following suggestions help you can enjoy it for the product so that can corrode the electronic circuits. 2. Keep the product dry. Cleaning of music and trouble-free operation...
User Manual (English)
Page 15
... not touch the high-polished playback head with the speed of the engine. Interference Radio reception in a moving environment (automobile) is not subject to 30 inches. FM reception is just the opposite of these problems, ALWAYS FINE TUNE a station, and if possible, set the antenna height to environmental noise and it will deteriorate when passing through the power source.
... not touch the high-polished playback head with the speed of the engine. Interference Radio reception in a moving environment (automobile) is not subject to 30 inches. FM reception is just the opposite of these problems, ALWAYS FINE TUNE a station, and if possible, set the antenna height to environmental noise and it will deteriorate when passing through the power source.


