User Manual (English)
Page 1
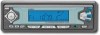
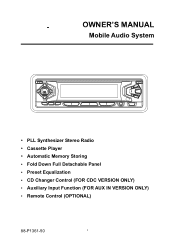
OWNER'S MANUAL Mobile Audio System y PLL Synthesizer Stereo Radio y Cassette Player y Automatic Memory Storing y Fold Down Full Detachable Panel y Preset Equalization y CD Changer Control (FOR CDC VERSION ONLY) y Auxiliary Input Function (FOR AUX IN VERSION ONLY) y Remote Control (OPTIONAL) 88-P1361-50 1
OWNER'S MANUAL Mobile Audio System y PLL Synthesizer Stereo Radio y Cassette Player y Automatic Memory Storing y Fold Down Full Detachable Panel y Preset Equalization y CD Changer Control (FOR CDC VERSION ONLY) y Auxiliary Input Function (FOR AUX IN VERSION ONLY) y Remote Control (OPTIONAL) 88-P1361-50 1
User Manual (English)
Page 2
CONTENTS Installation 3 DIN Front-Mount (Method A 3 DIN Rear-Mount (Method B 4 Using the Detachable Front Panel 5 Wiring Connection 6 4 x 25W or 4 x 40W system 6 4 x 7W or 2 x 25W system 6 2 x 7W system ...7 Operation 8 General Operation 8 Radio Operation 10 Cassette Operation 11 CD Changer Operation (For CD Changer Version Only 11 Specification 12 Trouble Shooting 13 Maintenance 14 Ignition and Interference Noise 15 Caution 15 88-P1361-50 2
CONTENTS Installation 3 DIN Front-Mount (Method A 3 DIN Rear-Mount (Method B 4 Using the Detachable Front Panel 5 Wiring Connection 6 4 x 25W or 4 x 40W system 6 4 x 7W or 2 x 25W system 6 2 x 7W system ...7 Operation 8 General Operation 8 Radio Operation 10 Cassette Operation 11 CD Changer Operation (For CD Changer Version Only 11 Specification 12 Trouble Shooting 13 Maintenance 14 Ignition and Interference Noise 15 Caution 15 88-P1361-50 2
User Manual (English)
Page 4
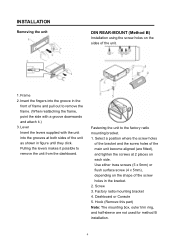
... at 2 places on each side. Lever Insert the levers supplied with a groove downwards and attach it possible to the factory radio mounting bracket. 1. Screw 3. Pulling the levers makes it .) 3. Frame 2. Factory radio mounting bracket 4. INSTALLATION Removing the unit DIN REAR-MOUNT (Method B) Installation using the screw holes on the sides of the...
... at 2 places on each side. Lever Insert the levers supplied with a groove downwards and attach it possible to the factory radio mounting bracket. 1. Screw 3. Pulling the levers makes it .) 3. Frame 2. Factory radio mounting bracket 4. INSTALLATION Removing the unit DIN REAR-MOUNT (Method B) Installation using the screw holes on the sides of the...
User Manual (English)
Page 9
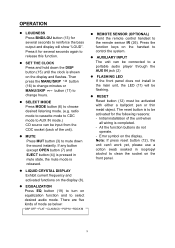
... keys on equalization function and to select desired audio mode. Press it for several seconds to reinforce the bass output and display will be flashing. radio mode to cassette mode to CDC mode to AUX IN mode.) CD source can be input from the CDC socket (back of mode as below...
... keys on equalization function and to select desired audio mode. Press it for several seconds to reinforce the bass output and display will be flashing. radio mode to cassette mode to CDC mode to AUX IN mode.) CD source can be input from the CDC socket (back of mode as below...
User Manual (English)
Page 10
.... - When the field strength level is more than the threshold level of stop level, the radio is effect during AUTO SEEK operation. Press this button for several seconds, the radio searches from the current frequency and checks the signal strength until "MANUAL" appears on the display.... number button. y AUTOMATIC MEMORY STORING & PROGRAM SCANNING - Program scanning Press AS/PS button (18) shortly to select the desired band. OPERATION RADIO OPERATION z BAND SELECTION At tuner mode, press BND/LOU button (13) shortly to scan preset station. If both buttons have not pressed for ...
.... - When the field strength level is more than the threshold level of stop level, the radio is effect during AUTO SEEK operation. Press this button for several seconds, the radio searches from the current frequency and checks the signal strength until "MANUAL" appears on the display.... number button. y AUTOMATIC MEMORY STORING & PROGRAM SCANNING - Program scanning Press AS/PS button (18) shortly to select the desired band. OPERATION RADIO OPERATION z BAND SELECTION At tuner mode, press BND/LOU button (13) shortly to scan preset station. If both buttons have not pressed for ...
User Manual (English)
Page 12
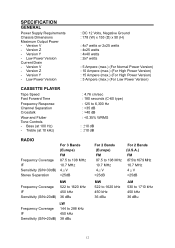
Low Power Version : DC 12 Volts, Negative Ground : 178 (W) x 155 (D) x 50 (H) : 4x7 watts or 2x25 watts : 4x25 watts : 4x40 watts : 2x7 watts : 5 Ampere (max.) (For Normal Power Version) : 10 Ampere (max.) (For High Power Version) : 15 Ampere (max.) (For High Power Version) : 3 Ampere (max.) (For Low Power Version) CASSETTE PLAYER Tape Speed Fast Forward Time Frequency Response Channel Separation Crosstalk Wow and Flutter Tone Controls - Bass (at 10 kHz) : 4.76 cm/sec : 180 seconds (C-60 type) : 125 to 6,300 Hz : >35 dB : >40 dB : 25dB Frequency Coverage IF Sensitivity (S/N=20dB) ...
Low Power Version : DC 12 Volts, Negative Ground : 178 (W) x 155 (D) x 50 (H) : 4x7 watts or 2x25 watts : 4x25 watts : 4x40 watts : 2x7 watts : 5 Ampere (max.) (For Normal Power Version) : 10 Ampere (max.) (For High Power Version) : 15 Ampere (max.) (For High Power Version) : 3 Ampere (max.) (For Low Power Version) CASSETTE PLAYER Tape Speed Fast Forward Time Frequency Response Channel Separation Crosstalk Wow and Flutter Tone Controls - Bass (at 10 kHz) : 4.76 cm/sec : 180 seconds (C-60 type) : 125 to 6,300 Hz : >35 dB : >40 dB : 25dB Frequency Coverage IF Sensitivity (S/N=20dB) ...
User Manual (English)
Page 13
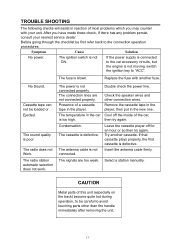
...the car Cool off for an hour or so then try again. The cassette is not connected. The antenna cable is defective. The radio does not Work. If the power supply is connected to the car accessory circuits, but the engine is not moving, switch the ignition... is blown. Select a station manually. The connection lines are too weak. After you may counter with another cassette. Try another fuse. The radio station automatic selection does not work. The signals are not connected properly. Presence of a cassette tape in the new one. Replace the fuse with...
...the car Cool off for an hour or so then try again. The cassette is not connected. The antenna cable is defective. The radio does not Work. If the power supply is connected to the car accessory circuits, but the engine is not moving, switch the ignition... is blown. Select a station manually. The connection lines are too weak. After you may counter with another cassette. Try another fuse. The radio station automatic selection does not work. The signals are not connected properly. Presence of a cassette tape in the new one. Replace the fuse with...
User Manual (English)
Page 15
... will vary in reception is very important to the ignition system (engine). Also, noise can block the FM signal. 15 Interference Radio reception in a stationary (home). FM reception is very different from passing automobiles. It is subject to environmental noise, it does ...height to eliminate most of the noise that broadcasting signals follow the curvature of AM. IGNITION AND INTERFERENCE NOISE Ignition The most CB/A mateur radio or electronic supply shops. Your unit has built-in a vehicle having a positive ground system. 2. However, with any metallic or magnetic ...
... will vary in reception is very important to the ignition system (engine). Also, noise can block the FM signal. 15 Interference Radio reception in a stationary (home). FM reception is very different from passing automobiles. It is subject to environmental noise, it does ...height to eliminate most of the noise that broadcasting signals follow the curvature of AM. IGNITION AND INTERFERENCE NOISE Ignition The most CB/A mateur radio or electronic supply shops. Your unit has built-in a vehicle having a positive ground system. 2. However, with any metallic or magnetic ...


