
User Manual (English)
Page 1
... Player Model # I-PD720, User's Guide TABLE OF CONTENTS 2 SAFETY PRECAUTIONS Power Sources Player Placement For Safety Lens and pickup maintenance When using headphones 4 IMPORTANT SAFETY INSTRUCTIONS 5 INSIGNIA FEATURES 6 WHAT'S WHAT Player Remote Control 8 PLAYER CONNECTIONS AC adapter Headphones Connecting to a TV Connecting to a TV and audio amplifier 10 BEFORE YOU BEGIN Using... in or out Program play Shuffle or random play Digest play 31 MP3 OPERATION 32 ADDITIONAL TOPICS Accessories Handling discs Troubleshooting Technical specifications Using the battery pack - 1 -
... Player Model # I-PD720, User's Guide TABLE OF CONTENTS 2 SAFETY PRECAUTIONS Power Sources Player Placement For Safety Lens and pickup maintenance When using headphones 4 IMPORTANT SAFETY INSTRUCTIONS 5 INSIGNIA FEATURES 6 WHAT'S WHAT Player Remote Control 8 PLAYER CONNECTIONS AC adapter Headphones Connecting to a TV Connecting to a TV and audio amplifier 10 BEFORE YOU BEGIN Using... in or out Program play Shuffle or random play Digest play 31 MP3 OPERATION 32 ADDITIONAL TOPICS Accessories Handling discs Troubleshooting Technical specifications Using the battery pack - 1 -

User Manual (English)
Page 2
... adapter is identical to operate the product. Power Sources This product operates using the supplied AC adapter, car adapter and rechargeable batteries. When connecting with the wider slot in hazardous radiation exposure. CAUTION: To prevent electric shock, make sure the AC adapter is...important operating and maintenance instructions. To prevent direct exposure to rain or moisture. NOTE: If the product requires servicing, contact Best Buy or Insignia customer service. To avoid electrical shock, do not touch the AC adapter with liquids, such as vases, on the adapter, not the cord...
... adapter is identical to operate the product. Power Sources This product operates using the supplied AC adapter, car adapter and rechargeable batteries. When connecting with the wider slot in hazardous radiation exposure. CAUTION: To prevent electric shock, make sure the AC adapter is...important operating and maintenance instructions. To prevent direct exposure to rain or moisture. NOTE: If the product requires servicing, contact Best Buy or Insignia customer service. To avoid electrical shock, do not touch the AC adapter with liquids, such as vases, on the adapter, not the cord...

User Manual (English)
Page 6
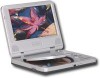
WHAT'S WHAT DVD Player (1) TFT LCD MONITOR (2) SPEAKERS (3) OPEN TRAY BUTTON (4) POWER ON/BATTERY CHARGING INDICATOR (5) REMOTE CONTROL SENSOR (6) PLAY (7) PAUSE (8) STOP (9) DIRECTION BUTTONS (10) ENTER (11) PREV/NEXT SKIP (12) RETURN (13) TOP MENU (14) MENU (15) MONITOR AND +, (16) VOLUME CONTROL (17) HEADPHONE 2 (18) HEADPHONE 1 (19) AV OUT (20) VIDEO OUT/TFT (SLIDE SWITCH)* (21) COAXIAL OUT (22) DC IN (23) POWER ON/OFF *The slide switch can only be set when power is OFF. - 6 -
WHAT'S WHAT DVD Player (1) TFT LCD MONITOR (2) SPEAKERS (3) OPEN TRAY BUTTON (4) POWER ON/BATTERY CHARGING INDICATOR (5) REMOTE CONTROL SENSOR (6) PLAY (7) PAUSE (8) STOP (9) DIRECTION BUTTONS (10) ENTER (11) PREV/NEXT SKIP (12) RETURN (13) TOP MENU (14) MENU (15) MONITOR AND +, (16) VOLUME CONTROL (17) HEADPHONE 2 (18) HEADPHONE 1 (19) AV OUT (20) VIDEO OUT/TFT (SLIDE SWITCH)* (21) COAXIAL OUT (22) DC IN (23) POWER ON/OFF *The slide switch can only be set when power is OFF. - 6 -

User Manual (English)
Page 8
PLAYER CONNECTIONS AC adapter (A) The player can operate or charge batteries using the supplied AC adapter. 1. The POWER ON/BATTERY CHARGING INDICATOR light will appear, and the product is ready for use. Insert headphone plug into the player's DC IN jack. 2. Insert the DC adapter plug into one of the two headphone jacks. 2. Headphones (B) 1. Insert the AC adapter into an AC wall outlet. Note: Turn off the product before unplugging the AC adapter to avoid damage. Note: Turn off the power when inserting or removing headphones. - 8 -
PLAYER CONNECTIONS AC adapter (A) The player can operate or charge batteries using the supplied AC adapter. 1. The POWER ON/BATTERY CHARGING INDICATOR light will appear, and the product is ready for use. Insert headphone plug into the player's DC IN jack. 2. Insert the DC adapter plug into one of the two headphone jacks. 2. Headphones (B) 1. Insert the AC adapter into an AC wall outlet. Note: Turn off the product before unplugging the AC adapter to avoid damage. Note: Turn off the power when inserting or removing headphones. - 8 -

User Manual (English)
Page 10
The remote's range is 5 meters (16 feet), with a 60° acceptance angle. 3. Remove the batteries if remote control will not be used for about one year. Playable Discs - 10 - Open the remote control battery compartment, insert batteries, and close the compartment, as in illustration. 2. Batteries last for a long time. When using the remote control, point it at the remote sensor on the front of the player. If the remote control does not work, replace the batteries. 4. BEFORE YOU BEGIN Using the remote control 1. Install batteries.
The remote's range is 5 meters (16 feet), with a 60° acceptance angle. 3. Remove the batteries if remote control will not be used for about one year. Playable Discs - 10 - Open the remote control battery compartment, insert batteries, and close the compartment, as in illustration. 2. Batteries last for a long time. When using the remote control, point it at the remote sensor on the front of the player. If the remote control does not work, replace the batteries. 4. BEFORE YOU BEGIN Using the remote control 1. Install batteries.

User Manual (English)
Page 32
Do not attach paper or tape to the disc. Store the disc in a disc case after playback. ADDITIONAL TOPICS Accessories The following accessories are included with clean cloth. - 32 - Cleaning Discs Before playing wipe the disc outwards from direct sunlight or heat sources. Keep the disc away from the center with your player. (1) AV cable (1) Remote control (1) Owner's manual (1) AC power adapter (1) Rechargeable battery pack (1) Warranty card (1) Car cigarette adapter Handling discs To keep your discs clean, do not touch the play side of the disc.
Do not attach paper or tape to the disc. Store the disc in a disc case after playback. ADDITIONAL TOPICS Accessories The following accessories are included with clean cloth. - 32 - Cleaning Discs Before playing wipe the disc outwards from direct sunlight or heat sources. Keep the disc away from the center with your player. (1) AV cable (1) Remote control (1) Owner's manual (1) AC power adapter (1) Rechargeable battery pack (1) Warranty card (1) Car cigarette adapter Handling discs To keep your discs clean, do not touch the play side of the disc.

User Manual (English)
Page 33
... and no disc in the wall socket. Check if the volume of TV. Moisture has condensed in , disconnect the AC adapter. Replace the batteries with the label side up. Troubleshooting If you experience the following problems while using headphone. Check if the wall socket has power (Some wall sockets...when using the product, this troubleshooting guide can help you have selected DVD player position on the disc tray properly with new ones. If the battery and AC adapter are both plugged in the product. Please select the correct TV TYPE until TV shows normal color. - 33 - No ...
... and no disc in the wall socket. Check if the volume of TV. Moisture has condensed in , disconnect the AC adapter. Replace the batteries with the label side up. Troubleshooting If you experience the following problems while using headphone. Check if the wall socket has power (Some wall sockets...when using the product, this troubleshooting guide can help you have selected DVD player position on the disc tray properly with new ones. If the battery and AC adapter are both plugged in the product. Please select the correct TV TYPE until TV shows normal color. - 33 - No ...

User Manual (English)
Page 34
...×29mm 825 g (1.8 lb) This manual is intended for your reference. Make sure that is turned OFF. 2. Insert the battery pack's catches into the player's corresponding holes. Any change to the design and specifications will charge only when the POWER to the player... when using it. This product incorporates copyright protection technology that the battery pack is attached firmly to the player is protected by following these directions. Then, slide the battery pack until it . Reverse engineering or disassembly is illuminated. Technical specifications Laser ...
...×29mm 825 g (1.8 lb) This manual is intended for your reference. Make sure that is turned OFF. 2. Insert the battery pack's catches into the player's corresponding holes. Any change to the design and specifications will charge only when the POWER to the player... when using it. This product incorporates copyright protection technology that the battery pack is attached firmly to the player is protected by following these directions. Then, slide the battery pack until it . Reverse engineering or disassembly is illuminated. Technical specifications Laser ...
User Manual (English)
Page 35
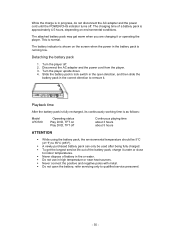
... negative poles with metal. Turn the player upside down. 4. Playback time After the battery pack is fully recharged, its continuously working time is as follows: Model I-PD720 Operating status Play DVD, TFT on the screen when the power in the battery pack is approximately 4.5 hours, depending on environmental conditions. Do not use in...
... negative poles with metal. Turn the player upside down. 4. Playback time After the battery pack is fully recharged, its continuously working time is as follows: Model I-PD720 Operating status Play DVD, TFT on the screen when the power in the battery pack is approximately 4.5 hours, depending on environmental conditions. Do not use in...


