
Installation Guide
Page 1
...IBM systems management software and IBM ServeRAID programs Go to register and profile your server, view the publications on the Documentation CD. Go to the Server Support flowchart to the Web for instructions, http://www.ibm.com/support System is based on the IBM Web site at: http://www.ibm... features superior performance, availability, and scalability. This server Installation Guide contains information for buying an IBM System x server. You can also find the most current information about your server. System x3950 Type 8872 and System x3950 E Type 8874 Installation...
...IBM systems management software and IBM ServeRAID programs Go to register and profile your server, view the publications on the Documentation CD. Go to the Server Support flowchart to the Web for instructions, http://www.ibm.com/support System is based on the IBM Web site at: http://www.ibm... features superior performance, availability, and scalability. This server Installation Guide contains information for buying an IBM System x server. You can also find the most current information about your server. System x3950 Type 8872 and System x3950 E Type 8874 Installation...
Installation Guide
Page 2
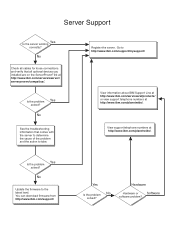
... server. No Update the firmware to take. Go to http://www.ibm.com/support/mysupport/ View information about IBM Support Line at http://www.ibm.com/services/sl/products/ or view support telephone numbers at http://www.ibm.com/planetwide/. Hardware Hardware or Software software problem? Is the problem... devices you installed are on the ServerProven list at http://www.ibm.com/servers/eserver/ serverproven/compat/us/. View support telephone numbers at http://www.ibm.com/planetwide/. You can download firmware from http://www.ibm.com/support/ Yes Is the problem No solved? No Check...
... server. No Update the firmware to take. Go to http://www.ibm.com/support/mysupport/ View information about IBM Support Line at http://www.ibm.com/services/sl/products/ or view support telephone numbers at http://www.ibm.com/planetwide/. Hardware Hardware or Software software problem? Is the problem... devices you installed are on the ServerProven list at http://www.ibm.com/servers/eserver/ serverproven/compat/us/. View support telephone numbers at http://www.ibm.com/planetwide/. You can download firmware from http://www.ibm.com/support/ Yes Is the problem No solved? No Check...

Installation Guide
Page 5
...IBM Corp. 2006 iii Introduction 1 The IBM Documentation CD 2 Hardware and software requirements 2 Using the Documentation Browser 2 Notices and statements in this document 3 Features and specifications 4 Major components of the server 6 Chapter 2. Contents Safety v Chapter 1. Server controls, connectors, LEDs, and power 31 Front view 31 Rear view...configuration 22 SMP Expansion cabling 23 Chapter 3. Installing options 7 Installation guidelines 7 System reliability guidelines 7 Working inside the server with the power on the server 35 Turning off the server 35 Chapter...
...IBM Corp. 2006 iii Introduction 1 The IBM Documentation CD 2 Hardware and software requirements 2 Using the Documentation Browser 2 Notices and statements in this document 3 Features and specifications 4 Major components of the server 6 Chapter 2. Contents Safety v Chapter 1. Server controls, connectors, LEDs, and power 31 Front view 31 Rear view...configuration 22 SMP Expansion cabling 23 Chapter 3. Installing options 7 Installation guidelines 7 System reliability guidelines 7 Working inside the server with the power on the server 35 Turning off the server 35 Chapter...

Installation Guide
Page 10
...with optical instruments, and avoid direct exposure to more than those specified herein might result in exposure to hazardous laser radiation. viii IBM System x3950 Type 8872 and System x3950 E Type 8874: Installation Guide Statement 3: CAUTION: When laser products (such as required by local ordinances or regulations. Statement ... only IBM Part Number 33F8354 or an equivalent type battery recommended by the same manufacturer. There are installed, note the following . Do not stare into water v Heat to the beam. Do not: v Throw or immerse into the beam, do not view directly with...
...with optical instruments, and avoid direct exposure to more than those specified herein might result in exposure to hazardous laser radiation. viii IBM System x3950 Type 8872 and System x3950 E Type 8874: Installation Guide Statement 3: CAUTION: When laser products (such as required by local ordinances or regulations. Statement ... only IBM Part Number 33F8354 or an equivalent type battery recommended by the same manufacturer. There are installed, note the following . Do not stare into water v Heat to the beam. Do not: v Throw or immerse into the beam, do not view directly with...

Installation Guide
Page 14
.... 2 IBM System x3950 Type 8872 and System x3950 E Type 8874: Installation Guide The IBM Documentation CD The IBM Documentation CD contains documentation for the server in the language for complete rack installation and removal instructions. v 32 MB of the documents, and view documents using Adobe Acrobat Reader or xpdf. Use one of supported options for that region (if available). The...
.... 2 IBM System x3950 Type 8872 and System x3950 E Type 8874: Installation Guide The IBM Documentation CD The IBM Documentation CD contains documentation for the server in the language for complete rack installation and removal instructions. v 32 MB of the documents, and view documents using Adobe Acrobat Reader or xpdf. Use one of supported options for that region (if available). The...

Installation Guide
Page 15
...the instruction or situation in which damage could occur. The Available Topics list displays all the documents, type a word or word string in which is on the IBM Documentation CD. When you select a document, a description of... from the Product menu. Each statement is placed just before the description of the following procedures: - Click a document to view it . v Caution: These statements indicate situations that appear in this document: v Note: These notices provide important tips,...the word or word string appears are using a Windows operating system, insert the CD into the drive;
...the instruction or situation in which damage could occur. The Available Topics list displays all the documents, type a word or word string in which is on the IBM Documentation CD. When you select a document, a description of... from the Product menu. Each statement is placed just before the description of the following procedures: - Click a document to view it . v Caution: These statements indicate situations that appear in this document: v Note: These notices provide important tips,...the word or word string appears are using a Windows operating system, insert the CD into the drive;

Installation Guide
Page 34
... port 3 Front view Power-control button USB connector Mouse Keyboard IXA RS 485 Gigabit Ethernet 2 Gigabit Ethernet 1 Information LED Release latch Power-on the IBM Documentation CD. See the documentation that you must install. You might receive a message that the configuration has changed. Detailed cabling instructions are available to 22 IBM System x3950 Type 8872 and System x3950 E Type...
... port 3 Front view Power-control button USB connector Mouse Keyboard IXA RS 485 Gigabit Ethernet 2 Gigabit Ethernet 1 Information LED Release latch Power-on the IBM Documentation CD. See the documentation that you must install. You might receive a message that the configuration has changed. Detailed cabling instructions are available to 22 IBM System x3950 Type 8872 and System x3950 E Type...

Installation Guide
Page 43
... Power-control button Information LED USB connector Release latch Power-on LED Hard disk drive activity LED Locator LED System-error LED The following controls, connectors, and LEDs are on the operator information panel: v USB connector: Connect...this button to turn the server on the operator information panel. v Power-control button: Press this connector. Front view The following illustration shows the controls and LEDs on and off manually. Hard disk drive activity LED: On some ..., and connectors on the light path diagnostics panel © Copyright IBM Corp. 2006 31
... Power-control button Information LED USB connector Release latch Power-on LED Hard disk drive activity LED Locator LED System-error LED The following controls, connectors, and LEDs are on the operator information panel: v USB connector: Connect...this button to turn the server on the operator information panel. v Power-control button: Press this connector. Front view The following illustration shows the controls and LEDs on and off manually. Hard disk drive activity LED: On some ..., and connectors on the light path diagnostics panel © Copyright IBM Corp. 2006 31

Installation Guide
Page 45
... the rear of the server. SP Ethernet 10/100 activity LED: This LED is an active connection on the Ethernet port. Rear view The following illustration shows the connectors and LEDs on the SP Ethernet 10/100 connector. When this connector. SP Serial connector: Connect ...indicates that there is a problem with the Remote Supervisor Adapter II SlimLine. When this connector. Server controls, connectors, LEDs, and power 33 System serial connector: Connect a 9-pin serial device to this LED is lit continuously, it indicates that there is activity on the SP Ethernet 10...
... the rear of the server. SP Ethernet 10/100 activity LED: This LED is an active connection on the Ethernet port. Rear view The following illustration shows the connectors and LEDs on the SP Ethernet 10/100 connector. When this connector. SP Serial connector: Connect ...indicates that there is a problem with the Remote Supervisor Adapter II SlimLine. When this connector. Server controls, connectors, LEDs, and power 33 System serial connector: Connect a 9-pin serial device to this LED is lit continuously, it indicates that there is activity on the SP Ethernet 10...

Installation Guide
Page 49
... Setup and Installation CD, complete the following configuration programs to : a. Follow the instructions on the IBM Documentation CD. For information about your operating system and adapter. Use this CD during the initial installation of the BIOS code. View the overview to : v Change interrupt request (IRQ) settings v Change the startup drive sequence v Configure serial...
... Setup and Installation CD, complete the following configuration programs to : a. Follow the instructions on the IBM Documentation CD. For information about your operating system and adapter. Use this CD during the initial installation of the BIOS code. View the overview to : v Change interrupt request (IRQ) settings v Change the startup drive sequence v Configure serial...

Installation Guide
Page 50
Follow the instructions on the server. 2. You can remotely view and change the BIOS settings, restart the server, identify the server, and perform other management functions. Updating and configuring the BIOS ... through the IPMI 2.0 protocol. Configure the BIOS settings: 38 IBM System x3950 Type 8872 and System x3950 E Type 8874: Installation Guide You can also save one or more information about IPMI 2.0, see the Intelligent Platform Management Interface Specification (IPMI Specification), version 2.0, available at http://www.intel.com. Enabling and configuring SOL using the...
Follow the instructions on the server. 2. You can remotely view and change the BIOS settings, restart the server, identify the server, and perform other management functions. Updating and configuring the BIOS ... through the IPMI 2.0 protocol. Configure the BIOS settings: 38 IBM System x3950 Type 8872 and System x3950 E Type 8874: Installation Guide You can also save one or more information about IPMI 2.0, see the Intelligent Platform Management Interface Specification (IPMI Specification), version 2.0, available at http://www.intel.com. Enabling and configuring SOL using the...

Installation Guide
Page 60
... and remotely manage a network. Insert the OSA BMC Management Utility CD into the diskette drive and restart the server. 48 IBM System x3950 Type 8872 and System x3950 E Type 8874: Installation Guide Follow the prompts to download the utility program; When the installation is the release level being ...file for a TCP/IP port number and an IP address. Go to http://www.ibm.com/support/ to complete the installation. then, copy the bmc_cfg.exe file to view or change the baseboard management controller configuration settings. Using the baseboard management controller configuration utility...
... and remotely manage a network. Insert the OSA BMC Management Utility CD into the diskette drive and restart the server. 48 IBM System x3950 Type 8872 and System x3950 E Type 8874: Installation Guide Follow the prompts to download the utility program; When the installation is the release level being ...file for a TCP/IP port number and an IP address. Go to http://www.ibm.com/support/ to complete the installation. then, copy the bmc_cfg.exe file to view or change the baseboard management controller configuration settings. Using the baseboard management controller configuration utility...

Installation Guide
Page 61
...operating-system update package that is available from a command-line interface. Use the following commands in CLI mode: - sysinfo Display general system information that is related to remotely perform power-management and system identification... power Turn the server on and off remotely. - connect Connect to remotely view the BMC system event log. 2. Using the OSA SMBridge management utility program Use the OSA ...not affect any device drivers. If you have installed the OSA device driver and IBM Mapping layer, the update can also use SOL to remotely perform control and ...
...operating-system update package that is available from a command-line interface. Use the following commands in CLI mode: - sysinfo Display general system information that is related to remotely perform power-management and system identification... power Turn the server on and off remotely. - connect Connect to remotely view the BMC system event log. 2. Using the OSA SMBridge management utility program Use the OSA ...not affect any device drivers. If you have installed the OSA device driver and IBM Mapping layer, the update can also use SOL to remotely perform control and ...

Installation Guide
Page 63
... partitions. Chapter 4. The multi-node configuration uses a single, contiguous memory space and provides access to create a scalable partition. Each scalable system can communicate with the procedure to all nodes to an ac power source and make sure that the Web Interface is open to create, delete... the current level of BIOS code, SAS BIOS code, service processor firmware, BMC firmware, and CPLD firmware. Access the network used to view, create, delete, or manage scalable partitions. Configuring the server 51 Make sure that the service processor on and power-off each node. Note...
... partitions. Chapter 4. The multi-node configuration uses a single, contiguous memory space and provides access to create a scalable partition. Each scalable system can communicate with the procedure to all nodes to an ac power source and make sure that the Web Interface is open to create, delete... the current level of BIOS code, SAS BIOS code, service processor firmware, BMC firmware, and CPLD firmware. Access the network used to view, create, delete, or manage scalable partitions. Configuring the server 51 Make sure that the service processor on and power-off each node. Note...

Installation Guide
Page 64
In the navigation pane, click Create Partition. Use the Create Partition page to view information about the current and new scalable partitions. 6. In the navigation pane, click Status under Scalable Partitioning. A page similar to the one in the ... Host Name or IP Address field, type the host name or Remote Supervisor Adapter II Slimline IP address for all nodes, click Assign. 52 IBM System x3950 Type 8872 and System x3950 E Type 8874: Installation Guide A page similar to the one in the following illustration is assigned the associated chassis ID. Only perform this step ...
In the navigation pane, click Create Partition. Use the Create Partition page to view information about the current and new scalable partitions. 6. In the navigation pane, click Status under Scalable Partitioning. A page similar to the one in the ... Host Name or IP Address field, type the host name or Remote Supervisor Adapter II Slimline IP address for all nodes, click Assign. 52 IBM System x3950 Type 8872 and System x3950 E Type 8874: Installation Guide A page similar to the one in the following illustration is assigned the associated chassis ID. Only perform this step ...

Installation Guide
Page 65
... field, select the number of memory in the following illustration is detected during POST on the monitor attached to the primary node. You can view the merge status during full merge. c. Chapter 4. A page similar to merge resources. In the On merge failure, attempt partial merge? ... the Scalable Partition Members field, select the nodes that will be assigned to define the scalable partition. Configuring the server 53 You can view the merge status on the monitor attached to the primary node. You can select all nodes or select individual nodes. Click Create. e....
... field, select the number of memory in the following illustration is detected during POST on the monitor attached to the primary node. You can view the merge status during full merge. c. Chapter 4. A page similar to merge resources. In the On merge failure, attempt partial merge? ... the Scalable Partition Members field, select the nodes that will be assigned to define the scalable partition. Configuring the server 53 You can view the merge status on the monitor attached to the primary node. You can select all nodes or select individual nodes. Click Create. e....

Installation Guide
Page 84
.... The ServerGuide program will not start the operating-system CD. Run the ServerGuide program and make sure that the operating system is supported on the hard disk. Make sure that setup is complete. 72 IBM System x3950 Type 8872 and System x3950 E Type 8874: Installation Guide v The serial ...label for a list of operating-system versions that there are no logical drive defined (SCSI RAID systems) available. v If an action step is preceded by "(Trained service technician only)," that step must be performed only by the ServerGuide program. view all installed drives, or the v...
.... The ServerGuide program will not start the operating-system CD. Run the ServerGuide program and make sure that the operating system is supported on the hard disk. Make sure that setup is complete. 72 IBM System x3950 Type 8872 and System x3950 E Type 8874: Installation Guide v The serial ...label for a list of operating-system versions that there are no logical drive defined (SCSI RAID systems) available. v If an action step is preceded by "(Trained service technician only)," that step must be performed only by the ServerGuide program. view all installed drives, or the v...
Installation Guide
Page 86
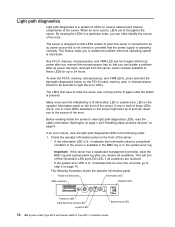
...the server is connected to 24 hours. To view the PCI-X, memory, microprocessor, and VRM LEDs, press and hold the light-path-diagnostics button on LED Hard disk drive activity LED Locator LED System-error LED 74 IBM System x3950 Type 8872 and System x3950 E Type 8874: Installation Guide If one ... first indicated by a lit information LED or system-error LED on the operator information panel on , provided that information about a suboptimal condition in the server is available in the BMC log or in a particular order, you to view light path diagnostics LEDs, read the safety information...
...the server is connected to 24 hours. To view the PCI-X, memory, microprocessor, and VRM LEDs, press and hold the light-path-diagnostics button on LED Hard disk drive activity LED Locator LED System-error LED 74 IBM System x3950 Type 8872 and System x3950 E Type 8874: Installation Guide If one ... first indicated by a lit information LED or system-error LED on the operator information panel on , provided that information about a suboptimal condition in the server is available in the BMC log or in a particular order, you to view light path diagnostics LEDs, read the safety information...

Installation Guide
Page 87
... the LEDs on the microprocessor tray. Solving problems 75 Remove the server cover and look inside the server have LEDs that has occurred. 2. Chapter 6. To view the light path diagnostics panel, press the release latch on the front of internal components that correspond to the failing VRM on the light path... REMIND OVER SPEC PS LINK CPU VRM LOG MEM NMI PCI SP DASD RAID NONRED TEMP FAN PCI CPU I/O BRD BRD BRD Look at the system service label on the microprocessor tray.
... the LEDs on the microprocessor tray. Solving problems 75 Remove the server cover and look inside the server have LEDs that has occurred. 2. Chapter 6. To view the light path diagnostics panel, press the release latch on the front of internal components that correspond to the failing VRM on the light path... REMIND OVER SPEC PS LINK CPU VRM LOG MEM NMI PCI SP DASD RAID NONRED TEMP FAN PCI CPU I/O BRD BRD BRD Look at the system service label on the microprocessor tray.
Installation Guide
Page 102
... baseboard management controller utility programs 48 integrated functions 5 intermittent problems 62 K keyboard connector 33 keyboard problems 62 L LEDs light path diagnostic panel 75 light path, viewing without power 74 microprocessor tray assembly 75 operator information panel 74 PCI-X board 76 LEDs, light path CPU BRD 80 I/O BRD 80 PCI BRD 80... 50 sysinfo 50 serial port problems 71 SerialSelect Utility program 50 ServeRAID configuration programs 50 ServerGuide 37 error symptoms 72 ServerGuide CD 1 size 5 slots 5 90 IBM System x3950 Type 8872 and System x3950 E Type 8874: Installation Guide
... baseboard management controller utility programs 48 integrated functions 5 intermittent problems 62 K keyboard connector 33 keyboard problems 62 L LEDs light path diagnostic panel 75 light path, viewing without power 74 microprocessor tray assembly 75 operator information panel 74 PCI-X board 76 LEDs, light path CPU BRD 80 I/O BRD 80 PCI BRD 80... 50 sysinfo 50 serial port problems 71 SerialSelect Utility program 50 ServeRAID configuration programs 50 ServerGuide 37 error symptoms 72 ServerGuide CD 1 size 5 slots 5 90 IBM System x3950 Type 8872 and System x3950 E Type 8874: Installation Guide
