Hardware Maintenance Manual
Page 5
... the cover Types 8301 and 8302 . . . . 71 Removing the CD-ROM drive Types 8301 and 8302 71 © Copyright IBM Corp. 2001 Front bezel Types 8307, 8308, 8310, 8311, 8314, and 8315 72 Replacing a microprocessor 72 Hard disk drive removal 73 Types 8303, 8304, and 8312... options 39 Removing the cover 40 Locating components 42 Identifying parts on LAN 265 BIOS levels 265 Flash update procedures 265 Flash from Operating System (WinPhlash). . . 266 Flash from CD-ROM ISO image 266 Flash recovery boot block jumper 267 Power management 269 Automatic configuration and power interface (ACPI...
... the cover Types 8301 and 8302 . . . . 71 Removing the CD-ROM drive Types 8301 and 8302 71 © Copyright IBM Corp. 2001 Front bezel Types 8307, 8308, 8310, 8311, 8314, and 8315 72 Replacing a microprocessor 72 Hard disk drive removal 73 Types 8303, 8304, and 8312... options 39 Removing the cover 40 Locating components 42 Identifying parts on LAN 265 BIOS levels 265 Flash update procedures 265 Flash from Operating System (WinPhlash). . . 266 Flash from CD-ROM ISO image 266 Flash recovery boot block jumper 267 Power management 269 Automatic configuration and power interface (ACPI...
Hardware Maintenance Manual
Page 88
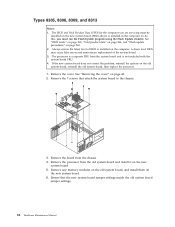
...the old system board, then replace the processor. 1. Remove the processor from the old system board and install it is installed in the computer. The BIOS and Vital Product Data (VPD) for the computer you must be installed on the new system board (FRU) after it on the computer. Remove the... diskette. If the new system board does not correct the problem, reinstall the options on page 40. 2. See "BIOS levels" on page 265, "Vital product data" on page 264, and "Flash update procedures" on the new system board. 6. Remove the board from the system board and is installed on the new ...
...the old system board, then replace the processor. 1. Remove the processor from the old system board and install it is installed in the computer. The BIOS and Vital Product Data (VPD) for the computer you must be installed on the new system board (FRU) after it on the computer. Remove the... diskette. If the new system board does not correct the problem, reinstall the options on page 40. 2. See "BIOS levels" on page 265, "Vital product data" on page 264, and "Flash update procedures" on the new system board. 6. Remove the board from the system board and is installed on the new ...
Hardware Maintenance Manual
Page 95
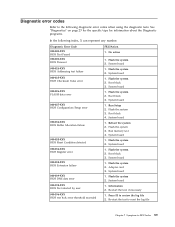
...block 3. Flash the system 2. Flash the system 3. Diagnostic Error Code 000-000-XXX BIOS Test Passed 000-002-XXX BIOS Timeout 000-024-XXX BIOS Addressing test failure 000-025-XXX BIOS Checksum Value error 000-026-XXX FLASH data error 000-027-XXX BIOS Configuration/Setup error 000-034-XXX BIOS Buffer ...Allocation failure 000-035-XXX BIOS Reset Condition detected...
...block 3. Flash the system 2. Flash the system 3. Diagnostic Error Code 000-000-XXX BIOS Test Passed 000-002-XXX BIOS Timeout 000-024-XXX BIOS Addressing test failure 000-025-XXX BIOS Checksum Value error 000-026-XXX FLASH data error 000-027-XXX BIOS Configuration/Setup error 000-034-XXX BIOS Buffer ...Allocation failure 000-035-XXX BIOS Reset Condition detected...

Hardware Maintenance Manual
Page 96
... unknown 000-250-XXX BIOS APM failure 000-270-XXX BIOS ACPI failure 001-000-XXX System Test Passed 001-00X-XXX System Error 001-01X-XXX System Error 001-024-XXX System Addressing test failure 001-025-XXX System Checksum Value error 001-026-XXX System FLASH data error 001-027-XXX...
... unknown 000-250-XXX BIOS APM failure 000-270-XXX BIOS ACPI failure 001-000-XXX System Test Passed 001-00X-XXX System Error 001-01X-XXX System Error 001-024-XXX System Addressing test failure 001-025-XXX System Checksum Value error 001-026-XXX System FLASH data error 001-027-XXX...

Hardware Maintenance Manual
Page 99
Flash the system 2. Video card, if installed 2. System board 1. System board 1. System board 1. ... 005-032-XXX Video Device Controller failure 005-036-XXX Video Register error 005-038-XXX System BIOS extension failure 005-040-XXX Video IRQ failure 005-195-XXX Video Test aborted by user 005-...-XXX Video test halt, error threshold exceeded FRU/Action 1. Video card, if installed 2. Re-start the test, if necessary 1. Video Ram 2. System board 1. System board 1. System board 1. System board 1. Video drivers update 3. System board 1. Video card, if installed...
Flash the system 2. Video card, if installed 2. System board 1. System board 1. System board 1. ... 005-032-XXX Video Device Controller failure 005-036-XXX Video Register error 005-038-XXX System BIOS extension failure 005-040-XXX Video IRQ failure 005-195-XXX Video Test aborted by user 005-...-XXX Video test halt, error threshold exceeded FRU/Action 1. Video card, if installed 2. Re-start the test, if necessary 1. Video Ram 2. System board 1. System board 1. System board 1. System board 1. Video drivers update 3. System board 1. Video card, if installed...
Hardware Maintenance Manual
Page 117
...Memory 2. System Board 3. L2 Cache Memory 3. System Board 1. If not, suspect that device. 3. Check System Summary menu for the BIOS level needed, then perform the flash update. 2. Processor Chapter 7. CMOS Backup Battery (see "Safety information" on page 271) 3. System Board 1. CMOS Backup Battery (...mismatch 163 Date and Time Incorrect 164 Memory Size Error 166 Boot Block Check Sum Error 167 No Processor BIOS Update Found FRU/Action 1. Riser card 4. See "Flash recovery boot block jumper" on page 271) 3. Run Setup and verify Configuration 2. Time and Date ...
...Memory 2. System Board 3. L2 Cache Memory 3. System Board 1. If not, suspect that device. 3. Check System Summary menu for the BIOS level needed, then perform the flash update. 2. Processor Chapter 7. CMOS Backup Battery (see "Safety information" on page 271) 3. System Board 1. CMOS Backup Battery (...mismatch 163 Date and Time Incorrect 164 Memory Size Error 166 Boot Block Check Sum Error 167 No Processor BIOS Update Found FRU/Action 1. Riser card 4. See "Flash recovery boot block jumper" on page 271) 3. Run Setup and verify Configuration 2. Time and Date ...

Hardware Maintenance Manual
Page 271
...POST errors v Operating system or POST hang condition Alert on LAN provides notification of BIOS installed. IBM Home Page http://www.ibm.com/pc/us / 2. IBM Home Page http://www.ibm.com/pc/us / 2. Working with DMI and Wake on LAN technologies, Alert ...to determine the current level of BIOS installed in the computer, the latest BIOS available for obtaining the latest level BIOS available 1. Additional Service Information 265 v Current Level BIOS information - Levels 1 and 2 Support To update (flash) the BIOS, see "Flash update procedures." v Sources for configuration...
...POST errors v Operating system or POST hang condition Alert on LAN provides notification of BIOS installed. IBM Home Page http://www.ibm.com/pc/us / 2. IBM Home Page http://www.ibm.com/pc/us / 2. Working with DMI and Wake on LAN technologies, Alert ...to determine the current level of BIOS installed in the computer, the latest BIOS available for obtaining the latest level BIOS available 1. Additional Service Information 265 v Current Level BIOS information - Levels 1 and 2 Support To update (flash) the BIOS, see "Flash update procedures." v Sources for configuration...

Hardware Maintenance Manual
Page 272
... been delivered successfully.″ 10. Click Start, then click Run. 13. Select Backup BIOS and Flash BIOS with a message stating ″The specified output folder does not exist. Flash from CD-ROM ISO image Attention: Refer to the information label located inside the system ...Click I Agree. Create it?″ 9. When prompted, select a drive and directory in which to save the downloaded file. 3. Click Flash BIOS. The system will automatically shutdown and restart so that the changes will locate the 24jyNNusa.exe file you just downloaded. 5. The installation folder ...
... been delivered successfully.″ 10. Click Start, then click Run. 13. Select Backup BIOS and Flash BIOS with a message stating ″The specified output folder does not exist. Flash from CD-ROM ISO image Attention: Refer to the information label located inside the system ...Click I Agree. Create it?″ 9. When prompted, select a drive and directory in which to save the downloaded file. 3. Click Flash BIOS. The system will automatically shutdown and restart so that the changes will locate the 24jyNNusa.exe file you just downloaded. 5. The installation folder ...

Hardware Maintenance Manual
Page 273
... error or displays a picture of the ISO image is lost, so a normal flash update has to be prompted with your keyboard which corresponds to "Types 8307, 8308, 8310, 8311, 8314, and 8315" on the Flash/BIOS update process done after a boot block recovery process to re-enter this process,... machine type and serial number data stored in the BIOS is 24J9nnA.ISO. 13. Press N. To perform a Flash/BIOS recovery using the computer...
... error or displays a picture of the ISO image is lost, so a normal flash update has to be prompted with your keyboard which corresponds to "Types 8307, 8308, 8310, 8311, 8314, and 8315" on the Flash/BIOS update process done after a boot block recovery process to re-enter this process,... machine type and serial number data stored in the BIOS is 24J9nnA.ISO. 13. Press N. To perform a Flash/BIOS recovery using the computer...
Hardware Maintenance Manual
Page 274
...-enter machine type and serial number data using the procedure provided below: Flash/BIOS Update process to update the data. 4. Type the 7-digit Serial Number...of your system. When the boot block recovery process is older than (or same as it . The IBM Logo will make a beep sound and will also be prompted to enter it starts reading from the floppy...the computer (keeping power button pressed for a few seconds of the computer and press enter. 5. When the Flash Update Utility appears, select the country/keyboard, then press enter. 3. Follow the onscreen instructions to continue. 8....
...-enter machine type and serial number data using the procedure provided below: Flash/BIOS Update process to update the data. 4. Type the 7-digit Serial Number...of your system. When the boot block recovery process is older than (or same as it . The IBM Logo will make a beep sound and will also be prompted to enter it starts reading from the floppy...the computer (keeping power button pressed for a few seconds of the computer and press enter. 5. When the Flash Update Utility appears, select the country/keyboard, then press enter. 3. Follow the onscreen instructions to continue. 8....


