User Guide
Page 3
Infoprint 1332/1352/1372 Power-On Self Test (POST 2-34 Symptom tables 2-35 Base printer symptoms 2-35 High-capacity feeder (2000-sheet) symptoms 2-35 Paper tray symptoms 2-36 Duplex option symptoms 2-36 Envelope feeder symptoms 2-36 Output expander 2-36 ...output stacker service check 2-62 Input sensor service check 2-64 Input tray(s) service check 2-64 Internal tray card/paper size sensing service check 2-66 Main drive service check 2-68 Main fan service check 2-69 Operator panel service check 2-70 Operator panel buttons service check 2-70 Operator panel display service check 2-...
Infoprint 1332/1352/1372 Power-On Self Test (POST 2-34 Symptom tables 2-35 Base printer symptoms 2-35 High-capacity feeder (2000-sheet) symptoms 2-35 Paper tray symptoms 2-36 Duplex option symptoms 2-36 Envelope feeder symptoms 2-36 Output expander 2-36 ...output stacker service check 2-62 Input sensor service check 2-64 Input tray(s) service check 2-64 Internal tray card/paper size sensing service check 2-66 Main drive service check 2-68 Main fan service check 2-69 Operator panel service check 2-70 Operator panel buttons service check 2-70 Operator panel display service check 2-...
User Guide
Page 5
... removal 4-12 Laser cover removal 4-14 Bevel gear removal 4-16 Installation 4-17 Communications board removal 4-18 Cover closed switch/cable removal 4-19 Developer drive assembly removal ...4-20 Frames removals 4-20 EP frame assembly 4-20 Left side frame 4-20 Right side frame 4-22 Table of contents vi Check MP Feeder 3-25 Error Message 260 Paper Jam - Check Stapler 3-26 Error Message 283 - Infoprint 1332...Option 3-21 Option microcode 3-22 Paper feed jams 3-22 Paper jams-base printer 3-23 Paper jams-options 3-24 Error Message 23x Paper Jam - Check ...
... removal 4-12 Laser cover removal 4-14 Bevel gear removal 4-16 Installation 4-17 Communications board removal 4-18 Cover closed switch/cable removal 4-19 Developer drive assembly removal ...4-20 Frames removals 4-20 EP frame assembly 4-20 Left side frame 4-20 Right side frame 4-22 Table of contents vi Check MP Feeder 3-25 Error Message 260 Paper Jam - Check Stapler 3-26 Error Message 283 - Infoprint 1332...Option 3-21 Option microcode 3-22 Paper feed jams 3-22 Paper jams-base printer 3-23 Paper jams-options 3-24 Error Message 23x Paper Jam - Check ...
User Guide
Page 6
Infoprint 1332/1352/1372 Fuser assembly removal 4-23 Fuser cover removal 4-25 Fuser exit sensor or fuser narrow media sensor removal 4-28 Fuser lamp removal 4-28 Fuser ... assembly removal 4-38 Interconnect board assembly removal 4-40 Internal tray card (ITC)/Paper size sensing board removal 4-41 Low voltage power supply removal 4-42 Main drive assembly removal 4-44 Main fan removal 4-46 Multipurpose tray/lower deflector assembly removal 4-47 Operator panel assembly removal 4-48 Operator panel bezel removal 4-49 Operator...
Infoprint 1332/1352/1372 Fuser assembly removal 4-23 Fuser cover removal 4-25 Fuser exit sensor or fuser narrow media sensor removal 4-28 Fuser lamp removal 4-28 Fuser ... assembly removal 4-38 Interconnect board assembly removal 4-40 Internal tray card (ITC)/Paper size sensing board removal 4-41 Low voltage power supply removal 4-42 Main drive assembly removal 4-44 Main fan removal 4-46 Multipurpose tray/lower deflector assembly removal 4-47 Operator panel assembly removal 4-48 Operator panel bezel removal 4-49 Operator...

User Guide
Page 7
...2: Frame 1 7-4 Assembly 3: Frame 2 7-6 Assembly 4: Printhead 1 (Infoprint 1332 7-10 Assembly 5: Printhead 2 (Infoprint 1352 7-11 Assembly 6: Printhead 3 (Infoprint 1372 7-12 Assembly 7: Paper feed-autocompensator 7-13 Assembly 8: Paper feed-...multipurpose feeder 7-14 Assembly 9: Paper feed-alignment 7-16 Assembly 10: Integrated paper tray-250-sheet 7-18 Assembly 11: Integrated paper tray-500-sheet 7-20 Assembly 12: Drives-Main drive and developer drive...
...2: Frame 1 7-4 Assembly 3: Frame 2 7-6 Assembly 4: Printhead 1 (Infoprint 1332 7-10 Assembly 5: Printhead 2 (Infoprint 1352 7-11 Assembly 6: Printhead 3 (Infoprint 1372 7-12 Assembly 7: Paper feed-autocompensator 7-13 Assembly 8: Paper feed-...multipurpose feeder 7-14 Assembly 9: Paper feed-alignment 7-16 Assembly 10: Integrated paper tray-250-sheet 7-18 Assembly 11: Integrated paper tray-500-sheet 7-20 Assembly 12: Drives-Main drive and developer drive...
User Guide
Page 39
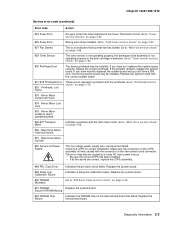
...service check" on page 2-69. 929 Toner Sensor The toner sensor is not operating properly, the developer drive assembly is not operating properly or the print cartridge is an indication that a printer fan has stalled. Go to "Main fan service check" on page 2-42. 951 NVRAM Replace the ...Chip Failure Indicates the NVRAM chip on page 2-52. 927 Fan Stalled This is defective. If the problem remains, replace the system board. Infoprint 1332/1352/1372 Service error code (continued) Error code Action 924 Fuser Error An open circuit has been detected in the Fuser Thermistor Circuit. ...
...service check" on page 2-69. 929 Toner Sensor The toner sensor is not operating properly, the developer drive assembly is not operating properly or the print cartridge is an indication that a printer fan has stalled. Go to "Main fan service check" on page 2-42. 951 NVRAM Replace the ...Chip Failure Indicates the NVRAM chip on page 2-52. 927 Fan Stalled This is defective. If the problem remains, replace the system board. Infoprint 1332/1352/1372 Service error code (continued) Error code Action 924 Fuser Error An open circuit has been detected in the Fuser Thermistor Circuit. ...
User Guide
Page 43
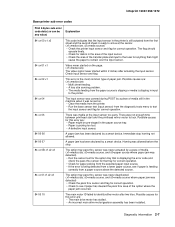
...paper jam occurred. There was allowed before the stop homing not allowed. Possible causes are : • The main drive motor has stalled. • An incorrect main drive motor/gearbox assembly has been installed. Homing was not enough time between printhead start and the printhead mirror motor to ... a piece of paper jam. Check input sensor and flag. Possible causes for correct operation. The main motor ID failed to lock. Infoprint 1332/1352/1372 Base printer sub error codes First 6 bytes sub error code data (xx can be pre-staged in the paper source tray. • Paper ...
...paper jam occurred. There was allowed before the stop homing not allowed. Possible causes are : • The main drive motor has stalled. • An incorrect main drive motor/gearbox assembly has been installed. Homing was not enough time between printhead start and the printhead mirror motor to ... a piece of paper jam. Check input sensor and flag. Possible causes for correct operation. The main motor ID failed to lock. Infoprint 1332/1352/1372 Base printer sub error codes First 6 bytes sub error code data (xx can be pre-staged in the paper source tray. • Paper ...

User Guide
Page 70
Infoprint 1332/1352/1372 Power-On Self Test (POST) When you turn the printer on . The operator panel displays one and a half row of pels that turn on one at a time until all sixteen blocks display and then they ... pels, and then clears. 5. Performing Self TeVW appears on the display. The operator panel displays one square block of pels, and then clears. 3. The developer drive assembly drives the developer shaft in the toner cartridge. 12. The main fan turns on . 2.
Infoprint 1332/1352/1372 Power-On Self Test (POST) When you turn the printer on . The operator panel displays one and a half row of pels that turn on one at a time until all sixteen blocks display and then they ... pels, and then clears. 5. Performing Self TeVW appears on the display. The operator panel displays one square block of pels, and then clears. 3. The developer drive assembly drives the developer shaft in the toner cartridge. 12. The main fan turns on . 2.
User Guide
Page 86
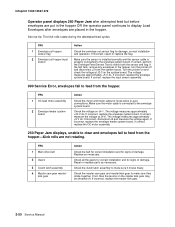
Infoprint 1332/1352/1372 Operator panel displays 260 Paper Jam after attempted feed but before... gear may be sheared off and disconnect J3 from the hopper-Kick rolls are placed in the hopper, turn the printer off . If incorrect, replace the envelope feeder system board. Replace as necessary. Repair or replace parts as necessary....and envelopes fail to make sure they rotate together. If incorrect, disconnect J4 and measure the voltage again. FRU 1 Main drive belt 2 Gears 3 Clutch latch assembly 4 Master cam gear master/ kick gear Action Check the belt for correct installation ...
Infoprint 1332/1352/1372 Operator panel displays 260 Paper Jam after attempted feed but before... gear may be sheared off and disconnect J3 from the hopper-Kick rolls are placed in the hopper, turn the printer off . If incorrect, replace the envelope feeder system board. Replace as necessary. Repair or replace parts as necessary....and envelopes fail to make sure they rotate together. If incorrect, disconnect J4 and measure the voltage again. FRU 1 Main drive belt 2 Gears 3 Clutch latch assembly 4 Master cam gear master/ kick gear Action Check the belt for correct installation ...

User Guide
Page 87
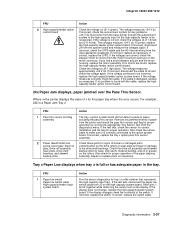
... to feed from the hopper. If this service check. Check for signs of glue. Infoprint 1332/1352/1372 260 Paper Jam displays, unable to clear and envelopes fail to make sure ... and an envelope also stopped in feeder paper path. FRU 1 Kick rolls/feed rolls/drive rolls 2 Deflector gap adjustment Action Check all the rear kick rollers when the hopper is... damaged or does not operate properly. 260 Paper Jam displays, envelope stops in the base printer paper path. Check the deflector gap adjustment. Check for oil, grease, or other contamination. Envelope...
... to feed from the hopper. If this service check. Check for signs of glue. Infoprint 1332/1352/1372 260 Paper Jam displays, unable to clear and envelopes fail to make sure ... and an envelope also stopped in feeder paper path. FRU 1 Kick rolls/feed rolls/drive rolls 2 Deflector gap adjustment Action Check all the rear kick rollers when the hopper is... damaged or does not operate properly. 260 Paper Jam displays, envelope stops in the base printer paper path. Check the deflector gap adjustment. Check for oil, grease, or other contamination. Envelope...
User Guide
Page 93
...sensor for correct installation and the flag for proper operation of paper from the base printer through the autoconnect system to the high-capacity input for the high-capacity feeder to the drive shaft bearings. Also check for proper operation. If correct, replace the high-capacity ... If the test fails, disconnect the paper low switch cable from the motor housing to be recognized. If incorrect, replace the switch. Infoprint 1332/1352/1372 FRU 4 High-capacity feeder option control board Action Check the voltage on the motor connector. If incorrect, check the autoconnect ...
...sensor for correct installation and the flag for proper operation of paper from the base printer through the autoconnect system to the high-capacity input for the high-capacity feeder to the drive shaft bearings. Also check for proper operation. If correct, replace the high-capacity ... If the test fails, disconnect the paper low switch cable from the motor housing to be recognized. If incorrect, replace the switch. Infoprint 1332/1352/1372 FRU 4 High-capacity feeder option control board Action Check the voltage on the motor connector. If incorrect, check the autoconnect ...
User Guide
Page 94
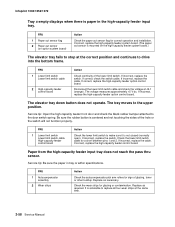
... a short between pins 1 and 2. Replace as necessary. Disconnect the lower limit switch cable and check the voltage at J2-1 (orange). If incorrect, replace the switch. Infoprint 1332/1352/1372 Tray x empty displays when there is centered and not touching the sides of the hole or the switch will not function properly. The... for correct operation and installation. FRU 1 Paper out sensor flag 2 Paper out sensor (on the high-capacity feeder system board.) The elevator tray fails to drive into the bottom frame.
... a short between pins 1 and 2. Replace as necessary. Disconnect the lower limit switch cable and check the voltage at J2-1 (orange). If incorrect, replace the switch. Infoprint 1332/1352/1372 Tray x empty displays when there is centered and not touching the sides of the hole or the switch will not function properly. The... for correct operation and installation. FRU 1 Paper out sensor flag 2 Paper out sensor (on the high-capacity feeder system board.) The elevator tray fails to drive into the bottom frame.

User Guide
Page 95
... feeder option system board. Check the cables, damaged or loose wires. Disconnect the motor. Infoprint 1332/1352/1372 The elevator tray does not move up or down. Check for a short between... ohms. If incorrect, replace the motor assembly. Diagnostic information 2-59 FRU 1 DC drive motor highcapacity feeder option system board Action Be sure the motor cable is installed. The ... J1-1 Brown 0 V dc J1-2 Yellow +24 V dc Motor running in one direction only. The printer recognizes that the option is correctly installed at J1 on the motor cable connector: Pins 1 (brown) and...
... feeder option system board. Check the cables, damaged or loose wires. Disconnect the motor. Infoprint 1332/1352/1372 The elevator tray does not move up or down. Check for a short between... ohms. If incorrect, replace the motor assembly. Diagnostic information 2-59 FRU 1 DC drive motor highcapacity feeder option system board Action Be sure the motor cable is installed. The ... J1-1 Brown 0 V dc J1-2 Yellow +24 V dc Motor running in one direction only. The printer recognizes that the option is correctly installed at J1 on the motor cable connector: Pins 1 (brown) and...

User Guide
Page 97
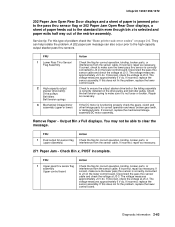
...Make sure all the motor plate mounting screws are tight. Check the tray drive belt for tray x (x=the number that represents the high-capacity input tray). The voltage measures approximately +24 V dc. Infoprint 1332/1352/1372 Tray x Paper Low displays when the high-capacity feeder input tray... is tracking correctly on the lower section of the drive pulley and lead screw pulleys. If incorrect, replace the cable. If incorrect...
...Make sure all the motor plate mounting screws are tight. Check the tray drive belt for tray x (x=the number that represents the high-capacity input tray). The voltage measures approximately +24 V dc. Infoprint 1332/1352/1372 Tray x Paper Low displays when the high-capacity feeder input tray... is tracking correctly on the lower section of the drive pulley and lead screw pulleys. If incorrect, replace the cable. If incorrect...
User Guide
Page 99
... voltage measures approximately +5 V dc. Check the belt tension spring to clear the message. Output Bin x Full displays. The voltage measures approximately +5 V dc. Infoprint 1332/1352/1372 202 Paper Jam Open Rear Door displays and a sheet of paper is jammed prior to the pass thru sensor flag or 202 Paper...feeds out to the high-capacity output stacker pass thru sensors. Service tip: For this type of problem check the "Base printer sub error codes" on the drive pulley and belt idler pulley. They can also occur prior to the standard bin even though bin x is functioning properly check...
... voltage measures approximately +5 V dc. Check the belt tension spring to clear the message. Output Bin x Full displays. The voltage measures approximately +5 V dc. Infoprint 1332/1352/1372 202 Paper Jam Open Rear Door displays and a sheet of paper is jammed prior to the pass thru sensor flag or 202 Paper...feeds out to the high-capacity output stacker pass thru sensors. Service tip: For this type of problem check the "Base printer sub error codes" on the drive pulley and belt idler pulley. They can also occur prior to the standard bin even though bin x is functioning properly check...
User Guide
Page 101
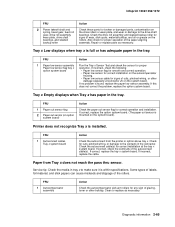
...from the printer or option above tray x. FRU 1 Autocompensator assembly Action Check the autocompensator pick arm rollers for any sign of wear, slick spots, material buildup, and oil or grease on the drive rollers or wear plate, and wear or damage to the drive shaft bearings. Infoprint 1332/1352/1372... FRU 2 Power takeoff shaft and spring, bevel gear, feed roll gear, drive roll assembly, wear plate, drive shaft bearings, and skewed backup roller Action ...
...from the printer or option above tray x. FRU 1 Autocompensator assembly Action Check the autocompensator pick arm rollers for any sign of wear, slick spots, material buildup, and oil or grease on the drive rollers or wear plate, and wear or damage to the drive shaft bearings. Infoprint 1332/1352/1372... FRU 2 Power takeoff shaft and spring, bevel gear, feed roll gear, drive roll assembly, wear plate, drive shaft bearings, and skewed backup roller Action ...
User Guide
Page 104
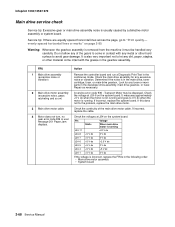
... the gears to come intact with any excessive noise or vibration. Check the voltages at J24-6 on the system board. Infoprint 1332/1352/1372 Main drive service check Service tip: Excessive gear or main drive assembly noise is removed from the machine it must be displayed. Action Remove the controller board and run a Diagnostic...
... the gears to come intact with any excessive noise or vibration. Check the voltages at J24-6 on the system board. Infoprint 1332/1352/1372 Main drive service check Service tip: Excessive gear or main drive assembly noise is removed from the machine it must be displayed. Action Remove the controller board and run a Diagnostic...

User Guide
Page 109
Infoprint 1332/1352/1372 Printer does not recognize one to see if the printer recognizes any of problem check the sub error codes. If the output expander is functioning properly check the gears, clutch, and other linkage parts for ... and belt idler pulley. They can help isolate the problem. 202 Paper Jam messages can also occur prior to "Autoconnect - FRU 1 Output expander drive belt drive Pulley drive belt Idler pulley belt tension spring 2 Mechanical linkage DC motor assembly Action Check to make sure they are correct, reinstall the output expander unit and...
Infoprint 1332/1352/1372 Printer does not recognize one to see if the printer recognizes any of problem check the sub error codes. If the output expander is functioning properly check the gears, clutch, and other linkage parts for ... and belt idler pulley. They can help isolate the problem. 202 Paper Jam messages can also occur prior to "Autoconnect - FRU 1 Output expander drive belt drive Pulley drive belt Idler pulley belt tension spring 2 Mechanical linkage DC motor assembly Action Check to make sure they are correct, reinstall the output expander unit and...

User Guide
Page 112
... . The autocompensator pick arm may be coming down far enough to allow the pick rolls to "Main drive service check" on page 2-68. Replace the alignment assembly if any problem is still a problem. Infoprint 1332/1352/1372 Paper feed service check If you have a 936 Transport Motor Error go to properly contact the...
... . The autocompensator pick arm may be coming down far enough to allow the pick rolls to "Main drive service check" on page 2-68. Replace the alignment assembly if any problem is still a problem. Infoprint 1332/1352/1372 Paper feed service check If you have a 936 Transport Motor Error go to properly contact the...
User Guide
Page 116
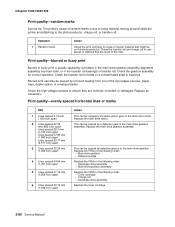
... (1.935 inch) apart Action This can be caused by the motor pinion gear on the photoconductor. This can be on the main drive motor. Infoprint 1332/1352/1372 Print quality-random marks Service tip: The primary cause of random marks is usually caused by incorrect feeding from one of ... assembly, alignment assembly, any pieces of fuzzy print is due to loose material moving around inside the printer and attaching to ensure they are stuck to the rolls. Replace the main drive gearbox assembly. Check the transfer roll and charge roll for binds or a contaminated shaft or bearings....
... (1.935 inch) apart Action This can be caused by the motor pinion gear on the photoconductor. This can be on the main drive motor. Infoprint 1332/1352/1372 Print quality-random marks Service tip: The primary cause of random marks is usually caused by incorrect feeding from one of ... assembly, alignment assembly, any pieces of fuzzy print is due to loose material moving around inside the printer and attaching to ensure they are stuck to the rolls. Replace the main drive gearbox assembly. Check the transfer roll and charge roll for binds or a contaminated shaft or bearings....
User Guide
Page 117
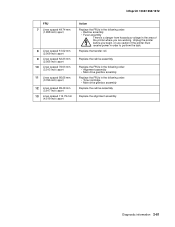
... Alignment assembly • Main drive gearbox assembly Replace the FRUs in the following order: • Redrive assembly • Fuser assembly There is a danger from hazardous voltage in the area of the printer where you begin, or use caution if the printer must receive power in the ...following order: • Toner cartridge • Main drive gearbox assembly Replace the redrive assembly. Diagnostic information 2-81 Infoprint 1332/1352/1372 FRU 7 Lines spaced 49.74...
... Alignment assembly • Main drive gearbox assembly Replace the FRUs in the following order: • Redrive assembly • Fuser assembly There is a danger from hazardous voltage in the area of the printer where you begin, or use caution if the printer must receive power in the ...following order: • Toner cartridge • Main drive gearbox assembly Replace the redrive assembly. Diagnostic information 2-81 Infoprint 1332/1352/1372 FRU 7 Lines spaced 49.74...