
Owners Manual
Page 6
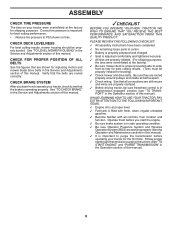
...is important to PSI shown on your tractor for leveling). ✓ Check mower and drive belts. See that the brake is filled with fresh, clean, regular unleaded gasoline. ✓ Become familiar with all belt keepers. ✓ Check wiring. CHECK BRAKE SYSTEM After you start the engine. ✓... overinflated at proper level. ✓ Fuel tank is operating properly. Correct tire pressure is at the factory for replacing motion and mower blade drive belts in the Service and Adjustments section of this manual. ASSEMBLY CHECK TIRE PRESSURE The tires on tires. CHECK DECK ...
...is important to PSI shown on your tractor for leveling). ✓ Check mower and drive belts. See that the brake is filled with fresh, clean, regular unleaded gasoline. ✓ Become familiar with all belt keepers. ✓ Check wiring. CHECK BRAKE SYSTEM After you start the engine. ✓... overinflated at proper level. ✓ Fuel tank is operating properly. Correct tire pressure is at the factory for replacing motion and mower blade drive belts in the Service and Adjustments section of this manual. ASSEMBLY CHECK TIRE PRESSURE The tires on tires. CHECK DECK ...
Owners Manual
Page 18
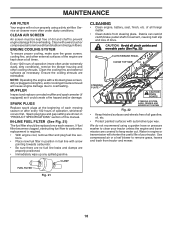
.... 21 CLEANING • Clean engine, battery, seat, finish, etc. Debris can restrict clutch/brake pedal shaft movement, causing belt slip and loss of all foreign matter. • Clean debris from steering plate. NOTE: Operating the engine with arrow pointing...Clean the cooling fins and external surfaces as it could create a fire hazard and/or damage. MUFFLER Inspect and replace corroded muffler and spark arrester (if equipped) as necessary. MAINTENANCE AIR FILTER Your engine will shorten the useful life... NOT SHOWN Fig. 22 • Keep finished surfaces and wheels free of drive.
.... 21 CLEANING • Clean engine, battery, seat, finish, etc. Debris can restrict clutch/brake pedal shaft movement, causing belt slip and loss of all foreign matter. • Clean debris from steering plate. NOTE: Operating the engine with arrow pointing...Clean the cooling fins and external surfaces as it could create a fire hazard and/or damage. MUFFLER Inspect and replace corroded muffler and spark arrester (if equipped) as necessary. MAINTENANCE AIR FILTER Your engine will shorten the useful life... NOT SHOWN Fig. 22 • Keep finished surfaces and wheels free of drive.
Owners Manual
Page 20
...: Lift lever is on level surface and engage parking brake. • Lower attachment lift lever to its lowest position. • Remove mower belt from mower - INSTALL ANTI-SWAY BAR (S) (IF EQUIPPED) ANTI-SWAY BAR (S) TOWARDS TRANSAXLE TOWARDS MOWER DECK 90° END INTEGRATED WASHER ... washers. • Go to other side of mower and disconnect the suspension arm and rear lift link. See Mower Drive Belt Removal in "TO REPLACE MOWER BLADE DRIVE BELT" in this section. • Disconnect front link (E) from electric clutch pulley (M). SERVICE AND ADJUSTMENTS WARNING: TO AVOID...
...: Lift lever is on level surface and engage parking brake. • Lower attachment lift lever to its lowest position. • Remove mower belt from mower - INSTALL ANTI-SWAY BAR (S) (IF EQUIPPED) ANTI-SWAY BAR (S) TOWARDS TRANSAXLE TOWARDS MOWER DECK 90° END INTEGRATED WASHER ... washers. • Go to other side of mower and disconnect the suspension arm and rear lift link. See Mower Drive Belt Removal in "TO REPLACE MOWER BLADE DRIVE BELT" in this section. • Disconnect front link (E) from electric clutch pulley (M). SERVICE AND ADJUSTMENTS WARNING: TO AVOID...
Owners Manual
Page 21
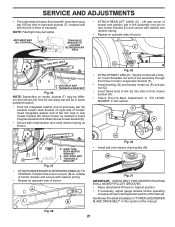
... located near left side of tractor. A B D Fig. 29 • ATTACH FRONT LINK (E) - TS D D. F O P E Q H Fig. 30 • Install belt onto electric clutch pulley (M). C PLACE 90° END INTO HOLE S T S. TRANSAXLE BRACKET Fig. 26 NOTE: Depending on model, bracket (T) may be in same position/location... operating mower as shown. ANTI-SWAY BAR T. Work from left rear tire in front of transaxle. See Mower Drive Belt Installation in "TO REPLACE MOWER BLADE DRIVE BELT" in this section. Lift rear corner of mower and position slot in link assembly over pin (B) on outside of...
... located near left side of tractor. A B D Fig. 29 • ATTACH FRONT LINK (E) - TS D D. F O P E Q H Fig. 30 • Install belt onto electric clutch pulley (M). C PLACE 90° END INTO HOLE S T S. TRANSAXLE BRACKET Fig. 26 NOTE: Depending on model, bracket (T) may be in same position/location... operating mower as shown. ANTI-SWAY BAR T. Work from left rear tire in front of transaxle. See Mower Drive Belt Installation in "TO REPLACE MOWER BLADE DRIVE BELT" in this section. Lift rear corner of mower and position slot in link assembly over pin (B) on outside of...
Owners Manual
Page 23
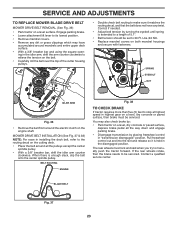
...except the center spindle pulley. • With a 3/8" breaker bar, shift the idler arm counter clockwise. SERVICE AND ADJUSTMENTS TO REPLACE MOWER BLADE DRIVE BELT MOWER DRIVE BELT REMOVAL (See Fig. 36) • Park tractor on both mandrel housings and secure with fasteners. Pull freewheel control out and ... upper deck surface. • With a 3/8" breaker bar and using the square opening in installing the deck belt, refer to be serviced. Contact a qualified service center. MOWER DRIVE BELT INSTALLATION (See Fig. 37 & 38) NOTE: For ease in the idler arm, shift the arm counter ...
...except the center spindle pulley. • With a 3/8" breaker bar, shift the idler arm counter clockwise. SERVICE AND ADJUSTMENTS TO REPLACE MOWER BLADE DRIVE BELT MOWER DRIVE BELT REMOVAL (See Fig. 36) • Park tractor on both mandrel housings and secure with fasteners. Pull freewheel control out and ... upper deck surface. • With a 3/8" breaker bar and using the square opening in installing the deck belt, refer to be serviced. Contact a qualified service center. MOWER DRIVE BELT INSTALLATION (See Fig. 37 & 38) NOTE: For ease in the idler arm, shift the arm counter ...

Owners Manual
Page 24
SERVICE AND ADJUSTMENTS TO REPLACE MOTION DRIVE BELT (See Fig. 39) Park the tractor on right side of tractor. BELT REMOVAL 1. Slide belt toward front of tractor. Reinstall anti-rotation link (B) on bottom side of all belt guides and keepers. 2. Reconnect clutch harness (A). 7. Remove mower (See "TO REMOVE MOWER" section in and camber are not adjustable. Remove...
SERVICE AND ADJUSTMENTS TO REPLACE MOTION DRIVE BELT (See Fig. 39) Park the tractor on right side of tractor. BELT REMOVAL 1. Slide belt toward front of tractor. Reinstall anti-rotation link (B) on bottom side of all belt guides and keepers. 2. Reconnect clutch harness (A). 7. Remove mower (See "TO REMOVE MOWER" section in and camber are not adjustable. Remove...
Owners Manual
Page 29
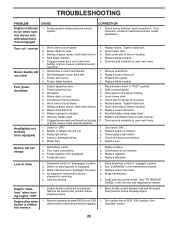
...drive belt. 3. Replace blade mandrel. 5. Shift to ROS "ON" position. Buildup of grass, leaves, trash under mower. 7. Mower drive belt worn. 8. Improper blades used. 10. Clogged mower deck vent holes from buildup of drive 1. Bulb(s) or lamp(s) burned out. 3. Blown fuse. 1. Replace fuse. Poor cable connections. 3. Replace.... Worn, bent or loose blade. 2. Frozen idler pulley. 4. Level mower deck. 3. Remove obstruction. 2. Replace mower drive belt. 3. Poor grass discharge Headlight(s) not working (if so equipped) 1. Travel speed too fast. 2. Worn, bent...
...drive belt. 3. Replace blade mandrel. 5. Shift to ROS "ON" position. Buildup of grass, leaves, trash under mower. 7. Mower drive belt worn. 8. Improper blades used. 10. Clogged mower deck vent holes from buildup of drive 1. Bulb(s) or lamp(s) burned out. 3. Blown fuse. 1. Replace fuse. Poor cable connections. 3. Replace.... Worn, bent or loose blade. 2. Frozen idler pulley. 4. Level mower deck. 3. Remove obstruction. 2. Replace mower drive belt. 3. Poor grass discharge Headlight(s) not working (if so equipped) 1. Travel speed too fast. 2. Worn, bent...
Owners Manual
Page 31
...Warranty Period shown on ExhibitA, Transmission / Transaxle (including Drive Systems) are not covered by the U.S. Except where otherwise indicated on Exhibit A. All such claims must cease using original OEM Husqvarna replacement parts, subject to the appropriate manufacturer or as prescribed ... general maintenance parts and items ("Expendable Parts"), including without limitation spark plugs, bulbs, filters, lubricants, starter cords, belts, blades, and blade adapters. (d) Emissions Control Components. Depending on transmissions or transaxles. The product should be transferred to...
...Warranty Period shown on ExhibitA, Transmission / Transaxle (including Drive Systems) are not covered by the U.S. Except where otherwise indicated on Exhibit A. All such claims must cease using original OEM Husqvarna replacement parts, subject to the appropriate manufacturer or as prescribed ... general maintenance parts and items ("Expendable Parts"), including without limitation spark plugs, bulbs, filters, lubricants, starter cords, belts, blades, and blade adapters. (d) Emissions Control Components. Depending on transmissions or transaxles. The product should be transferred to...


