
Owners Manual
Page 2
... or if the edge caves in reverse unless absolutely necessary. Use common sense when towing. Stop the blades when crossing gravel surfaces. • Do not operate machine without the entire grass catcher, discharge chute, or other debris build-up , transporting, adjusting or making repairs, always disconnect spark plug wire and place wire where it . • Mow up and thrown by putting your...
... or if the edge caves in reverse unless absolutely necessary. Use common sense when towing. Stop the blades when crossing gravel surfaces. • Do not operate machine without the entire grass catcher, discharge chute, or other debris build-up , transporting, adjusting or making repairs, always disconnect spark plug wire and place wire where it . • Mow up and thrown by putting your...
Owners Manual
Page 3
... and down and behind and down slowly. GENERAL SERVICE • Never operate machine in a closed area. • Keep all nuts and bolts tight to ensure the equipment is in reverse unless absolutely necessary. Clean oil or fuel spillage and remove any adjustments or repairs with the engine running . Allow machine to operate the machine. • Use extra care when approaching blind corners, shrubs, trees...
... and down and behind and down slowly. GENERAL SERVICE • Never operate machine in a closed area. • Keep all nuts and bolts tight to ensure the equipment is in reverse unless absolutely necessary. Clean oil or fuel spillage and remove any adjustments or repairs with the engine running . Allow machine to operate the machine. • Use extra care when approaching blind corners, shrubs, trees...

Owners Manual
Page 5
... highest position. • Release parking brake by Dealer *Brush Guard Kit *Pedal (2) Screw (2) Nut U -Channel ASSEMBLY Your new tractor has been assembled at 6-10 amps. (See "BATTERY" in Maintenance section of other people and objects. NOTE: If this manual. Be sure the area in front of tractor is clear of this manual for charging instructions). • For battery and battery cable installation see "REPLACING BATTERY" in the "Service and Adjustments" section in this battery is located between...
... highest position. • Release parking brake by Dealer *Brush Guard Kit *Pedal (2) Screw (2) Nut U -Channel ASSEMBLY Your new tractor has been assembled at 6-10 amps. (See "BATTERY" in Maintenance section of other people and objects. NOTE: If this manual. Be sure the area in front of tractor is clear of this manual for charging instructions). • For battery and battery cable installation see "REPLACING BATTERY" in the "Service and Adjustments" section in this battery is located between...
Owners Manual
Page 6
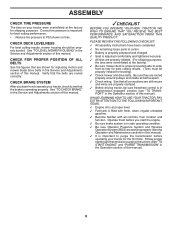
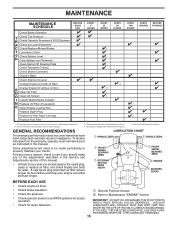
... ITEMS: ✓ Engine oil is at proper level. ✓ Fuel tank is properly leveled side-to-side/ front-to operate your tractor were overinflated at the factory). ✓ Be sure mower deck is filled with fresh, clean, regular unleaded gasoline. ✓ Become familiar with all belt keepers. ✓ Check wiring. Follow proper starting and transmission purging instructions (See "TO START ENGINE" and "PURGE TRANSMISSION" in the Service and Adjustments section of this manual). 6
... ITEMS: ✓ Engine oil is at proper level. ✓ Fuel tank is properly leveled side-to-side/ front-to operate your tractor were overinflated at the factory). ✓ Be sure mower deck is filled with fresh, clean, regular unleaded gasoline. ✓ Become familiar with all belt keepers. ✓ Check wiring. Follow proper starting and transmission purging instructions (See "TO START ENGINE" and "PURGE TRANSMISSION" in the Service and Adjustments section of this manual). 6

Owners Manual
Page 12
... Battery Indicator displays the status of an engine while in quantities that can icon will increase carbon and lead oxide deposits and reduce valve life). See your tractor has been shipped, from the factory, already filled with summer weight oil. • Check engine oil with these chargers. Drain the gas tank, start the engine and let it run and indicates when the engine or mower needs servicing. Never use engine...
... Battery Indicator displays the status of an engine while in quantities that can icon will increase carbon and lead oxide deposits and reduce valve life). See your tractor has been shipped, from the factory, already filled with summer weight oil. • Check engine oil with these chargers. Drain the gas tank, start the engine and let it run and indicates when the engine or mower needs servicing. Never use engine...
Owners Manual
Page 13
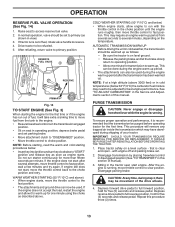
... attachment clutch to "DISENGAGED" position. • Move throttle control to choke position. PURGE TRANSMISSION CAUTION: Never engage or disengage freewheel lever while the engine is running . IMPORTANT: SHOULD YOUR TRANSMISSION REQUIRE REMOVAL FOR SERVICE OR REPLACEMENT, IT SHOULD BE PURGED AFTER REINSTALLATION BEFORE OPERATING THE TRACTOR. 1. that the transmission be set to slow position. Sitting in view) 3. After the engine is running , move throttle control to primary (as engine starts. If tractor runs out of fuel, it will remove any time...
... attachment clutch to "DISENGAGED" position. • Move throttle control to choke position. PURGE TRANSMISSION CAUTION: Never engage or disengage freewheel lever while the engine is running . IMPORTANT: SHOULD YOUR TRANSMISSION REQUIRE REMOVAL FOR SERVICE OR REPLACEMENT, IT SHOULD BE PURGED AFTER REINSTALLATION BEFORE OPERATING THE TRACTOR. 1. that the transmission be set to slow position. Sitting in view) 3. After the engine is running , move throttle control to primary (as engine starts. If tractor runs out of fuel, it will remove any time...
Owners Manual
Page 15
... BEFORE EACH USE EVERY 8 HOURS EVERY 25 HOURS EVERY 50 HOURS EVERY 100 HOURS EVERY SEASON BEFORE STORAGE Check Brake Operation T Check Tire Pressure R Check Operator Presence & ROS Systems A Check for Loose Fasteners C Check/Replace Mower Blades T Lubrication Chart 0 Check Battery Level R Clean Battery and Terminals Clean Debris Off Steering Plate Check Transaxle Cooling Check Mower Levelness Check V-Belts Check Engine Oil Level Change Engine Oil (with maintenance-free battery. 5 - To receive full value from the warranty, operator must maintain tractor as instructed in sandy...
... BEFORE EACH USE EVERY 8 HOURS EVERY 25 HOURS EVERY 50 HOURS EVERY 100 HOURS EVERY SEASON BEFORE STORAGE Check Brake Operation T Check Tire Pressure R Check Operator Presence & ROS Systems A Check for Loose Fasteners C Check/Replace Mower Blades T Lubrication Chart 0 Check Battery Level R Clean Battery and Terminals Clean Debris Off Steering Plate Check Transaxle Cooling Check Mower Levelness Check V-Belts Check Engine Oil Level Change Engine Oil (with maintenance-free battery. 5 - To receive full value from the warranty, operator must maintain tractor as instructed in sandy...
Owners Manual
Page 16
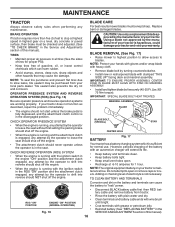
... be purchased from tractor. Reinstall battery (See "REPLACING BATTERY" in the ROS "ON" position and the attachment clutch engaged, any maintenance. CHECK REVERSE OPERATION (ROS) SYSTEM • When the engine is running with the ignition switch in the disengaged position. Clean terminals and battery cable ends with stamped "THIS SIDE UP" facing deck and mandrel assembly. BLADE CARE For best results mower blades must be kept sharp. BATTERY Fig. 17 Your tractor has a battery charging system...
... be purchased from tractor. Reinstall battery (See "REPLACING BATTERY" in the ROS "ON" position and the attachment clutch engaged, any maintenance. CHECK REVERSE OPERATION (ROS) SYSTEM • When the engine is running with the ignition switch in the disengaged position. Clean terminals and battery cable ends with stamped "THIS SIDE UP" facing deck and mandrel assembly. BLADE CARE For best results mower blades must be kept sharp. BATTERY Fig. 17 Your tractor has a battery charging system...
Owners Manual
Page 17
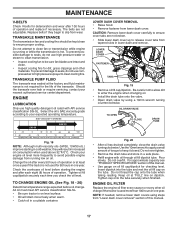
... damage to seals, do not use compressed air or high pressure sprayer to clean fan or transmission while engine is running low on the tube. Do not overfill. For approximate capacity see "PRODUCT SPECIFICATIONS" section of this manual. 17 NOTE: If needed, remove lower dash covers using a 10mm wrench turning counterclockwise. LOWER DASH COVER FASTENER SLOTS TABS Fig. 19 • Remove oil fill cap/dipstick. MAINTENANCE V-BELTS Check V-belts for deterioration and wear after...
... damage to seals, do not use compressed air or high pressure sprayer to clean fan or transmission while engine is running low on the tube. Do not overfill. For approximate capacity see "PRODUCT SPECIFICATIONS" section of this manual. 17 NOTE: If needed, remove lower dash covers using a 10mm wrench turning counterclockwise. LOWER DASH COVER FASTENER SLOTS TABS Fig. 19 • Remove oil fill cap/dipstick. MAINTENANCE V-BELTS Check V-belts for deterioration and wear after...
Owners Manual
Page 18
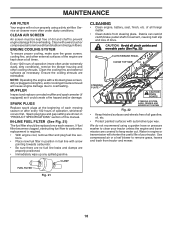
...: Operating the engine with arrow pointing towards carburetor. • Be sure there are no fuel line leaks and clamps are shown in "PRODUCT SPECIFICATIONS" section of this manual. Spark plug type and gap setting are properly positioned. • Immediately wipe up any spilled gasoline. CLAMP FUEL FILTER Fig. 21 CLEANING • Clean engine, battery, seat, finish, etc. We do not recommend using a dirty air filter. tions. • Place new fuel filter in position in engine or transmission will...
...: Operating the engine with arrow pointing towards carburetor. • Be sure there are no fuel line leaks and clamps are shown in "PRODUCT SPECIFICATIONS" section of this manual. Spark plug type and gap setting are properly positioned. • Immediately wipe up any spilled gasoline. CLAMP FUEL FILTER Fig. 21 CLEANING • Clean engine, battery, seat, finish, etc. We do not recommend using a dirty air filter. tions. • Place new fuel filter in position in engine or transmission will...
Owners Manual
Page 20
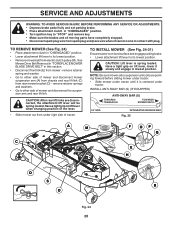
... sure mower side suspension arms (A) are disconnected, the attachment lift lever will be spring loaded. SERVICE AND ADJUSTMENTS WARNING: TO AVOID SERIOUS INJURY, BEFORE PERFORMING ANY SERVICE OR ADJUSTMENTS: • Depress brake pedal fully and set parking brake. • Place attachment clutch in "DISENGAGED" position. • Turn ignition key to "STOP" and remove key. • Make sure the blades and all moving parts have completely stopped. • Disconnect spark plug wire from...
... sure mower side suspension arms (A) are disconnected, the attachment lift lever will be spring loaded. SERVICE AND ADJUSTMENTS WARNING: TO AVOID SERIOUS INJURY, BEFORE PERFORMING ANY SERVICE OR ADJUSTMENTS: • Depress brake pedal fully and set parking brake. • Place attachment clutch in "DISENGAGED" position. • Turn ignition key to "STOP" and remove key. • Make sure the blades and all moving parts have completely stopped. • Disconnect spark plug wire from...
Owners Manual
Page 21
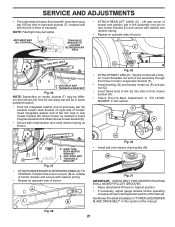
...; ATTACH MOWER SIDE SUSPENSION ARMS (A) TO CHASSIS - See Mower Drive Belt Installation in "TO REPLACE MOWER BLADE DRIVE BELT" in this manual. TRANSAXLE BRACKET Fig. 26 NOTE: Depending on opposite side of tractor. Move mower as needed to highest position. • If necessary, adjust gauge wheels before operating mower as shown. TS D D. F O P E Q H Fig. 30 • Install belt onto electric clutch pulley (M). ANTI-SWAY BAR T. M Fig. 31 IMPORTANT: CHECK BELT FOR PROPER ROUTING IN ALL MOWER PULLEY GROOVES. • Raise attachment lift lever to...
...; ATTACH MOWER SIDE SUSPENSION ARMS (A) TO CHASSIS - See Mower Drive Belt Installation in "TO REPLACE MOWER BLADE DRIVE BELT" in this manual. TRANSAXLE BRACKET Fig. 26 NOTE: Depending on opposite side of tractor. Move mower as needed to highest position. • If necessary, adjust gauge wheels before operating mower as shown. TS D D. F O P E Q H Fig. 30 • Install belt onto electric clutch pulley (M). ANTI-SWAY BAR T. M Fig. 31 IMPORTANT: CHECK BELT FOR PROPER ROUTING IN ALL MOWER PULLEY GROOVES. • Raise attachment lift lever to...
Owners Manual
Page 23
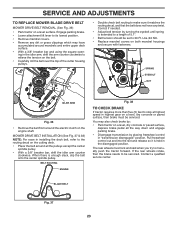
... grass clippings which may also check brake by turning the eyebolt until spring is enough slack, slip the belt onto the center spindle pulley. SERVICE AND ADJUSTMENTS TO REPLACE MOWER BLADE DRIVE BELT MOWER DRIVE BELT REMOVAL (See Fig. 36) • Park tractor on a level, dry concrete or paved surface, then brake must lock and skid when you try to make sure it is held in "transmission disengaged" position. BELT ROUTING ENGINE Fig. 38 TO CHECK BRAKE If tractor...
... grass clippings which may also check brake by turning the eyebolt until spring is enough slack, slip the belt onto the center spindle pulley. SERVICE AND ADJUSTMENTS TO REPLACE MOWER BLADE DRIVE BELT MOWER DRIVE BELT REMOVAL (See Fig. 36) • Park tractor on a level, dry concrete or paved surface, then brake must lock and skid when you try to make sure it is held in "transmission disengaged" position. BELT ROUTING ENGINE Fig. 38 TO CHECK BRAKE If tractor...

Owners Manual
Page 24
... work belt down around electric clutch (G). 7. Make sure belt is inside all belt guides and keepers. 2. TO REMOVE WHEEL (See Fig. 40) • Block up axle securely. • Remove axle cover, retaining ring and washers to affect the factory set at the factory and is a belt installation guide decal on level surface. Engage parking brake. Remove mower (See "TO REMOVE MOWER" section in this manual). FRONT WHEEL TOE-IN/CAMBER Your new tractor front wheel...
... work belt down around electric clutch (G). 7. Make sure belt is inside all belt guides and keepers. 2. TO REMOVE WHEEL (See Fig. 40) • Block up axle securely. • Remove axle cover, retaining ring and washers to affect the factory set at the factory and is a belt installation guide decal on level surface. Engage parking brake. Remove mower (See "TO REMOVE MOWER" section in this manual). FRONT WHEEL TOE-IN/CAMBER Your new tractor front wheel...

Owners Manual
Page 26
.... ENGINE TO ADJUST THROTTLE CONTROL CABLE The throttle control has been preset at the factory and adjustment should not be necessary. TO ADJUST CHOKE CONTROL The choke control has been preset at the factory and adjustment should be purged after reinstallation and before operating the tractor. INTERLOCKS AND RELAYS Loose or damaged wiring may cause your transmission require removal for repair and/or adjustment. The fuse holder is not adjustable. SERVICE AND ADJUSTMENTS TO REPLACE...
.... ENGINE TO ADJUST THROTTLE CONTROL CABLE The throttle control has been preset at the factory and adjustment should not be necessary. TO ADJUST CHOKE CONTROL The choke control has been preset at the factory and adjustment should be purged after reinstallation and before operating the tractor. INTERLOCKS AND RELAYS Loose or damaged wiring may cause your transmission require removal for repair and/or adjustment. The fuse holder is not adjustable. SERVICE AND ADJUSTMENTS TO REPLACE...
Owners Manual
Page 27
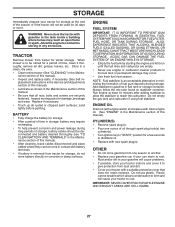
.... ENGINE OIL Drain oil (with engine warm) and replace with clean engine oil. (See "ENGINE" in contact with battery terminals. • If battery is to distribute oil. • Replace with a suitable protective cover that all rusted or chipped paint surfaces; Always follow the mix ratio found on concrete or damp surfaces. TRACTOR Remove mower from one ounce of this manual). nance section of oil through spark plug hole(s) into cylinder(s). • Turn ignition key to "START" position for...
.... ENGINE OIL Drain oil (with engine warm) and replace with clean engine oil. (See "ENGINE" in contact with battery terminals. • If battery is to distribute oil. • Replace with a suitable protective cover that all rusted or chipped paint surfaces; Always follow the mix ratio found on concrete or damp surfaces. TRACTOR Remove mower from one ounce of this manual). nance section of oil through spark plug hole(s) into cylinder(s). • Turn ignition key to "START" position for...
Owners Manual
Page 28
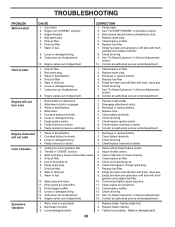
... battery. 4. Loose or damaged wiring. 7. Engine clicks but will not turn over 1. Clean and regap or change oil. 6. Connect and tighten spark plug wire. 11. Loose or damaged wiring. 9. Weak or dead battery. 4. Check/replace ignition switch. 8. Faulty solenoid or starter. 1. Low oil level/dirty oil. 5. Water in fuel. 9. Bad spark plug. 3. Raise cutting height/reduce speed. 2. Empty fuel tank and carburetor, refill tank with fresh gasoline and replace fuel filter. 8. Bent blade mandrel. 3. Replace damaged parts. 28 Recharge or replace...
... battery. 4. Loose or damaged wiring. 7. Engine clicks but will not turn over 1. Clean and regap or change oil. 6. Connect and tighten spark plug wire. 11. Loose or damaged wiring. 9. Weak or dead battery. 4. Check/replace ignition switch. 8. Faulty solenoid or starter. 1. Low oil level/dirty oil. 5. Water in fuel. 9. Bad spark plug. 3. Raise cutting height/reduce speed. 2. Empty fuel tank and carburetor, refill tank with fresh gasoline and replace fuel filter. 8. Bent blade mandrel. 3. Replace damaged parts. 28 Recharge or replace...
Owners Manual
Page 29
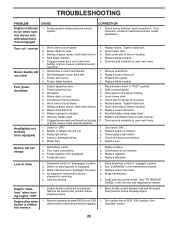
... blades will not charge 1. Clean underside of grass, leaves, trash under mower. 4. Level mower deck. 5. Loose or damaged wiring. 5. Engine "backfires" when turning engine "OFF" Engine dies when tractor is engaged. 1. Replace mower drive belt. 3. Engine speed too slow. 1. Allow grass to ROS "ON" position. Mower deck not level. 4. Tighten blade bolt. 7. Check wiring and connections. 5. Check wiring, switches and connections. Bent blade mandrel. 5. Switch is "OFF". 2. Replace bulb(s) or lamp(s). 3. Faulty regulator (if so equipped). 4. See "TO REMOVE WHEEL...
... blades will not charge 1. Clean underside of grass, leaves, trash under mower. 4. Level mower deck. 5. Loose or damaged wiring. 5. Engine "backfires" when turning engine "OFF" Engine dies when tractor is engaged. 1. Replace mower drive belt. 3. Engine speed too slow. 1. Allow grass to ROS "ON" position. Mower deck not level. 4. Tighten blade bolt. 7. Check wiring and connections. 5. Check wiring, switches and connections. Bent blade mandrel. 5. Switch is "OFF". 2. Replace bulb(s) or lamp(s). 3. Faulty regulator (if so equipped). 4. See "TO REMOVE WHEEL...
Owners Manual
Page 31
... enclosed operator's manual. This Limited Warranty does not cover general maintenance parts and items ("Expendable Parts"), including without limitation spark plugs, bulbs, filters, lubricants, starter cords, belts, blades, and blade adapters. (d) Emissions Control Components. Please refer to the extent regulated by this Limited Warranty, Certified Factory Reconditioned or Refurbished products have a 30 Day Limited Warranty for parts and labor for exceptions - The product should be submitted and sent to handle warranty adjustments or repairs...
... enclosed operator's manual. This Limited Warranty does not cover general maintenance parts and items ("Expendable Parts"), including without limitation spark plugs, bulbs, filters, lubricants, starter cords, belts, blades, and blade adapters. (d) Emissions Control Components. Please refer to the extent regulated by this Limited Warranty, Certified Factory Reconditioned or Refurbished products have a 30 Day Limited Warranty for parts and labor for exceptions - The product should be submitted and sent to handle warranty adjustments or repairs...

Owners Manual
Page 32
... any starting fluids; (i) Pressure cleaning or steam cleaning the product; (j) Use of spark plugs other than those meeting emission performance requirements listed in the operator's manual; (k) Tampering with engine speed governor or emission components, or running engines above specified and recommended engine speeds as listed in material or workmanship. and (d) Natural discoloration of paint or other than an authorized Husqvarna servicing dealer during the warranty period; (o) Dirt contaminated grease or oil, use of oils...
... any starting fluids; (i) Pressure cleaning or steam cleaning the product; (j) Use of spark plugs other than those meeting emission performance requirements listed in the operator's manual; (k) Tampering with engine speed governor or emission components, or running engines above specified and recommended engine speeds as listed in material or workmanship. and (d) Natural discoloration of paint or other than an authorized Husqvarna servicing dealer during the warranty period; (o) Dirt contaminated grease or oil, use of oils...


