
Owners Manual
Page 6
...Presence System and Reverse Operation System (ROS) are shown for replacing motion and mower blade drive belts in the Service and Adjustments section of this manual. CHECK FOR PROPER POSITION OF ALL BELTS See the figures that are working properly (See the Operation and Maintenance sections in "... at the factory for best cutting performance. • Reduce tire pressure to PSI shown on tires. Verify that the belts are properly clamped. ✓ Before driving tractor, be sure freewheel control is in this manual. ✓CHECKLIST BEFORE YOU OPERATE YOUR NEW TRACTOR, WE WISH...
...Presence System and Reverse Operation System (ROS) are shown for replacing motion and mower blade drive belts in the Service and Adjustments section of this manual. CHECK FOR PROPER POSITION OF ALL BELTS See the figures that are working properly (See the Operation and Maintenance sections in "... at the factory for best cutting performance. • Reduce tire pressure to PSI shown on tires. Verify that the belts are properly clamped. ✓ Before driving tractor, be sure freewheel control is in this manual. ✓CHECKLIST BEFORE YOU OPERATE YOUR NEW TRACTOR, WE WISH...
Owners Manual
Page 18
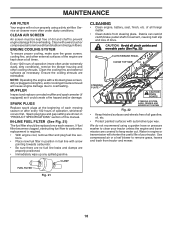
... If fuel filter becomes clogged, obstructing fuel flow to prevent engine damage from overheating. Debris can restrict clutch/brake pedal shaft movement, causing belt slip and loss of dirt and chaff to carburetor, replacement is required. • With engine cool, remove filter and plug fuel line ... garden hose or pressure washer to clean your tractor. IN-LINE FUEL FILTER (See Fig. 21) The fuel filter should be kept free of drive. CLAMP FUEL FILTER Fig. 21 CLEANING • Clean engine, battery, seat, finish, etc. Service air cleaner more often under dusty conditions. ...
... If fuel filter becomes clogged, obstructing fuel flow to prevent engine damage from overheating. Debris can restrict clutch/brake pedal shaft movement, causing belt slip and loss of dirt and chaff to carburetor, replacement is required. • With engine cool, remove filter and plug fuel line ... garden hose or pressure washer to clean your tractor. IN-LINE FUEL FILTER (See Fig. 21) The fuel filter should be kept free of drive. CLAMP FUEL FILTER Fig. 21 CLEANING • Clean engine, battery, seat, finish, etc. Service air cleaner more often under dusty conditions. ...
Owners Manual
Page 20
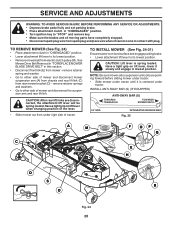
..., the attachment lift lever will be spring loaded. See Mower Drive Belt Removal in "TO REPLACE MOWER BLADE DRIVE BELT" in this section. • Disconnect front link (E) from under tractor. remove retainer spring and washer. • Go to its lowest position. • Remove mower belt from spark plug and place wire where it slowly and...
..., the attachment lift lever will be spring loaded. See Mower Drive Belt Removal in "TO REPLACE MOWER BLADE DRIVE BELT" in this section. • Disconnect front link (E) from under tractor. remove retainer spring and washer. • Go to its lowest position. • Remove mower belt from spark plug and place wire where it slowly and...
Owners Manual
Page 21
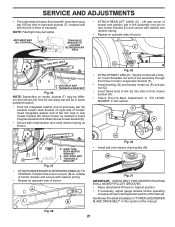
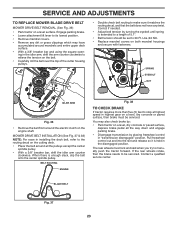
... (C) - Lift rear corner of mower and position slot in this section. ANTI-SWAY BAR T. See Mower Drive Belt Installation in "TO REPLACE MOWER BLADE DRIVE BELT" in rear mower bracket (D). Insert integrated washer end of bar into hole in this section of the manual.... RIGHT SIDE REAR MOWER BRACKET S. ANTI-SWAY BAR T. F O P E Q H Fig. 30 • Install belt onto electric clutch pulley (M). TS D D. A B D Fig. 29 •...
... (C) - Lift rear corner of mower and position slot in this section. ANTI-SWAY BAR T. See Mower Drive Belt Installation in "TO REPLACE MOWER BLADE DRIVE BELT" in rear mower bracket (D). Insert integrated washer end of bar into hole in this section of the manual.... RIGHT SIDE REAR MOWER BRACKET S. ANTI-SWAY BAR T. F O P E Q H Fig. 30 • Install belt onto electric clutch pulley (M). TS D D. A B D Fig. 29 •...
Owners Manual
Page 23
... spindle pulley. • With a 3/8" breaker bar, shift the idler arm counter clockwise. SPRING EYEBOLT NUT IDLER ARM Fig. 36 • Remove the belt from around mandrels and entire upper deck surface. • With a 3/8" breaker bar and using the square opening in the disengaged position. Contact a qualified ... transmission by turning the eyebolt until spring is held in the idler arm, shift the arm counter clockwise to 30 Ft. MOWER DRIVE BELT INSTALLATION (See Fig. 37 & 38) NOTE: For ease in "transmission disengaged" position. SERVICE AND ADJUSTMENTS TO REPLACE MOWER BLADE...
... spindle pulley. • With a 3/8" breaker bar, shift the idler arm counter clockwise. SPRING EYEBOLT NUT IDLER ARM Fig. 36 • Remove the belt from around mandrels and entire upper deck surface. • With a 3/8" breaker bar and using the square opening in the disengaged position. Contact a qualified ... transmission by turning the eyebolt until spring is held in the idler arm, shift the arm counter clockwise to 30 Ft. MOWER DRIVE BELT INSTALLATION (See Fig. 37 & 38) NOTE: For ease in "transmission disengaged" position. SERVICE AND ADJUSTMENTS TO REPLACE MOWER BLADE...

Owners Manual
Page 24
... tires due to front, over cooling fan blades (F). 6. SERVICE AND ADJUSTMENTS TO REPLACE MOTION DRIVE BELT (See Fig. 39) Park the tractor on right side of tractor. BELT REMOVAL 1. NOTE: Observe entire motion drive belt and position of tractor. Be sure belt is normal. TO REMOVE WHEEL (See Fig. 40) • Block up axle securely. •...
... tires due to front, over cooling fan blades (F). 6. SERVICE AND ADJUSTMENTS TO REPLACE MOTION DRIVE BELT (See Fig. 39) Park the tractor on right side of tractor. BELT REMOVAL 1. NOTE: Observe entire motion drive belt and position of tractor. Be sure belt is normal. TO REMOVE WHEEL (See Fig. 40) • Block up axle securely. •...
Owners Manual
Page 29
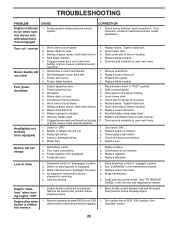
...not level. 3. Bent blade mandrel. 5. Tighten blade bolt. 2. Replace blade mandrel. 5. Buildup of mower housing. 4. Replace mower drive belt. 9. Improper blades used. 10. Replace with attachment clutch engaged 1. Blown fuse. 1. Faulty regulator (if so equipped). 4. Freewheel .... Turn switch "ON". 2. Bad battery cell(s). 2. Faulty operator-safety presence control system. uneven Mower blades will not charge 1. Motion drive belt worn, damaged, or broken. 4. Axle key missing. 1. Buildup of grass, leaves, trash under mower. 7. Frozen idler pulley. ...
...not level. 3. Bent blade mandrel. 5. Tighten blade bolt. 2. Replace blade mandrel. 5. Buildup of mower housing. 4. Replace mower drive belt. 9. Improper blades used. 10. Replace with attachment clutch engaged 1. Blown fuse. 1. Faulty regulator (if so equipped). 4. Freewheel .... Turn switch "ON". 2. Bad battery cell(s). 2. Faulty operator-safety presence control system. uneven Mower blades will not charge 1. Motion drive belt worn, damaged, or broken. 4. Axle key missing. 1. Buildup of grass, leaves, trash under mower. 7. Frozen idler pulley. ...
Owners Manual
Page 31
...be transferred to handle warranty adjustments or repairs on ExhibitA, Transmission / Transaxle (including Drive Systems) are not covered by the Limited Warranty, free of this Limited Warranty.... have a 30 Day Limited Warranty. Under this separate warranty statement for an authorized Husqvarna service provider. Adjustments after the first (30) thirty days of the product, including...("Expendable Parts"), including without limitation spark plugs, bulbs, filters, lubricants, starter cords, belts, blades, and blade adapters. (d) Emissions Control Components. The Limited Warranty does not ...
...be transferred to handle warranty adjustments or repairs on ExhibitA, Transmission / Transaxle (including Drive Systems) are not covered by the Limited Warranty, free of this Limited Warranty.... have a 30 Day Limited Warranty. Under this separate warranty statement for an authorized Husqvarna service provider. Adjustments after the first (30) thirty days of the product, including...("Expendable Parts"), including without limitation spark plugs, bulbs, filters, lubricants, starter cords, belts, blades, and blade adapters. (d) Emissions Control Components. The Limited Warranty does not ...


