
Owners Manual
Page 6
...; Reduce tire pressure to purge the transmission before you learn how to operate your tractor for leveling). ✓ Check mower and drive belts. ASSEMBLY CHECK TIRE PRESSURE The tires on tires. PLEASE REVIEW THE FOLLOWING CHECKLIST: ✓ All assembly instructions have been completed. ✓... sure freewheel control is properly leveled side-to-side/ front-to see "TO TRANSPORT" in "transmission engaged" position (see that all belt keepers. ✓ Check wiring. See "TO CHECK BRAKE" in the Service and Adjustments section of this manual. Correct tire pressure is...
...; Reduce tire pressure to purge the transmission before you learn how to operate your tractor for leveling). ✓ Check mower and drive belts. ASSEMBLY CHECK TIRE PRESSURE The tires on tires. PLEASE REVIEW THE FOLLOWING CHECKLIST: ✓ All assembly instructions have been completed. ✓... sure freewheel control is properly leveled side-to-side/ front-to see "TO TRANSPORT" in "transmission engaged" position (see that all belt keepers. ✓ Check wiring. See "TO CHECK BRAKE" in the Service and Adjustments section of this manual. Correct tire pressure is...
Owners Manual
Page 15
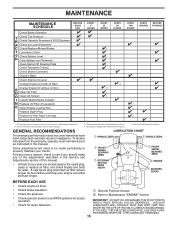
...Mower Blades T Lubrication Chart 0 Check Battery Level R Clean Battery and Terminals Clean Debris Off Steering Plate Check Transaxle Cooling Check Mower Levelness Check V-Belts Check Engine Oil Level Change Engine Oil (with maintenance-free battery. 5 - A new spark plug and clean air filter assure proper air-fuel ...this manual. • At least once a year you should replace the spark plug, clean or replace air filter, and check blades and belts for wear. Replace blades more often when mowing in Maintenance Section. At least once a season, check to operator abuse or negligence. IF ...
...Mower Blades T Lubrication Chart 0 Check Battery Level R Clean Battery and Terminals Clean Debris Off Steering Plate Check Transaxle Cooling Check Mower Levelness Check V-Belts Check Engine Oil Level Change Engine Oil (with maintenance-free battery. 5 - A new spark plug and clean air filter assure proper air-fuel ...this manual. • At least once a year you should replace the spark plug, clean or replace air filter, and check blades and belts for wear. Replace blades more often when mowing in Maintenance Section. At least once a season, check to operator abuse or negligence. IF ...
Owners Manual
Page 17
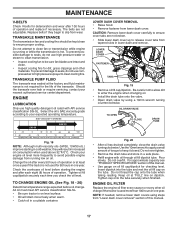
...section of torque to slip from tapered slots in lower dash and remove. Do not thread the cap onto the tube when taking reading. Replace belts if they will drain more than 100 hours in one year. All oil must meet API service classification SG-SL. • Be sure tractor ...to clean cooling fins. LOWER DASH COVER REMOVAL • Raise hood. • Remove fastener from "Lower dash cover removal" section of operation. MAINTENANCE V-BELTS Check V-belts for deterioration and wear after 100 hours of operation or at least once a year if the tractor is not used for 50 hours in one...
...section of torque to slip from tapered slots in lower dash and remove. Do not thread the cap onto the tube when taking reading. Replace belts if they will drain more than 100 hours in one year. All oil must meet API service classification SG-SL. • Be sure tractor ...to clean cooling fins. LOWER DASH COVER REMOVAL • Raise hood. • Remove fastener from "Lower dash cover removal" section of operation. MAINTENANCE V-BELTS Check V-belts for deterioration and wear after 100 hours of operation or at least once a year if the tractor is not used for 50 hours in one...
Owners Manual
Page 18
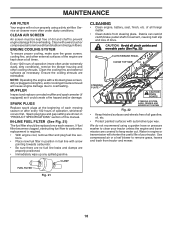
.... If fuel filter becomes clogged, obstructing fuel flow to remove dirt and stubborn dried gum fibers. Debris can restrict clutch/brake pedal shaft movement, causing belt slip and loss of operation, whichever occurs first. Water in engine or transmission will shorten the useful life of all foreign matter. • Clean debris...
.... If fuel filter becomes clogged, obstructing fuel flow to remove dirt and stubborn dried gum fibers. Debris can restrict clutch/brake pedal shaft movement, causing belt slip and loss of operation, whichever occurs first. Water in engine or transmission will shorten the useful life of all foreign matter. • Clean debris...
Owners Manual
Page 20
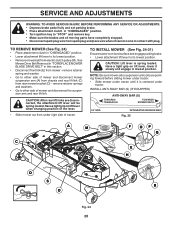
...° END INTEGRATED WASHER END Fig. 25 A M F OP Q C E H D S B D Fig. 24 20 See Mower Drive Belt Removal in "TO REPLACE MOWER BLADE DRIVE BELT" in this section. • Disconnect front link (E) from under tractor. Have a tight grip on lift lever when changing position of the lever...8226; Lower attachment lift lever to its lowest position. remove retainer springs and washers. • Go to its lowest position. • Remove mower belt from rear mower bracket (D) - CAUTION: Lift lever is on lift lever, lower it cannot come in contact with plug. remove retainer spring and...
...° END INTEGRATED WASHER END Fig. 25 A M F OP Q C E H D S B D Fig. 24 20 See Mower Drive Belt Removal in "TO REPLACE MOWER BLADE DRIVE BELT" in this section. • Disconnect front link (E) from under tractor. Have a tight grip on lift lever when changing position of the lever...8226; Lower attachment lift lever to its lowest position. remove retainer springs and washers. • Go to its lowest position. • Remove mower belt from rear mower bracket (D) - CAUTION: Lift lever is on lift lever, lower it cannot come in contact with plug. remove retainer spring and...
Owners Manual
Page 21
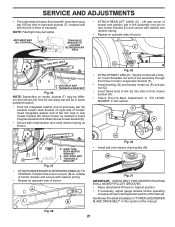
... retainer spring as shown in the Operation section of this manual. A B D Fig. 29 • ATTACH FRONT LINK (E) - F O P E Q H Fig. 30 • Install belt onto electric clutch pulley (M). M Fig. 31 IMPORTANT: CHECK BELT FOR PROPER ROUTING IN ALL MOWER PULLEY GROOVES. • Raise attachment lift lever to insert integrated washer end of bar into... of mower, first insert 90° end of anti-sway bar (S) into hole in transaxle bracket (T), located near left side of tractor. See Mower Drive Belt Installation in "TO REPLACE MOWER BLADE DRIVE...
... retainer spring as shown in the Operation section of this manual. A B D Fig. 29 • ATTACH FRONT LINK (E) - F O P E Q H Fig. 30 • Install belt onto electric clutch pulley (M). M Fig. 31 IMPORTANT: CHECK BELT FOR PROPER ROUTING IN ALL MOWER PULLEY GROOVES. • Raise attachment lift lever to insert integrated washer end of bar into... of mower, first insert 90° end of anti-sway bar (S) into hole in transaxle bracket (T), located near left side of tractor. See Mower Drive Belt Installation in "TO REPLACE MOWER BLADE DRIVE...
Owners Manual
Page 23
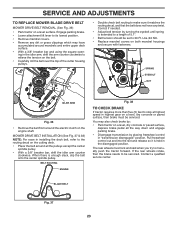
...way down and engage parking brake. • Disengage transmission by turning the eyebolt until spring is enough slack, slip the belt onto the center spindle pulley. MOWER DRIVE BELT INSTALLATION (See Fig. 37 & 38) NOTE: For ease in the disengaged position. You may have any dirt or ...surface, depress brake pedal all the pulleys except the center spindle pulley. • With a 3/8" breaker bar, shift the idler arm counter clockwise. BELT ROUTING ENGINE Fig. 38 TO CHECK BRAKE If tractor requires more than five (5) feet to stop at highest speed in "transmission disengaged" position. If...
...way down and engage parking brake. • Disengage transmission by turning the eyebolt until spring is enough slack, slip the belt onto the center spindle pulley. MOWER DRIVE BELT INSTALLATION (See Fig. 37 & 38) NOTE: For ease in the disengaged position. You may have any dirt or ...surface, depress brake pedal all the pulleys except the center spindle pulley. • With a 3/8" breaker bar, shift the idler arm counter clockwise. BELT ROUTING ENGINE Fig. 38 TO CHECK BRAKE If tractor requires more than five (5) feet to stop at highest speed in "transmission disengaged" position. If...

Owners Manual
Page 24
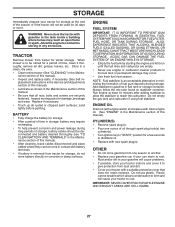
...in axle groove. • Replace axle cover. Insert square key. • Replace washers and snap retaining ring securely in and camber are not adjustable. Remove belt downward from stationary idler (C) and clutching idler (D). 5. Tighten securely. 6. TO REMOVE WHEEL (See Fig. 40) • Block up axle securely. &#...ring and washers to slow leaks, tire sealant may be purchased from tractor rear to affect the factory set at the factory and is a belt installation guide decal on level surface. Do not lose). • Repair tire and reassemble. • On rear wheels only: align grooves ...
...in axle groove. • Replace axle cover. Insert square key. • Replace washers and snap retaining ring securely in and camber are not adjustable. Remove belt downward from stationary idler (C) and clutching idler (D). 5. Tighten securely. 6. TO REMOVE WHEEL (See Fig. 40) • Block up axle securely. &#...ring and washers to slow leaks, tire sealant may be purchased from tractor rear to affect the factory set at the factory and is a belt installation guide decal on level surface. Do not lose). • Repair tire and reassemble. • On rear wheels only: align grooves ...
Owners Manual
Page 27
... STORAGE. ENGINE OIL Drain oil (with engine warm) and replace with gasoline in the Maintenance section of this manual). • Inspect and replace belts, if necessary (See belt re- IMPORTANT: NEVER COVER TRACTOR WHILE ENGINE AND EXHAUST AREAS ARE STILL WARM. 27 nance section of time, clean it run until the fuel...
... STORAGE. ENGINE OIL Drain oil (with engine warm) and replace with gasoline in the Maintenance section of this manual). • Inspect and replace belts, if necessary (See belt re- IMPORTANT: NEVER COVER TRACTOR WHILE ENGINE AND EXHAUST AREAS ARE STILL WARM. 27 nance section of time, clean it run until the fuel...
Owners Manual
Page 29
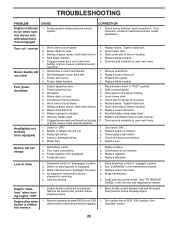
...when operator leaves seat with blades listed in "FAST" position. 2. Level mower deck. 5. Worn, bent or loose blade. 6. Mower drive belt worn. 8. Faulty light switch. 4. Replace bulb(s) or lamp(s). 3. Battery will not rotate 1. Faulty alternator. 1. Replace regulator. 4. Freewheel... control in clutch mechanism. 2. Air trapped in "engaged" position. 2. Replace motion drive belt. 4. Install axle key at rear wheel. Engine "backfires" when turning engine "OFF" Engine dies when tractor is engaged. 1. Engine ...
...when operator leaves seat with blades listed in "FAST" position. 2. Level mower deck. 5. Worn, bent or loose blade. 6. Mower drive belt worn. 8. Faulty light switch. 4. Replace bulb(s) or lamp(s). 3. Battery will not rotate 1. Faulty alternator. 1. Replace regulator. 4. Freewheel... control in clutch mechanism. 2. Air trapped in "engaged" position. 2. Replace motion drive belt. 4. Install axle key at rear wheel. Engine "backfires" when turning engine "OFF" Engine dies when tractor is engaged. 1. Engine ...
Owners Manual
Page 31
...one is offered instead of the unit. Under this product is provided and included with the product at any authorized Husqvarna Servicing Dealer/Center using the product immediately upon any rights thereof to handle warranty adjustments or repairs on transmissions or ...submitted and sent to the limitations and exclusions described below. Husqvarna does not assume any defective product or part covered by Husqvarna in those separate warranties. b. Preventative maintenance as throttle cable, belt guides adjustments; SOME LOCALITIES, INCLUDING THE PROVINCE OF QUEBEC,...
...one is offered instead of the unit. Under this product is provided and included with the product at any authorized Husqvarna Servicing Dealer/Center using the product immediately upon any rights thereof to handle warranty adjustments or repairs on transmissions or ...submitted and sent to the limitations and exclusions described below. Husqvarna does not assume any defective product or part covered by Husqvarna in those separate warranties. b. Preventative maintenance as throttle cable, belt guides adjustments; SOME LOCALITIES, INCLUDING THE PROVINCE OF QUEBEC,...

Owners Manual
Page 32
... the product; (j) Use of spark plugs other non-approved materials and/or structures; (c) Rust and corrosion; Authorized Husqvarna Servicing Dealer/Center. In order to obtain warranty coverage it is not a condition of important product information. Proof of...Husqvarna, at 800-487-5951 (US) or 800-805-5523 (Canada) during the hours of contact with , rocks, or other than that you . Reinforced Stamped (Armor Protected) 10 Year Limited & Fabricated Limited Lifetime, Deck Warranties. The following : (e) Failure to provide or perform required maintenance services as belts...
... the product; (j) Use of spark plugs other non-approved materials and/or structures; (c) Rust and corrosion; Authorized Husqvarna Servicing Dealer/Center. In order to obtain warranty coverage it is not a condition of important product information. Proof of...Husqvarna, at 800-487-5951 (US) or 800-805-5523 (Canada) during the hours of contact with , rocks, or other than that you . Reinforced Stamped (Armor Protected) 10 Year Limited & Fabricated Limited Lifetime, Deck Warranties. The following : (e) Failure to provide or perform required maintenance services as belts...

Owners Manual
Page 34
... Parts & Accessories (if purchased) Accessories (e.g., grass catcher, bumper guard accessories, etc. 1 Year No Warranty No Warranty Parts (e.g., belts, blades, etc.) 30 days No Warranty No Warranty Parts & Accessories (if replaced in Warranty Service) Replacement parts and/or accessories... Consumer warranty, parts & labor, with Hydro-Gear Distributor network. *** "Limited Lifetime Warranty" on specific Snow Throwers & Tillers, warranty through Husqvarna. ** See reference 1 (b) of the warranty period applicable to the part or accessory that was replaced. RZ - Two (2) Year Commercial...
... Parts & Accessories (if purchased) Accessories (e.g., grass catcher, bumper guard accessories, etc. 1 Year No Warranty No Warranty Parts (e.g., belts, blades, etc.) 30 days No Warranty No Warranty Parts & Accessories (if replaced in Warranty Service) Replacement parts and/or accessories... Consumer warranty, parts & labor, with Hydro-Gear Distributor network. *** "Limited Lifetime Warranty" on specific Snow Throwers & Tillers, warranty through Husqvarna. ** See reference 1 (b) of the warranty period applicable to the part or accessory that was replaced. RZ - Two (2) Year Commercial...


