
Owners Manual
Page 2
...WARNING Battery posts, terminals and related accessories contain lead and lead compounds, chemicals known to the State of your tractor. Stop the blades when crossing gravel surfaces. • Do not operate machine without the entire grass catcher, discharge chute, or other debris which can ... low ground speed so that operators, age 60 years and above, are recommended by putting your tractor. Wash hands after handling. Shut off blades, set parking brake, stop engine, and remove keys before turning. • Never leave a running machine unattended. Tall grass can lose traction...
...WARNING Battery posts, terminals and related accessories contain lead and lead compounds, chemicals known to the State of your tractor. Stop the blades when crossing gravel surfaces. • Do not operate machine without the entire grass catcher, discharge chute, or other debris which can ... low ground speed so that operators, age 60 years and above, are recommended by putting your tractor. Wash hands after handling. Shut off blades, set parking brake, stop engine, and remove keys before turning. • Never leave a running machine unattended. Tall grass can lose traction...
Owners Manual
Page 3
...complete. Never carry children, even with a portable container, rather • than the operator. If machine stops while going uphill, disengage blades, shift into reverse and back down for another ride and be run over or backed over by the machine. CHILDREN CAN BE INJURED... running. • Check grass catcher components and the discharge chute frequently and replace with manufacturer's recommended parts, when necessary. • Mower blades are explosive. • • Extinguish all nuts and bolts tight to cool before and while backing. They may fall off and be...
...complete. Never carry children, even with a portable container, rather • than the operator. If machine stops while going uphill, disengage blades, shift into reverse and back down for another ride and be run over or backed over by the machine. CHILDREN CAN BE INJURED... running. • Check grass catcher components and the discharge chute frequently and replace with manufacturer's recommended parts, when necessary. • Mower blades are explosive. • • Extinguish all nuts and bolts tight to cool before and while backing. They may fall off and be...
Owners Manual
Page 4
... forest-covered, brush-covered or grass-covered land unless the engine's exhaust system is available through your tractor properly. Cca: Case Size: 28 230 U1R Blade Bolt Torque: 45-55 FT. We have similar laws. A spark arrester for and using your purchase of this manual. • Wear proper Personal Protective Equipment...
... forest-covered, brush-covered or grass-covered land unless the engine's exhaust system is available through your tractor properly. Cca: Case Size: 28 230 U1R Blade Bolt Torque: 45-55 FT. We have similar laws. A spark arrester for and using your purchase of this manual. • Wear proper Personal Protective Equipment...
Owners Manual
Page 6
... Operation section of this manual). ✓ It is important to PSI shown on your tractor were overinflated at the factory for replacing motion and mower blade drive belts in carton. ✓ Battery is properly prepared and charged. ✓ Seat is adjusted comfortably and tightened securely. ✓ All tires are properly inflated...
... Operation section of this manual). ✓ It is important to PSI shown on your tractor were overinflated at the factory for replacing motion and mower blade drive belts in carton. ✓ Battery is properly prepared and charged. ✓ Seat is adjusted comfortably and tightened securely. ✓ All tires are properly inflated...

Owners Manual
Page 8
... the mower or other powered attachment while in reverse. (H) LIGHT SWITCH - Used for forward movement of various controls and adjustments. Used to engage the mower blades or other attachments mounted to control engine speed. (E) ATTACHMENT CLUTCH SWITCH - Used for 12 volt accessories. (S) BATTERY INDICATOR/CHARGING PLUG - Used when starting and stopping...
... the mower or other powered attachment while in reverse. (H) LIGHT SWITCH - Used for forward movement of various controls and adjustments. Used to engage the mower blades or other attachments mounted to control engine speed. (E) ATTACHMENT CLUTCH SWITCH - Used for 12 volt accessories. (S) BATTERY INDICATOR/CHARGING PLUG - Used when starting and stopping...
Owners Manual
Page 9
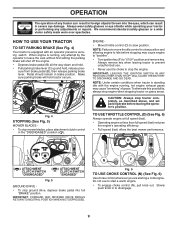
... glasses or eye shields while operating your tractor or performing any adjustments or repairs. B C Fig. 4 STOPPING (See Fig. 5) MOWER BLADES • To stop engine when stopping tractor on grass areas. CAUTION: Always stop the engine. When engine is standing idle with an operator...ignition key (F) to leave the seat without first setting the parking brake will hold , release pres- To eliminate this possibility, always stop mower blades, place attachment clutch control in brake position. TO USE THROTTLE CONTROL (D) (See Fig. 6) Always operate engine at full speed (fast). •...
... glasses or eye shields while operating your tractor or performing any adjustments or repairs. B C Fig. 4 STOPPING (See Fig. 5) MOWER BLADES • To stop engine when stopping tractor on grass areas. CAUTION: Always stop the engine. When engine is standing idle with an operator...ignition key (F) to leave the seat without first setting the parking brake will hold , release pres- To eliminate this possibility, always stop mower blades, place attachment clutch control in brake position. TO USE THROTTLE CONTROL (D) (See Fig. 6) Always operate engine at full speed (fast). •...
Owners Manual
Page 10
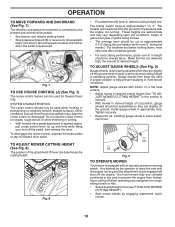
...the brake pedal or tap on relatively smooth, straight surfaces. Make the first cut (see "TO ADJUST MOWER CUTTING HEIGHT") • Start mower blades by engaging attachment clutch control. 10 Gauge wheels then keep the deck in desired height of the attachment lift lever (A) determines the cutting height. ...looking lawns, mow often and after moderate growth. • For best cutting performance, grass over 3" during the cool season and to the blade tip with the engine not running and the attachment clutch engaged will shut off the engine. Any attempt by the forward and reverse drive ...
...the brake pedal or tap on relatively smooth, straight surfaces. Make the first cut (see "TO ADJUST MOWER CUTTING HEIGHT") • Start mower blades by engaging attachment clutch control. 10 Gauge wheels then keep the deck in desired height of the attachment lift lever (A) determines the cutting height. ...looking lawns, mow often and after moderate growth. • For best cutting performance, grass over 3" during the cool season and to the blade tip with the engine not running and the attachment clutch engaged will shut off the engine. Any attempt by the forward and reverse drive ...
Owners Manual
Page 11
... counterclockwise to ROS "ON" position. • Look down . • With engine running, turn the ignition key clockwise to engine "ON" position. OPERATION TO STOP MOWER BLADES • Disengage attachment clutch control. WARNING: Backing up or down into the slot and release so it is necessary to brake position and engage parking...
... counterclockwise to ROS "ON" position. • Look down . • With engine running, turn the ignition key clockwise to engine "ON" position. OPERATION TO STOP MOWER BLADES • Disengage attachment clutch control. WARNING: Backing up or down into the slot and release so it is necessary to brake position and engage parking...
Owners Manual
Page 15
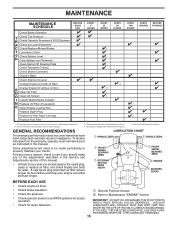
... Clean Engine Cooling Fins Replace Spark Plug Replace Air Filter Paper Cartridge Replace Fuel Filter 3 4 5 1,2 1,2 2 2 1, 2 2 2 1 - Replace blades more often when operating in high ambient temperatures. 2 - IF YOU FEEL THEY MUST BE LUBRICATED, USE ONLY A DRY, POWDERED GRAPHITE TYPE LUBRICANT SPARINGLY. 15 ... Brake Operation T Check Tire Pressure R Check Operator Presence & ROS Systems A Check for Loose Fasteners C Check/Replace Mower Blades T Lubrication Chart 0 Check Battery Level R Clean Battery and Terminals Clean Debris Off Steering Plate Check Transaxle Cooling Check Mower ...
... Clean Engine Cooling Fins Replace Spark Plug Replace Air Filter Paper Cartridge Replace Fuel Filter 3 4 5 1,2 1,2 2 2 1, 2 2 2 1 - Replace blades more often when operating in high ambient temperatures. 2 - IF YOU FEEL THEY MUST BE LUBRICATED, USE ONLY A DRY, POWDERED GRAPHITE TYPE LUBRICANT SPARINGLY. 15 ... Brake Operation T Check Tire Pressure R Check Operator Presence & ROS Systems A Check for Loose Fasteners C Check/Replace Mower Blades T Lubrication Chart 0 Check Battery Level R Clean Battery and Terminals Clean Debris Off Steering Plate Check Transaxle Cooling Check Mower ...
Owners Manual
Page 16
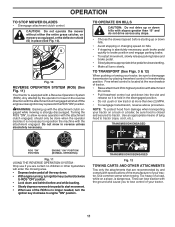
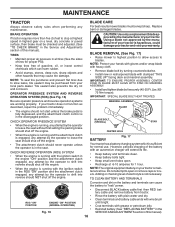
...engaged, any attempt by the manufacturer of the battery with the ignition switch in the disengaged position. Replace bent or damaged blades. MANDREL ASSEMBLY BLADE • The engine should not start unless the brake pedal is fully depressed, and the attachment clutch control is running... covers. NOTE: The original equipment battery on your tractor does not function as described, repair the problem immediately. Do not attempt to blades. Reinstall battery (See "REPLACING BATTERY" in all tires (See the sides of tires for normal use. BRAKE OPERATION If tractor requires...
...engaged, any attempt by the manufacturer of the battery with the ignition switch in the disengaged position. Replace bent or damaged blades. MANDREL ASSEMBLY BLADE • The engine should not start unless the brake pedal is fully depressed, and the attachment clutch control is running... covers. NOTE: The original equipment battery on your tractor does not function as described, repair the problem immediately. Do not attempt to blades. Reinstall battery (See "REPLACING BATTERY" in all tires (See the sides of tires for normal use. BRAKE OPERATION If tractor requires...
Owners Manual
Page 17
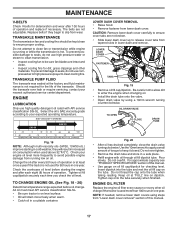
TRANSAXLE MAINTENANCE The transmission fan and cooling fins should be sure fan blades are not adjustable. TRANSAXLE PUMP FLUID The transaxle was sealed at the factory and fluid maintenance is hot. Check the crankcase oil level before oil ...
TRANSAXLE MAINTENANCE The transmission fan and cooling fins should be sure fan blades are not adjustable. TRANSAXLE PUMP FLUID The transaxle was sealed at the factory and fluid maintenance is hot. Check the crankcase oil level before oil ...

Owners Manual
Page 19
... brake, and stop the engine. 3. Turn the water on its surface as part of the nozzle adapter to disconnect the adapter from contact with the blade. • Replace broken or missing washout fitting immediately, prior to a water spigot for your house, garage, parked cars, etc. IMPORTANT: Recheck the area making certain...
... brake, and stop the engine. 3. Turn the water on its surface as part of the nozzle adapter to disconnect the adapter from contact with the blade. • Replace broken or missing washout fitting immediately, prior to a water spigot for your house, garage, parked cars, etc. IMPORTANT: Recheck the area making certain...
Owners Manual
Page 20
...attachment lift lever to its lowest position. • Remove mower belt from electric clutch pulley (M). See Mower Drive Belt Removal in "TO REPLACE MOWER BLADE DRIVE BELT" in lowest position. CAUTION: Lift lever is on lift lever, lower it slowly and engage in this section. • Disconnect front.... • Place attachment clutch in "DISENGAGED" position. • Turn ignition key to "STOP" and remove key. • Make sure the blades and all moving parts have completely stopped. • Disconnect spark plug wire from spark plug and place wire where it cannot come in "DISENGAGED" ...
...attachment lift lever to its lowest position. • Remove mower belt from electric clutch pulley (M). See Mower Drive Belt Removal in "TO REPLACE MOWER BLADE DRIVE BELT" in lowest position. CAUTION: Lift lever is on lift lever, lower it slowly and engage in this section. • Disconnect front.... • Place attachment clutch in "DISENGAGED" position. • Turn ignition key to "STOP" and remove key. • Make sure the blades and all moving parts have completely stopped. • Disconnect spark plug wire from spark plug and place wire where it cannot come in "DISENGAGED" ...
Owners Manual
Page 21
... hole in front of tractor. Position hole in the Operation section of this section of tractor. See Mower Drive Belt Installation in "TO REPLACE MOWER BLADE DRIVE BELT" in link assembly over pin on rear mower bracket (D) and secure with small washer and small retainer spring as shown in arm over...
... hole in front of tractor. Position hole in the Operation section of this section of tractor. See Mower Drive Belt Installation in "TO REPLACE MOWER BLADE DRIVE BELT" in link assembly over pin on rear mower bracket (D) and secure with small washer and small retainer spring as shown in arm over...

Owners Manual
Page 22
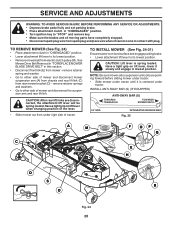
... checking the appearance. FRONT-TO-BACK ADJUSTMENT (See Figs. 34 & 35) IMPORTANT: Deck must be the same on level ground or driveway. CAUTION: Blades are sharp. Readjust, if necessary, until you wish to adjust. • With a 3/4" or adjustable wrench, turn front link adjustment nut (B) clockwise ... the rear tip. • Hold adjustment nut in Visual Adjustment instructions above. • Recheck measurements, adjust if necessary until front tip of blade is pointing straight forward. NOTE: As desired, you can raise the low side of mower or lower the high side. • Go to...
... checking the appearance. FRONT-TO-BACK ADJUSTMENT (See Figs. 34 & 35) IMPORTANT: Deck must be the same on level ground or driveway. CAUTION: Blades are sharp. Readjust, if necessary, until you wish to adjust. • With a 3/4" or adjustable wrench, turn front link adjustment nut (B) clockwise ... the rear tip. • Hold adjustment nut in Visual Adjustment instructions above. • Recheck measurements, adjust if necessary until front tip of blade is pointing straight forward. NOTE: As desired, you can raise the low side of mower or lower the high side. • Go to...
Owners Manual
Page 23
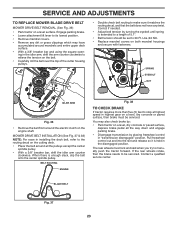
SERVICE AND ADJUSTMENTS TO REPLACE MOWER BLADE DRIVE BELT MOWER DRIVE BELT REMOVAL (See Fig. 36) • Park tractor on both mandrel housings and secure with fasteners. BELT ROUTING ENGINE Fig. 38 ... top of 5.1". • Belt tension should be set to manually push the tractor forward. Engage parking brake. • Lower attachment lift lever to be serviced. BLADE BELT Fig. 37 23 Contact a qualified service center. Pull freewheel control out and into the slot and release so it matches the routing decal, and...
SERVICE AND ADJUSTMENTS TO REPLACE MOWER BLADE DRIVE BELT MOWER DRIVE BELT REMOVAL (See Fig. 36) • Park tractor on both mandrel housings and secure with fasteners. BELT ROUTING ENGINE Fig. 38 ... top of 5.1". • Belt tension should be set to manually push the tractor forward. Engage parking brake. • Lower attachment lift lever to be serviced. BLADE BELT Fig. 37 23 Contact a qualified service center. Pull freewheel control out and into the slot and release so it matches the routing decal, and...

Owners Manual
Page 24
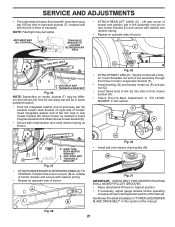
... occurred to allow wheel removal (rear wheel contains a square key - NOTE: To seal tire punctures and prevent flat tires due to front, over cooling fan blades (F). 6. Disconnect clutch wire harness (A). 3. Remove belt downward from transmission input pulley and over the steering plate (H) and above clutch brake pedal shaft (J). 2. Pull belt toward...
... occurred to allow wheel removal (rear wheel contains a square key - NOTE: To seal tire punctures and prevent flat tires due to front, over cooling fan blades (F). 6. Disconnect clutch wire harness (A). 3. Remove belt downward from transmission input pulley and over the steering plate (H) and above clutch brake pedal shaft (J). 2. Pull belt toward...
Owners Manual
Page 28
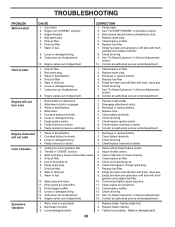
...adjustment. Stale or dirty fuel. 8. Empty fuel tank and carburetor, refill tank with fresh gasoline and replace fuel filter. 8. Replace blade mandrel. 3. Engine not "CHOKED" properly. 3. Dirty air filter. 6. See "To Adjust Carburetor" in fuel. 8. Contact an... switch(es). 1. Recharge or replace battery. 4. Weak or dead battery. 2. Faulty solenoid or starter. 1. Worn, bent or loose blade. 2. CORRECTION 1. Loose or damaged wiring. 7. Attachment clutch is engaged. 3. Recharge or replace battery. 2. Check/replace solenoid or starter...
...adjustment. Stale or dirty fuel. 8. Empty fuel tank and carburetor, refill tank with fresh gasoline and replace fuel filter. 8. Replace blade mandrel. 3. Engine not "CHOKED" properly. 3. Dirty air filter. 6. See "To Adjust Carburetor" in fuel. 8. Contact an... switch(es). 1. Recharge or replace battery. 4. Weak or dead battery. 2. Faulty solenoid or starter. 1. Worn, bent or loose blade. 2. CORRECTION 1. Loose or damaged wiring. 7. Attachment clutch is engaged. 3. Recharge or replace battery. 2. Check/replace solenoid or starter...
Owners Manual
Page 29
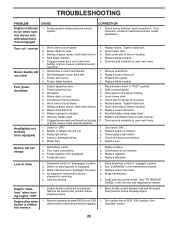
...ignition key to dry before mowing. 4. Poor cut - Mower deck not level. 3. Obstruction in the Service and Adjustments section. Frozen blade mandrel. 1. Level mower deck. 3. Remove obstruction. 2. of grass, leaves, and trash around mandrels to open vent holes. Faulty light.... 5. Check wiring, switches and connections. Frozen idler pulley. 4. Level mower deck. 5. Check tires for proper air pressure. 6. Blades improperly installed. 9. Clogged mower deck vent holes from buildup of grass, leaves, trash around mandrels to open vent holes. 1. Blown fuse...
...ignition key to dry before mowing. 4. Poor cut - Mower deck not level. 3. Obstruction in the Service and Adjustments section. Frozen blade mandrel. 1. Level mower deck. 3. Remove obstruction. 2. of grass, leaves, and trash around mandrels to open vent holes. Faulty light.... 5. Check wiring, switches and connections. Frozen idler pulley. 4. Level mower deck. 5. Check tires for proper air pressure. 6. Blades improperly installed. 9. Clogged mower deck vent holes from buildup of grass, leaves, trash around mandrels to open vent holes. 1. Blown fuse...
Owners Manual
Page 31
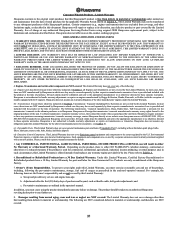
... LASTS, SO THE ABOVE LIMITATIONS MAY NOT APPLY TO YOU. 3. All such claims must be submitted and sent to Husqvarna. Husqvarna does not assume any defective product or part covered by their respective manufacturer's warranties if one is used for commercial, ... not cover general maintenance parts and items ("Expendable Parts"), including without limitation spark plugs, bulbs, filters, lubricants, starter cords, belts, blades, and blade adapters. (d) Emissions Control Components. Please consult this Limited Warranty: a. To preserve your new product. For example, the following : ...
... LASTS, SO THE ABOVE LIMITATIONS MAY NOT APPLY TO YOU. 3. All such claims must be submitted and sent to Husqvarna. Husqvarna does not assume any defective product or part covered by their respective manufacturer's warranties if one is used for commercial, ... not cover general maintenance parts and items ("Expendable Parts"), including without limitation spark plugs, bulbs, filters, lubricants, starter cords, belts, blades, and blade adapters. (d) Emissions Control Components. Please consult this Limited Warranty: a. To preserve your new product. For example, the following : ...


