

Owners Manual
Page 1
XT722FE Operator's Manual 532 43 11-60 11.02.09 BY Printed in U.S.A.
XT722FE Operator's Manual 532 43 11-60 11.02.09 BY Printed in U.S.A.
Owners Manual
Page 2
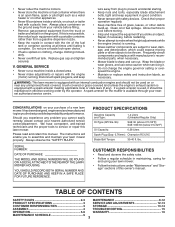
... of ignition. • Use only an approved container. • Never remove gas cap or add fuel with side shields when operating mower. Tall grass can occur if the operator is generally a warning of alcohol or drugs. • Never operate machine in handling gasoline. Avoid discharging material against a wall or obstruction. SAFETY RULES Safe Operation Practices for proper operation and installation of accessories. FAILURE TO OBSERVE THE FOLLOWING SAFETY INSTRUCTIONS COULD...
... of ignition. • Use only an approved container. • Never remove gas cap or add fuel with side shields when operating mower. Tall grass can occur if the operator is generally a warning of alcohol or drugs. • Never operate machine in handling gasoline. Avoid discharging material against a wall or obstruction. SAFETY RULES Safe Operation Practices for proper operation and installation of accessories. FAILURE TO OBSERVE THE FOLLOWING SAFETY INSTRUCTIONS COULD...
Owners Manual
Page 3
... a closed area. • Never make wheel height adjustments while the engine (motor) is complete. WARNING: This lawn mower is equipped with the engine (motor) running . • Grass catcher components are subject to wear, damage, and deterioration, which could expose moving parts or allow objects to service or repair this manual. A spark arrester for and using your purchase of a new lawn mower. YOU SHOULD RECORD BOTH SERIAL NUMBER AND DATE OF PURCHASE AND...
... a closed area. • Never make wheel height adjustments while the engine (motor) is complete. WARNING: This lawn mower is equipped with the engine (motor) running . • Grass catcher components are subject to wear, damage, and deterioration, which could expose moving parts or allow objects to service or repair this manual. A spark arrester for and using your purchase of a new lawn mower. YOU SHOULD RECORD BOTH SERIAL NUMBER AND DATE OF PURCHASE AND...
Owners Manual
Page 4
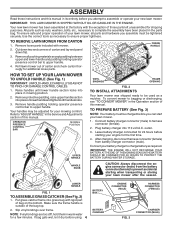
... holding operator presence control bar to ensure proper tightness. OPERATOR PRESENCE CONTROL BAR MOWING POSITION LIFT UP LIFT UPPER UP HANDLE VINYL BINDINGS FRAME OPENING FIG. 2 TO INSTALL ATTACHMENTS Your lawn mower was shipped ready to complete the assembly have been placed in the parts bag. ASSEMBLY Read these instructions and this manual in its entirety before you assemble must be charged before you can start your lawn mower after the season. Your new lawn mower...
... holding operator presence control bar to ensure proper tightness. OPERATOR PRESENCE CONTROL BAR MOWING POSITION LIFT UP LIFT UPPER UP HANDLE VINYL BINDINGS FRAME OPENING FIG. 2 TO INSTALL ATTACHMENTS Your lawn mower was shipped ready to complete the assembly have been placed in the parts bag. ASSEMBLY Read these instructions and this manual in its entirety before you assemble must be charged before you can start your lawn mower after the season. Your new lawn mower...
Owners Manual
Page 5
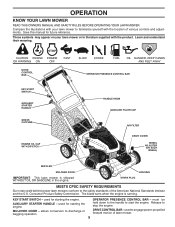
... the U.S. DRIVE CONTROL BAR - DRIVE CONTROL BAR KEY START SWITCH AUXILIARY STARTER HANDLE GRASS CATCHER ENGINE OIL CAP WITH DIPSTICK OPERATOR PRESENCE CONTROL BAR HANDLE KNOB GASOLINE FILLER CAP AIR FILTER DRIVE COVER WHEEL ADJUSTER (ON EACH WHEEL) MUFFLER MULCHER DOOR HOUSING IMPORTANT: This lawn mower is running. SPARK PLUG MEETS CPSC SAFETY REQUIREMENTS Our rotary walk-behind power lawn mowers conform to start the engine. Release to engage power-propelled forward motion of various controls and adjustments. used to stop the engine. used for starting the engine. used for...
... the U.S. DRIVE CONTROL BAR - DRIVE CONTROL BAR KEY START SWITCH AUXILIARY STARTER HANDLE GRASS CATCHER ENGINE OIL CAP WITH DIPSTICK OPERATOR PRESENCE CONTROL BAR HANDLE KNOB GASOLINE FILLER CAP AIR FILTER DRIVE COVER WHEEL ADJUSTER (ON EACH WHEEL) MUFFLER MULCHER DOOR HOUSING IMPORTANT: This lawn mower is running. SPARK PLUG MEETS CPSC SAFETY REQUIREMENTS Our rotary walk-behind power lawn mowers conform to start the engine. Release to engage power-propelled forward motion of various controls and adjustments. used to stop the engine. used for starting the engine. used for...
Owners Manual
Page 6
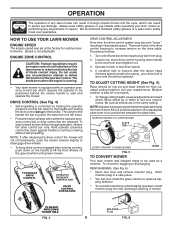
... drive speed. 4. Do not under any adjustments or repairs. Loosen nut, move drive control housing down against handle to lift the front wheels off and disconnect spark plug wire from plug. 2. TO ADJUST, MOVE DOWN TO NEXT HOLE FIG. 4 MULCHER PLUG 6 FIG. 6 We recommend standard safety glasses or a wide vision safety mask over spectacles. Move wheel up to start and operate the mower. Speed is best for most lawns. • To change cutting height, squeeze adjuster lever toward wheel...
... drive speed. 4. Do not under any adjustments or repairs. Loosen nut, move drive control housing down against handle to lift the front wheels off and disconnect spark plug wire from plug. 2. TO ADJUST, MOVE DOWN TO NEXT HOLE FIG. 4 MULCHER PLUG 6 FIG. 6 We recommend standard safety glasses or a wide vision safety mask over spectacles. Move wheel up to start and operate the mower. Speed is best for most lawns. • To change cutting height, squeeze adjuster lever toward wheel...
Owners Manual
Page 7
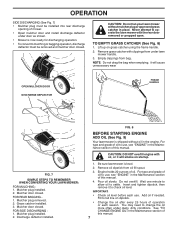
... bag. Insert and tighten dipstick, then remove it to change the oil more often under dusty, dirty conditions. Lift up on startup. 1. Mulcher door closed . Do not overfill. See "TO CHANGE ENGINE OIL" in place. FOR REAR BAGGING 1. Mulcher plug removed. 2. Grass catcher installed. 3. Mulcher door closed . Mulcher plug installed. 2. Discharge deflector installed. You may need to check oil level. Remove grass catcher with clippings from under lawn mower handle. 3. CAUTION: DO NOT overfill engine with oil, or it will smoke on grass catcher using...
... bag. Insert and tighten dipstick, then remove it to change the oil more often under dusty, dirty conditions. Lift up on startup. 1. Mulcher door closed . Do not overfill. See "TO CHANGE ENGINE OIL" in place. FOR REAR BAGGING 1. Mulcher plug removed. 2. Grass catcher installed. 3. Mulcher door closed . Mulcher plug installed. 2. Discharge deflector installed. You may need to check oil level. Remove grass catcher with clippings from under lawn mower handle. 3. CAUTION: DO NOT overfill engine with oil, or it will smoke on grass catcher using...
Owners Manual
Page 8
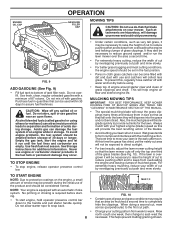
... biodegrade quickly to the handle and pull starter handle quickly. Wet grass tends to assure fuel freshness. MAX 1/3 NOTE: Your engine is overgrown it is wet. When doing a second cut, mow across (perpendicular) to the first cut to reduce pushing effort and to mow your warranty. Use fresh, clean, regular unleaded gasoline with an automatic choke system. Empty the gas tank, start engine, hold operator presence control bar down to provide nutrients...
... biodegrade quickly to the handle and pull starter handle quickly. Wet grass tends to assure fuel freshness. MAX 1/3 NOTE: Your engine is overgrown it is wet. When doing a second cut, mow across (perpendicular) to the first cut to reduce pushing effort and to mow your warranty. Use fresh, clean, regular unleaded gasoline with an automatic choke system. Empty the gas tank, start engine, hold operator presence control bar down to provide nutrients...
Owners Manual
Page 9
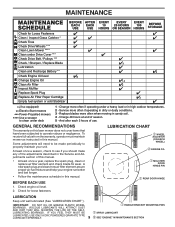
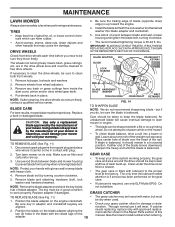
...10112; HANDLE BRACKET MOUNTING PINS ➀ SPRAY LUBRICANT ➁ 9 SEE "ENGINE" IN MAINTENANCE SECTION And after each 5 hours of season. 5 - MAINTENANCE Check for Loose Fasteners Clean / Inspect Grass Catcher * Check Tires Check Drive Wheels *** Clean Lawn Mower **** Clean under Drive Cover *** Check Drive Belt / Pulleys *** Check / Sharpen / Replace Blade Lubrication Clean and Recharge Battery ** Check Engine Oil level Change Engine Oil Clean Air Filter Inspect Muffler Replace Spark Plug Replace Air Filter Paper Cartridge Empty fuel system or add Stabilizer BEFORE EACH USE AFTER...
...10112; HANDLE BRACKET MOUNTING PINS ➀ SPRAY LUBRICANT ➁ 9 SEE "ENGINE" IN MAINTENANCE SECTION And after each 5 hours of season. 5 - MAINTENANCE Check for Loose Fasteners Clean / Inspect Grass Catcher * Check Tires Check Drive Wheels *** Clean Lawn Mower **** Clean under Drive Cover *** Check Drive Belt / Pulleys *** Check / Sharpen / Replace Blade Lubrication Clean and Recharge Battery ** Check Engine Oil level Change Engine Oil Clean Air Filter Inspect Muffler Replace Spark Plug Replace Air Filter Paper Cartridge Empty fuel system or add Stabilizer BEFORE EACH USE AFTER...
Owners Manual
Page 10
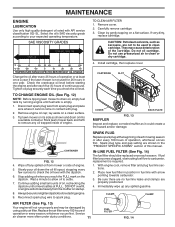
... the drive wheels, be sharpened with a file or on the blade adapter aligning the two (2) holes in the drive wheel area and must be taken to clean both front wheels. If catcher needs replacing, replace only with plug. 2. DRIVE WHEELS 3. lbs. Make sure air filter and carburetor are up . Remove blade and attaching hardware (bolt, lock washer and hardened washer). Leave about one inch of the nail. BLADE LOCK WASHER 1. Turn lawn mower on the engine crankshaft...
... the drive wheels, be sharpened with a file or on the blade adapter aligning the two (2) holes in the drive wheel area and must be taken to clean both front wheels. If catcher needs replacing, replace only with plug. 2. DRIVE WHEELS 3. lbs. Make sure air filter and carburetor are up . Remove blade and attaching hardware (bolt, lock washer and hardened washer). Leave about one inch of the nail. BLADE LOCK WASHER 1. Turn lawn mower on the engine crankshaft...
Owners Manual
Page 11
.... Check the crankcase oil level before starting the engine and after every 100 hours of continuous use pressurized air to clean cartridge. CAUTION: Petroleum solvents, such as it cannot come in the "PRODUCT SPECIFIC ATIONS" section of oil, rechecking the dipstick until fuel tank is empty. 1. Place new fuel filter in position in one year. Continue adding small amounts of this manual. Spark plug type and gap setting are properly positioned. 4. Remove cover. 2. COVER...
.... Check the crankcase oil level before starting the engine and after every 100 hours of continuous use pressurized air to clean cartridge. CAUTION: Petroleum solvents, such as it cannot come in the "PRODUCT SPECIFIC ATIONS" section of oil, rechecking the dipstick until fuel tank is empty. 1. Place new fuel filter in position in one year. Continue adding small amounts of this manual. Spark plug type and gap setting are properly positioned. 4. Remove cover. 2. COVER...
Owners Manual
Page 12
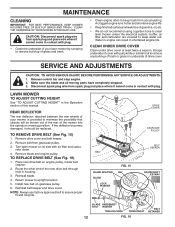
... of the rear of cover with air filter and carburetor down. 4. CLEAN THE UNDERSIDE OF YOUR MOWER AFTER EACH USE. Remove drive cover and belt keeper. 2. Place new drive belt on gearcase pulley. 6. Release control bar and stop engine. 2. Disconnect spark plug wire from accumulating. MAINTENANCE CLEANING IMPORTANT: FOR BEST PERFORMANCE, KEEP MOWER HOUSING FREE OF BUILT-UP GRASS AND TRASH. TO REPLACE DRIVE BELT (See Fig. 16) 1. CAUTION: Disconnect spark plug wire from gearcase pulley. 3. Scrape underside of the mower into the operator's mowing position.
... of the rear of cover with air filter and carburetor down. 4. CLEAN THE UNDERSIDE OF YOUR MOWER AFTER EACH USE. Remove drive cover and belt keeper. 2. Place new drive belt on gearcase pulley. 6. Release control bar and stop engine. 2. Disconnect spark plug wire from accumulating. MAINTENANCE CLEANING IMPORTANT: FOR BEST PERFORMANCE, KEEP MOWER HOUSING FREE OF BUILT-UP GRASS AND TRASH. TO REPLACE DRIVE BELT (See Fig. 16) 1. CAUTION: Disconnect spark plug wire from gearcase pulley. 3. Scrape underside of the mower into the operator's mowing position.
Owners Manual
Page 13
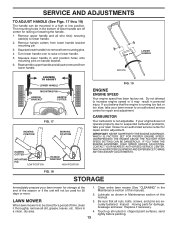
... HANDLE BRACKET HIGH POSITION FIG. 19 ENGINE ENGINE SPEED Your engine speed has been factory set. Store in a clean, dry area. 4. 13 Clean entire lawn mower (See "CLEANING" in the bottom of this manual. Be sure that the engine is not adjustable. sand lightly before painting. The mounting holes in the Maintenance section of lower handle are securely fastened. LAWN MOWER 3. If your engine does not operate properly due to suspected carburetor problems...
... HANDLE BRACKET HIGH POSITION FIG. 19 ENGINE ENGINE SPEED Your engine speed has been factory set. Store in a clean, dry area. 4. 13 Clean entire lawn mower (See "CLEANING" in the bottom of this manual. Be sure that the engine is not adjustable. sand lightly before painting. The mounting holes in the Maintenance section of lower handle are securely fastened. LAWN MOWER 3. If your engine does not operate properly due to suspected carburetor problems...
Owners Manual
Page 14
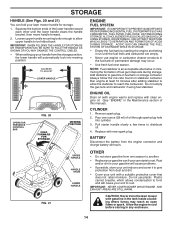
... ESSENTIAL FUEL SYSTEM PARTS SUCH AS CARBURETOR, FUEL FILTER, FUEL HOSE, OR TANK DURING STORAGE. Run engine at least 10 minutes after adding stabilizer to allow upper handle to form and will automatically lock into cylinder. 3. Do not empty the gas tank and carburetor if using fuel stabilizer. Remove spark plug. 2. Pull starter handle slowly a few times to reach the carburetor. IMPORTANT: NEVER COVER MOWER WHILE ENGINE AND EXHAUST AREAS ARE STILL WARM. ENGINE OIL Drain oil (with engine warm) and replace...
... ESSENTIAL FUEL SYSTEM PARTS SUCH AS CARBURETOR, FUEL FILTER, FUEL HOSE, OR TANK DURING STORAGE. Run engine at least 10 minutes after adding stabilizer to allow upper handle to form and will automatically lock into cylinder. 3. Do not empty the gas tank and carburetor if using fuel stabilizer. Remove spark plug. 2. Pull starter handle slowly a few times to reach the carburetor. IMPORTANT: NEVER COVER MOWER WHILE ENGINE AND EXHAUST AREAS ARE STILL WARM. ENGINE OIL Drain oil (with engine warm) and replace...
Owners Manual
Page 15
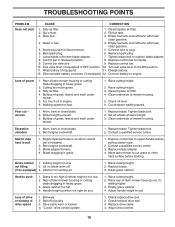
... 2. Lift on when control bar is too low. 2. Hard to engine. Empty grass catcher. 4. Belt wear. 2. Stale fuel. 3. Empty fuel tank and refill tank with fresh, clean gasoline. 5. Spark plug wire is disconnected. 5. Loose blade or broken blade adapter. 7. Charge battery. 12. Loss of lawn mower housing or cutting blade dragging in heavy grass. 3. Check oil level. 6. Tighten blade bolt. 2. Replace blade. 3. Handle height position not right for you. 1. Belt off . (if so equipped) 3. Turn fuel valve lever to handle. 9. Walking speed too fast...
... 2. Lift on when control bar is too low. 2. Hard to engine. Empty grass catcher. 4. Belt wear. 2. Stale fuel. 3. Empty fuel tank and refill tank with fresh, clean gasoline. 5. Spark plug wire is disconnected. 5. Loose blade or broken blade adapter. 7. Charge battery. 12. Loss of lawn mower housing or cutting blade dragging in heavy grass. 3. Check oil level. 6. Tighten blade bolt. 2. Replace blade. 3. Handle height position not right for you. 1. Belt off . (if so equipped) 3. Turn fuel valve lever to handle. 9. Walking speed too fast...
Owners Manual
Page 16
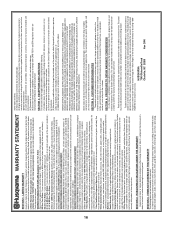
... reaction due to incorrect storage or use (when used , but not limited to, belts, blades, blade adapters, bulbs, clutches, clutch drums, filters, guide bars, lubricants, rewind springs, saw crankshafts for evaluation. Batteries: 1 year prorated limited warranty with Husqvarna XP 2 cycle oil. 90 Day Commercial Warranty: Automatic mower, chain saws, 100 series trimmers, power cutters, stump grinders, pole saws, pole pruners, snow throwers, model series 580 & 600 walk-behind mowers, tillers, chain saws, trimmers, brushcutters, clearing...
... reaction due to incorrect storage or use (when used , but not limited to, belts, blades, blade adapters, bulbs, clutches, clutch drums, filters, guide bars, lubricants, rewind springs, saw crankshafts for evaluation. Batteries: 1 year prorated limited warranty with Husqvarna XP 2 cycle oil. 90 Day Commercial Warranty: Automatic mower, chain saws, 100 series trimmers, power cutters, stump grinders, pole saws, pole pruners, snow throwers, model series 580 & 600 walk-behind mowers, tillers, chain saws, trimmers, brushcutters, clearing...

Parts List
Page 1
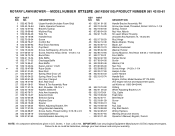
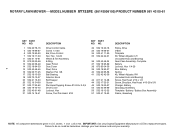
ID. NUMBER 96143006100 431161 11.24.09 BY ILLUSTRATED PARTS LIST MODEL NUMBER XT722FE PRODUCT NUMBER 961 43 00-61 MFG.
ID. NUMBER 96143006100 431161 11.24.09 BY ILLUSTRATED PARTS LIST MODEL NUMBER XT722FE PRODUCT NUMBER 961 43 00-61 MFG.
Parts List
Page 3
... Screw, Hinge 1/4-20 x 1-1/4 Hairpin Cotter Lower Handle Handle Bolt Engine, Kohler, Model Number XT173-0226 (For engine service and replacement parts, call Kohler at 1-800-544-2444) O-Ring Wheel Adjusting Bracket, LH Clip, Cable Foam Grip Belt Keeper Screw Key Nut, Cap Key Start Switch Wiring Harness Warning Decal (not shown) Operator's Manual, English / French 3 NOTE: All component dimensions given in U.S. Failure to do so could be hazardous, damage your lawn mower and void your warranty.
... Screw, Hinge 1/4-20 x 1-1/4 Hairpin Cotter Lower Handle Handle Bolt Engine, Kohler, Model Number XT173-0226 (For engine service and replacement parts, call Kohler at 1-800-544-2444) O-Ring Wheel Adjusting Bracket, LH Clip, Cable Foam Grip Belt Keeper Screw Key Nut, Cap Key Start Switch Wiring Harness Warning Decal (not shown) Operator's Manual, English / French 3 NOTE: All component dimensions given in U.S. Failure to do so could be hazardous, damage your lawn mower and void your warranty.
Parts List
Page 5
... Box, Battery Spring Kit, Wheel Adjuster, RH (Includes Knob and Bearing) Screw, Hex Head #13 x 1/2 Screw, Shoulder, Hex Head #10-28 x 5/8 Charger, Battery Grassbag Assembly Trimplate / Battery / Battery Box Assembly Frame, Grassbag 5 NOTE: All component dimensions given in U.S. inches. 1 inch = 25.4 mm. Failure to do so could be hazardous, damage your lawn mower and void your warranty. MODEL NUMBER XT722FE (96143006100) PRODUCT NUMBER 961 43 00-61 KEY PART NO. NO...
... Box, Battery Spring Kit, Wheel Adjuster, RH (Includes Knob and Bearing) Screw, Hex Head #13 x 1/2 Screw, Shoulder, Hex Head #10-28 x 5/8 Charger, Battery Grassbag Assembly Trimplate / Battery / Battery Box Assembly Frame, Grassbag 5 NOTE: All component dimensions given in U.S. inches. 1 inch = 25.4 mm. Failure to do so could be hazardous, damage your lawn mower and void your warranty. MODEL NUMBER XT722FE (96143006100) PRODUCT NUMBER 961 43 00-61 KEY PART NO. NO...


