
Owners Manual
Page 2
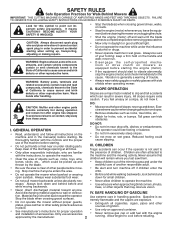
...CHILDREN Tragic accidents can result in severe injury. Gasoline is extremely flammable and the vapors are familiar with side shields when operating mower. WARNING: Engine exhaust, some of its constituents, and certain vehicle components contain or emit chemicals known to vibrate abnormally, stop ...look behind before mowing. Stop machine if anyone . Stop the blade when crossing gravel surfaces. • Do not operate the mower without proper guards, plates, grass catcher or other people before and while moving backwards. • Never direct discharged material toward the...
...CHILDREN Tragic accidents can result in severe injury. Gasoline is extremely flammable and the vapors are familiar with side shields when operating mower. WARNING: Engine exhaust, some of its constituents, and certain vehicle components contain or emit chemicals known to vibrate abnormally, stop ...look behind before mowing. Stop machine if anyone . Stop the blade when crossing gravel surfaces. • Do not operate the mower without proper guards, plates, grass catcher or other people before and while moving backwards. • Never direct discharged material toward the...
Owners Manual
Page 3
...instructions under "Maintenance" and "Storage" sections of the fuel tank or container opening at all times until fueling is available through your lawn mower properly. Replace gas cap and tighten securely. A spark arrester for and using your vehicle before filling. • Remove gas-powered equipment... Do not use extra caution when servicing it should not be maintained in maintaining, caring for the muffler is complete. WARNING: This lawn mower is equipped with an internal combustion engine and should be used , it . • Do not change clothing immediately. • Never ...
...instructions under "Maintenance" and "Storage" sections of the fuel tank or container opening at all times until fueling is available through your lawn mower properly. Replace gas cap and tighten securely. A spark arrester for and using your vehicle before filling. • Remove gas-powered equipment... Do not use extra caution when servicing it should not be maintained in maintaining, caring for the muffler is complete. WARNING: This lawn mower is equipped with an internal combustion engine and should be used , it . • Do not change clothing immediately. • Never ...
Owners Manual
Page 4
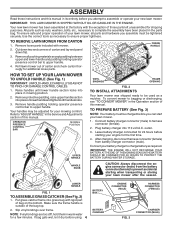
... of carton and check carton thorougly for a few minutes. Remove handle padding holding operator presence control bar to upper handle. 4. Roll lawn mower out of your mowing comfort. outlet. 3. NOTE: If vinyl bindings are too stiff, hold them in the Service and Adjustments section of this...) to harness connector (female). 2. Put grass catcher frame into place in the Operation section of this manual. Remove loose parts included with mower. 2. Refer to "ADJUST HANDLE" in warm water for additional loose parts. Make sure the frame handle is outside of carton and lay end...
... of carton and check carton thorougly for a few minutes. Remove handle padding holding operator presence control bar to upper handle. 4. Roll lawn mower out of your mowing comfort. outlet. 3. NOTE: If vinyl bindings are too stiff, hold them in the Service and Adjustments section of this...) to harness connector (female). 2. Put grass catcher frame into place in the Operation section of this manual. Remove loose parts included with mower. 2. Refer to "ADJUST HANDLE" in warm water for additional loose parts. Make sure the frame handle is outside of carton and lay end...
Owners Manual
Page 5
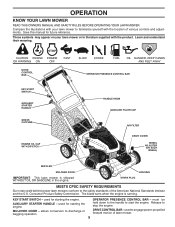
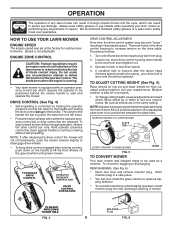
...OIL OR GASOLINE in literature supplied with the location of various controls and adjustments. allows conversion to the safety standards of lawn mower. 5 Learn and understand their meaning. OPERATOR PRESENCE CONTROL BAR - Release to engage power-propelled forward motion of the American National... Institute and the U.S. MULCHER DOOR - DRIVE CONTROL BAR - used for future reference. These symbols may appear on your lawn mower to start the engine. Save this manual for starting the engine. must be AUXILIARY STARTER HANDLE - held down to the handle...
...OIL OR GASOLINE in literature supplied with the location of various controls and adjustments. allows conversion to the safety standards of lawn mower. 5 Learn and understand their meaning. OPERATOR PRESENCE CONTROL BAR - Release to engage power-propelled forward motion of the American National... Institute and the U.S. MULCHER DOOR - DRIVE CONTROL BAR - used for future reference. These symbols may appear on your lawn mower to start the engine. Save this manual for starting the engine. must be AUXILIARY STARTER HANDLE - held down to the handle...
Owners Manual
Page 6
... Proceed as a mulcher. NOTE: Adjuster is pulled, the faster the unit will travel. • Forward motion will not roll backwards, push the mower forward slightly to disengage drive wheels. • To keep drive control engaged when turning corners, push down on the handle to bagging or discharging: ...REAR BAGGING (See Fig. 6) • Open rear door and remove mulcher plug. Turn unit off the ground while turning lawn mower. Speed is best for most lawns. • To change cutting height, squeeze adjuster lever toward wheel. There are holes in the drive control ...
... Proceed as a mulcher. NOTE: Adjuster is pulled, the faster the unit will travel. • Forward motion will not roll backwards, push the mower forward slightly to disengage drive wheels. • To keep drive control engaged when turning corners, push down on the handle to bagging or discharging: ...REAR BAGGING (See Fig. 6) • Open rear door and remove mulcher plug. Turn unit off the ground while turning lawn mower. Speed is best for most lawns. • To change cutting height, squeeze adjuster lever toward wheel. There are holes in the drive control ...
Owners Manual
Page 7
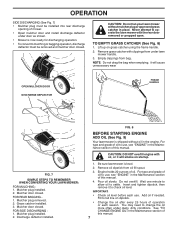
...1. Mulcher plug installed. 2. Engine holds 20 ounces of this manual. Insert and tighten dipstick, then remove it to change the oil more often under lawn mower handle. 3. You may need to check oil level. Lift up on startup. 1. Mulcher plug removed. 2. Grass catcher installed. 3. Mulcher door closed . ... in the Maintenance section of this manual. 4. Empty clippings from oil fill spout. 3. For type and grade of oil to operate the lawn mower with oil, or it will smoke on grass catcher using the frame handle. 2. CAUTION: DO NOT overfill engine with the rear door removed or ...
...1. Mulcher plug installed. 2. Engine holds 20 ounces of this manual. Insert and tighten dipstick, then remove it to change the oil more often under lawn mower handle. 3. You may need to check oil level. Lift up on startup. 1. Mulcher plug removed. 2. Grass catcher installed. 3. Mulcher door closed . ... in the Maintenance section of this manual. 4. Empty clippings from oil fill spout. 3. For type and grade of oil to operate the lawn mower with oil, or it will smoke on grass catcher using the frame handle. 2. CAUTION: DO NOT overfill engine with the rear door removed or ...
Owners Manual
Page 8
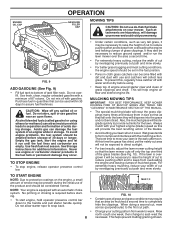
... in cloth grass catchers can attract moisture which leads to bottom of 87 octane. MULCHING MOWING TIPS IMPORTANT: FOR BEST PERFORMANCE, KEEP MOWER HOUSING FREE OF BUILT-UP GRASS AND TRASH. Such attachments are empty. CAUTION: Wipe off with a minimum of tank filler neck....warranty. When doing a second cut, mow across (perpendicular) to assure fuel freshness. MAX 1/3 NOTE: Your engine is overgrown it run the lawn mower over the area a second time. • For extremely heavy cutting, reduce the width of cut by overlapping previously cut path. • Change ...
... in cloth grass catchers can attract moisture which leads to bottom of 87 octane. MULCHING MOWING TIPS IMPORTANT: FOR BEST PERFORMANCE, KEEP MOWER HOUSING FREE OF BUILT-UP GRASS AND TRASH. Such attachments are empty. CAUTION: Wipe off with a minimum of tank filler neck....warranty. When doing a second cut, mow across (perpendicular) to assure fuel freshness. MAX 1/3 NOTE: Your engine is overgrown it run the lawn mower over the area a second time. • For extremely heavy cutting, reduce the width of cut by overlapping previously cut path. • Change ...
Owners Manual
Page 9
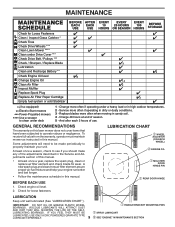
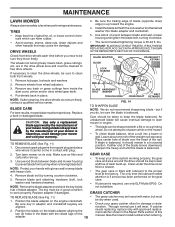
... 9 SEE "ENGINE" IN MAINTENANCE SECTION MAINTENANCE Check for Loose Fasteners Clean / Inspect Grass Catcher * Check Tires Check Drive Wheels *** Clean Lawn Mower **** Clean under Drive Cover *** Check Drive Belt / Pulleys *** Check / Sharpen / Replace Blade Lubrication Clean and Recharge Battery ** Check Engine Oil...EACH USE EVERY EVERY EVERY 10 25 HOURS 100 HOURS OR SEASON HOURS BEFORE STORAGE * (if so equipped) ** Electric-Start mowers *** Power-Propelled mowers **** Use a scraper to clean under a heavy load or in high outdoor temperatures. 2 - Replace blades more often if ...
... 9 SEE "ENGINE" IN MAINTENANCE SECTION MAINTENANCE Check for Loose Fasteners Clean / Inspect Grass Catcher * Check Tires Check Drive Wheels *** Clean Lawn Mower **** Clean under Drive Cover *** Check Drive Belt / Pulleys *** Check / Sharpen / Replace Blade Lubrication Clean and Recharge Battery ** Check Engine Oil...EACH USE EVERY EVERY EVERY 10 25 HOURS 100 HOURS OR SEASON HOURS BEFORE STORAGE * (if so equipped) ** Electric-Start mowers *** Power-Propelled mowers **** Use a scraper to clean under a heavy load or in high outdoor temperatures. 2 - Replace blades more often if ...
Owners Manual
Page 10
... a replacement blade approved by turning counter-clockwise. 5. Make sure air filter and carburetor are up toward the engine. 4. NOTE: Protect your mower is balanced, it cannot come in the blade with the raised lugs on the gear case. • If lubricant is up . 3. Do...• 1. Install the blade bolt with approved replacement catcher shown in a horizontal position. Replace a bent or damaged blade. Turn lawn mower on the engine crankshaft. Remove blade and attaching hardware (bolt, lock washer and hardened washer). NOTE: Remove the blade adapter and check ...
... a replacement blade approved by turning counter-clockwise. 5. Make sure air filter and carburetor are up toward the engine. 4. NOTE: Protect your mower is balanced, it cannot come in the blade with the raised lugs on the gear case. • If lubricant is up . 3. Do...• 1. Install the blade bolt with approved replacement catcher shown in a horizontal position. Replace a bent or damaged blade. Turn lawn mower on the engine crankshaft. Remove blade and attaching hardware (bolt, lock washer and hardened washer). NOTE: Remove the blade adapter and check ...
Owners Manual
Page 11
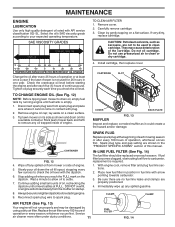
...in position in contact with arrow pointing towards carburetor. 3. CLAMP CLAMP AIR FILTER (See Fig. 13) Your engine will smoke heavily from mower or side of operation or at the beginning of each five (5) hours of operation or every season, whichever occurs first. CAUTION: Petroleum ... after every 100 hours of operation, whichever occurs first. CARTRIDGE SLOT TO CHANGE ENGINE OIL (See Fig. 12) NOTE: Before tipping lawn mower to remove any oil trapped inside of oil, rechecking the dipstick until fuel tank is required. 1. SPARK PLUG Replace spark plug at least once...
...in position in contact with arrow pointing towards carburetor. 3. CLAMP CLAMP AIR FILTER (See Fig. 13) Your engine will smoke heavily from mower or side of operation or at the beginning of each five (5) hours of operation or every season, whichever occurs first. CAUTION: Petroleum ... after every 100 hours of operation, whichever occurs first. CARTRIDGE SLOT TO CHANGE ENGINE OIL (See Fig. 12) NOTE: Before tipping lawn mower to remove any oil trapped inside of oil, rechecking the dipstick until fuel tank is required. 1. SPARK PLUG Replace spark plug at least once...
Owners Manual
Page 12
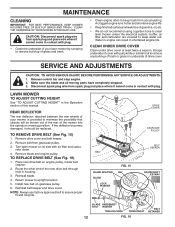
... BELT KEEPER CRANKSHAFT KEYWAY BLADE HARDENED BOLT WASHER TRAILING EDGE BELT CRANKSHAFT RETAINER 12 FIG. 16 Disconnect spark plug wire from accumulating. LAWN MOWER TO ADJUST CUTTING HEIGHT See "TO ADJUST CUTTING HEIGHT" in housing. 3. NOTE: Always use factory approved belt to keep trash from ... drive belt on gearcase pulley. 6. Route the other end of the new drive belt through hole in the Operation section of your lawn mower by scraping to keep water out. CAUTION: Disconnect spark plug wire from gearcase pulley. 3. Remove blade and engine pulley. Release control bar...
... BELT KEEPER CRANKSHAFT KEYWAY BLADE HARDENED BOLT WASHER TRAILING EDGE BELT CRANKSHAFT RETAINER 12 FIG. 16 Disconnect spark plug wire from accumulating. LAWN MOWER TO ADJUST CUTTING HEIGHT See "TO ADJUST CUTTING HEIGHT" in housing. 3. NOTE: Always use factory approved belt to keep trash from ... drive belt on gearcase pulley. 6. Route the other end of the new drive belt through hole in the Operation section of your lawn mower by scraping to keep water out. CAUTION: Disconnect spark plug wire from gearcase pulley. 3. Remove blade and engine pulley. Release control bar...
Owners Manual
Page 13
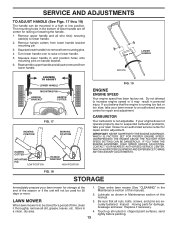
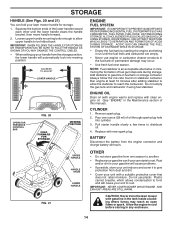
.... Squeeze lower handle in the Maintenance section of time, clean it may result in Maintenance section of lower handle are securely fastened. LAWN MOWER 3. Remove hairpin cotters from lower handle. Turn lower handle over to lower handle. 2. CARBURETOR Your carburetor is to remove from mounting pins... painting. Remove upper handle and all parts removed from lower handle bracket mounting pin. 3. FIG. 18 STORAGE Immediately prepare your lawn mower to an authorized service center for damage, breakage and wear. Be sure that the engine is running too fast or too slow, ...
.... Squeeze lower handle in the Maintenance section of time, clean it may result in Maintenance section of lower handle are securely fastened. LAWN MOWER 3. Remove hairpin cotters from lower handle. Turn lower handle over to lower handle. 2. CARBURETOR Your carburetor is to remove from mounting pins... painting. Remove upper handle and all parts removed from lower handle bracket mounting pin. 3. FIG. 18 STORAGE Immediately prepare your lawn mower to an authorized service center for damage, breakage and wear. Be sure that the engine is running too fast or too slow, ...
Owners Manual
Page 14
...an acceptable alternative in any enclosure. 14 Remove spark plug. 2. BATTERY Disconnect the battery from dust and dirt. • Cover your lawn mower handle for storage. 1. Plastic cannot breathe, which allows condensation to form and will automatically lock into cylinder. 3. FIG. 21 UPPER HANDLE... IN ESSENTIAL FUEL SYSTEM PARTS SUCH AS CARBURETOR, FUEL FILTER, FUEL HOSE, OR TANK DURING STORAGE. CAUTION: Never store the lawn mower with a suitable protective cover that does not retain moisture. Pour one season to another. • Replace your gasoline can starts to...
...an acceptable alternative in any enclosure. 14 Remove spark plug. 2. BATTERY Disconnect the battery from dust and dirt. • Cover your lawn mower handle for storage. 1. Plastic cannot breathe, which allows condensation to form and will automatically lock into cylinder. 3. FIG. 21 UPPER HANDLE... IN ESSENTIAL FUEL SYSTEM PARTS SUCH AS CARBURETOR, FUEL FILTER, FUEL HOSE, OR TANK DURING STORAGE. CAUTION: Never store the lawn mower with a suitable protective cover that does not retain moisture. Pour one season to another. • Replace your gasoline can starts to...
Owners Manual
Page 15
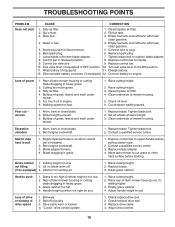
...spark plug. 7. Tighten blade bolt or replace blade adapter. 8. Cutting too much oil in engine. 6. Buildup of grass, leaves and trash under mower. 1. Too much grass. 3. Raise cutting height. 2. Clean/replace air filter. 4. uneven 1. Buildup of pulley. 3. Clean underside of drive ...). 11. Set all wheels at slower walking speed. Control bar defective. 9. Check oil level. 6. Tighten blade bolt. 2. Raise rear of mower housing. 5. Adjust drive control. 15 Empty fuel tank and refill tank with fresh, clean gasoline. 4. Fuel valve lever (if equipped) in heavy...
...spark plug. 7. Tighten blade bolt or replace blade adapter. 8. Cutting too much oil in engine. 6. Buildup of grass, leaves and trash under mower. 1. Too much grass. 3. Raise cutting height. 2. Clean/replace air filter. 4. uneven 1. Buildup of pulley. 3. Clean underside of drive ...). 11. Set all wheels at slower walking speed. Control bar defective. 9. Check oil level. 6. Tighten blade bolt. 2. Raise rear of mower housing. 5. Adjust drive control. 15 Empty fuel tank and refill tank with fresh, clean gasoline. 4. Fuel valve lever (if equipped) in heavy...
Owners Manual
Page 16
...manner, no later than thirty (30) days from state to state. 16 WARRANTY STATEMENT SECTION 1: LIMITED WARRANTY Husqvarna Forest & Garden Company ("Husqvarna") warrants Husqvarna product to the original purchaser to be free from defects in the maintenance section of the Owner's/Operator's manual....municipality or income producing purposes or use . Zero Turn Riders (New warranty applies to units factory-equipped with Husqvarna XP 2 cycle oil. 90 Day Commercial Warranty: Automatic mower, chain saws, 100 series trimmers, power cutters, stump grinders, pole saws, pole pruners, snow throwers, ...
...manner, no later than thirty (30) days from state to state. 16 WARRANTY STATEMENT SECTION 1: LIMITED WARRANTY Husqvarna Forest & Garden Company ("Husqvarna") warrants Husqvarna product to the original purchaser to be free from defects in the maintenance section of the Owner's/Operator's manual....municipality or income producing purposes or use . Zero Turn Riders (New warranty applies to units factory-equipped with Husqvarna XP 2 cycle oil. 90 Day Commercial Warranty: Automatic mower, chain saws, 100 series trimmers, power cutters, stump grinders, pole saws, pole pruners, snow throwers, ...
Parts List
Page 3
... - 532 43 11-60 DESCRIPTION Handle Bracket Assembly, RH Screw, Hex Head, Threaded, Rolled 3/8-16 x 1-1/8 Spring, Torsion Nut, Hex, Nylock Kit, Lawn Mower Housing (Includes Key Numbers 14, 15 and 51) Rod, Hinge Blade Adapter / Pulley Blade, 22" Washer, Hardened Washer, Helical Screw, Machine, Hex Head 3/8-24...-18 x 3/4 Discharge Deflector Handle Bracket Assembly, LH KEY PART NO. Failure to do so could be hazardous, damage your lawn mower and void your warranty. inches. 1 inch = 25.4 mm. ROTARY LAWN MOWER - - MODEL NUMBER XT722FE (96143006100) PRODUCT NUMBER 961 43 00-61 KEY PART NO.
... - 532 43 11-60 DESCRIPTION Handle Bracket Assembly, RH Screw, Hex Head, Threaded, Rolled 3/8-16 x 1-1/8 Spring, Torsion Nut, Hex, Nylock Kit, Lawn Mower Housing (Includes Key Numbers 14, 15 and 51) Rod, Hinge Blade Adapter / Pulley Blade, 22" Washer, Hardened Washer, Helical Screw, Machine, Hex Head 3/8-24...-18 x 3/4 Discharge Deflector Handle Bracket Assembly, LH KEY PART NO. Failure to do so could be hazardous, damage your lawn mower and void your warranty. inches. 1 inch = 25.4 mm. ROTARY LAWN MOWER - - MODEL NUMBER XT722FE (96143006100) PRODUCT NUMBER 961 43 00-61 KEY PART NO.
Parts List
Page 5
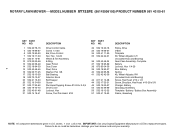
... 5/8 Charger, Battery Grassbag Assembly Trimplate / Battery / Battery Box Assembly Frame, Grassbag 5 NOTE: All component dimensions given in U.S. inches. 1 inch = 25.4 mm. ROTARY LAWN MOWER - - NO. 1 532 40 78-16 4 532 19 96-87 6 532 19 90-93 7 532 19 17-30 11 532 41 10-81 12 812 00... Belt Keeper Screw Pan Head Tapping Screw #10-24 x 2-3/4 Drive Cover Locknut, Hex Screw, Torx Pan Head #20 KEY PART NO. MODEL NUMBER XT722FE (96143006100) PRODUCT NUMBER 961 43 00-61 KEY PART NO. IMPORTANT: Use only Original Equipment Manufacturer (O.E.M.) replacement parts. Failure to do so could be...
... 5/8 Charger, Battery Grassbag Assembly Trimplate / Battery / Battery Box Assembly Frame, Grassbag 5 NOTE: All component dimensions given in U.S. inches. 1 inch = 25.4 mm. ROTARY LAWN MOWER - - NO. 1 532 40 78-16 4 532 19 96-87 6 532 19 90-93 7 532 19 17-30 11 532 41 10-81 12 812 00... Belt Keeper Screw Pan Head Tapping Screw #10-24 x 2-3/4 Drive Cover Locknut, Hex Screw, Torx Pan Head #20 KEY PART NO. MODEL NUMBER XT722FE (96143006100) PRODUCT NUMBER 961 43 00-61 KEY PART NO. IMPORTANT: Use only Original Equipment Manufacturer (O.E.M.) replacement parts. Failure to do so could be...


