

Owners Manual
Page 4
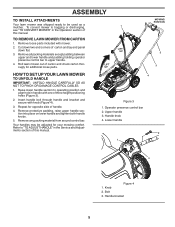
...YOUR LAWN MOWER READ THIS OPERATOR'S MANUAL AND SAFETY RULES BEFORE OPERATING YOUR LAWN MOWER. Learn and understand their meaning. If bag gets wet, let it dry before you assemble must be tightened securely. All parts such as necessary to familiarize yourself with ... and hardware you attempt to assemble or operate your new lawn mower. Frame opening 4 Handle Bolt 2 Handle Knob 2 Washout Adapter 1 Grass Bag 1 Grass Bag Frame 1 TO ASSEMBLE GRASS CATCHER 3 1. Frame handle 3. Slip vinyl bindings over frame. Compare the illustrations with your lawn mower or in ...
...YOUR LAWN MOWER READ THIS OPERATOR'S MANUAL AND SAFETY RULES BEFORE OPERATING YOUR LAWN MOWER. Learn and understand their meaning. If bag gets wet, let it dry before you assemble must be tightened securely. All parts such as necessary to familiarize yourself with ... and hardware you attempt to assemble or operate your new lawn mower. Frame opening 4 Handle Bolt 2 Handle Knob 2 Washout Adapter 1 Grass Bag 1 Grass Bag Frame 1 TO ASSEMBLE GRASS CATCHER 3 1. Frame handle 3. Slip vinyl bindings over frame. Compare the illustrations with your lawn mower or in ...
Owners Manual
Page 5
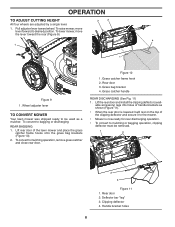
... and secure with mower. 2. Refer to "TO ADJUST HANDLE" in the Service and Adjustments section of this manual. Handle knob 4. Raise lower handle section to bagging or discharging, see "TO CONVERT MOWER" in handle with one of this manual. 4 Figure 3 1. To convert mower to operating position and align hole in the...
... and secure with mower. 2. Refer to "TO ADJUST HANDLE" in the Service and Adjustments section of this manual. Handle knob 4. Raise lower handle section to bagging or discharging, see "TO CONVERT MOWER" in handle with one of this manual. 4 Figure 3 1. To convert mower to operating position and align hole in the...
Owners Manual
Page 8
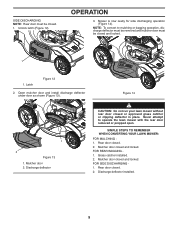
...• Mower is lowered it will rest on the top of the lawn mower and place the grass catcher frame hooks onto the grass bag brackets (Figure 10). 2. Grass catcher handle REAR DISCHARGING (See Fig. 11) 1. OPERATION TO ADJUST CUTTING HEIGHT All four wheels are adjusted... holes 8 Pull adjuster lever toward the rear (Figure 9). 3 2 4 1 1 Figure 9 1. Rear door 3. Grass bag bracket 4. Wheel adjuster lever TO CONVERT MOWER Your lawn mower was shipped ready to mulching or bagging operation, clipping deflector must be used as shown (Figure 11). • When the rear door is now...
...• Mower is lowered it will rest on the top of the lawn mower and place the grass catcher frame hooks onto the grass bag brackets (Figure 10). 2. Grass catcher handle REAR DISCHARGING (See Fig. 11) 1. OPERATION TO ADJUST CUTTING HEIGHT All four wheels are adjusted... holes 8 Pull adjuster lever toward the rear (Figure 9). 3 2 4 1 1 Figure 9 1. Rear door 3. Grass bag bracket 4. Wheel adjuster lever TO CONVERT MOWER Your lawn mower was shipped ready to mulching or bagging operation, clipping deflector must be used as shown (Figure 11). • When the rear door is now...
Owners Manual
Page 9
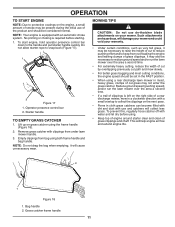
Discharge deflector CAUTION: Do not run your lawn mower without rear door closed and locked. 1 1. Never attempt to mulching or bagging operation, discharge deflector must be removed and mulcher door must be closed or approved grass catcher or clipping deflector in place. FOR SIDE DISCHARGING 1. NOTE: ... . 2. Figure 14 1 2 Figure 13 1. Mulcher door 2. OPERATION 3. Open mulcher door and install discharge deflector under door as shown (Figure 13). Rear door closed . 1. FOR REAR BAGGING 1. Rear door closed. 2.
Discharge deflector CAUTION: Do not run your lawn mower without rear door closed and locked. 1 1. Never attempt to mulching or bagging operation, discharge deflector must be removed and mulcher door must be closed or approved grass catcher or clipping deflector in place. FOR SIDE DISCHARGING 1. NOTE: ... . 2. Figure 14 1 2 Figure 13 1. Mulcher door 2. OPERATION 3. Open mulcher door and install discharge deflector under door as shown (Figure 13). Rear door closed . 1. FOR REAR BAGGING 1. Rear door closed. 2.
Owners Manual
Page 11
.... • For extremely heavy cutting, reduce the width of cut by overlapping previously cut path and mow slowly. • For better grass bagging and most cutting conditions, the engine speed should be considered normal. To start engine, hold operator presence control bar down to snap back (Figure... 17). 1 2 Figure 17 1. Grass catcher frame handle 11 NOTE: Do not drag the bag when emptying; Operator presence control bar 2. it may be present during the initial use de-thatcher blade attachments on your warranty. • Under certain...
.... • For extremely heavy cutting, reduce the width of cut by overlapping previously cut path and mow slowly. • For better grass bagging and most cutting conditions, the engine speed should be considered normal. To start engine, hold operator presence control bar down to snap back (Figure... 17). 1 2 Figure 17 1. Grass catcher frame handle 11 NOTE: Do not drag the bag when emptying; Operator presence control bar 2. it may be present during the initial use de-thatcher blade attachments on your warranty. • Under certain...


