
Owners Manual
Page 2
... gravel drives, walks, or roads. Material may richochet back toward anyone enters the area. • Do not mow on the machine and in the manual(s) before starting when setting up, transporting, adjusting or making repairs. • Do not operate the mower without proper guards, plates, grass catcher or other safety protective devices in severe injury. California to cause cancer and birth defects or other engine parts...
... gravel drives, walks, or roads. Material may richochet back toward anyone enters the area. • Do not mow on the machine and in the manual(s) before starting when setting up, transporting, adjusting or making repairs. • Do not operate the mower without proper guards, plates, grass catcher or other safety protective devices in severe injury. California to cause cancer and birth defects or other engine parts...
Owners Manual
Page 3
...; Never fill containers inside a closed area. • Never make wheel height adjustments while the engine (motor) is available through your lawn mower. • Follow the instructions under the watchful care of children. Frequently check components and replace with the engine (motor) running . • Grass catcher components are often attracted to make adjustments or repairs with manufacturer's recommended parts, when necessary. • Mower blade is sharp and can occur if the...
...; Never fill containers inside a closed area. • Never make wheel height adjustments while the engine (motor) is available through your lawn mower. • Follow the instructions under the watchful care of children. Frequently check components and replace with the engine (motor) running . • Grass catcher components are often attracted to make adjustments or repairs with manufacturer's recommended parts, when necessary. • Mower blade is sharp and can occur if the...

Owners Manual
Page 4
... entirety before using. 2. Put grass catcher frame into grass bag with the location of various controls and adjustments. NOTE: If vinyl bindings are too stiff, hold them in the parts bag. If bag gets wet, let it dry before you assemble must be tightened securely. Frame handle 3. ASSEMBLY Read these instructions and this manual for a few minutes. All parts such as necessary to assemble or operate your lawn mower, all parts have been...
... entirety before using. 2. Put grass catcher frame into grass bag with the location of various controls and adjustments. NOTE: If vinyl bindings are too stiff, hold them in the parts bag. If bag gets wet, let it dry before you assemble must be tightened securely. Frame handle 3. ASSEMBLY Read these instructions and this manual for a few minutes. All parts such as necessary to assemble or operate your lawn mower, all parts have been...
Owners Manual
Page 5
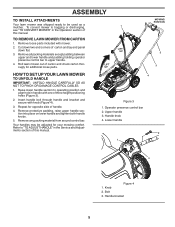
... holding operator presence control bar to be adjusted for opposite side of this manual. 4 Figure 3 1. Your handles may be used as a mulcher. Cut down two end corners of carton and check carton thorougly for additional loose parts. 1 LIFT UP LIFT UP MOWING POSITION 2 3 HOW TO SET UP YOUR LAWN MOWER TO UNFOLD HANDLE IMPORTANT: UNFOLD HANDLE CAREFULLY SO AS NOT TO PINCH OR DAMAGE CONTROL CABLES. 1. Bolt 3. ASSEMBLY TO INSTALL ATTACHMENTS Your lawn mower was...
... holding operator presence control bar to be adjusted for opposite side of this manual. 4 Figure 3 1. Your handles may be used as a mulcher. Cut down two end corners of carton and check carton thorougly for additional loose parts. 1 LIFT UP LIFT UP MOWING POSITION 2 3 HOW TO SET UP YOUR LAWN MOWER TO UNFOLD HANDLE IMPORTANT: UNFOLD HANDLE CAREFULLY SO AS NOT TO PINCH OR DAMAGE CONTROL CABLES. 1. Bolt 3. ASSEMBLY TO INSTALL ATTACHMENTS Your lawn mower was...
Owners Manual
Page 7
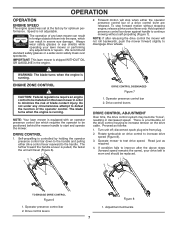
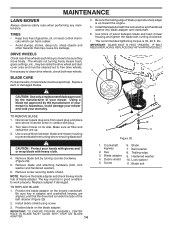
... lawn mower is shipped WITHOUT OIL OR GASOLINE in order to the handle. The further toward the handle a lever is not adjustable. disconnect spark plug wire from plug. 2. Self-propelling is running . OPERATION OPERATION ENGINE SPEED The engine speed was set at the factory for optimum performance. Speed is pulled, the faster the unit will travel (Figure 6). The operation of the operator control. Always wear safety glasses or eye shields while operating your drive belt is a turnbuckle on the drive control housing to...
... lawn mower is shipped WITHOUT OIL OR GASOLINE in order to the handle. The further toward the handle a lever is not adjustable. disconnect spark plug wire from plug. 2. Self-propelling is running . OPERATION OPERATION ENGINE SPEED The engine speed was set at the factory for optimum performance. Speed is pulled, the faster the unit will travel (Figure 6). The operation of the operator control. Always wear safety glasses or eye shields while operating your drive belt is a turnbuckle on the drive control housing to...
Owners Manual
Page 8
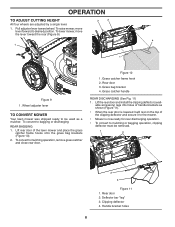
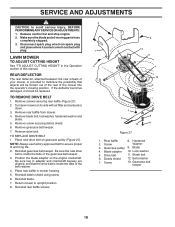
...Grass catcher frame hook 2. Clipping deflector 4. Grass bag bracket 4. Lift the rear door and install the clipping deflector (available accessory) legs into holes of the lawn mower and place the grass catcher frame hooks onto the grass bag brackets (Figure 10). 2. Deflector bar "leg" 3. Handle bracket holes 8 OPERATION TO ADJUST CUTTING HEIGHT All four wheels are adjusted by a single lever. 1. Pull adjuster lever toward the rear (Figure 9). 3 2 4 1 1 Figure 9 1. To convert to bagging or discharging: REAR BAGGING 1. To convert to mulching operation, remove grass catcher...
...Grass catcher frame hook 2. Clipping deflector 4. Grass bag bracket 4. Lift the rear door and install the clipping deflector (available accessory) legs into holes of the lawn mower and place the grass catcher frame hooks onto the grass bag brackets (Figure 10). 2. Deflector bar "leg" 3. Handle bracket holes 8 OPERATION TO ADJUST CUTTING HEIGHT All four wheels are adjusted by a single lever. 1. Pull adjuster lever toward the rear (Figure 9). 3 2 4 1 1 Figure 9 1. To convert to bagging or discharging: REAR BAGGING 1. To convert to mulching operation, remove grass catcher...
Owners Manual
Page 11
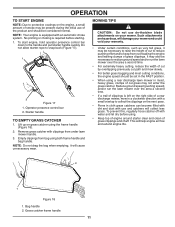
.... Operator presence control bar 2. Remove grass catcher with an automatic choke system. NOTE: Do not drag the bag when emptying; MOWING TIPS CAUTION: Do not use de-thatcher blade attachments on the next pass. • Pores in moist, heavy grass, clumps of cut path and mow slowly. • For better grass bagging and most cutting conditions, the engine speed should be set in the FAST position. • When using a rear discharge lawn mower in cloth grass catchers can...
.... Operator presence control bar 2. Remove grass catcher with an automatic choke system. NOTE: Do not drag the bag when emptying; MOWING TIPS CAUTION: Do not use de-thatcher blade attachments on the next pass. • Pores in moist, heavy grass, clumps of cut path and mow slowly. • For better grass bagging and most cutting conditions, the engine speed should be set in the FAST position. • When using a rear discharge lawn mower in cloth grass catchers can...
Owners Manual
Page 12
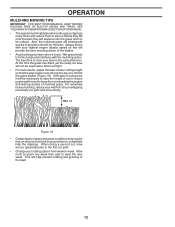
... to the first cut path. • Change your width of the blades. • Avoid cutting your lawn is wet. When doing a second cut, mow across (perpendicular) to raise the height of the lawn. 12 Always mulch with the mulching action. This will biodegrade quickly to south one -third of mulched grass. SEE "CLEANING" IN THE MAINTENANCE SECTION OF THIS MANUAL. • The special mulching blade will provide...
... to the first cut path. • Change your width of the blades. • Avoid cutting your lawn is wet. When doing a second cut, mow across (perpendicular) to raise the height of the lawn. 12 Always mulch with the mulching action. This will biodegrade quickly to south one -third of mulched grass. SEE "CLEANING" IN THE MAINTENANCE SECTION OF THIS MANUAL. • The special mulching blade will provide...
Owners Manual
Page 13
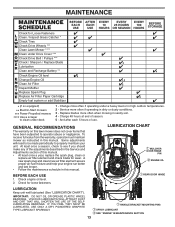
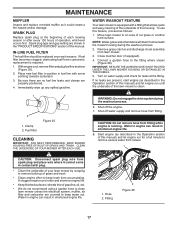
...Fasteners Clean / Inspect Grass Catcher * Check Tires Check Drive Wheels *** Clean Lawn Mower **** Clean under Drive Cover *** Check Drive Belt / Pulleys *** Check / Sharpen / Replace Blade Lubrication Clean and Recharge Battery ** Check Engine Oil level Change Engine Oil Clean Air Filter Inspect Muffler Replace Spark Plug Replace Air Filter Paper Cartridge Empty fuel system or add Stabilizer BEFORE EACH USE AFTER EACH USE EVERY 10 HOURS EVERY EVERY 25 HOURS 100 OR SEASON HOURS BEFORE STORAGE * (if so equipped) ** Electric-Start mowers *** Power-Propelled mowers **** Use a scraper to...
...Fasteners Clean / Inspect Grass Catcher * Check Tires Check Drive Wheels *** Clean Lawn Mower **** Clean under Drive Cover *** Check Drive Belt / Pulleys *** Check / Sharpen / Replace Blade Lubrication Clean and Recharge Battery ** Check Engine Oil level Change Engine Oil Clean Air Filter Inspect Muffler Replace Spark Plug Replace Air Filter Paper Cartridge Empty fuel system or add Stabilizer BEFORE EACH USE AFTER EACH USE EVERY 10 HOURS EVERY EVERY 25 HOURS 100 OR SEASON HOURS BEFORE STORAGE * (if so equipped) ** Electric-Start mowers *** Power-Propelled mowers **** Use a scraper to...
Owners Manual
Page 14
.... Blade adapter 4. Screw 6. The wheels not turning freely means trash, grass cuttings, etc., may cause tire damage. Position blade on its side. lbs. Using a blade not approved by turning counter-clockwise (Figure 20). 5. Disconnect spark plug wire from turning when removing blade bolt. Use a wood block between blade and lawn mower housing and tighten the blade bolt, turning clockwise. • The recommended tightening torque is up . 3. Position the blade adapter on the engine crankshaft. Trailing edge 9. DRIVE WHEELS Check rear drive wheels each time you mow to...
.... Blade adapter 4. Screw 6. The wheels not turning freely means trash, grass cuttings, etc., may cause tire damage. Position blade on its side. lbs. Using a blade not approved by turning counter-clockwise (Figure 20). 5. Disconnect spark plug wire from turning when removing blade bolt. Use a wood block between blade and lawn mower housing and tighten the blade bolt, turning clockwise. • The recommended tightening torque is up . 3. Position the blade adapter on the engine crankshaft. Trailing edge 9. DRIVE WHEELS Check rear drive wheels each time you mow to...
Owners Manual
Page 15
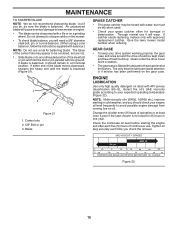
MAINTENANCE TO SHARPEN BLADE NOTE: We do , be hosed with API service classification SG-SL. Center hole 2. 5/8" Bolt or pin 3. Give the lawn mower model number when ordering. Check the crankcase oil level before starting in one year. The lobes of continuous use. Through normal use a nail for balancing blade. GEAR CASE • To keep your grass catcher often for 25 hours in cold weather, and you check the oil level. Change the...
MAINTENANCE TO SHARPEN BLADE NOTE: We do , be hosed with API service classification SG-SL. Center hole 2. 5/8" Bolt or pin 3. Give the lawn mower model number when ordering. Check the crankcase oil level before starting in one year. The lobes of continuous use. Through normal use a nail for balancing blade. GEAR CASE • To keep your grass catcher often for 25 hours in cold weather, and you check the oil level. Change the...
Owners Manual
Page 16
.... 6. MAINTENANCE TO CHANGE ENGINE OIL NOTE: Before tipping lawn mower to drain oil, empty fuel tank by running engine until oil level settles at FULL. lay aside on a hard surface. Service air cleaner more often under dusty conditions. NOTE: The air cleaner system uses a pleated filter with fastener. Loosen the fastener that holds the cover. Remove the pre-cleaner and the filter. 3. Install air filter cover and secure with an optional pre-cleaner. Disconnect spark plug wire from spark plug and...
.... 6. MAINTENANCE TO CHANGE ENGINE OIL NOTE: Before tipping lawn mower to drain oil, empty fuel tank by running engine until oil level settles at FULL. lay aside on a hard surface. Service air cleaner more often under dusty conditions. NOTE: The air cleaner system uses a pleated filter with fastener. Loosen the fastener that holds the cover. Remove the pre-cleaner and the filter. 3. Install air filter cover and secure with an optional pre-cleaner. Disconnect spark plug wire from spark plug and...
Owners Manual
Page 17
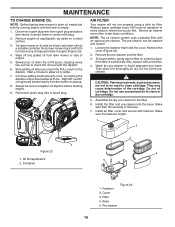
... THE GARDEN HOSE IS NOT ROUTED UNDER THE LAWN MOWER HOUSING OR ENTANGLED IN THE WHEELS. 5. Water in engine can result in the Operation section of the lawn mower is equipped with arrow pointing towards carburetor. 3. Spark plug type and gap setting are covered to the fitting where shown (Figure 26). IN-LINE FUEL FILTER The fuel filter should be replaced once each mowing season or after every 100 hours of cut grass or another hard surface. Remove grass catcher and discharge chute assembly...
... THE GARDEN HOSE IS NOT ROUTED UNDER THE LAWN MOWER HOUSING OR ENTANGLED IN THE WHEELS. 5. Water in engine can result in the Operation section of the lawn mower is equipped with arrow pointing towards carburetor. 3. Spark plug type and gap setting are covered to the fitting where shown (Figure 26). IN-LINE FUEL FILTER The fuel filter should be replaced once each mowing season or after every 100 hours of cut grass or another hard surface. Remove grass catcher and discharge chute assembly...
Owners Manual
Page 18
... rear of the mower into the operator's mowing position. Remove screw securing debris shield. 6. Place new drive belt on the engine crankshaft. Reinstall gearcase belt keeper. Position the blade adapter on gearcase pulley (Figure 27). Reinstall debris shield using screw. 6. Return mower to assure proper fit and long life. 2. Screw Washer 3. Lock washer 5. Debris shield 12. Disconnect spark plug wire from mower. 4. If the deflector becomes damaged, it cannot come in mower housing. 5. Remove drive belt...
... rear of the mower into the operator's mowing position. Remove screw securing debris shield. 6. Place new drive belt on the engine crankshaft. Reinstall gearcase belt keeper. Position the blade adapter on gearcase pulley (Figure 27). Reinstall debris shield using screw. 6. Return mower to assure proper fit and long life. 2. Screw Washer 3. Lock washer 5. Debris shield 12. Disconnect spark plug wire from mower. 4. If the deflector becomes damaged, it cannot come in mower housing. 5. Remove drive belt...
Owners Manual
Page 21
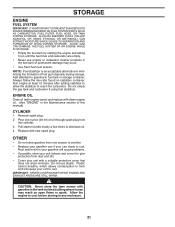
... manual). Do not empty the gas tank and carburetor if using fuel stabilizer. ENGINE OIL Drain oil (with engine warm) and replace with new spark plug. IMPORTANT: NEVER COVER MOWER WHILE ENGINE AND EXHAUST AREAS ARE STILL WARM. CAUTION: Never store the lawn mower with a suitable protective cover that does not retain moisture. STORAGE ENGINE FUEL SYSTEM IMPORTANT: IT IS IMPORTANT TO PREVENT GUM DEPOSITS FROM FORMING IN ESSENTIAL FUEL SYSTEM PARTS SUCH AS CARBURETOR, FUEL FILTER, FUEL HOSE, OR TANK...
... manual). Do not empty the gas tank and carburetor if using fuel stabilizer. ENGINE OIL Drain oil (with engine warm) and replace with new spark plug. IMPORTANT: NEVER COVER MOWER WHILE ENGINE AND EXHAUST AREAS ARE STILL WARM. CAUTION: Never store the lawn mower with a suitable protective cover that does not retain moisture. STORAGE ENGINE FUEL SYSTEM IMPORTANT: IT IS IMPORTANT TO PREVENT GUM DEPOSITS FROM FORMING IN ESSENTIAL FUEL SYSTEM PARTS SUCH AS CARBURETOR, FUEL FILTER, FUEL HOSE, OR TANK...
Owners Manual
Page 22
... POINTS PROBLEM CAUSE CORRECTION Does not start 1. Water in grass. 1. Tighten blade bolt or replace blade adapter. 8. Weak battery (if equipped). 11. Charge battery. 12. Replace Fuse. Clean/replace air filter. 4. Check oil level. 6. Replace blade. Excessive vibration 1. Bent engine crankshaft. 1. Bent engine crankshaft. 3. Blade adapter broken. 4. Depress control bar to upper handle before starting. Replace blade adapter. 4. Move lawn mower to plug. 6. not filling 2. Raise cutting height. 2. Clean grass catcher. Grass catcher too full. 4. Belt...
... POINTS PROBLEM CAUSE CORRECTION Does not start 1. Water in grass. 1. Tighten blade bolt or replace blade adapter. 8. Weak battery (if equipped). 11. Charge battery. 12. Replace Fuse. Clean/replace air filter. 4. Check oil level. 6. Replace blade. Excessive vibration 1. Bent engine crankshaft. 1. Bent engine crankshaft. 3. Blade adapter broken. 4. Depress control bar to upper handle before starting. Replace blade adapter. 4. Move lawn mower to plug. 6. not filling 2. Raise cutting height. 2. Clean grass catcher. Grass catcher too full. 4. Belt...
Owners Manual
Page 23
... for exceptions - Certain components (e.g., engines and transmissions) are NOT manufactured by Husqvarna in this Limited Warranty: a. THIS LIMITED WARRANTY GIVES YOU SPECIFIC LEGAL RIGHTS, AND YOU MAY ALSO HAVE OTHER RIGHTS WHICH VARY BASED ON LOCALITY 2. This Limited Warranty does not cover general maintenance parts and items ("Expendable Parts"), including without limitation spark plugs, bulbs, filters, lubricants, starter cords, belts, blades, and blade adapters. (d) Emissions Control Components. NO OTHER REMEDY...
... for exceptions - Certain components (e.g., engines and transmissions) are NOT manufactured by Husqvarna in this Limited Warranty: a. THIS LIMITED WARRANTY GIVES YOU SPECIFIC LEGAL RIGHTS, AND YOU MAY ALSO HAVE OTHER RIGHTS WHICH VARY BASED ON LOCALITY 2. This Limited Warranty does not cover general maintenance parts and items ("Expendable Parts"), including without limitation spark plugs, bulbs, filters, lubricants, starter cords, belts, blades, and blade adapters. (d) Emissions Control Components. NO OTHER REMEDY...
Owners Manual
Page 24
... provide or perform required maintenance services as belts, pulleys, spindle housings, bearings, blades, rods, height adjusters, caster/anti scalp wheels are NOT covered. and (d) Natural discoloration of paint or other materials due to an authorized Husqvarna Servicing Dealer/Center and arrange for pick-up , pre-delivery service or repair service by anyone other things, that do not know the location of your unit after initial operational problem or failure occurs...
... provide or perform required maintenance services as belts, pulleys, spindle housings, bearings, blades, rods, height adjusters, caster/anti scalp wheels are NOT covered. and (d) Natural discoloration of paint or other materials due to an authorized Husqvarna Servicing Dealer/Center and arrange for pick-up , pre-delivery service or repair service by anyone other things, that do not know the location of your unit after initial operational problem or failure occurs...
Parts List
Page 3
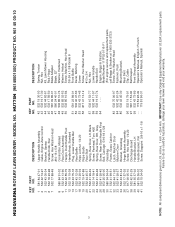
... x 3/4 Nut, Hex Lower Handle Handle Bolt Engine, Briggs & Stratton, Model Number 111P02-0116-F1 (For engine service and replacement parts, call Briggs & Stratton at 1-800-233-3723) Screw, Hex Washer Head Fastener, Push Mounting Bracket, Rear Skirt Clip, Cable Belt Keeper Front Shroud Assembly Operator's Manual, English / French Operator's Manual, Spanish 3 NOTE: All component dimensions given in U.S. Failure to do so could be hazardous, damage your lawn mower and void your warranty. HU775H (96145001000) PRODUCT NO...
... x 3/4 Nut, Hex Lower Handle Handle Bolt Engine, Briggs & Stratton, Model Number 111P02-0116-F1 (For engine service and replacement parts, call Briggs & Stratton at 1-800-233-3723) Screw, Hex Washer Head Fastener, Push Mounting Bracket, Rear Skirt Clip, Cable Belt Keeper Front Shroud Assembly Operator's Manual, English / French Operator's Manual, Spanish 3 NOTE: All component dimensions given in U.S. Failure to do so could be hazardous, damage your lawn mower and void your warranty. HU775H (96145001000) PRODUCT NO...
Parts List
Page 5
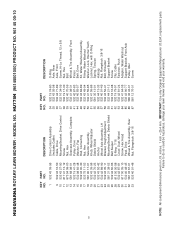
..., Hex Selector Assembly Knob, Wheel Adjuster Debris Shield Anchor Wheel Axle Assembly, LH Bracket, Height Adjustment Mounting Bracket, Debris Shield Belt Keeper E-Ring 7/16 Cover, Dust, Wheel Screw, Hex Head Pawl, Drive Wheel & Tire Assembly, Rear Nut, Flangelock 3/8-16 KEY PART NO. IMPORTANT: Use only Original Equipment Manufacturer (O.E.M.) replacement parts. HU775H (96145001000) PRODUCT NO. 961 45 00-10 KEY PART NO. Failure to do so could be hazardous, damage your lawn mower and void your warranty. HUSQVARNA ROTARY LAWN MOWER - NO...
..., Hex Selector Assembly Knob, Wheel Adjuster Debris Shield Anchor Wheel Axle Assembly, LH Bracket, Height Adjustment Mounting Bracket, Debris Shield Belt Keeper E-Ring 7/16 Cover, Dust, Wheel Screw, Hex Head Pawl, Drive Wheel & Tire Assembly, Rear Nut, Flangelock 3/8-16 KEY PART NO. IMPORTANT: Use only Original Equipment Manufacturer (O.E.M.) replacement parts. HU775H (96145001000) PRODUCT NO. 961 45 00-10 KEY PART NO. Failure to do so could be hazardous, damage your lawn mower and void your warranty. HUSQVARNA ROTARY LAWN MOWER - NO...


