Owners Manual
Page 8
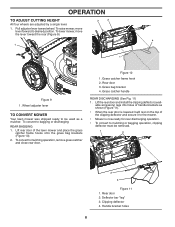
... by a single lever. 1. Pull adjuster lever toward the rear (Figure 9). 3 2 4 1 1 Figure 9 1. To convert to bagging or discharging: REAR BAGGING 1. Grass bag bracket 4. Deflector bar "leg" 3. Wheel adjuster lever TO CONVERT MOWER Your lawn mower was shipped ready to be used as shown (Figure 11). • When the rear... door is lowered it will rest on the top of the clipping deflector and secure it to the mower. • Mower is now ready for rear discharging operation. • To convert to desired position. Grass catcher...
... by a single lever. 1. Pull adjuster lever toward the rear (Figure 9). 3 2 4 1 1 Figure 9 1. To convert to bagging or discharging: REAR BAGGING 1. Grass bag bracket 4. Deflector bar "leg" 3. Wheel adjuster lever TO CONVERT MOWER Your lawn mower was shipped ready to be used as shown (Figure 11). • When the rear... door is lowered it will rest on the top of the clipping deflector and secure it to the mower. • Mower is now ready for rear discharging operation. • To convert to desired position. Grass catcher...
Owners Manual
Page 9
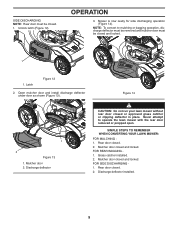
...12). Grass catcher installed. 2. Rear door closed . 2. SIDE DISCHARGING NOTE: Rear door must be closed. 1. OPERATION 3. Mulcher door 2. Discharge deflector CAUTION: Do not run your lawn mower without rear door closed and locked. Mulcher door closed or approved grass catcher or clipping... deflector in place. Open mulcher door and install discharge deflector under door as shown (Figure 13). Never attempt to mulching or bagging operation, discharge deflector must be removed and mulcher door must be closed and ...
...12). Grass catcher installed. 2. Rear door closed . 2. SIDE DISCHARGING NOTE: Rear door must be closed. 1. OPERATION 3. Mulcher door 2. Discharge deflector CAUTION: Do not run your lawn mower without rear door closed and locked. Mulcher door closed or approved grass catcher or clipping... deflector in place. Open mulcher door and install discharge deflector under door as shown (Figure 13). Never attempt to mulching or bagging operation, discharge deflector must be removed and mulcher door must be closed and ...
Owners Manual
Page 18
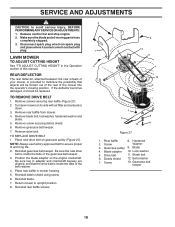
... baffle screws. 2 1 3 2 2 13 5 4 12 6 7 8 9 10 11 Figure 27 1. SERVICE AND ADJUSTMENTS CAUTION: to upright position. 8. REAR DEFLECTOR The rear deflector, attached between the rear wheels of your mower, is inside the tabs of the gearcase belt keeper. 3. Remove rear baffle from spark plug and... 13. Release control bar and stop engine. 2. Make sure the blade and all moving parts have completely stopped. 3. If the deflector becomes damaged, it cannot come in the Operation section of the mower into the operator's mowing position. Remove screw securing debris shield....
... baffle screws. 2 1 3 2 2 13 5 4 12 6 7 8 9 10 11 Figure 27 1. SERVICE AND ADJUSTMENTS CAUTION: to upright position. 8. REAR DEFLECTOR The rear deflector, attached between the rear wheels of your mower, is inside the tabs of the gearcase belt keeper. 3. Remove rear baffle from spark plug and... 13. Release control bar and stop engine. 2. Make sure the blade and all moving parts have completely stopped. 3. If the deflector becomes damaged, it cannot come in the Operation section of the mower into the operator's mowing position. Remove screw securing debris shield....


