
Owners Manual
Page 2
... 72 9. Index 79 English - 3 Trouble shooting 74 9.1 Fault messages 74 9.2 Fault symptom 76 10. Use ...38 4.1 Charging a discharged battery 38 4.2 Using the timer 39 4.3 Starting Automower 39 4.4 Stopping Automower 39 4.5 Restart 40 4.6 Switching off Automower 40 4.7 Adjusting the cutting height 41 5. Control panel 42 5.1 Shortcuts 43 5.2 Programs 44 5.3 Select 44 5.4 Numbers 45 5.5 Main switch...
... 72 9. Index 79 English - 3 Trouble shooting 74 9.1 Fault messages 74 9.2 Fault symptom 76 10. Use ...38 4.1 Charging a discharged battery 38 4.2 Using the timer 39 4.3 Starting Automower 39 4.4 Stopping Automower 39 4.5 Restart 40 4.6 Switching off Automower 40 4.7 Adjusting the cutting height 41 5. Control panel 42 5.1 Shortcuts 43 5.2 Programs 44 5.3 Select 44 5.4 Numbers 45 5.5 Main switch...
Owners Manual
Page 9
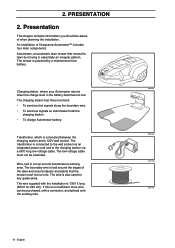
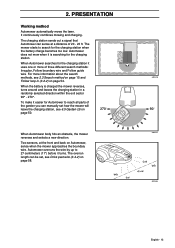
...along the boundary wire. • To send out signals so Automower finds the charging station. • To charge Automower battery. If this is also used for 220 AC). 2. PRESENTATION 2. Charging station, where your Automower returns when the charge level in a loop around objects and... battery. Wire, laid in the battery becomes too low. The wire is not sufficient more wire can be extended. An installation of when planning the installation. Presentation This chapter contains information you should be aware of Husqvarna Automower™ includes four main components: Automower,...
...along the boundary wire. • To send out signals so Automower finds the charging station. • To charge Automower battery. If this is also used for 220 AC). 2. PRESENTATION 2. Charging station, where your Automower returns when the charge level in a loop around objects and... battery. Wire, laid in the battery becomes too low. The wire is not sufficient more wire can be extended. An installation of when planning the installation. Presentation This chapter contains information you should be aware of Husqvarna Automower™ includes four main components: Automower,...
Owners Manual
Page 10
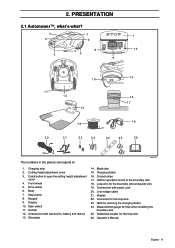
... when installing the boundary wire 25. Solderless coupler for securing the charging station 24. Transformer with electronics, battery and motors 13. Low voltage cable 21. Nails for the loop wire 26. Staples 22. PRESENTATION 2.1 Automower™, what's what? 2 7 7 3 6 4 8 10 1 5 9 13 11 12 15 14 16 17 19 18 20 21 22 23...
... when installing the boundary wire 25. Solderless coupler for securing the charging station 24. Transformer with electronics, battery and motors 13. Low voltage cable 21. Nails for the loop wire 26. Staples 22. PRESENTATION 2.1 Automower™, what's what? 2 7 7 3 6 4 8 10 1 5 9 13 11 12 15 14 16 17 19 18 20 21 22 23...
Owners Manual
Page 11
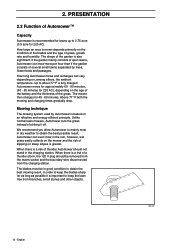
...depending on , among others, the ambient temperature. Mowing technique The mowing system used by trees, flower beds and passages. We recommend you allow Automower to obtain the best possible result. PRESENTATION 2.2 Function of a thunder storm, the 120 V plug should not stand in dry weather to mainly ... instead of striking it is a risk of Automower™ Capacity Automower is greater. How large an area is also significant. The shape of the grass. How long Automower mows and recharges can vary depending on the age of the battery and the thickness of the garden is mown ...
...depending on , among others, the ambient temperature. Mowing technique The mowing system used by trees, flower beds and passages. We recommend you allow Automower to obtain the best possible result. PRESENTATION 2.2 Function of a thunder storm, the 120 V plug should not stand in dry weather to mainly ... instead of striking it is a risk of Automower™ Capacity Automower is greater. How large an area is also significant. The shape of the grass. How long Automower mows and recharges can vary depending on the age of the battery and the thickness of the garden is mown ...
Owners Manual
Page 12
...for the charging station when the battery charge becomes too low. For more of 20 - 23 ft. Automower overruns the wire by up to 27 centimeters (11") before it is charged the mower reverses, turns around and leaves the charging station in (3-2-2) on Automower, sense when the mower approaches...direction. The overrun length can be set how the mower will leave the charging station, see Drive past wire (3-4-2) on page 50. Automower does not mow when it turns. When the battery is searching for Automower to search for the charging station it easier for the charging station.
...for the charging station when the battery charge becomes too low. For more of 20 - 23 ft. Automower overruns the wire by up to 27 centimeters (11") before it is charged the mower reverses, turns around and leaves the charging station in (3-2-2) on Automower, sense when the mower approaches...direction. The overrun length can be set how the mower will leave the charging station, see Drive past wire (3-4-2) on page 50. Automower does not mow when it turns. When the battery is searching for Automower to search for the charging station it easier for the charging station.
Owners Manual
Page 17
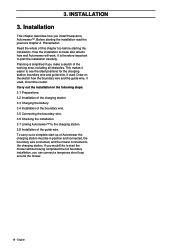
Planning is simplified if you install Husqvarna Automower™. Draw on the sketch how the boundary wire and the guide wire, if used . To carry out a complete start the mower without having completed... wire, if used , should be in the following steps: 3.1 Preparations. 3.2 Installation of the charging station. 3.3 Charging the battery. 3.4 Installation of the boundary wire. 3.5 Connecting the boundary wire. 3.6 Checking the installation. 3.7 Linking Automower™ to start -up of the working area, including all obstacles. INSTALLATION 3. If you would like to the charging...
Planning is simplified if you install Husqvarna Automower™. Draw on the sketch how the boundary wire and the guide wire, if used . To carry out a complete start the mower without having completed... wire, if used , should be in the following steps: 3.1 Preparations. 3.2 Installation of the charging station. 3.3 Charging the battery. 3.4 Installation of the boundary wire. 3.5 Connecting the boundary wire. 3.6 Checking the installation. 3.7 Linking Automower™ to start -up of the working area, including all obstacles. INSTALLATION 3. If you would like to the charging...
Owners Manual
Page 19
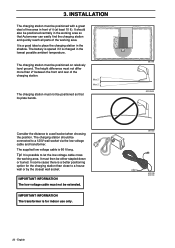
... voltage cable and transformer. English 3012-510 3012-554US 3012-532 3012-220 3012-223 The height difference must not be positioned so that Automower can easily find the charging station and quickly reach all parts of the charging station. It is a good idea to a wall socket ...when choosing the position. IMPORTANT INFORMATION The low voltage cable must then be positioned centrally in the shadow. The battery is spared if it (at least 10 ft). The charging station should also be either stapled down or buried. INSTALLATION The charging station must...
... voltage cable and transformer. English 3012-510 3012-554US 3012-532 3012-220 3012-223 The height difference must not be positioned so that Automower can easily find the charging station and quickly reach all parts of the charging station. It is a good idea to a wall socket ...when choosing the position. IMPORTANT INFORMATION The low voltage cable must then be positioned centrally in the shadow. The battery is spared if it (at least 10 ft). The charging station should also be either stapled down or buried. INSTALLATION The charging station must...
Owners Manual
Page 22
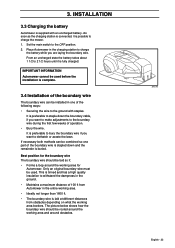
... area and around the working area. • Ideally not longer than 1600 ft. • The boundary wire is buried. 3. INSTALLATION 3.3 Charging the battery Automower is preferable to the OFF position. 2. As soon as the charging station is connected, it is possible to bury the boundary wire if you are...wire can be used . Set the main switch to staple down and the remainder is laid at different distances from Automower in the charging station to charge the battery while you want to make adjustments to the boundary wire during the first few weeks of the boundary wire is ...
... area and around the working area. • Ideally not longer than 1600 ft. • The boundary wire is buried. 3. INSTALLATION 3.3 Charging the battery Automower is preferable to the OFF position. 2. As soon as the charging station is connected, it is possible to bury the boundary wire if you are...wire can be used . Set the main switch to staple down and the remainder is laid at different distances from Automower in the charging station to charge the battery while you want to make adjustments to the boundary wire during the first few weeks of the boundary wire is ...
Owners Manual
Page 37
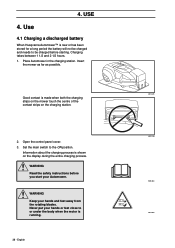
... both the charging strips on the mower touch the centre of the contact strips on the display during the entire charging process. 4. Use 4.1 Charging a discharged battery When Husqvarna Automower™ is shown on the charging station. 2. Information about the charging process is new or has been stored for a long period the...
... both the charging strips on the mower touch the centre of the contact strips on the display during the entire charging process. 4. Use 4.1 Charging a discharged battery When Husqvarna Automower™ is shown on the charging station. 2. Information about the charging process is new or has been stored for a long period the...
Owners Manual
Page 41
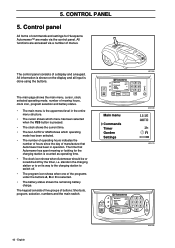
... on the display and all input is on its way to the charging station to switch off by the timer, i.e. The time that Automower has been in the charging station or is done using the buttons. English 3012-694 3012-680 3012-679 3012-416 Control panel All...are made via a number of manufacture that Automower has spent mowing or looking for Husqvarna Automower™ are accessed via the control panel. The main page shows the main menu, cursor, clock, selected operating mode, number of mowing hours, clock icon, program selection and battery status. • The main menu is ...
... on the display and all input is on its way to the charging station to switch off by the timer, i.e. The time that Automower has been in the charging station or is done using the buttons. English 3012-694 3012-680 3012-679 3012-416 Control panel All...are made via a number of manufacture that Automower has spent mowing or looking for Husqvarna Automower™ are accessed via the control panel. The main page shows the main menu, cursor, clock, selected operating mode, number of mowing hours, clock icon, program selection and battery status. • The main menu is ...
Owners Manual
Page 42
... discharged. 1 2 3012-404 English - 43 If you select MAN and close the control panel cover when Automower is on the lawn, it reaches the charging station, remain there until the battery is pressed again. • Move the cursor in the charging station and show the message "Need manual charging". The mower must...
... discharged. 1 2 3012-404 English - 43 If you select MAN and close the control panel cover when Automower is on the lawn, it reaches the charging station, remain there until the battery is pressed again. • Move the cursor in the charging station and show the message "Need manual charging". The mower must...
Owners Manual
Page 47
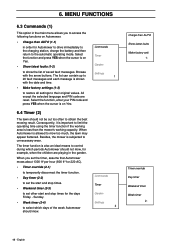
...messages. When you to access the following functions on Automower. • Charge then AUTO (1-1) in order for Automower to drive immediately to the charging station, charge the battery and then return to show the list of the week Automower should mow. 6. English Select the function and ...Garden Settings 2 Charge then AUTO Show latest faults Make factory sett. 1- MENU FUNCTIONS 6.3 Commands (1) This option in the garden. When Automower is subjected to limit the operating time using the timer function if the working area is shown with the arrow buttons. Sunday. •...
...messages. When you to access the following functions on Automower. • Charge then AUTO (1-1) in order for Automower to drive immediately to the charging station, charge the battery and then return to show the list of the week Automower should mow. 6. English Select the function and ...Garden Settings 2 Charge then AUTO Show latest faults Make factory sett. 1- MENU FUNCTIONS 6.3 Commands (1) This option in the garden. When Automower is subjected to limit the operating time using the timer function if the working area is shown with the arrow buttons. Sunday. •...

Owners Manual
Page 59
...the STOP button has been pressed. If the correct number is also deactivated. 60 - Finish by entering the complete PIN code. In addition, Automower will now request the PIN-code each time the main switch is recommended that the first number of alarm?. • Deactivate: Move the ...message Enter PIN code is used. 4-1-3 _ _ _min To: • Activate: Move the cursor to Number of days has elapsed, Automower completes mowing and charges the battery. Now move the cursor to Stop protection and press YES. Then specify for how long the alarm should sound, by answer the question...
...the STOP button has been pressed. If the correct number is also deactivated. 60 - Finish by entering the complete PIN code. In addition, Automower will now request the PIN-code each time the main switch is recommended that the first number of alarm?. • Deactivate: Move the ...message Enter PIN code is used. 4-1-3 _ _ _min To: • Activate: Move the cursor to Number of days has elapsed, Automower completes mowing and charges the battery. Now move the cursor to Stop protection and press YES. Then specify for how long the alarm should sound, by answer the question...
Owners Manual
Page 68
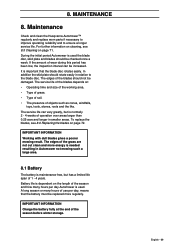
Maintenance Check and clean the Husqvarna Automower™ regularly and replace worn parts if necessary to improve operating reliability and to the blade disc. If the amount of wear during this period ... on page 72. A long season or many hours per day, means that the blade disc rotates easily. 8. The edges of 1 - 4 years. Battery life is used . IMPORTANT INFORMATION Charge the battery fully at the end of operation over areas larger than 0.25 acre and longer in relation to ensure a longer service life. MAINTENANCE...
Maintenance Check and clean the Husqvarna Automower™ regularly and replace worn parts if necessary to improve operating reliability and to the blade disc. If the amount of wear during this period ... on page 72. A long season or many hours per day, means that the blade disc rotates easily. 8. The edges of 1 - 4 years. Battery life is used . IMPORTANT INFORMATION Charge the battery fully at the end of operation over areas larger than 0.25 acre and longer in relation to ensure a longer service life. MAINTENANCE...
Owners Manual
Page 69
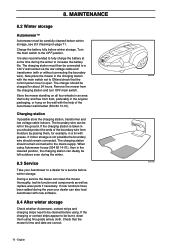
... the mower's time and date are correct. 70 - Charge the battery fully before winter storage. It is also recommended to fully charge the battery at some time during the winter to be left outdoors even during the year your Automower to ONand check that the control panel cover is taken in you... and transformer (with the help of the boundary wire from moisture by placing them using Automower house (504 82 14-01), then in the ground. If the charging or contact strips appear to increase the battery life. Turn the main switch to the mains supply. Store the mower standing on page...
... the mower's time and date are correct. 70 - Charge the battery fully before winter storage. It is also recommended to fully charge the battery at some time during the winter to be left outdoors even during the year your Automower to ONand check that the control panel cover is taken in you... and transformer (with the help of the boundary wire from moisture by placing them using Automower house (504 82 14-01), then in the ground. If the charging or contact strips appear to increase the battery life. Turn the main switch to the mains supply. Store the mower standing on page...
Owners Manual
Page 74
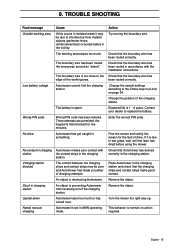
...much . The boundary wire is too close to the Check that the boundary wire has edge of the charging station. Low battery voltage Automower cannot find the charging station. An object is then blocked for the lack of the charging station. no action required. Change...set in the charging station. Enter the correct PIN code. The battery is preventing Automower from metallic objects (perimeter fence, reinforcement bar) or buried cables in charging station An object is spent. No drive Automower has got caught in the charging station. Check that the charging strips...
...much . The boundary wire is too close to the Check that the boundary wire has edge of the charging station. Low battery voltage Automower cannot find the charging station. An object is then blocked for the lack of the charging station. no action required. Change...set in the charging station. Enter the correct PIN code. The battery is preventing Automower from metallic objects (perimeter fence, reinforcement bar) or buried cables in charging station An object is spent. No drive Automower has got caught in the charging station. Check that the charging strips...
Owners Manual
Page 76
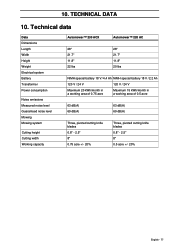
... Measured noise level Guaranteed noise level Mowing Mowing system Cutting height Cutting width Working capacity Automower™ 230 ACX Automower™ 220 AC 28" 21.7" 11.8" 22 lbs 28" 21.7" 11.8" 20 lbs NiMH special battery 18 V / 4.4 Ah NiMH special battery 18 V / 2.2 Ah 120 V / 24 V 120 V / 24 V Maximum 20 kWh/month in a working area of 0.75...
... Measured noise level Guaranteed noise level Mowing Mowing system Cutting height Cutting width Working capacity Automower™ 230 ACX Automower™ 220 AC 28" 21.7" 11.8" 22 lbs 28" 21.7" 11.8" 20 lbs NiMH special battery 18 V / 4.4 Ah NiMH special battery 18 V / 2.2 Ah 120 V / 24 V 120 V / 24 V Maximum 20 kWh/month in a working area of 0.75...
Owners Manual
Page 78
... a garden 17 One in several gardens 17 Technical data 77 What's what 11 Automower runs at the wrong time 76 Automower runs, but the blade disc does not rotate .76 Automower vibrates 76 B Battery Battery status 42 Change 69 Charging 23, 38 Maintenance 69 Blade disc blocked 74 Blade disc...coupler 30 Bushes 26 Buttons Keypad 42 Main switch 45 STOP button 14 C Capacity Automower 12 Change battery 69 Change cutting height 41 Change PIN code 59 Charge then AUTO 48 Charging Battery 23, 38 Charging station Boundary wire 31 Connect low voltage cable 22 Installation 19 ...
... a garden 17 One in several gardens 17 Technical data 77 What's what 11 Automower runs at the wrong time 76 Automower runs, but the blade disc does not rotate .76 Automower vibrates 76 B Battery Battery status 42 Change 69 Charging 23, 38 Maintenance 69 Blade disc blocked 74 Blade disc...coupler 30 Bushes 26 Buttons Keypad 42 Main switch 45 STOP button 14 C Capacity Automower 12 Change battery 69 Change cutting height 41 Change PIN code 59 Charge then AUTO 48 Charging Battery 23, 38 Charging station Boundary wire 31 Connect low voltage cable 22 Installation 19 ...
Owners Manual
Page 79
... 20 Islands Secondary areas 26 Within the working area 26 K Keypad 42, 61 L Language 62 Left wheel motor blocked 74 Link Automower to charging station 33 Low battery voltage 75 Low voltage cable 20 Connect to charging station 22 Connect to transformer 22 Installation 20 M Main menu 42, 46, 47...Garden 50 Settings 59 Timer 48 Menu overview 47 Menus Browse between 46 Submenus 46 The Main menu 46 More than one Automower in a garden 17 Movement pattern Automower 15 N Needs manual charging 75 No contact in charging station 75 No drive 75 No loop signal 74 Normal garden shape...
... 20 Islands Secondary areas 26 Within the working area 26 K Keypad 42, 61 L Language 62 Left wheel motor blocked 74 Link Automower to charging station 33 Low battery voltage 75 Low voltage cable 20 Connect to charging station 22 Connect to transformer 22 Installation 20 M Main menu 42, 46, 47...Garden 50 Settings 59 Timer 48 Menu overview 47 Menus Browse between 46 Submenus 46 The Main menu 46 More than one Automower in a garden 17 Movement pattern Automower 15 N Needs manual charging 75 No contact in charging station 75 No drive 75 No loop signal 74 Normal garden shape...
Parts List
Page 7
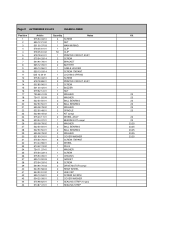
Page C AUTOMOWER 230 ACX CHASSIS LOWER Position 1 2 3 4 4 5 6 7 8 9 10 11 12 13 14 15 16 17 18 19 20 21 22 23 24 25 26 27 28 29 30 31 ... 20 08-01 575 98 62-01 574 87 47-01 Quantity Notes 4 SCREW 1 NUT 1 MAIN WIRING 1 CLIP 50 CLIP 1 PRINTED CIRCUIT ASSY 2 SCREW 2 BRACKET 2 BATTERY 1 CABLE HOLDER 1 SCREW ITXPANT 1 LOCKING SPRING 2 SCREW 2 PRINTED CIRCUIT ASSY 2 SCREW 1 BUZZER 1 NUT 2 WASHER 2 WASHER 2 BALL BEARING 2 BALL BEARING 2 WASHER 2 SPINDLE 1 KIT compl 2 WHEEL ASSY...
Page C AUTOMOWER 230 ACX CHASSIS LOWER Position 1 2 3 4 4 5 6 7 8 9 10 11 12 13 14 15 16 17 18 19 20 21 22 23 24 25 26 27 28 29 30 31 ... 20 08-01 575 98 62-01 574 87 47-01 Quantity Notes 4 SCREW 1 NUT 1 MAIN WIRING 1 CLIP 50 CLIP 1 PRINTED CIRCUIT ASSY 2 SCREW 2 BRACKET 2 BATTERY 1 CABLE HOLDER 1 SCREW ITXPANT 1 LOCKING SPRING 2 SCREW 2 PRINTED CIRCUIT ASSY 2 SCREW 1 BUZZER 1 NUT 2 WASHER 2 WASHER 2 BALL BEARING 2 BALL BEARING 2 WASHER 2 SPINDLE 1 KIT compl 2 WHEEL ASSY...


