
Owners Manual
Page 2
...23 3.4 Installation of the boundary wire 23 3.5 Connecting the boundary wire 31 3.6 Checking the installation 33 3.7 Linking Automower™ to the charging station 33 3.8 Installation of Automower 12 2.3 Search method 15 2.4 More than one Automower™ in a garden 17 2.5 One Automower™ in the Operator's Manual 7 1.4 Safety instructions 8 2. Garden example 64 8. Use ...38 4.1 Charging a discharged battery 38 4.2 Using the timer 39 4.3 Starting Automower 39 4.4 Stopping Automower 39 4.5 Restart 40 4.6 Switching off Automower 40 4.7 Adjusting the cutting height 41...
...23 3.4 Installation of the boundary wire 23 3.5 Connecting the boundary wire 31 3.6 Checking the installation 33 3.7 Linking Automower™ to the charging station 33 3.8 Installation of Automower 12 2.3 Search method 15 2.4 More than one Automower™ in a garden 17 2.5 One Automower™ in the Operator's Manual 7 1.4 Safety instructions 8 2. Garden example 64 8. Use ...38 4.1 Charging a discharged battery 38 4.2 Using the timer 39 4.3 Starting Automower 39 4.4 Stopping Automower 39 4.5 Restart 40 4.6 Switching off Automower 40 4.7 Adjusting the cutting height 41...
Owners Manual
Page 8
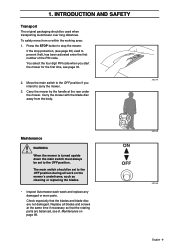
..., (see 8. INTRODUCTION AND SAFETY Transport The original packaging should be set to carry the mower. 3. Carry the mower by the handle at the same time if necessary so that the blades and blade disc are balanced, see page 60) used when transporting Automower over long distances. Maintenance on the mower's underframe, such as cleaning or replacing the blades. • Inspect Automower each week and...
..., (see 8. INTRODUCTION AND SAFETY Transport The original packaging should be set to carry the mower. 3. Carry the mower by the handle at the same time if necessary so that the blades and blade disc are balanced, see page 60) used when transporting Automower over long distances. Maintenance on the mower's underframe, such as cleaning or replacing the blades. • Inspect Automower each week and...
Owners Manual
Page 9
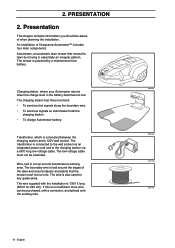
... 10 - An installation of Husqvarna Automower™ includes four main components: Automower, an automatic lawn mower that the mower must not be extended. Charging station, where your Automower returns when the charge level in a loop around Automower's working area. The wire is also used for 220 AC). The low voltage cable must not run into. The charging station has three functions: • To send control signals along the...
... 10 - An installation of Husqvarna Automower™ includes four main components: Automower, an automatic lawn mower that the mower must not be extended. Charging station, where your Automower returns when the charge level in a loop around Automower's working area. The wire is also used for 220 AC). The low voltage cable must not run into. The charging station has three functions: • To send control signals along the...
Owners Manual
Page 10
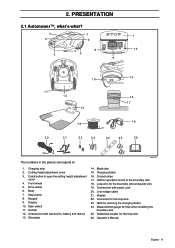
... guide wire 19. Solderless coupler for securing the charging station 24. Blade disc 15. Drive wheel 6. Contact strips 17. Nails for the loop wire 26. PRESENTATION 2.1 Automower™, what's what? 2 7 7 3 6 4 8 10 1 5 9 13 11 12 15 14 16 17 19 18 20 21 22 23 24 25 26 The numbers in the picture correspond to open the cutting height adjustment cover 4. Charging strip 2. Front wheel 5. Handle 12. 2. Cutting height adjustment cover...
... guide wire 19. Solderless coupler for securing the charging station 24. Blade disc 15. Drive wheel 6. Contact strips 17. Nails for the loop wire 26. PRESENTATION 2.1 Automower™, what's what? 2 7 7 3 6 4 8 10 1 5 9 13 11 12 15 14 16 17 19 18 20 21 22 23 24 25 26 The numbers in the picture correspond to open the cutting height adjustment cover 4. Charging strip 2. Front wheel 5. Handle 12. 2. Cutting height adjustment cover...
Owners Manual
Page 11
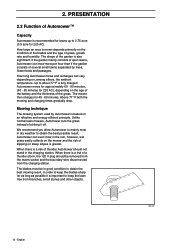
... the battery and the thickness of the grass. Mowing technique The mowing system used by trees, flower beds and passages. Automower can even mow in the charging station. When there is a risk of striking it is also significant. The mower then charges for 220 AC), depending on steep slopes is greater. Unlike normal lawn mowers, Automower cuts the grass instead of a thunder storm, the 120 V plug...
... the battery and the thickness of the grass. Mowing technique The mowing system used by trees, flower beds and passages. Automower can even mow in the charging station. When there is a risk of striking it is also significant. The mower then charges for 220 AC), depending on steep slopes is greater. Unlike normal lawn mowers, Automower cuts the grass instead of a thunder storm, the 120 V plug...
Owners Manual
Page 12
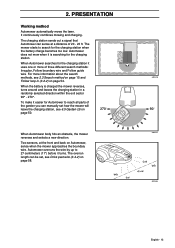
... guide wire. The mower starts to 27 centimeters (11") before it is charged the mower reverses, turns around and leaves the charging station in (3-2-2) on page 50. PRESENTATION Working method Automower automatically mows the lawn. When Automower searches for the charging station it easier for the charging station when the battery charge becomes too low. To make it uses one or more information about the search methods, see Drive...
... guide wire. The mower starts to 27 centimeters (11") before it is charged the mower reverses, turns around and leaves the charging station in (3-2-2) on page 50. PRESENTATION Working method Automower automatically mows the lawn. When Automower searches for the charging station it easier for the charging station when the battery charge becomes too low. To make it uses one or more information about the search methods, see Drive...
Owners Manual
Page 15
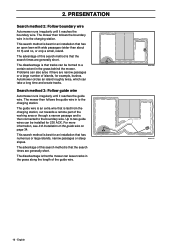
... extent in the grass along the length of this search method is best for 230 ACX. The advantage of the guide wire. 3012-484 3012-677 16 - The mower then follows the guide wire in to the boundary wire. The advantage of islands, for an installation that the search times are generally short. PRESENTATION Search method 2: Follow boundary wire Automower runs irregularly until...
... extent in the grass along the length of this search method is best for 230 ACX. The advantage of the guide wire. 3012-484 3012-677 16 - The mower then follows the guide wire in to the boundary wire. The advantage of islands, for an installation that the search times are generally short. PRESENTATION Search method 2: Follow boundary wire Automower runs irregularly until...

Owners Manual
Page 33
... used for 230 ACX. In passages where the distance between the boundary wires is less than 10 ft, it leaves the island and once again searches for the mower to two guide wires can either be installed for the guide wire. If Automower is permitted to install a guide wire through a narrow passage and is recommended to follow close to the boundary wire. English 3012-736US Need...
... used for 230 ACX. In passages where the distance between the boundary wires is less than 10 ft, it leaves the island and once again searches for the mower to two guide wires can either be installed for the guide wire. If Automower is permitted to install a guide wire through a narrow passage and is recommended to follow close to the boundary wire. English 3012-736US Need...
Owners Manual
Page 46
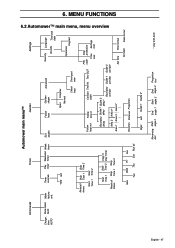
... lock Settings lock Boundary Guide 1 Guide 2 delay delay delay* Boundary Area 2 Area 4* corridor Guide 1 corridor Guide 2 corridor* Area 1 Area 3 Area 5* Set time Time format Direction Distance Proportion Set date Date format Right Left Guide 1 Guide 2* Reversing Start End Start End Proportion dist. angle 1 angle 1 angle 2 angle 2 first * only 230 ACX MENU FUNCTIONS 6.2 Automower™ main menu, menu overview English - 47 Commands Timer Automower main menu™ Garden Settings Charge...
... lock Settings lock Boundary Guide 1 Guide 2 delay delay delay* Boundary Area 2 Area 4* corridor Guide 1 corridor Guide 2 corridor* Area 1 Area 3 Area 5* Set time Time format Direction Distance Proportion Set date Date format Right Left Guide 1 Guide 2* Reversing Start End Start End Proportion dist. angle 1 angle 1 angle 2 angle 2 first * only 230 ACX MENU FUNCTIONS 6.2 Automower™ main menu, menu overview English - 47 Commands Timer Automower main menu™ Garden Settings Charge...
Owners Manual
Page 61
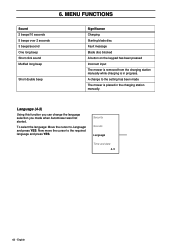
... Muffled long beep Short double beep Significance Charging Starting blade disc Fault message Blade disc blocked A button on the keypad has been pressed Incorrect input The mower is removed from the charging station manually while charging is placed in progress. A change the language selection you can change to the setting has been made when Automower was first started. Security Sounds Language Time and date...
... Muffled long beep Short double beep Significance Charging Starting blade disc Fault message Blade disc blocked A button on the keypad has been pressed Incorrect input The mower is removed from the charging station manually while charging is placed in progress. A change the language selection you can change to the setting has been made when Automower was first started. Security Sounds Language Time and date...
Owners Manual
Page 63
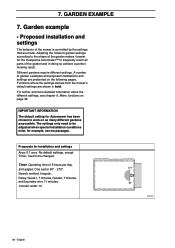
... of garden examples and proposed installations and settings are made. No default settings, except Timer, need to be adjusted when special installation conditions exist, for the Husqvarna Automower™ to be changed. Timer: Operating time of the garden and in bold. Search method: Irregular. The settings only need to frequently reach all parts of 5 hours per day. Delay: Guide1, 7 minutes, Guide2, 7 minutes, and boundary wire 11...
... of garden examples and proposed installations and settings are made. No default settings, except Timer, need to be adjusted when special installation conditions exist, for the Husqvarna Automower™ to be changed. Timer: Operating time of the garden and in bold. Search method: Irregular. The settings only need to frequently reach all parts of 5 hours per day. Delay: Guide1, 7 minutes, Guide2, 7 minutes, and boundary wire 11...
Owners Manual
Page 64
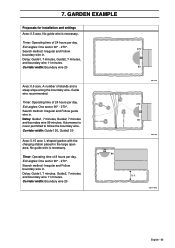
...;. Search method: Irregular and Follow guide wire in . L-shaped garden with the charging station placed in . Timer: Operating time of 24 hours per day. Corridor width: Boundary wire 20 3012-543 3012-544 3012-545US English - 65 Timer: Operating time of 8 hours per day. Delay: Guide1, 7 minutes, Guide2, 7 minutes and boundary wire 99 minutes. Automower is necessary. Corridor width...
...;. Search method: Irregular and Follow guide wire in . L-shaped garden with the charging station placed in . Timer: Operating time of 24 hours per day. Corridor width: Boundary wire 20 3012-543 3012-544 3012-545US English - 65 Timer: Operating time of 8 hours per day. Delay: Guide1, 7 minutes, Guide2, 7 minutes and boundary wire 99 minutes. Automower is necessary. Corridor width...
Owners Manual
Page 66
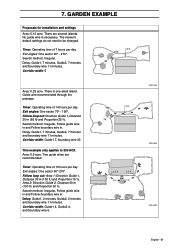
... of 7 hours per day. Corridor width: 5 Area: 0.25 acre. There is necessary. Guide wire recommended through the passage. Timer: Operating time of 14 hours per day. The mower's default settings do not need to 230 ACX. Corridor width: Guide1 7, boundary wire 20 This example only applies to be changed. Follow loop out: Area 1; Delay: Guide1, 2 minutes, Guide2, 2 minutes and boundary...
... of 7 hours per day. Corridor width: 5 Area: 0.25 acre. There is necessary. Guide wire recommended through the passage. Timer: Operating time of 14 hours per day. The mower's default settings do not need to 230 ACX. Corridor width: Guide1 7, boundary wire 20 This example only applies to be changed. Follow loop out: Area 1; Delay: Guide1, 2 minutes, Guide2, 2 minutes and boundary...
Owners Manual
Page 69
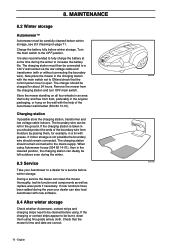
... on page 71. MAINTENANCE 8.2 Winter storage Automower™ Automower must then be charged for a service before using. The boundary wire can be left in a tin with the help of the boundary wire from the charging station and turn OFF main switch. Charge the battery fully before winter storage, see 8.5 Cleaning on the wall with grease. Remove the mower from moisture by placing them using Automower house (504 82 14...
... on page 71. MAINTENANCE 8.2 Winter storage Automower™ Automower must then be charged for a service before using. The boundary wire can be left in a tin with the help of the boundary wire from the charging station and turn OFF main switch. Charge the battery fully before winter storage, see 8.5 Cleaning on the wall with grease. Remove the mower from moisture by placing them using Automower house (504 82 14...
Owners Manual
Page 74
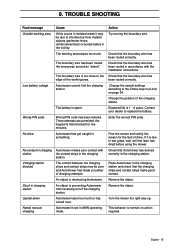
... the installation instructions. Charging station blocked The contact between the charging strips and contact strips may be poor and Automower has made a number of drive. Stuck in the charging station. Needs manual charging Automower is preventing Automower from metallic objects (perimeter fence, reinforcement bar) or buried cables in the charging station and check that the charging strips and contact strips make good contact. The boundary wire has been routed the...
... the installation instructions. Charging station blocked The contact between the charging strips and contact strips may be poor and Automower has made a number of drive. Stuck in the charging station. Needs manual charging Automower is preventing Automower from metallic objects (perimeter fence, reinforcement bar) or buried cables in the charging station and check that the charging strips and contact strips make good contact. The boundary wire has been routed the...
Owners Manual
Page 75
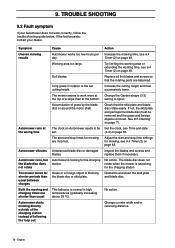
... more at Change the Garden shape (3-3) the top of a slope than at the wrong time The clock on Automower needs to Open. See 8.5 Cleaning on page 48. No action. Automower starts mowing directly outside of the charging station instead of grass by the blade disc or around the motor shaft. Adjust the start and stop time settings for mowing, see 6.4 day. Both the mowing and charging times...
... more at Change the Garden shape (3-3) the top of a slope than at the wrong time The clock on Automower needs to Open. See 8.5 Cleaning on page 48. No action. Automower starts mowing directly outside of the charging station instead of grass by the blade disc or around the motor shaft. Adjust the start and stop time settings for mowing, see 6.4 day. Both the mowing and charging times...
Owners Manual
Page 78
... Checking 58 Connecting 31 Connecting the guide wire to the boundary wire .37 Find wire 58 Installation 23 Routed towards charging station 30 Secondary areas 26 Slope 28 Solderless coupler 30 Bushes 26 Buttons Keypad 42 Main switch 45 STOP button 14 C Capacity Automower 12 Change battery 69 Change cutting height 41 Change PIN code 59 Charge then AUTO 48 Charging Battery 23, 38 Charging station Boundary wire 31 Connect low voltage cable 22 Installation...
... Checking 58 Connecting 31 Connecting the guide wire to the boundary wire .37 Find wire 58 Installation 23 Routed towards charging station 30 Secondary areas 26 Slope 28 Solderless coupler 30 Bushes 26 Buttons Keypad 42 Main switch 45 STOP button 14 C Capacity Automower 12 Change battery 69 Change cutting height 41 Change PIN code 59 Charge then AUTO 48 Charging Battery 23, 38 Charging station Boundary wire 31 Connect low voltage cable 22 Installation...
Owners Manual
Page 80
... 19 Positioning transformer 20 Preparations Installation 19 Program buttons 44 Program icon 42 Programs 44 Proportion first 52 Proportion in Follow loop out 53 R Replace blades 72 Reset factory settings Automower 48 Restart 40 Restart Automower 40 Return arrow 44 Reversing distance 51 Right wheel motor blocked 74 S Safety Instructions 8 Maintenance 9 Transport 9 Use 8 Search for charging station Follow guide wire 16 Follow loop in 16 Irregular...
... 19 Positioning transformer 20 Preparations Installation 19 Program buttons 44 Program icon 42 Programs 44 Proportion first 52 Proportion in Follow loop out 53 R Replace blades 72 Reset factory settings Automower 48 Restart 40 Restart Automower 40 Return arrow 44 Reversing distance 51 Right wheel motor blocked 74 S Safety Instructions 8 Maintenance 9 Transport 9 Use 8 Search for charging station Follow guide wire 16 Follow loop in 16 Irregular...
Parts List
Page 5
...AUTOMOWER 230 ACX CHASSIS UPPER Position Article Quantity Notes Kit 1 544 89 98-02 1 KEYBOARD 6 2 577 52 72-01 1 CABLE CLAMP 3 535 10 17-01 1 CAP 8 4 574 45 01-01 4 SCREW ITXPANT 5 575 98 63-01 1 SEALING STRIP (10 pcs) 6 5 574 87 47-02 1 SEALING STRIP 6 575 94 42-02 1 DISPLAY COVER compl 7 535 14 47-01 1 FILTER... 8 535 12 39-01 1 MAIN SWITCH compl 9 577 59 23-01 1 SWITCH KIT 10 540 06 03-03 1 DISPLAY 11 535 12 79-01 1 BRACKET...1 SENSOR 23 535 12 22-01 1 HEIGHT ADJUSTMENT WHEEL 24 574 45 01-01 16 SCREW ITXPANT...
...AUTOMOWER 230 ACX CHASSIS UPPER Position Article Quantity Notes Kit 1 544 89 98-02 1 KEYBOARD 6 2 577 52 72-01 1 CABLE CLAMP 3 535 10 17-01 1 CAP 8 4 574 45 01-01 4 SCREW ITXPANT 5 575 98 63-01 1 SEALING STRIP (10 pcs) 6 5 574 87 47-02 1 SEALING STRIP 6 575 94 42-02 1 DISPLAY COVER compl 7 535 14 47-01 1 FILTER... 8 535 12 39-01 1 MAIN SWITCH compl 9 577 59 23-01 1 SWITCH KIT 10 540 06 03-03 1 DISPLAY 11 535 12 79-01 1 BRACKET...1 SENSOR 23 535 12 22-01 1 HEIGHT ADJUSTMENT WHEEL 24 574 45 01-01 16 SCREW ITXPANT...

Parts List
Page 7
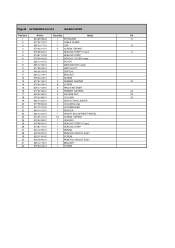
Page C AUTOMOWER 230 ACX CHASSIS LOWER Position 1 2 3 4 4 5 6 7 8 9 10 11 12 13 14 15 16 17 18 19 20 21 ... SCREW 2 BRACKET 2 BATTERY 1 CABLE HOLDER 1 SCREW ITXPANT 1 LOCKING SPRING 2 SCREW 2 PRINTED CIRCUIT ASSY 2 SCREW 1 BUZZER 1 NUT 2 WASHER 2 WASHER 2 BALL BEARING 2 BALL BEARING 2 WASHER 2 SPINDLE 1 KIT compl 2 WHEEL ASSY 1 BEARING KIT compl 2 WASHER 2 BALL BEARING 2 BALL BEARING 2 WASHER 2 COVER WASHER 6 SCREW ITXPANT 2 WHEEL 1 PLUG 1 WASHER 1 SCREW 1 CHASSIS 2 GASKET 8 SCREW 2 DRIVE MOTOR compl 2 REAR WHEEL 2 HUB CAP 2 SCREW IHCSFM 2 COVER WASHER 1 ...
Page C AUTOMOWER 230 ACX CHASSIS LOWER Position 1 2 3 4 4 5 6 7 8 9 10 11 12 13 14 15 16 17 18 19 20 21 ... SCREW 2 BRACKET 2 BATTERY 1 CABLE HOLDER 1 SCREW ITXPANT 1 LOCKING SPRING 2 SCREW 2 PRINTED CIRCUIT ASSY 2 SCREW 1 BUZZER 1 NUT 2 WASHER 2 WASHER 2 BALL BEARING 2 BALL BEARING 2 WASHER 2 SPINDLE 1 KIT compl 2 WHEEL ASSY 1 BEARING KIT compl 2 WASHER 2 BALL BEARING 2 BALL BEARING 2 WASHER 2 COVER WASHER 6 SCREW ITXPANT 2 WHEEL 1 PLUG 1 WASHER 1 SCREW 1 CHASSIS 2 GASKET 8 SCREW 2 DRIVE MOTOR compl 2 REAR WHEEL 2 HUB CAP 2 SCREW IHCSFM 2 COVER WASHER 1 ...


