
Owners Manual
Page 2
... 72 9. Use ...38 4.1 Charging a discharged battery 38 4.2 Using the timer 39 4.3 Starting Automower 39 4.4 Stopping Automower 39 4.5 Restart 40 4.6 Switching off Automower 40 4.7 Adjusting the cutting height 41 5. Installation 18 3.1 Preparations 19 3.2 Installation of the charging... 3.6 Checking the installation 33 3.7 Linking Automower™ to the charging station 33 3.8 Installation of Automower 12 2.3 Search method 15 2.4 More than one Automower™ in a garden 17 2.5 One Automower™ in the Operator's Manual 7 1.4 Safety instructions 8 2. Garden example...
... 72 9. Use ...38 4.1 Charging a discharged battery 38 4.2 Using the timer 39 4.3 Starting Automower 39 4.4 Stopping Automower 39 4.5 Restart 40 4.6 Switching off Automower 40 4.7 Adjusting the cutting height 41 5. Installation 18 3.1 Preparations 19 3.2 Installation of the charging... 3.6 Checking the installation 33 3.7 Linking Automower™ to the charging station 33 3.8 Installation of Automower 12 2.3 Search method 15 2.4 More than one Automower™ in a garden 17 2.5 One Automower™ in the Operator's Manual 7 1.4 Safety instructions 8 2. Garden example...

Owners Manual
Page 3
This Operator's Manual deals with version 2.5x of products without prior notice. English TABLE OF CONTENTS Husqvarna AB has a policy of continuous product development and therefore reserves the right to modify the design and appearance and function of the mower's control program. 4 -
This Operator's Manual deals with version 2.5x of products without prior notice. English TABLE OF CONTENTS Husqvarna AB has a policy of continuous product development and therefore reserves the right to modify the design and appearance and function of the mower's control program. 4 -

Owners Manual
Page 4
...Automower. IMPORTANT INFORMATION Read through the Operator's Manual carefully and understand the content before using your Husqvarna Automower™ requires knowledge of its function. 1. Introduction and safety 1.1 Introduction Congratulations on the mower. WARNING Automower can be dangerous if incorrectly used in the Operator's manual... system is a reference to another section of the Operator's manual. • Words written in bold are one of an exceptionally high quality product. This Operator's manual contains important information about the mower, how you install it ...
...Automower. IMPORTANT INFORMATION Read through the Operator's Manual carefully and understand the content before using your Husqvarna Automower™ requires knowledge of its function. 1. Introduction and safety 1.1 Introduction Congratulations on the mower. WARNING Automower can be dangerous if incorrectly used in the Operator's manual... system is a reference to another section of the Operator's manual. • Words written in bold are one of an exceptionally high quality product. This Operator's manual contains important information about the mower, how you install it ...
Owners Manual
Page 5
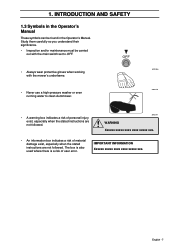
...• Read through the Operator's Manual carefully and understand the content before using your hands or feet close to or under the body when Automower is moved to be found on Automower™ These symbols can be used safely and efficiently. • Automower can only start when the main switch... is in this Operator's Manual must be left at an appropriate recycling station. 6 -...
...• Read through the Operator's Manual carefully and understand the content before using your hands or feet close to or under the body when Automower is moved to be found on Automower™ These symbols can be used safely and efficiently. • Automower can only start when the main switch... is in this Operator's Manual must be left at an appropriate recycling station. 6 -...
Owners Manual
Page 6
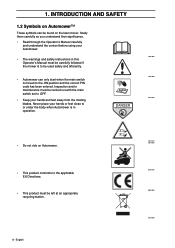
...xxx. English - 7 Study them carefully so you understand their significance. • Inspection and/or maintenance must be found in the Operator's Manual These symbols can be carried out with the mower's underframe. • Never use a high-pressure washer or even running water to OFF... when the stated instructions are not followed. 1. OFF • Always wear protective gloves when working with the main switch set to clean Automower. 3012-288 3012-272 • A warning box indicates a risk of personal injury exist, especially when the stated instructions are not followed...
...xxx. English - 7 Study them carefully so you understand their significance. • Inspection and/or maintenance must be found in the Operator's Manual These symbols can be carried out with the mower's underframe. • Never use a high-pressure washer or even running water to OFF... when the stated instructions are not followed. 1. OFF • Always wear protective gloves when working with the main switch set to clean Automower. 3012-288 3012-272 • A warning box indicates a risk of personal injury exist, especially when the stated instructions are not followed...

Owners Manual
Page 7
... carry it around when it be used at your hands and feet away from the rotating blades. make sure you understand the instructions before using Automower. • It is running. • Do not let persons who do not intend to be used with a defective blade disc or body.... English INTRODUCTION AND SAFETY 1.4 Safety instructions Use • Please read the Operator's Manual carefully and make sure you do not know how Automower works and behaves use the mower. • Never use the timer function, see 6.4 Timer (2) on the lawn that there...
... carry it around when it be used at your hands and feet away from the rotating blades. make sure you understand the instructions before using Automower. • It is running. • Do not let persons who do not intend to be used with a defective blade disc or body.... English INTRODUCTION AND SAFETY 1.4 Safety instructions Use • Please read the Operator's Manual carefully and make sure you do not know how Automower works and behaves use the mower. • Never use the timer function, see 6.4 Timer (2) on the lawn that there...
Owners Manual
Page 10
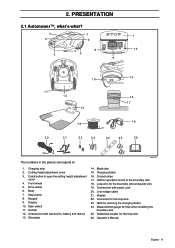
PRESENTATION 2.1 Automower™, what's what? 2 7 7 3 6 4 8 10 1 5 9 13 11 12 15 14 16 17 19 18 20 21 22 23 24 25 26 The numbers in the picture ... 17. Measurement gauge for the loop wire 26. Front wheel 5. Skid plate 14. Transformer with electronics, battery and motors 13. Keypad 9. Main switch 11. Operator's Manual English - 11 Solderless coupler for help when installing the boundary wire 25. 2. Charging strip 2. Stop button 8. Connector for operation check of the boundary wire 18...
PRESENTATION 2.1 Automower™, what's what? 2 7 7 3 6 4 8 10 1 5 9 13 11 12 15 14 16 17 19 18 20 21 22 23 24 25 26 The numbers in the picture ... 17. Measurement gauge for the loop wire 26. Front wheel 5. Skid plate 14. Transformer with electronics, battery and motors 13. Keypad 9. Main switch 11. Operator's Manual English - 11 Solderless coupler for help when installing the boundary wire 25. 2. Charging strip 2. Stop button 8. Connector for operation check of the boundary wire 18...
Owners Manual
Page 12
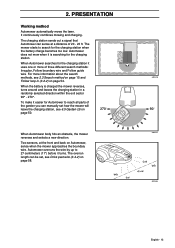
...page 15 and Follow loop in a randomly selected direction within the exit sector 90° - 270°. When Automower searches for Automower to reach all parts of 20 - 23 ft. When Automower body hits an obstacle, the mower reverses and selects a new direction. The mower starts to 27 centimeters (11... see Drive past wire (3-4-2) on page 54. To make it turns. Two sensors, at a distance of the garden you can manually set , see 6.5 Garden (3) on Automower, sense when the mower approaches the boundary wire. The overrun length can sense at the front and back on page 50. It ...
...page 15 and Follow loop in a randomly selected direction within the exit sector 90° - 270°. When Automower searches for Automower to reach all parts of 20 - 23 ft. When Automower body hits an obstacle, the mower reverses and selects a new direction. The mower starts to 27 centimeters (11... see Drive past wire (3-4-2) on page 54. To make it turns. Two sensors, at a distance of the garden you can manually set , see 6.5 Garden (3) on Automower, sense when the mower approaches the boundary wire. The overrun length can sense at the front and back on page 50. It ...
Owners Manual
Page 18
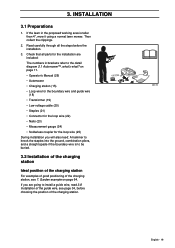
... guide wire, read 3.8 Installation of the charging station, see page 34, before the installation. 3. Garden example on page 11. • Operator's Manual (26) • Automower • Charging station (15) • Loop wire for the boundary wire and guide wire (18) • Transformer (19) • Low ... charging station For examples of good positioning of the guide wire, see 7. If the lawn in brackets refer to the detail diagram 2.1 Automower™, what's what? Check that all the steps before choosing the position of the charging station. 3012-512 English - 19 3. INSTALLATION...
... guide wire, read 3.8 Installation of the charging station, see page 34, before the installation. 3. Garden example on page 11. • Operator's Manual (26) • Automower • Charging station (15) • Loop wire for the boundary wire and guide wire (18) • Transformer (19) • Low ... charging station For examples of good positioning of the guide wire, see 7. If the lawn in brackets refer to the detail diagram 2.1 Automower™, what's what? Check that all the steps before choosing the position of the charging station. 3012-512 English - 19 3. INSTALLATION...

Owners Manual
Page 25
...collision, for example, trees or bushes higher than 24". When the boundary wire to be laid under the same staple on the return route. Automower will turn when it is less than 6", do not need to and from the island are used . Secondary areas It is recommended to create...withstand a collision, for example, flower beds and fountains. Use the MAN operating mode when Automower shall mow a secondary area. A secondary area generator can ideally be used , the wire should be moved manually between the boundary wires is preferable to demarcate areas inside the working area is made up ...
...collision, for example, trees or bushes higher than 24". When the boundary wire to be laid under the same staple on the return route. Automower will turn when it is less than 6", do not need to and from the island are used . Secondary areas It is recommended to create...withstand a collision, for example, flower beds and fountains. Use the MAN operating mode when Automower shall mow a secondary area. A secondary area generator can ideally be used , the wire should be moved manually between the boundary wires is preferable to demarcate areas inside the working area is made up ...
Owners Manual
Page 42
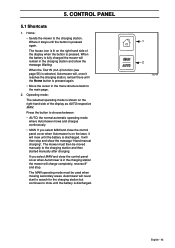
... mode is in the charging station and show the message "Need manual charging". The MAN operating mode must then be used when mowing secondary areas. If you select MAN and close the control panel cover when Automower is on the lawn, it stays until the battery is pressed again... the button to the charging station. Home: • Sends the mower to choose between: • AUTO, the normal automatic operating mode where Automower mows and charges continuously. • MAN. The mower must be moved manually to mow until the button is discharged. 1 2 3012-404 English - 43
... mode is in the charging station and show the message "Need manual charging". The MAN operating mode must then be used when mowing secondary areas. If you select MAN and close the control panel cover when Automower is on the lawn, it stays until the battery is pressed again... the button to the charging station. Home: • Sends the mower to choose between: • AUTO, the normal automatic operating mode where Automower mows and charges continuously. • MAN. The mower must be moved manually to mow until the button is discharged. 1 2 3012-404 English - 43
Owners Manual
Page 61
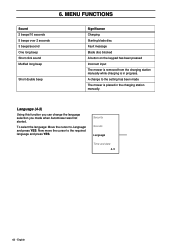
A change the language selection you made The mower is in the charging station manually. To select the language: Move the cursor to the required language and press YES. Now move the cursor to Language and press YES. English 6. Security ... Starting blade disc Fault message Blade disc blocked A button on the keypad has been pressed Incorrect input The mower is removed from the charging station manually while charging is placed in progress. Language (4-3) Using this function you can change to the setting has been made when...
A change the language selection you made The mower is in the charging station manually. To select the language: Move the cursor to the required language and press YES. Now move the cursor to Language and press YES. English 6. Security ... Starting blade disc Fault message Blade disc blocked A button on the keypad has been pressed Incorrect input The mower is removed from the charging station manually while charging is placed in progress. Language (4-3) Using this function you can change to the setting has been made when...
Owners Manual
Page 74
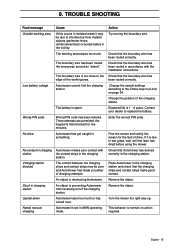
... been routed in accordance with the contact strips in the vicinity. English - 75 Enter the correct PIN code. Check that Automower has docked correctly in something. Remove the object. Needs manual charging Automower is 1 - 4 years. Try moving the boundary wire. The boundary wire has been routed the wrong way around an "island". No...
... been routed in accordance with the contact strips in the vicinity. English - 75 Enter the correct PIN code. Check that Automower has docked correctly in something. Remove the object. Needs manual charging Automower is 1 - 4 years. Try moving the boundary wire. The boundary wire has been routed the wrong way around an "island". No...
Owners Manual
Page 78
...Battery 23, 38 Charging station Boundary wire 31 Connect low voltage cable 22 Installation 19 Installation and connection 22 Irregular search 15 Link to Automower 33 Passages 21 Positioning 19 Presentation 10 Search by Follow guide wire 16 Search by Follow loop in 16 Search for 15 Winter storage 70... operating mode 43 Battery status 42 Clock 42 Clock icon 42 Cursor 42 Home button 43 Keypad 42 Main menu 46 Main switch 45 Manual operating mode 43 Numbers 45 Operating mode 43 Program icon 42 Programs 44 Select 44 Shortcuts 43 Corridor 55 Corridor width 55 Cursor 42...
...Battery 23, 38 Charging station Boundary wire 31 Connect low voltage cable 22 Installation 19 Installation and connection 22 Irregular search 15 Link to Automower 33 Passages 21 Positioning 19 Presentation 10 Search by Follow guide wire 16 Search by Follow loop in 16 Search for 15 Winter storage 70... operating mode 43 Battery status 42 Clock 42 Clock icon 42 Cursor 42 Home button 43 Keypad 42 Main menu 46 Main switch 45 Manual operating mode 43 Numbers 45 Operating mode 43 Program icon 42 Programs 44 Select 44 Shortcuts 43 Corridor 55 Corridor width 55 Cursor 42...
Owners Manual
Page 79
... Settings 59 Timer 48 Menu overview 47 Menus Browse between 46 Submenus 46 The Main menu 46 More than one Automower in a garden 17 Movement pattern Automower 15 N Needs manual charging 75 No contact in charging station 75 No drive 75 No loop signal 74 Normal garden shape 57 Number... buttons 45 O Obstacles 26 One Automower in several gardens 17 Open garden shape 57 Operating hours 42 Operating mode 43 Outside ...
... Settings 59 Timer 48 Menu overview 47 Menus Browse between 46 Submenus 46 The Main menu 46 More than one Automower in a garden 17 Movement pattern Automower 15 N Needs manual charging 75 No contact in charging station 75 No drive 75 No loop signal 74 Normal garden shape 57 Number... buttons 45 O Obstacles 26 One Automower in several gardens 17 Open garden shape 57 Operating hours 42 Operating mode 43 Outside ...
Owners Manual
Page 80
... Program buttons 44 Program icon 42 Programs 44 Proportion first 52 Proportion in Follow loop out 53 R Replace blades 72 Reset factory settings Automower 48 Restart 40 Restart Automower 40 Return arrow 44 Reversing distance 51 Right wheel motor blocked 74 S Safety Instructions 8 Maintenance 9 Transport 9 Use 8 Search for... STOP button 14 Stop protection 60 Stuck in charging station 75 Submenus 46 Switch off Automower 40 Symbols Automower 6 Operator's manual 7 Symptom cause and action 76 T Technical data 77 Test in 56 Test out 56 The mower mows for shorter periods than ...
... Program buttons 44 Program icon 42 Programs 44 Proportion first 52 Proportion in Follow loop out 53 R Replace blades 72 Reset factory settings Automower 48 Restart 40 Restart Automower 40 Return arrow 44 Reversing distance 51 Right wheel motor blocked 74 S Safety Instructions 8 Maintenance 9 Transport 9 Use 8 Search for... STOP button 14 Stop protection 60 Stuck in charging station 75 Submenus 46 Switch off Automower 40 Symbols Automower 6 Operator's manual 7 Symptom cause and action 76 T Technical data 77 Test in 56 Test out 56 The mower mows for shorter periods than ...


