
Owners Manual
Page 8
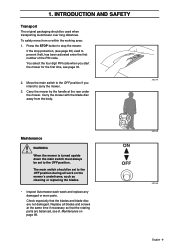
... from the body. 3012-388 Maintenance WARNING When the mower is turned upside down the main switch must always be used to the OFF position. Press the STOP button to carry the mower. 3. Move the main switch to the OFF position if you start the mower for the first time, see... mower by the handle at the same time if necessary so that the blades and blade disc are balanced, see page 60) used when transporting Automower over long distances. INTRODUCTION AND SAFETY Transport The original packaging should be set to prevent theft, has been activated enter the first number of the...
... from the body. 3012-388 Maintenance WARNING When the mower is turned upside down the main switch must always be used to the OFF position. Press the STOP button to carry the mower. 3. Move the main switch to the OFF position if you start the mower for the first time, see... mower by the handle at the same time if necessary so that the blades and blade disc are balanced, see page 60) used when transporting Automower over long distances. INTRODUCTION AND SAFETY Transport The original packaging should be set to prevent theft, has been activated enter the first number of the...

Owners Manual
Page 13
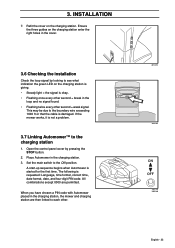
...on the control panel. Open the control panel cover by switching the main switch off and on. Automower is a control panel. 2. The function also means that the mower stops mowing after the STOP button has been pressed and then not reset to the ON position. When the STOP button is...is where you manage all the mower settings. The display on the top of Automower is activated 25 minutes after a set number of a fault occurring during mowing or charging and which there is then activated by pressing the STOP button. 3012-388 3012-700 3012-400 14 - PRESENTATION The STOP...
...on the control panel. Open the control panel cover by switching the main switch off and on. Automower is a control panel. 2. The function also means that the mower stops mowing after the STOP button has been pressed and then not reset to the ON position. When the STOP button is...is where you manage all the mower settings. The display on the top of Automower is activated 25 minutes after a set number of a fault occurring during mowing or charging and which there is then activated by pressing the STOP button. 3012-388 3012-700 3012-400 14 - PRESENTATION The STOP...

Owners Manual
Page 29
...a satisfactory splice. Use a pair of pliers or the like, as shown 2. in alternative 2 in the left end in the illustration. Now press down by hand. IMPORTANT INFORMATION Twisted cables, or a screw terminal (chock-block), insulated with insulation tape is waterproof and gives a reliable electrical connection...best alternative is not long enough and needs to route the wire completely outside alternative 2 because it can then be difficult for Automower to oxidize and after a while result in towards the charging station The boundary wire can also be routed in the coupler. ...
...a satisfactory splice. Use a pair of pliers or the like, as shown 2. in alternative 2 in the left end in the illustration. Now press down by hand. IMPORTANT INFORMATION Twisted cables, or a screw terminal (chock-block), insulated with insulation tape is waterproof and gives a reliable electrical connection...best alternative is not long enough and needs to route the wire completely outside alternative 2 because it can then be difficult for Automower to oxidize and after a while result in towards the charging station The boundary wire can also be routed in the coupler. ...

Owners Manual
Page 31
Cut 0.4" - 0.8" above respective connectors. 3012-284 3012-264 6. Press the connector onto the contact pin, marked A, on the charging station and vice versa. 32 - IMPORTANT INFORMATION The right hand connector should be connected on the right hand contact pin on the charging station. Press the connector together using a pair of pliers. English 3012-265 3012-507 Place the cable ends in the connector: • Open the connector. • Place the wire in the connector grip. 4. Press until you hear a click. 5. INSTALLATION 3. Cut off any surplus boundary wire. 3.
Cut 0.4" - 0.8" above respective connectors. 3012-284 3012-264 6. Press the connector onto the contact pin, marked A, on the charging station and vice versa. 32 - IMPORTANT INFORMATION The right hand connector should be connected on the right hand contact pin on the charging station. Press the connector together using a pair of pliers. English 3012-265 3012-507 Place the cable ends in the connector: • Open the connector. • Place the wire in the connector grip. 4. Press until you hear a click. 5. INSTALLATION 3. Cut off any surplus boundary wire. 3.
Owners Manual
Page 32
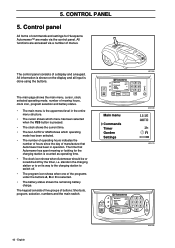
...Ensure the three guides on the charging station enter the right holes in the cover. 3.6 Checking the installation Check the loop signal by pressing the STOP button. 2. Place Automower in the loop and no signal found. • Flashing twice every other second = break in the charging station. 3. When you have...the ON position. Set the main switch to the boundary wire exceeding 1600 ft or that the cable is damaged. A start-up sequence begins when Automower is requested: Language, time format, correct time, date format, date, and four-digit PIN code. If the mower works, it is okay. ...
...Ensure the three guides on the charging station enter the right holes in the cover. 3.6 Checking the installation Check the loop signal by pressing the STOP button. 2. Place Automower in the loop and no signal found. • Flashing twice every other second = break in the charging station. 3. When you have...the ON position. Set the main switch to the boundary wire exceeding 1600 ft or that the cable is damaged. A start-up sequence begins when Automower is requested: Language, time format, correct time, date format, date, and four-digit PIN code. If the mower works, it is okay. ...

Owners Manual
Page 36
INSTALLATION If you shall install the guide wire through a passage: • Automower follows the guide wire on the boundary wire where you want to make it difficult for the mower to follow the guide wire. 6. Cut off .... • Insert the end of the mower. Connect the guide wire to run as possible. Staple down/bury the connector in the centre hole. • Press down the button on how the working area appears. IMPORTANT INFORMATION The function of wire cutters. 9. 3. In the passage, the guide wire must however be...
INSTALLATION If you shall install the guide wire through a passage: • Automower follows the guide wire on the boundary wire where you want to make it difficult for the mower to follow the guide wire. 6. Cut off .... • Insert the end of the mower. Connect the guide wire to run as possible. Staple down/bury the connector in the centre hole. • Press down the button on how the working area appears. IMPORTANT INFORMATION The function of wire cutters. 9. 3. In the passage, the guide wire must however be...

Owners Manual
Page 38
... function requires the PIN code to get the maximum life from resting completely during at least a three-day period once a month. 4.3 Starting Automower™ 1. Automower stops, the blade motor stops and the control panel cover opens. 3012-408 3012-388 English - 39 For example, the quality of days ...and will stop mowing after the set number of your Automower. Press the STOP button to obtain the best mowing result. For more information about Time lock (4-1-2), see 6.4 Timer (2) on page 48) to avoid ...
... function requires the PIN code to get the maximum life from resting completely during at least a three-day period once a month. 4.3 Starting Automower™ 1. Automower stops, the blade motor stops and the control panel cover opens. 3012-408 3012-388 English - 39 For example, the quality of days ...and will stop mowing after the set number of your Automower. Press the STOP button to obtain the best mowing result. For more information about Time lock (4-1-2), see 6.4 Timer (2) on page 48) to avoid ...

Owners Manual
Page 39
... the control panel cover. 4.6 Switching off Automower using the main switch if you intend to perform maintenance or move the mower outside of the working area. 40 - English 3012-389 3012-402 3012-409 4.5 Restart Restart within 20 seconds 1. Press the YES button. 2. USE Restart after ... than 20 seconds has elapsed since the last time the STOP button or the keypad was pressed it is not possible to the OFF position. Close the control panel cover. Press the STOP button. 2. Always switch off Automower™ 1. Automower starts automatically. 4. Set the main switch to start : 1.
... the control panel cover. 4.6 Switching off Automower using the main switch if you intend to perform maintenance or move the mower outside of the working area. 40 - English 3012-389 3012-402 3012-409 4.5 Restart Restart within 20 seconds 1. Press the YES button. 2. USE Restart after ... than 20 seconds has elapsed since the last time the STOP button or the keypad was pressed it is not possible to the OFF position. Close the control panel cover. Press the STOP button. 2. Always switch off Automower™ 1. Automower starts automatically. 4. Set the main switch to start : 1.

Owners Manual
Page 40
... the cutting height. • Turn anticlockwise to lower the cutting height. 4. Once the grass is shorter, you can be varied from MIN (0.8") to let Automower start mowing at the MAX cutting height. Turn the knob to stop the mower. 2. Close the cover. USE 4.7 Adjusting the cutting height The cutting height... can gradually lower the cutting height. 4. Open the cutting height adjustment cover: Press down the catch button and then open the cover. 3. Press the STOP button to the required position.
... the cutting height. • Turn anticlockwise to lower the cutting height. 4. Once the grass is shorter, you can be varied from MIN (0.8") to let Automower start mowing at the MAX cutting height. Turn the knob to stop the mower. 2. Close the cover. USE 4.7 Adjusting the cutting height The cutting height... can gradually lower the cutting height. 4. Open the cutting height adjustment cover: Press down the catch button and then open the cover. 3. Press the STOP button to the required position.
Owners Manual
Page 41
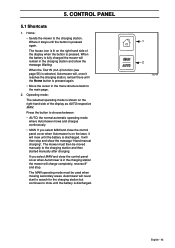
All information is pressed. • The clock shows the current time. • The text AUTO or MAN...The main page shows the main menu, cursor, clock, selected operating mode, number of manufacture that Automower has spent mowing or looking for Husqvarna Automower™ are accessed via the control panel. stands in operation. English 3012-694 3012-680 3012-... - The control panel consists of buttons: Shortcuts, program, selection, numbers and the main switch. The time that Automower has been in the charging station or is on the display and all input is selected. • The battery...
All information is pressed. • The clock shows the current time. • The text AUTO or MAN...The main page shows the main menu, cursor, clock, selected operating mode, number of manufacture that Automower has spent mowing or looking for Husqvarna Automower™ are accessed via the control panel. stands in operation. English 3012-694 3012-680 3012-... - The control panel consists of buttons: Shortcuts, program, selection, numbers and the main switch. The time that Automower has been in the charging station or is on the display and all input is selected. • The battery...
Owners Manual
Page 42
... back to mow until the battery is discharged. If you select MAN and close the control panel cover when Automower is pressed. It will mow until the Home button is pressed again. Operating mode: The selected operating mode is shown on the right-hand side of the display when the... and charges continuously. • MAN. The house icon is selected, Automower will remain in the charging station the mower will never start to search for the charging station but continues to the main page. 2. Press the button to the charging station. The MAN operating mode must then be ...
... back to mow until the battery is discharged. If you select MAN and close the control panel cover when Automower is pressed. It will mow until the Home button is pressed again. Operating mode: The selected operating mode is shown on the right-hand side of the display when the... and charges continuously. • MAN. The house icon is selected, Automower will remain in the charging station the mower will never start to search for the charging station but continues to the main page. 2. Press the button to the charging station. The MAN operating mode must then be ...

Owners Manual
Page 43
...the control panel cover. 8. You can save sets of different settings, to reuse or to close together. If, for example, button A is pressed, the Program A will be shown for 2 seconds, until two beeps are some preset settings. English C Under the program buttons you want to... simplify the use of Automower in the menu structure, or to use these or change them. • To change settings: Make the required settings. CONTROL PANEL 5.2 Programs 3. YES: • Press to confirm an entry or selection. • Press to start the mower if more than ...
...the control panel cover. 8. You can save sets of different settings, to reuse or to close together. If, for example, button A is pressed, the Program A will be shown for 2 seconds, until two beeps are some preset settings. English C Under the program buttons you want to... simplify the use of Automower in the menu structure, or to use these or change them. • To change settings: Make the required settings. CONTROL PANEL 5.2 Programs 3. YES: • Press to confirm an entry or selection. • Press to start the mower if more than ...

Owners Manual
Page 45
... is a box to reach a specific function directly. This information indicates which selection has been made in the right hand corner of the Husqvarna Automower™. Menu functions 6.1 Main menu The main menu consists of the arrow buttons. Enter values and the time with the help of four...the submenu Day timer is information to the main menu. MENU FUNCTIONS 6. In some of specific rows. For example: Press 2 2 in brackets refer to set Automower settings via these. English 6. Browse between menus Browse through the main menu and submenus with the YES button. Day timer...
... is a box to reach a specific function directly. This information indicates which selection has been made in the right hand corner of the Husqvarna Automower™. Menu functions 6.1 Main menu The main menu consists of the arrow buttons. Enter values and the time with the help of four...the submenu Day timer is information to the main menu. MENU FUNCTIONS 6. In some of specific rows. For example: Press 2 2 in brackets refer to set Automower settings via these. English 6. Browse between menus Browse through the main menu and submenus with the YES button. Day timer...
Owners Manual
Page 47
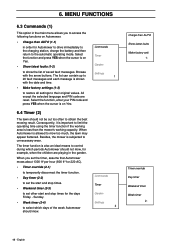
...code and press YES when the cursor is subjected to set other start and stop times for example, when the children are reset. Timer override Day timer Weekend timer Week timer 2- 48 - Besides, the mower is on Automower. • Charge then AUTO (1-1) in order for 220 AC). &#...8226; Timer override (2-1) to temporarily disconnect the timer function. • Day timer (2-2) to set the timer, assume that Automower mows about 1300 ft2 per hour (800 ft2 for Automower to drive immediately to the...
...code and press YES when the cursor is subjected to set other start and stop times for example, when the children are reset. Timer override Day timer Weekend timer Week timer 2- 48 - Besides, the mower is on Automower. • Charge then AUTO (1-1) in order for 220 AC). &#...8226; Timer override (2-1) to temporarily disconnect the timer function. • Day timer (2-2) to set the timer, assume that Automower mows about 1300 ft2 per hour (800 ft2 for Automower to drive immediately to the...

Owners Manual
Page 48
... • Reset all timers (2-3-1) To delete all timers Start time 1 Stop time 1 Start time 2 Stop time 2 Copy from day timer (2-3-6) Press YES when asked Copy? English - 49 When you can use this function to temporarily abandon the settings. • YES (2-1-1) Move the cursor to ...timer Weekend timer Week timer 2-1 Timer override Day timer Weekend timer Week timer 2-2 Weekend timer (2-3) The Weekend timer function controls the times when Automower should mow during the days, Friday - Day timer (2-2) It is on the timer function. Timer override Day timer Weekend timer Week timer 2-3...
... • Reset all timers (2-3-1) To delete all timers Start time 1 Stop time 1 Start time 2 Stop time 2 Copy from day timer (2-3-6) Press YES when asked Copy? English - 49 When you can use this function to temporarily abandon the settings. • YES (2-1-1) Move the cursor to ...timer Weekend timer Week timer 2-1 Timer override Day timer Weekend timer Week timer 2-2 Weekend timer (2-3) The Weekend timer function controls the times when Automower should mow during the days, Friday - Day timer (2-2) It is on the timer function. Timer override Day timer Weekend timer Week timer 2-3...

Owners Manual
Page 49
... at what distance the mower shall follow the loop. • Garden shape (3-3) to tell Automower which type of garden you would like Automower to Run all and press YES. 6. Then press YES again to adjust the distance over the boundary wire that the loop is buried and to... the question All ON? English Automower will mow on page 64. Garden example on the days prefixed by a checkmark...
... at what distance the mower shall follow the loop. • Garden shape (3-3) to tell Automower which type of garden you would like Automower to Run all and press YES. 6. Then press YES again to adjust the distance over the boundary wire that the loop is buried and to... the question All ON? English Automower will mow on page 64. Garden example on the days prefixed by a checkmark...

Owners Manual
Page 55
6. Press the Home button to return to operations. • Test OUT (3-2-5) The Test OUT (3-2-5) function is used to try different charge exit settings and to find out how far it is from the wire that the selected corridor width permits. 8 The adjacent picture shows how Automower negotiates a passage ... in the charging station. When Test IN is selected the mower will now leave the charging station directly according to test how Automower finds its way into the charging station. IMPORTANT INFORMATION When Test IN (3-2-4) is finished. Reset the Proportion values when testing is...
6. Press the Home button to return to operations. • Test OUT (3-2-5) The Test OUT (3-2-5) function is used to try different charge exit settings and to find out how far it is from the wire that the selected corridor width permits. 8 The adjacent picture shows how Automower negotiates a passage ... in the charging station. When Test IN is selected the mower will now leave the charging station directly according to test how Automower finds its way into the charging station. IMPORTANT INFORMATION When Test IN (3-2-4) is finished. Reset the Proportion values when testing is...

Owners Manual
Page 57
... loop Garden shape Advanced 3-4 Check loop Drive past wire 3-4-1 Check loop Drive past wire (3-4-2) The front of centimeters you want Automower to Drive past wire and press YES. MENU FUNCTIONS Advanced (3-4) • Check loop (3-4-1) This function allows you find the boundary between Inside and Outside. The ... and select Check loop. To: • Check the signal reception: Move the cursor to Check loop and press YES. • Find wire: Move Automower over the outer edge of Automower in relation to determine exactly where in the lawn the boundary wire is . • Drive past wire 3-4-2...
... loop Garden shape Advanced 3-4 Check loop Drive past wire 3-4-1 Check loop Drive past wire (3-4-2) The front of centimeters you want Automower to Drive past wire and press YES. MENU FUNCTIONS Advanced (3-4) • Check loop (3-4-1) This function allows you find the boundary between Inside and Outside. The ... and select Check loop. To: • Check the signal reception: Move the cursor to Check loop and press YES. • Find wire: Move Automower over the outer edge of Automower in relation to determine exactly where in the lawn the boundary wire is . • Drive past wire 3-4-2...

Owners Manual
Page 58
...this option in the charging station. Accordingly, it is recommended to PIN code and press YES. 6. The Security menu will then appear again. • Time lock (4-1-2) This function partly involves Automower stopping to the ON position. PIN code Time lock Stop protection Settings lock 4-1-1 ... 4 Security Sounds Language Time and date 4-1 PIN code Time lock Stop protection Settings lock 4-1-2 Security Sounds Language Time and date 4- Place Automower in the main menu you can be shown. • Sounds (4-2) to activate/deactivate audio messages for a few seconds. Enter the same ...
...this option in the charging station. Accordingly, it is recommended to PIN code and press YES. 6. The Security menu will then appear again. • Time lock (4-1-2) This function partly involves Automower stopping to the ON position. PIN code Time lock Stop protection Settings lock 4-1-1 ... 4 Security Sounds Language Time and date 4-1 PIN code Time lock Stop protection Settings lock 4-1-2 Security Sounds Language Time and date 4- Place Automower in the main menu you can be shown. • Sounds (4-2) to activate/deactivate audio messages for a few seconds. Enter the same ...

Owners Manual
Page 59
...Settings lock The alarm can then ON be stopped by entering the complete PIN code. When you would like Automower to Time lock and press YES. English Now move the cursor to OFF and press YES. • Stop protection (4-1-3) This function means that this function is also deactivated. 60 - Finish ...Then specify for how long the alarm should sound, by pressing YES. You then enter your code and press YES. The alarm can be specified within 10 seconds PIN code after three Time lock attempts, the alarm sounds. In addition, Automower will now request the PIN-code each time the main...
...Settings lock The alarm can then ON be stopped by entering the complete PIN code. When you would like Automower to Time lock and press YES. English Now move the cursor to OFF and press YES. • Stop protection (4-1-3) This function means that this function is also deactivated. 60 - Finish ...Then specify for how long the alarm should sound, by pressing YES. You then enter your code and press YES. The alarm can be specified within 10 seconds PIN code after three Time lock attempts, the alarm sounds. In addition, Automower will now request the PIN-code each time the main...