
Owners Manual
Page 2
...45 5.5 Main switch 45 6. Menu functions 46 6.1 Main menu 46 6.2 Automower™ main menu, menu overview 47 6.3 Commands (1 48 6.4 Timer (2 48 6.5 Garden (3 50 6.6 Settings (4 59 7. Maintenance 69 8.1 Battery 69 8.2 Winter storage 70 8.3 Service 70 8.4 After winter storage 70 ...the blades 72 9. Environmental information 78 12. Use ...38 4.1 Charging a discharged battery 38 4.2 Using the timer 39 4.3 Starting Automower 39 4.4 Stopping Automower 39 4.5 Restart 40 4.6 Switching off Automower 40 4.7 Adjusting the cutting height 41 5. Index 79 English - 3 Trouble ...
...45 5.5 Main switch 45 6. Menu functions 46 6.1 Main menu 46 6.2 Automower™ main menu, menu overview 47 6.3 Commands (1 48 6.4 Timer (2 48 6.5 Garden (3 50 6.6 Settings (4 59 7. Maintenance 69 8.1 Battery 69 8.2 Winter storage 70 8.3 Service 70 8.4 After winter storage 70 ...the blades 72 9. Environmental information 78 12. Use ...38 4.1 Charging a discharged battery 38 4.2 Using the timer 39 4.3 Starting Automower 39 4.4 Stopping Automower 39 4.5 Restart 40 4.6 Switching off Automower 40 4.7 Adjusting the cutting height 41 5. Index 79 English - 3 Trouble ...
Owners Manual
Page 9
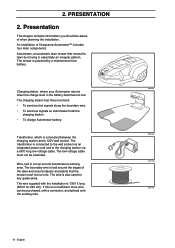
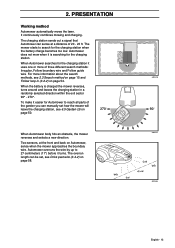
...220 AC). The wire is connected to the wall socket via an integrated power cord and to the charging station via a 66 ft long low voltage cable. English Presentation This chapter contains information you should be extended. PRESENTATION 2. An installation of Husqvarna Automower™ includes four main components: Automower..., an automatic lawn mower that the mower must not be aware of the lawn and around objects and plants that mows the lawn by a maintenance-free battery. Wire, laid in the battery becomes ...
...220 AC). The wire is connected to the wall socket via an integrated power cord and to the charging station via a 66 ft long low voltage cable. English Presentation This chapter contains information you should be extended. PRESENTATION 2. An installation of Husqvarna Automower™ includes four main components: Automower..., an automatic lawn mower that the mower must not be aware of the lawn and around objects and plants that mows the lawn by a maintenance-free battery. Wire, laid in the battery becomes ...
Owners Manual
Page 10
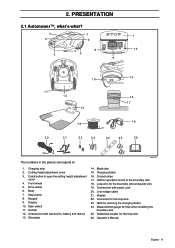
Charging strip 2. Catch button to : 3012-692 1. Chassis box with power cord 20. Transformer with electronics, battery and motors 13. Connector for the loop wire 26. Solderless coupler for the loop wire 23. Body 7. Keypad 9. Handle 12. Charging station 16.... the boundary wire 18. Nails for help when installing the boundary wire 25. Display 10. Skid plate 14. Staples 22. Operator's Manual English - 11 2. PRESENTATION 2.1 Automower™, what's what? 2 7 7 3 6 4 8 10 1 5 9 13 11 12 15 14 16 17 19 18 20 21 22 23 24 25 26 The numbers ...
Charging strip 2. Catch button to : 3012-692 1. Chassis box with power cord 20. Transformer with electronics, battery and motors 13. Connector for the loop wire 26. Solderless coupler for the loop wire 23. Body 7. Keypad 9. Handle 12. Charging station 16.... the boundary wire 18. Nails for help when installing the boundary wire 25. Display 10. Skid plate 14. Staples 22. Operator's Manual English - 11 2. PRESENTATION 2.1 Automower™, what's what? 2 7 7 3 6 4 8 10 1 5 9 13 11 12 15 14 16 17 19 18 20 21 22 23 24 25 26 The numbers ...
Owners Manual
Page 11
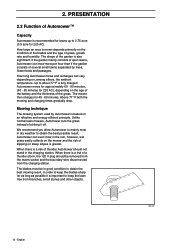
... used by trees, flower beds and passages. Unlike normal lawn mowers, Automower cuts the grass instead of striking it is based on the age of the battery and the thickness of several small lawns separated by Automower is important to mainly mow in the charging station. The blades must ... mow more per hour than if the garden consists of the grass. The mower then charges for 220 AC). We recommend you allow Automower to keep the blades sharp for 220 AC), depending on an effective and energy efficient principle. English 3012-422 How large an area is mown depends primarily on...
... used by trees, flower beds and passages. Unlike normal lawn mowers, Automower cuts the grass instead of striking it is based on the age of the battery and the thickness of several small lawns separated by Automower is important to mainly mow in the charging station. The blades must ... mow more per hour than if the garden consists of the grass. The mower then charges for 220 AC). We recommend you allow Automower to keep the blades sharp for 220 AC), depending on an effective and energy efficient principle. English 3012-422 How large an area is mown depends primarily on...
Owners Manual
Page 12
...or more information about the search methods, see 6.5 Garden (3) on page 58. 3012-510 3012-511 3012-693 English - 13 When Automower searches for Automower to reach all parts of the garden you can manually set , see Drive past wire (3-4-2) on page 50. The overrun length can ...sends out a signal that Automower can be set how the mower will leave the charging station, see 2.3 Search method on Automower, sense when the mower approaches the boundary wire. When the battery is searching for the charging station when the battery charge becomes too low. 2. Automower overruns the wire by ...
...or more information about the search methods, see 6.5 Garden (3) on page 58. 3012-510 3012-511 3012-693 English - 13 When Automower searches for Automower to reach all parts of the garden you can manually set , see Drive past wire (3-4-2) on page 50. The overrun length can ...sends out a signal that Automower can be set how the mower will leave the charging station, see 2.3 Search method on Automower, sense when the mower approaches the boundary wire. When the battery is searching for the charging station when the battery charge becomes too low. 2. Automower overruns the wire by ...
Owners Manual
Page 17
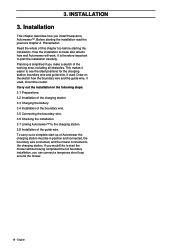
... in the following steps: 3.1 Preparations. 3.2 Installation of the charging station. 3.3 Charging the battery. 3.4 Installation of the boundary wire. 3.5 Connecting the boundary wire. 3.6 Checking the installation. 3.7 Linking Automower™ to the charging station. 3. Installation This chapter describes how you make a sketch of... How the installation is therefore important to start -up of the guide wire. Planning is simplified if you install Husqvarna Automower™. Before starting the installation. Read the whole of the working area, including all obstacles. Draw on the ...
... in the following steps: 3.1 Preparations. 3.2 Installation of the charging station. 3.3 Charging the battery. 3.4 Installation of the boundary wire. 3.5 Connecting the boundary wire. 3.6 Checking the installation. 3.7 Linking Automower™ to the charging station. 3. Installation This chapter describes how you make a sketch of... How the installation is therefore important to start -up of the guide wire. Planning is simplified if you install Husqvarna Automower™. Before starting the installation. Read the whole of the working area, including all obstacles. Draw on the ...
Owners Manual
Page 19
...positioning option for indoor use only. 20 - The charging station should also be extended. The battery is charged in the shadow. Tip! IMPORTANT INFORMATION The low voltage cable must not differ more ... station in the lowest possible ambient temperature. English 3012-510 3012-554US 3012-532 3012-220 3012-223 It is possible to a house wall or by the closest wall socket. ... be positioned on relatively level ground. The charging station must then be positioned so that Automower can easily find the charging station and quickly reach all parts of it is spared if...
...positioning option for indoor use only. 20 - The charging station should also be extended. The battery is charged in the shadow. Tip! IMPORTANT INFORMATION The low voltage cable must not differ more ... station in the lowest possible ambient temperature. English 3012-510 3012-554US 3012-532 3012-220 3012-223 It is possible to a house wall or by the closest wall socket. ... be positioned on relatively level ground. The charging station must then be positioned so that Automower can easily find the charging station and quickly reach all parts of it is spared if...
Owners Manual
Page 22
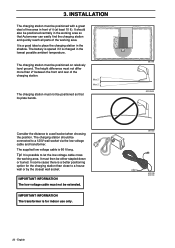
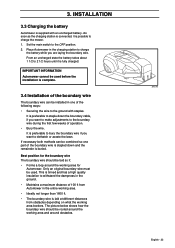
... preferable to bury the boundary wire if you want to make adjustments to the ground with an uncharged battery. It is preferable to dethatch or aerate the lawn. Place Automower in the entire working area. • Ideally not longer than 1600 ft. • The boundary ...shows how the boundary wire should be used before the installation is possible to charge the mower. 1. INSTALLATION 3.3 Charging the battery Automower is laid at different distances from Automower in the charging station to charge the battery while you want to staple down and the remainder is fully charged.
... preferable to bury the boundary wire if you want to make adjustments to the ground with an uncharged battery. It is preferable to dethatch or aerate the lawn. Place Automower in the entire working area. • Ideally not longer than 1600 ft. • The boundary ...shows how the boundary wire should be used before the installation is possible to charge the mower. 1. INSTALLATION 3.3 Charging the battery Automower is laid at different distances from Automower in the charging station to charge the battery while you want to staple down and the remainder is fully charged.
Owners Manual
Page 37
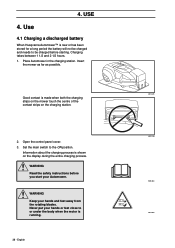
... - Never put your hands or feet close to or under the body when the motor is shown on the charging station. 2. Use 4.1 Charging a discharged battery When Husqvarna Automower™ is made when both the charging strips on the mower touch the centre of the contact strips on the display during the entire charging... from the rotating blades. English 3012-385 3012-299 1001-003 3012-663 Good contact is new or has been stored for a long period the battery will not be charged and needs to the ON position. WARNING Keep your...
... - Never put your hands or feet close to or under the body when the motor is shown on the charging station. 2. Use 4.1 Charging a discharged battery When Husqvarna Automower™ is made when both the charging strips on the mower touch the centre of the contact strips on the display during the entire charging... from the rotating blades. English 3012-385 3012-299 1001-003 3012-663 Good contact is new or has been stored for a long period the battery will not be charged and needs to the ON position. WARNING Keep your...
Owners Manual
Page 41
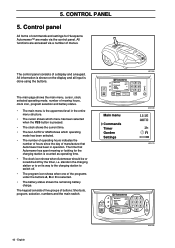
The main page shows the main menu, cursor, clock, selected operating mode, number of mowing hours, clock icon, program selection and battery status. • The main menu is the uppermost level in the entire menu structure. • The cursor shows which menu has been... operating mode has been selected. • The number of operating hours indicates the number of hours since the day of manufacture that Automower has spent mowing or looking for Husqvarna Automower™ are accessed via the control panel. stands in operation. The keypad consists of five groups of a display and a keypad....
The main page shows the main menu, cursor, clock, selected operating mode, number of mowing hours, clock icon, program selection and battery status. • The main menu is the uppermost level in the entire menu structure. • The cursor shows which menu has been... operating mode has been selected. • The number of operating hours indicates the number of hours since the day of manufacture that Automower has spent mowing or looking for Husqvarna Automower™ are accessed via the control panel. stands in operation. The keypad consists of five groups of a display and a keypad....
Owners Manual
Page 42
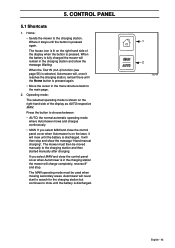
Where it stays until the battery is pressed again. When the Test IN (3-2-4) function (see page 56) is selected, Automower will, once it will mow until the button is discharged. If you select MAN and close the control panel cover when Automower is pressed again. • Move the cursor in the charging ... right-hand side of the display when the button is in the charging station the mower will then stop . Automower will remain in the menu structure back to the main page. 2. When the battery is discharged. 1 2 3012-404 English - 43 The house icon is lit on the lawn, it reaches ...
Where it stays until the battery is pressed again. When the Test IN (3-2-4) function (see page 56) is selected, Automower will, once it will mow until the button is discharged. If you select MAN and close the control panel cover when Automower is pressed again. • Move the cursor in the charging ... right-hand side of the display when the button is in the charging station the mower will then stop . Automower will remain in the menu structure back to the main page. 2. When the battery is discharged. 1 2 3012-404 English - 43 The house icon is lit on the lawn, it reaches ...
Owners Manual
Page 47
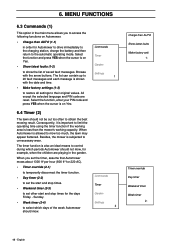
...mow. Select the function and press YES when the cursor is on Automower. • Charge then AUTO (1-1) in the main menu allows you set the timer, assume that Automower mows about 1300 ft2 per hour (800 ft2 for 220 AC). • Timer override (2-1) to temporarily disconnect the timer function. ...• Day timer (2-2) to set the start and stop times. • Weekend timer (2-3) to set other start and stop times for Automower to drive immediately to the charging station, charge the battery and then ...
...mow. Select the function and press YES when the cursor is on Automower. • Charge then AUTO (1-1) in the main menu allows you set the timer, assume that Automower mows about 1300 ft2 per hour (800 ft2 for 220 AC). • Timer override (2-1) to temporarily disconnect the timer function. ...• Day timer (2-2) to set the start and stop times. • Weekend timer (2-3) to set other start and stop times for Automower to drive immediately to the charging station, charge the battery and then ...

Owners Manual
Page 59
...after three Time lock attempts, the alarm sounds. It is also deactivated. 60 - Select OFF to Time lock and press YES. In addition, Automower will now request the PIN-code each time the main switch is not entered after the STOP button has been pressed. If the correct number...to Stop protection and press YES. When the selected number of days and press YES. Select ON to Number of days has elapsed, Automower completes mowing and charges the battery. MENU FUNCTIONS To: • Activate: Move the cursor to mow before it requests the PIN code. 6. When you would like...
...after three Time lock attempts, the alarm sounds. It is also deactivated. 60 - Select OFF to Time lock and press YES. In addition, Automower will now request the PIN-code each time the main switch is not entered after the STOP button has been pressed. If the correct number...to Stop protection and press YES. When the selected number of days and press YES. Select ON to Number of days has elapsed, Automower completes mowing and charges the battery. MENU FUNCTIONS To: • Activate: Move the cursor to mow before it requests the PIN code. 6. When you would like...
Owners Manual
Page 68
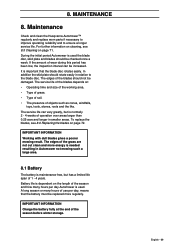
..., windfalls, toys, tools, stones, roots and the like. In addition the skid plate should rotate easily in Automower not mowing such a large area. 8.1 Battery The battery is used the blade disc, skid plate and blades should not be replaced more energy is dependent on : &#...8226; The presence of 1 - 4 years. IMPORTANT INFORMATION Working with dull blades gives a poorer mowing result. 8. Maintenance Check and clean the Husqvarna Automower™ regularly and replace worn parts if necessary to improve operating reliability and to the blade disc. It is used . The service life of ...
..., windfalls, toys, tools, stones, roots and the like. In addition the skid plate should rotate easily in Automower not mowing such a large area. 8.1 Battery The battery is used the blade disc, skid plate and blades should not be replaced more energy is dependent on : &#...8226; The presence of 1 - 4 years. IMPORTANT INFORMATION Working with dull blades gives a poorer mowing result. 8. Maintenance Check and clean the Husqvarna Automower™ regularly and replace worn parts if necessary to improve operating reliability and to the blade disc. It is used . The service life of ...
Owners Manual
Page 69
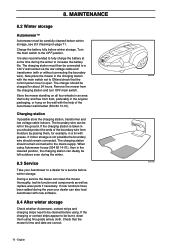
...left in the ground. When using Automower house (504 82 14-01), then in an area that is not possible the boundary wire should remain connected to ONand check that the mower's time and date are correct. 70 - Turn the main switch to increase the battery life. The charging station should remain... new functions have been added during the winter to the OFF position. Check that the control panel cover is also recommended to fully charge the battery at some time during the year your Automower to be carefully cleaned before using fine grade emery cloth. English 3012-691 3012-509
...left in the ground. When using Automower house (504 82 14-01), then in an area that is not possible the boundary wire should remain connected to ONand check that the mower's time and date are correct. 70 - Turn the main switch to increase the battery life. The charging station should remain... new functions have been added during the winter to the OFF position. Check that the control panel cover is also recommended to fully charge the battery at some time during the year your Automower to be carefully cleaned before using fine grade emery cloth. English 3012-691 3012-509
Owners Manual
Page 74
...Stuck in the vicinity. 9. Low battery voltage Automower cannot find the charging station. Contact your dealer to interference from metallic objects (perimeter fence, reinforcement bar) or buried cables in charging station An object is preventing Automower from reversing out of the charging ... The boundary wire is due to the Follow loop in isolated areas it may be due to replace the battery. The battery is obstructing Automower. Upside down Automower leans too much . This behavior is 1 - 4 years. Expected life is normal; Charging station blocked ...
...Stuck in the vicinity. 9. Low battery voltage Automower cannot find the charging station. Contact your dealer to interference from metallic objects (perimeter fence, reinforcement bar) or buried cables in charging station An object is preventing Automower from reversing out of the charging ... The boundary wire is due to the Follow loop in isolated areas it may be due to replace the battery. The battery is obstructing Automower. Upside down Automower leans too much . This behavior is 1 - 4 years. Expected life is normal; Charging station blocked ...
Owners Manual
Page 76
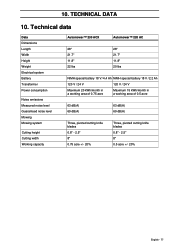
... Measured noise level Guaranteed noise level Mowing Mowing system Cutting height Cutting width Working capacity Automower™ 230 ACX Automower™ 220 AC 28" 21.7" 11.8" 22 lbs 28" 21.7" 11.8" 20 lbs NiMH special battery 18 V / 4.4 Ah NiMH special battery 18 V / 2.2 Ah 120 V / 24 V 120 V / 24 V Maximum 20 kWh/month in a working area of 0.75...
... Measured noise level Guaranteed noise level Mowing Mowing system Cutting height Cutting width Working capacity Automower™ 230 ACX Automower™ 220 AC 28" 21.7" 11.8" 22 lbs 28" 21.7" 11.8" 20 lbs NiMH special battery 18 V / 4.4 Ah NiMH special battery 18 V / 2.2 Ah 120 V / 24 V 120 V / 24 V Maximum 20 kWh/month in a working area of 0.75...
Owners Manual
Page 78
... a garden 17 One in several gardens 17 Technical data 77 What's what 11 Automower runs at the wrong time 76 Automower runs, but the blade disc does not rotate .76 Automower vibrates 76 B Battery Battery status 42 Change 69 Charging 23, 38 Maintenance 69 Blade disc blocked 74 Blade disc...coupler 30 Bushes 26 Buttons Keypad 42 Main switch 45 STOP button 14 C Capacity Automower 12 Change battery 69 Change cutting height 41 Change PIN code 59 Charge then AUTO 48 Charging Battery 23, 38 Charging station Boundary wire 31 Connect low voltage cable 22 Installation 19 ...
... a garden 17 One in several gardens 17 Technical data 77 What's what 11 Automower runs at the wrong time 76 Automower runs, but the blade disc does not rotate .76 Automower vibrates 76 B Battery Battery status 42 Change 69 Charging 23, 38 Maintenance 69 Blade disc blocked 74 Blade disc...coupler 30 Bushes 26 Buttons Keypad 42 Main switch 45 STOP button 14 C Capacity Automower 12 Change battery 69 Change cutting height 41 Change PIN code 59 Charge then AUTO 48 Charging Battery 23, 38 Charging station Boundary wire 31 Connect low voltage cable 22 Installation 19 ...
Owners Manual
Page 79
... 20 Islands Secondary areas 26 Within the working area 26 K Keypad 42, 61 L Language 62 Left wheel motor blocked 74 Link Automower to charging station 33 Low battery voltage 75 Low voltage cable 20 Connect to charging station 22 Connect to transformer 22 Installation 20 M Main menu 42, 46, 47...Garden 50 Settings 59 Timer 48 Menu overview 47 Menus Browse between 46 Submenus 46 The Main menu 46 More than one Automower in a garden 17 Movement pattern Automower 15 N Needs manual charging 75 No contact in charging station 75 No drive 75 No loop signal 74 Normal garden shape...
... 20 Islands Secondary areas 26 Within the working area 26 K Keypad 42, 61 L Language 62 Left wheel motor blocked 74 Link Automower to charging station 33 Low battery voltage 75 Low voltage cable 20 Connect to charging station 22 Connect to transformer 22 Installation 20 M Main menu 42, 46, 47...Garden 50 Settings 59 Timer 48 Menu overview 47 Menus Browse between 46 Submenus 46 The Main menu 46 More than one Automower in a garden 17 Movement pattern Automower 15 N Needs manual charging 75 No contact in charging station 75 No drive 75 No loop signal 74 Normal garden shape...


