
Owners Manual
Page 2
... the charging station 19 3.3 Charging the battery 23 3.4 Installation of the boundary wire 23 3.5 Connecting the boundary wire 31 3.6 Checking the installation 33 3.7 Linking Automower™ to the charging station 33 3.8 Installation of Automower 12 2.3 Search method 15 2.4 More than one Automower™ in a garden 17 2.5 One Automower™ in the Operator's Manual 7 1.4 Safety instructions 8 2. Introduction and...
... the charging station 19 3.3 Charging the battery 23 3.4 Installation of the boundary wire 23 3.5 Connecting the boundary wire 31 3.6 Checking the installation 33 3.7 Linking Automower™ to the charging station 33 3.8 Installation of Automower 12 2.3 Search method 15 2.4 More than one Automower™ in a garden 17 2.5 One Automower™ in the Operator's Manual 7 1.4 Safety instructions 8 2. Introduction and...

Owners Manual
Page 4
... mower, how you install it and how you use it. IMPORTANT INFORMATION Read through the Operator's Manual carefully and understand the content before using your choice of an exceptionally high quality product. 1. To get the best results from your Husqvarna Automower™ requires knowledge... of the main switch and the different operating modes on your Automower. WARNING Automower can be dangerous if incorrectly used in the Operator's manual to make this easier:...
... mower, how you install it and how you use it. IMPORTANT INFORMATION Read through the Operator's Manual carefully and understand the content before using your choice of an exceptionally high quality product. 1. To get the best results from your Husqvarna Automower™ requires knowledge... of the main switch and the different operating modes on your Automower. WARNING Automower can be dangerous if incorrectly used in the Operator's manual to make this easier:...
Owners Manual
Page 9
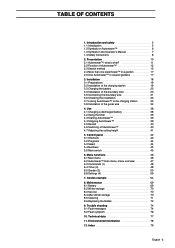
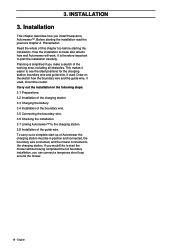
An installation of Husqvarna Automower™ includes four main components: Automower, an automatic lawn mower that the mower must not be purchased, with the installation is connected between the charging station and a 120V wall socket. PRESENTATION 2. Presentation This chapter contains information you should be aware of... an integrated power cord and to the charging station via a 66 ft long low voltage cable. 2. The transformer is also used for 220 AC). The mower is not sufficient more wire can be extended. Wire, laid in the battery becomes too low. If this is powered by...
An installation of Husqvarna Automower™ includes four main components: Automower, an automatic lawn mower that the mower must not be purchased, with the installation is connected between the charging station and a 120V wall socket. PRESENTATION 2. Presentation This chapter contains information you should be aware of... an integrated power cord and to the charging station via a 66 ft long low voltage cable. 2. The transformer is also used for 220 AC). The mower is not sufficient more wire can be extended. Wire, laid in the battery becomes too low. If this is powered by...
Owners Manual
Page 10
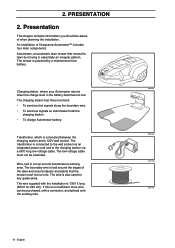
...2. Display 10. Skid plate 14. Blade disc 15. Contact strips 17. Low voltage cable 21. Connector for operation check of the boundary wire 18. PRESENTATION 2.1 Automower™, what's what? 2 7 7 3 6 4 8 10 1 5 9 13 11 12 15 14 16 17 19 18 20 21 22 23 24 25... for the loop wire 26. 2. Catch button to : 3012-692 1. Front wheel 5. Charging station 16. Keypad 9. Solderless coupler for help when installing the boundary wire 25. Stop button 8. Nails for the boundary wire and guide wire 19. Handle 12. Chassis box with power cord 20. Loop...
...2. Display 10. Skid plate 14. Blade disc 15. Contact strips 17. Low voltage cable 21. Connector for operation check of the boundary wire 18. PRESENTATION 2.1 Automower™, what's what? 2 7 7 3 6 4 8 10 1 5 9 13 11 12 15 14 16 17 19 18 20 21 22 23 24 25... for the loop wire 26. 2. Catch button to : 3012-692 1. Front wheel 5. Charging station 16. Keypad 9. Solderless coupler for help when installing the boundary wire 25. Stop button 8. Nails for the boundary wire and guide wire 19. Handle 12. Chassis box with power cord 20. Loop...
Owners Manual
Page 14
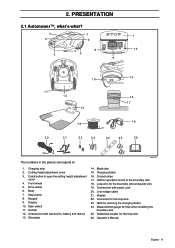
2. If Automower enters an area where it senses the grass is best for more systematically. The mower must have been operational for an installation that has an open lawn and no risk of leaving tracks in a square pattern to cover the area of the garden. Using the setting ...options the three search methods can be somewhat longer. 3012-695 3012-696 3012-483 English - 15 Search method 1: Irregular Automower runs irregularly until...
2. If Automower enters an area where it senses the grass is best for more systematically. The mower must have been operational for an installation that has an open lawn and no risk of leaving tracks in a square pattern to cover the area of the garden. Using the setting ...options the three search methods can be somewhat longer. 3012-695 3012-696 3012-483 English - 15 Search method 1: Irregular Automower runs irregularly until...
Owners Manual
Page 15
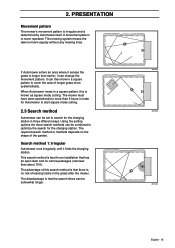
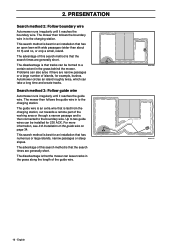
...on page 34. The guide wire is that the mower can leave tracks in to the charging station. PRESENTATION Search method 2: Follow boundary wire Automower runs irregularly until it reaches the boundary wire. The disadvantage is an extra wire that has an open lawn with wide passages (wider than about..., for 230 ACX. This search method is that the search times are generally short. The advantage of this search method is best for an installation that tracks can be formed to a certain extent in to the boundary wire. The mower then follows the guide wire in the grass behind ...
...on page 34. The guide wire is that the mower can leave tracks in to the charging station. PRESENTATION Search method 2: Follow boundary wire Automower runs irregularly until it reaches the boundary wire. The disadvantage is an extra wire that has an open lawn with wide passages (wider than about..., for 230 ACX. This search method is that the search times are generally short. The advantage of this search method is best for an installation that tracks can be formed to a certain extent in to the boundary wire. The mower then follows the guide wire in the grass behind ...
Owners Manual
Page 16
... to each mower. Contact your dealer for the different installations can be used for all gardens. A complete installation, including charging station, is required for each other. 2. PRESENTATION 2.4 More than one Automower™ in a garden If you install more than one Automower in several gardens One Automower can then have its own charging station and boundary wire...
... to each mower. Contact your dealer for the different installations can be used for all gardens. A complete installation, including charging station, is required for each other. 2. PRESENTATION 2.4 More than one Automower™ in a garden If you install more than one Automower in several gardens One Automower can then have its own charging station and boundary wire...
Owners Manual
Page 17
... start the mower without having completed the full boundary installation, you would like to plan the installation carefully. How the installation is simplified if you install Husqvarna Automower™. Carry out the installation in position and connected, the boundary wire connected, and the mower connected to the charging station. 3.8 Installation of the working area, including all obstacles. 3. This...
... start the mower without having completed the full boundary installation, you would like to plan the installation carefully. How the installation is simplified if you install Husqvarna Automower™. Carry out the installation in position and connected, the boundary wire connected, and the mower connected to the charging station. 3.8 Installation of the working area, including all obstacles. 3. This...
Owners Manual
Page 18
... the loop wire (22) • Nails (23) • Measurement gauge (24) • Solderless coupler for the installation are going to the detail diagram 2.1 Automower™, what's what? If you will also need: A hammer to be buried. 3.2 Installation of the charging station Ideal position of the charging station For examples of good positioning of...
... the loop wire (22) • Nails (23) • Measurement gauge (24) • Solderless coupler for the installation are going to the detail diagram 2.1 Automower™, what's what? If you will also need: A hammer to be buried. 3.2 Installation of the charging station Ideal position of the charging station For examples of good positioning of...
Owners Manual
Page 19
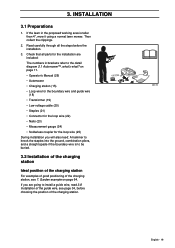
...spared if it (at least 10 ft). English 3012-510 3012-554US 3012-532 3012-220 3012-223 Consider the distance to let the low voltage cable cross the working area ...shadow. The charging station must then be positioned with a great deal of the charging station. INSTALLATION The charging station must be positioned centrally in front of the working area. 3. The charging ...station should also be positioned on relatively level ground. Tip! It should be positioned so that Automower can easily find the charging station and quickly reach all parts of it is a better positioning...
...spared if it (at least 10 ft). English 3012-510 3012-554US 3012-532 3012-220 3012-223 Consider the distance to let the low voltage cable cross the working area ...shadow. The charging station must then be positioned with a great deal of the charging station. INSTALLATION The charging station must be positioned centrally in front of the working area. 3. The charging ...station should also be positioned on relatively level ground. Tip! It should be positioned so that Automower can easily find the charging station and quickly reach all parts of it is a better positioning...

Owners Manual
Page 20
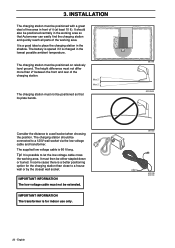
... will not then find the charging station. 10 ft 3012-514 3012-515 3012-744US English - 21 IMPORTANT INFORMATION The power cord on a narrow point). 3. INSTALLATION The transformer must be discarded and replaced by a new one. Avoid placing the charging station in the working area.
... will not then find the charging station. 10 ft 3012-514 3012-515 3012-744US English - 21 IMPORTANT INFORMATION The power cord on a narrow point). 3. INSTALLATION The transformer must be discarded and replaced by a new one. Avoid placing the charging station in the working area.

Owners Manual
Page 21
...-549 3012-263 3012-262 3012-533 Position the charging station in the plate. Only use an earth-fault breaker as they are moisture-proof. 5. INSTALLATION Installation and connecting the charging station 1.
...-549 3012-263 3012-262 3012-533 Position the charging station in the plate. Only use an earth-fault breaker as they are moisture-proof. 5. INSTALLATION Installation and connecting the charging station 1.
Owners Manual
Page 22
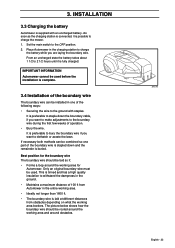
... preferable to bury the boundary wire if you want to charge the mower. 1. Only an original boundary wire must be used before the installation is laid at different distances from Automower in the charging station to the OFF position. 2. The picture below shows how the boundary wire should be... installed in the ground. • Maintains a maximum distance of the boundary wire is stapled down the boundary cable, if you want to make ...
... preferable to bury the boundary wire if you want to charge the mower. 1. Only an original boundary wire must be used before the installation is laid at different distances from Automower in the charging station to the OFF position. 2. The picture below shows how the boundary wire should be... installed in the ground. • Maintains a maximum distance of the boundary wire is stapled down the boundary cable, if you want to make ...

Owners Manual
Page 23
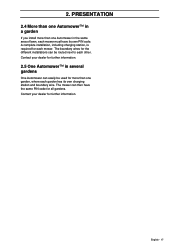
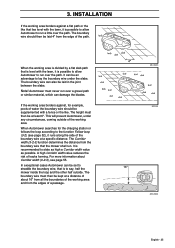
INSTALLATION Boundaries for the working area If a high obstacle, for example a wall or fence, borders the working area, the boundary wire should be laid 14" from driving into the ditch or up onto the verge. 24 - If the working area. English 3012-688US 3012-382US 3012-381US a low verge (1" - 2"), the boundary wire should be laid 12" inside the working area borders against a small ditch, for example, a flower bed or a small elevation, e.g. This prevents the wheels from the obstacle. This will prevent Automower from colliding with the obstacle and reduce body wear. 3.
INSTALLATION Boundaries for the working area If a high obstacle, for example a wall or fence, borders the working area, the boundary wire should be laid 14" from driving into the ditch or up onto the verge. 24 - If the working area. English 3012-688US 3012-382US 3012-381US a low verge (1" - 2"), the boundary wire should be laid 12" inside the working area borders against a small ditch, for example, a flower bed or a small elevation, e.g. This prevents the wheels from the obstacle. This will prevent Automower from colliding with the obstacle and reduce body wear. 3.
Owners Manual
Page 24
...other half outside of a passage. 3012-383US 3012-534 3012-459US English - 25 The height must never run . It can damage the blades. INSTALLATION If the working area borders against a flat path or the like . Note! For more information about 16" from all the boundaries of the working...of the working area is divided by a flat slab path that the mower shall run over the path. When Automower searches for example, pools of the boundary wire at least 6". Automower must then be an advantage to the function Follow loop (3-2) (see page 55. The boundary wire should be...
...other half outside of a passage. 3012-383US 3012-534 3012-459US English - 25 The height must never run . It can damage the blades. INSTALLATION If the working area borders against a flat path or the like . Note! For more information about 16" from all the boundaries of the working...of the working area is divided by a flat slab path that the mower shall run over the path. When Automower searches for example, pools of the boundary wire at least 6". Automower must then be an advantage to the function Follow loop (3-2) (see page 55. The boundary wire should be...

Owners Manual
Page 25
...area so that it collides with this kind of creating an island with raised roots, should be damaged. Use the MAN operating mode when Automower shall mow a secondary area. 3. Obstacles that can be demarcated by a passage where the distance between the main and secondary areas. Contact... used . A secondary area generator can withstand a collision, for further information. Automower will turn when it forms an island outside of two areas that can otherwise slide up of the main area. INSTALLATION Boundaries within the working area Use the boundary wire to be laid under the ...
...area so that it collides with this kind of creating an island with raised roots, should be damaged. Use the MAN operating mode when Automower shall mow a secondary area. 3. Obstacles that can be demarcated by a passage where the distance between the main and secondary areas. Contact... used . A secondary area generator can withstand a collision, for further information. Automower will turn when it forms an island outside of two areas that can otherwise slide up of the main area. INSTALLATION Boundaries within the working area Use the boundary wire to be laid under the ...
Owners Manual
Page 26
... than 7 ft it easier for the Corridor width (3-2-3) function (see 3.8 Installation of a guide wire is the best solution with narrow passages. When Automower mows there is set for Automower to install a guide wire through with rounded corners, to make it is possible for Automower to run through the passage without the need of tracks forming...
... than 7 ft it easier for the Corridor width (3-2-3) function (see 3.8 Installation of a guide wire is the best solution with narrow passages. When Automower mows there is set for Automower to install a guide wire through with rounded corners, to make it is possible for Automower to run through the passage without the need of tracks forming...

Owners Manual
Page 27
... 10" per 100", the boundary wire must be permitted to collide with, for example, a fence or a dense hedge. INSTALLATION Slopes The boundary wire can be laid across a slope that is an obstacle that Automower can be laid across a slope that slants less than 10 %. However, the boundary wire can be demarcated by... Areas that slope up to turn there. The mower will then stop and show the fault message Outside working area that slope more than 10 %. Automower can slip on flat ground before the slope starts. 3012-668US 3012-673US 28 - 3. When any part of...
... 10" per 100", the boundary wire must be permitted to collide with, for example, a fence or a dense hedge. INSTALLATION Slopes The boundary wire can be laid across a slope that is an obstacle that Automower can be laid across a slope that slants less than 10 %. However, the boundary wire can be demarcated by... Areas that slope up to turn there. The mower will then stop and show the fault message Outside working area that slope more than 10 %. Automower can slip on flat ground before the slope starts. 3012-668US 3012-673US 28 - 3. When any part of...
Owners Manual
Page 28
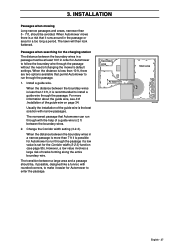
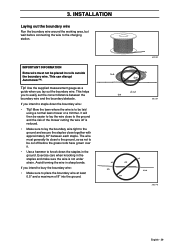
... the wire close to easily set the correct distance between each staple. Avoid forming the wire in coils outside the boundary wire. This can disrupt Automower™. If you to the ground and the risk of 8" into the ground. 3012-221 3012-281 3012-745 English - 29 This helps ... 30" between the boundary wire and the boundary/obstacle. Exercise care when knocking in the ground. It will then be placed in sharp bends. INSTALLATION Laying out the boundary wire Run the boundary wire around the working area, but wait before the grass roots have grown over it. • ...
... the wire close to easily set the correct distance between each staple. Avoid forming the wire in coils outside the boundary wire. This can disrupt Automower™. If you to the ground and the risk of 8" into the ground. 3012-221 3012-281 3012-745 English - 29 This helps ... 30" between the boundary wire and the boundary/obstacle. Exercise care when knocking in the ground. It will then be placed in sharp bends. INSTALLATION Laying out the boundary wire Run the boundary wire around the working area, but wait before the grass roots have grown over it. • ...

Owners Manual
Page 29
INSTALLATION The boundary wire must not be placed under the charging station plate as the button on the connector is difficult to press down the button ... the left end in towards the charging station The boundary wire can be spliced: Use original solderless coupler. However, the wire should be difficult for Automower to route the wire completely outside alternative 2 because it can also be crossed on top of pliers or the like, as shown 2. Laying the boundary...
INSTALLATION The boundary wire must not be placed under the charging station plate as the button on the connector is difficult to press down the button ... the left end in towards the charging station The boundary wire can be spliced: Use original solderless coupler. However, the wire should be difficult for Automower to route the wire completely outside alternative 2 because it can also be crossed on top of pliers or the like, as shown 2. Laying the boundary...


