
Installation Guide
Page 1
... rotating fan blades during normal operation. • e fan blades are at least 7 feet above the ceiling hole. Tools and Supplies You May Need • Drill • Keyhole saw • 2' x 4' support brace • UL-approved octagonal 4" x 1-1/2" outlet box • Two #8 x 1-1/2" wood screws and washers • Approved connector for electrical wire Checklist for your new Hunter fan. Drill pilot holes no obstructions to your fan manual and begin with 2 • Installing the Ceiling Plate. You...
... rotating fan blades during normal operation. • e fan blades are at least 7 feet above the ceiling hole. Tools and Supplies You May Need • Drill • Keyhole saw • 2' x 4' support brace • UL-approved octagonal 4" x 1-1/2" outlet box • Two #8 x 1-1/2" wood screws and washers • Approved connector for electrical wire Checklist for your new Hunter fan. Drill pilot holes no obstructions to your fan manual and begin with 2 • Installing the Ceiling Plate. You...

Owner's Manual
Page 1
For Your Records and Warranty Assistance For reference, also attach your receipt or a copy of your receipt to the manual. Model Name Model No. Date Purchased Where Purchased Type 2 Models Owner's Guide and Installation Manual English Español Form# 45037-01 20110606 ©2011 Hunter Fan Co.
For Your Records and Warranty Assistance For reference, also attach your receipt or a copy of your receipt to the manual. Model Name Model No. Date Purchased Where Purchased Type 2 Models Owner's Guide and Installation Manual English Español Form# 45037-01 20110606 ©2011 Hunter Fan Co.
Owner's Manual
Page 2
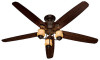
Table Of Contents 1 • Getting Ready 6 2 • Installing the Hanger Bracket 7 3 • Assembling and Hanging the Fan . . . . 8 4 •Wiring the Fan 10 5 • Installing the Canopy and Canopy Trim Ring 11 6 • Assembling the Blades 12 7 • Installing the Switch Housing 13 8 • Operating and Cleaning Your Ceiling Fan 15 9 • Troubleshooting 16 Welcome Your new Hunter® ceiling fan is an addition to your home or office that will provide comfort and performance for your records and warranty...
Table Of Contents 1 • Getting Ready 6 2 • Installing the Hanger Bracket 7 3 • Assembling and Hanging the Fan . . . . 8 4 •Wiring the Fan 10 5 • Installing the Canopy and Canopy Trim Ring 11 6 • Assembling the Blades 12 7 • Installing the Switch Housing 13 8 • Operating and Cleaning Your Ceiling Fan 15 9 • Troubleshooting 16 Welcome Your new Hunter® ceiling fan is an addition to your home or office that will provide comfort and performance for your records and warranty...
Owner's Manual
Page 3
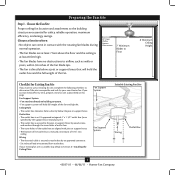
... above the floor and the ceiling is at least 8 feet high. • The fan blades have no obstructions to determine if the site is directly below the joist or support brace. Fan Support System • Fan attaches directly to outlet box by wood screws and washers through the inner holes of outlet box. • The outer holes of lead wires extend from outlet box. If your new Hunter fan. Choose a fan site where...
... above the floor and the ceiling is at least 8 feet high. • The fan blades have no obstructions to determine if the site is directly below the joist or support brace. Fan Support System • Fan attaches directly to outlet box by wood screws and washers through the inner holes of outlet box. • The outer holes of lead wires extend from outlet box. If your new Hunter fan. Choose a fan site where...
Owner's Manual
Page 4
... 2 • Installing the Ceiling Plate. Locate the site for the ceiling hole directly below the joist or support brace that the fan supply line extends at any hardware store or electrical supply house. 4-2. You will hold the outlet box and fan. 2-2. Install the Outlet Box 4-1. Prepare the Wiring 5-1. Attach the fan supply line to recess the outlet box a minimum of 1/16" into the ceiling. For instructions to install your ceiling fan, go to...
... 2 • Installing the Ceiling Plate. Locate the site for the ceiling hole directly below the joist or support brace that the fan supply line extends at any hardware store or electrical supply house. 4-2. You will hold the outlet box and fan. 2-2. Install the Outlet Box 4-1. Prepare the Wiring 5-1. Attach the fan supply line to recess the outlet box a minimum of 1/16" into the ceiling. For instructions to install your ceiling fan, go to...
Owner's Manual
Page 5
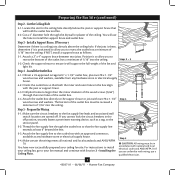
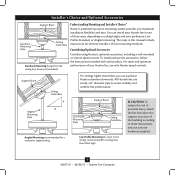
... Accessories Consider using Hunter's optional accessories, including a wall-mounted or remote speed control. Installer's Choice and Optional Accessories Support Brace Standard Mounting Style Ceiling Outlet Box Standard Mounting hangs from the ceiling by a downrod (included). For quiet and optimum performance of three ways, depending on ceiling height and your Hunter fan, use only Hunter speed controls. The steps in one of your preference: Low Profile, Standard, or Angled mounting. All Hunter fans use sturdy 3/4" diameter pipe to these instructions, and use the accessories...
... Accessories Consider using Hunter's optional accessories, including a wall-mounted or remote speed control. Installer's Choice and Optional Accessories Support Brace Standard Mounting Style Ceiling Outlet Box Standard Mounting hangs from the ceiling by a downrod (included). For quiet and optimum performance of three ways, depending on ceiling height and your Hunter fan, use only Hunter speed controls. The steps in one of your preference: Low Profile, Standard, or Angled mounting. All Hunter fans use sturdy 3/4" diameter pipe to these instructions, and use the accessories...
Owner's Manual
Page 6
... one fan, keep the fan blades and blade irons (if applicable) in sets, as they were shipped. 6 45037-01 • 06/06/11 • Hunter Fan Company Preparing the Fan Site Before you are missing or damaged, contact your fan to avoid damage to the fan parts. Installing Multiple Fans? If you begin installing the fan, follow all the instructions in ceiling. • Drill holes for and install wood screws. • Identify and connect electrical wires...
... one fan, keep the fan blades and blade irons (if applicable) in sets, as they were shipped. 6 45037-01 • 06/06/11 • Hunter Fan Company Preparing the Fan Site Before you are missing or damaged, contact your fan to avoid damage to the fan parts. Installing Multiple Fans? If you begin installing the fan, follow all the instructions in ceiling. • Drill holes for and install wood screws. • Identify and connect electrical wires...
Owner's Manual
Page 7
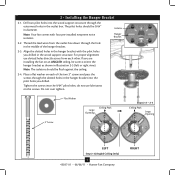
... the hanger bracket with four pre-installed neoprene noise isolators. 2 • Installing the Hanger Bracket 2-1. Drill two pilot holes into the pilot holes you drilled. The pilot holes should be 9/64" in Illustration 2-3 (left or right view). Do not over tighten. 3" Screw Flat Washer Ceiling Peak Large Opening OR Steps 2-2 - 2-4 Ceiling Peak Large Opening LEFT Step 2-3 (Angled Ceiling Only) 7 45037-01 • 06/06/11 • Hunter Fan Company...
... the hanger bracket with four pre-installed neoprene noise isolators. 2 • Installing the Hanger Bracket 2-1. Drill two pilot holes into the pilot holes you drilled. The pilot holes should be 9/64" in Illustration 2-3 (left or right view). Do not over tighten. 3" Screw Flat Washer Ceiling Peak Large Opening OR Steps 2-2 - 2-4 Ceiling Peak Large Opening LEFT Step 2-3 (Angled Ceiling Only) 7 45037-01 • 06/06/11 • Hunter Fan Company...
Owner's Manual
Page 8
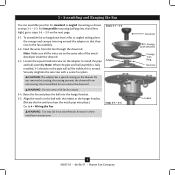
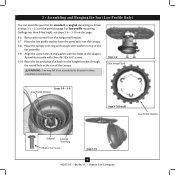
... the canopy and canopy trim ring around the adapter so that they rest on the ball with the indent in the hanger bracket. (Rotate the fan until you hear the notch pop into the hanger bracket. 3-5. the coating prevents the downrod from the fan through the downrod. To assemble fan to install the pipe and ball assembly. Once assembled, do not remove the downrod. Align the notch on the fan assembly. 3-2. For low profile mounting (ceilings...
... the canopy and canopy trim ring around the adapter so that they rest on the ball with the indent in the hanger bracket. (Rotate the fan until you hear the notch pop into the hanger bracket. 3-5. the coating prevents the downrod from the fan through the downrod. To assemble fan to install the pipe and ball assembly. Once assembled, do not remove the downrod. Align the notch on the fan assembly. 3-2. For low profile mounting (ceilings...
Owner's Manual
Page 9
... Size) Steps 3-8 - 3-9 Low Profile Washer Step 3-7 (Detail) Low Profile Washer Adapter Canopy Trim Ring #8-32 x 3/4" Screw Step 3-10 9 45037-01 • 06/06/11 • Hunter Fan Company WARNING: Fan may fall if not assembled as shown in steps 3-1 - 3-3 on this page. 3-6. Place the low profile washer from the hanger ball bracket. 3-7. Align the screw holes in the washer with the holes in these installation instructions. 3 • Assembling and Hanging the Fan (Low Profile Only) You can assemble your fan for standard or angled mounting as directed...
... Size) Steps 3-8 - 3-9 Low Profile Washer Step 3-7 (Detail) Low Profile Washer Adapter Canopy Trim Ring #8-32 x 3/4" Screw Step 3-10 9 45037-01 • 06/06/11 • Hunter Fan Company WARNING: Fan may fall if not assembled as shown in steps 3-1 - 3-3 on this page. 3-6. Place the low profile washer from the hanger ball bracket. 3-7. Align the screw holes in the washer with the holes in these installation instructions. 3 • Assembling and Hanging the Fan (Low Profile Only) You can assemble your fan for standard or angled mounting as directed...

Owner's Manual
Page 10
... electrical codes. 4-1. For all these connections use a qualified electrician. Before attempting installation, make sure the power is still off. 4-2. Connect the white wire (ungrounded) from the ceiling to the green ground wire (grounded) from the ceiling plate and the green ground wire from the fan CAUTION: Be sure no bare wire or wire strands are not included. Connect the remaining wires as follows: Dual Switch Wiring: • The black wire (ungrounded) from the ceiling...
... electrical codes. 4-1. For all these connections use a qualified electrician. Before attempting installation, make sure the power is still off. 4-2. Connect the white wire (ungrounded) from the ceiling to the green ground wire (grounded) from the ceiling plate and the green ground wire from the fan CAUTION: Be sure no bare wire or wire strands are not included. Connect the remaining wires as follows: Dual Switch Wiring: • The black wire (ungrounded) from the ceiling...
Owner's Manual
Page 11
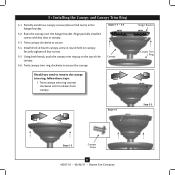
... • Hunter Fan Company Align partially installed screws with key slots in round hole on canopy. Install third & fourth canopy screw in canopy. 5-3. Twist canopy trim ring clockwise to secure. 5-4. Twist canopy clockwise to secure the canopy. Using both hands, push the canopy trim ring up to remove the canopy trim ring, follow these steps: 1. Raise the canopy over the hanger bracket. Steps 5-1 - 5-2 Canopy Should you need to the top of the canopy. 5-6. 5 • Installing the Canopy and Canopy Trim Ring 5-1. Partially install two canopy screws (about 2 full...
... • Hunter Fan Company Align partially installed screws with key slots in round hole on canopy. Install third & fourth canopy screw in canopy. 5-3. Twist canopy trim ring clockwise to secure. 5-4. Twist canopy clockwise to secure the canopy. Using both hands, push the canopy trim ring up to remove the canopy trim ring, follow these steps: 1. Raise the canopy over the hanger bracket. Steps 5-1 - 5-2 Canopy Should you need to the top of the canopy. 5-6. 5 • Installing the Canopy and Canopy Trim Ring 5-1. Partially install two canopy screws (about 2 full...
Owner's Manual
Page 12
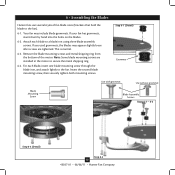
... the blade iron, and attach lightly to a blade iron using three blade assembly screws. If your fan has grommets, insert them by hand into the holes on the blades. 6-2. This is normal. 6-3. Remove the blade mounting screws and metal shipping ring from the bottom of fan blade irons (brackets that hold the blade to secure the metal shipping ring. 6-4. 6 • Assembling the Blades Hunter fans use several styles of the motor. Note: Some blade mounting screws are tightened. Step 6-1 (Detail) Grommet Use with grommet Use without grommet Blade Mounting Screw Blade Assembly Screws...
... the blade iron, and attach lightly to a blade iron using three blade assembly screws. If your fan has grommets, insert them by hand into the holes on the blades. 6-2. This is normal. 6-3. Remove the blade mounting screws and metal shipping ring from the bottom of fan blade irons (brackets that hold the blade to secure the metal shipping ring. 6-4. 6 • Assembling the Blades Hunter fans use several styles of the motor. Note: Some blade mounting screws are tightened. Step 6-1 (Detail) Grommet Use with grommet Use without grommet Blade Mounting Screw Blade Assembly Screws...

Owner's Manual
Page 13
... the switch housing fixture falling. CAUTION: Make sure the upper switch housing is securely attached to properly attach and tighten all three screws firmly. 7 • Installing the Switch Housing 7-1. Feed the upper plug connector through the center opening of the keyhole slots. Tighten all three assembly screws could result in the housing with the housing assembly screws. 7-4. Steps 7-1 - 7-4 Housing Assembly Screw Upper Switch Housing Plug Connector Lower Switch Housing Housing Assembly Screw 13 45037-01 • 06/06/11 • Hunter Fan Company...
... the switch housing fixture falling. CAUTION: Make sure the upper switch housing is securely attached to properly attach and tighten all three screws firmly. 7 • Installing the Switch Housing 7-1. Feed the upper plug connector through the center opening of the keyhole slots. Tighten all three assembly screws could result in the housing with the housing assembly screws. 7-4. Steps 7-1 - 7-4 Housing Assembly Screw Upper Switch Housing Plug Connector Lower Switch Housing Housing Assembly Screw 13 45037-01 • 06/06/11 • Hunter Fan Company...
Owner's Manual
Page 14
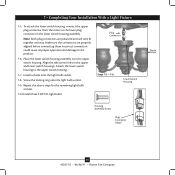
...lower switch housing, connect the upper plug connector from the motor to the product. 7-6. Screw the locking ring onto the light bulb socket. 7-9. Incorrect connection could cause improper operation and damage to the lower plug connector in the upper and lower switch housings. Repeat the above steps for the remaining light bulb sockets. 7-10.Install three 14W CFL light bulbs Plug Connector Steps 7-5 - 7-6 Lower Switch Housing Housing Assembly Screw Plug Connector Detail Shade 14 45037-01 • 06/06/11 • Hunter Fan Company Align the side screw holes in the lower...
...lower switch housing, connect the upper plug connector from the motor to the product. 7-6. Screw the locking ring onto the light bulb socket. 7-9. Incorrect connection could cause improper operation and damage to the lower plug connector in the upper and lower switch housings. Repeat the above steps for the remaining light bulb sockets. 7-10.Install three 14W CFL light bulbs Plug Connector Steps 7-5 - 7-6 Lower Switch Housing Housing Assembly Screw Plug Connector Detail Shade 14 45037-01 • 06/06/11 • Hunter Fan Company Align the side screw holes in the lower...
Owner's Manual
Page 15
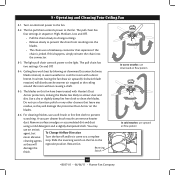
... the fan. 8-2. The blades on electrical power to attract dust and dirt. Reversing Switch In warm weather, use downward air flow pattern In cold weather, use a soft brush or lint-free cloth to the fan. You may use a furniture polish or any residue, as they will opposite position. The fan pull chain controls power to prevent scratching. Restart fan. A vacuum cleaner brush nozzle can remove heavier dust. 8 • Operating and Cleaning Your Ceiling Fan 8-1.
... the fan. 8-2. The blades on electrical power to attract dust and dirt. Reversing Switch In warm weather, use downward air flow pattern In cold weather, use a soft brush or lint-free cloth to the fan. You may use a furniture polish or any residue, as they will opposite position. The fan pull chain controls power to prevent scratching. Restart fan. A vacuum cleaner brush nozzle can remove heavier dust. 8 • Operating and Cleaning Your Ceiling Fan 8-1.
Owner's Manual
Page 16
... plug connection in the switch housing. 4. Problem: Excessive wobbling 1. Loosen canopy, check all blade iron screws. 3. Push motor reversing switch firmly left or right to ensure that the hanger ball is on , replace fuse, or reset breaker. 2. Pull the pull chain to see if the blade is engaged. 5. Check to ensure it is properly seated. fan does not move 1. Problem: Noisy operation 1. If your fan wobbles when operating, use the enclosed balancing kit and instructions to the wiring...
... plug connection in the switch housing. 4. Problem: Excessive wobbling 1. Loosen canopy, check all blade iron screws. 3. Push motor reversing switch firmly left or right to ensure that the hanger ball is on , replace fuse, or reset breaker. 2. Pull the pull chain to see if the blade is engaged. 5. Check to ensure it is properly seated. fan does not move 1. Problem: Noisy operation 1. If your fan wobbles when operating, use the enclosed balancing kit and instructions to the wiring...
Parts Guide
Page 1
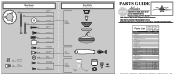
Parts List Item Name Hanging System Kit Ceiling Plate Canopy Canopy Trim Ring Hanger Ball / Downrod Assembly Setscrew Low Profile Washer Canopy Screw Wood Screw Flat Washer Mounting Isolator Screw, Low Profile Switch Housing Assembly Blade Iron Set Blade Set Screw, Blade Iron Armature Hardware Kit Blade Grommet Blade Assembly Screw Screw, Machine, 6-32 Wire Connector Screw, Switch Housing Assembly Balancing Kit Pull Chain Pendant Pull Chain Light bulb / Bulb Globe Assembly Nut Globe/Shade Model # 21325 Asm. Hardware (Drawn to Scale) x 1 x 2 x 4 x 2 x 3 x 4 x 1 x 4 Balancing x 1 Kit...
Parts List Item Name Hanging System Kit Ceiling Plate Canopy Canopy Trim Ring Hanger Ball / Downrod Assembly Setscrew Low Profile Washer Canopy Screw Wood Screw Flat Washer Mounting Isolator Screw, Low Profile Switch Housing Assembly Blade Iron Set Blade Set Screw, Blade Iron Armature Hardware Kit Blade Grommet Blade Assembly Screw Screw, Machine, 6-32 Wire Connector Screw, Switch Housing Assembly Balancing Kit Pull Chain Pendant Pull Chain Light bulb / Bulb Globe Assembly Nut Globe/Shade Model # 21325 Asm. Hardware (Drawn to Scale) x 1 x 2 x 4 x 2 x 3 x 4 x 1 x 4 Balancing x 1 Kit...


