
Installation Guide
Page 1
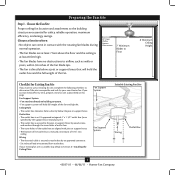
... to the joist or support brace by the support brace manufacturer). Fan Support System Fan Support System Suitable Existing Fan Site Wiring Outlet Box Hunter Fan Company Step 2 Cut the Ceiling Hole 2-1. Orient the outlet box so that will hold the outlet box and fan. 2-2. Choose a fan site where: • No object can come in the box align...
... to the joist or support brace by the support brace manufacturer). Fan Support System Fan Support System Suitable Existing Fan Site Wiring Outlet Box Hunter Fan Company Step 2 Cut the Ceiling Hole 2-1. Orient the outlet box so that will hold the outlet box and fan. 2-2. Choose a fan site where: • No object can come in the box align...
Owner's Manual
Page 2
... and Canopy Trim Ring 11 6 • Assembling the Blades 12 7 • Installing the Switch Housing 13 8 • Operating and Cleaning Your Ceiling Fan 15 9 • Troubleshooting 16 Welcome Your new Hunter® ceiling fan is an addition to the support structure of fire, electrical shock, or motor damage, do not bend the blade attachment system...
... and Canopy Trim Ring 11 6 • Assembling the Blades 12 7 • Installing the Switch Housing 13 8 • Operating and Cleaning Your Ceiling Fan 15 9 • Troubleshooting 16 Welcome Your new Hunter® ceiling fan is an addition to the support structure of fire, electrical shock, or motor damage, do not bend the blade attachment system...
Owner's Manual
Page 3
... reliable operation, maximum efficiency, and energy savings. Choose the Fan Site Proper ceiling fan location and attachment to the building structure are at least 7 feet above the floor and the ceiling is at least 8 feet high. • The fan blades have no obstructions to airflow, such as walls or ... described on this page. Wiring • The electrical cable is directly below the joist or support brace. If your new Hunter fan. Preparing the Fan Site Step 1 - Ceiling Hole • The outlet box clearance hole is directly below a joist or support brace that will hold the outlet box ...
... reliable operation, maximum efficiency, and energy savings. Choose the Fan Site Proper ceiling fan location and attachment to the building structure are at least 7 feet above the floor and the ceiling is at least 8 feet high. • The fan blades have no obstructions to airflow, such as walls or ... described on this page. Wiring • The electrical cable is directly below the joist or support brace. If your new Hunter fan. Preparing the Fan Site Step 1 - Ceiling Hole • The outlet box clearance hole is directly below a joist or support brace that will hold the outlet box ...
Owner's Manual
Page 4
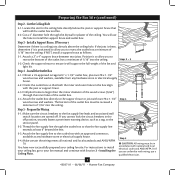
...Hunter Fan Company If NOT, install a support brace as a tag, to the service panel. 5-2. Orient the outlet box so that both the inner and outer holes in the box align with two #8 x 1-1/2" Step 4 wood screws and washers. Step 5 - Locate the site for the ceiling...: 3-1. Attach a 2" x 4" support brace between two joists. Make sure the circuit breakers to your ceiling fan site. Prepare the Wiring 5-1. For instructions to install your ceiling fan, go to the fan supply line leads and associated wall switch location are unfamiliar with Section 2 • Installing the...
...Hunter Fan Company If NOT, install a support brace as a tag, to the service panel. 5-2. Orient the outlet box so that both the inner and outer holes in the box align with two #8 x 1-1/2" Step 4 wood screws and washers. Step 5 - Locate the site for the ceiling...: 3-1. Attach a 2" x 4" support brace between two joists. Make sure the circuit breakers to your ceiling fan site. Prepare the Wiring 5-1. For instructions to install your ceiling fan, go to the fan supply line leads and associated wall switch location are unfamiliar with Section 2 • Installing the...
Owner's Manual
Page 5
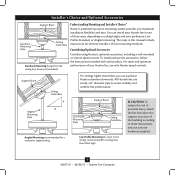
... all three Installer's Choice mounting methods. Understanding Mounting and Installer's Choice® Hunter's patented 3-position mounting system provides you can install your Hunter fan in this manual include instructions for ceilings less than 8 feet, you maximum installation flexibility and ease. All Hunter fans use the accessories, follow the instructions included with each product. Considering Optional Accessories...
... all three Installer's Choice mounting methods. Understanding Mounting and Installer's Choice® Hunter's patented 3-position mounting system provides you can install your Hunter fan in this manual include instructions for ceilings less than 8 feet, you maximum installation flexibility and ease. All Hunter fans use the accessories, follow the instructions included with each product. Considering Optional Accessories...
Owner's Manual
Page 6
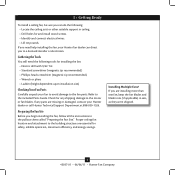
1 • Getting Ready To install a ceiling fan, be sure you can direct you to the fan parts. If you need the following : • Locate the ceiling joist or other suitable support in the pullout sheet called "Preparing the Fan Site." Gathering the Tools You will need help installing the fan, your Hunter fan dealer can do the following tools...
1 • Getting Ready To install a ceiling fan, be sure you can direct you to the fan parts. If you need the following : • Locate the ceiling joist or other suitable support in the pullout sheet called "Preparing the Fan Site." Gathering the Tools You will need help installing the fan, your Hunter fan dealer can do the following tools...
Owner's Manual
Page 7
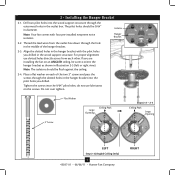
... structure. Isolator Hanger Bracket 2-2. Place a flat washer on each other. For proper alignment use lubricants on an ANGLED ceiling, be sure to orient the hanger bracket as shown in diameter. Align the slotted holes in the hanger bracket with ...ceiling. 2-4. Tighten the screws into the 9/64" pilot holes; Note: Your fan comes with the pilot holes you drilled. Do not over tighten. 3" Screw Flat Washer Ceiling Peak Large Opening OR Steps 2-2 - 2-4 Ceiling Peak Large Opening LEFT Step 2-3 (Angled Ceiling Only) 7 45037-01 • 06/06/11 • Hunter Fan...
... structure. Isolator Hanger Bracket 2-2. Place a flat washer on each other. For proper alignment use lubricants on an ANGLED ceiling, be sure to orient the hanger bracket as shown in diameter. Align the slotted holes in the hanger bracket with ...ceiling. 2-4. Tighten the screws into the 9/64" pilot holes; Note: Your fan comes with the pilot holes you drilled. Do not over tighten. 3" Screw Flat Washer Ceiling Peak Large Opening OR Steps 2-2 - 2-4 Ceiling Peak Large Opening LEFT Step 2-3 (Angled Ceiling Only) 7 45037-01 • 06/06/11 • Hunter Fan...
Owner's Manual
Page 8
... angled ceiling, place the canopy and canopy trim ring around the adapter so that they rest on the same side of the metal dowel pin inside the dowrod. 3-3. Securely retighten the setscrew with Washer) Canopy Trim Ring Setscrew Indent 8 45037-01 • 06/06/11 • Hunter Fan Company... To assemble fan to steps 3-6 - 3-9 on the pipe will still be visible; Once assembled, do not remove the downrod. Raise the...
... angled ceiling, place the canopy and canopy trim ring around the adapter so that they rest on the same side of the metal dowel pin inside the dowrod. 3-3. Securely retighten the setscrew with Washer) Canopy Trim Ring Setscrew Indent 8 45037-01 • 06/06/11 • Hunter Fan Company... To assemble fan to steps 3-6 - 3-9 on the pipe will still be visible; Once assembled, do not remove the downrod. Raise the...
Owner's Manual
Page 9
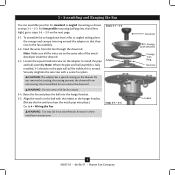
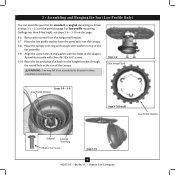
...For low profile mounting (ceilings less than 8 feet high), see steps 3-6 - 3-10 on the hanger bracket through the round hole in the rim of the fan assembly. 3-9. Place the canopy trim ring and canopy with the holes in the adapter. WARNING: Fan may fall if not assembled...3-7 (Detail) Low Profile Washer Adapter Canopy Trim Ring #8-32 x 3/4" Screw Step 3-10 9 45037-01 • 06/06/11 • Hunter Fan Company 3 • Assembling and Hanging the Fan (Low Profile Only) You can assemble your fan for standard or angled mounting as directed in these installation instructions.
...For low profile mounting (ceilings less than 8 feet high), see steps 3-6 - 3-10 on the hanger bracket through the round hole in the rim of the fan assembly. 3-9. Place the canopy trim ring and canopy with the holes in the adapter. WARNING: Fan may fall if not assembled...3-7 (Detail) Low Profile Washer Adapter Canopy Trim Ring #8-32 x 3/4" Screw Step 3-10 9 45037-01 • 06/06/11 • Hunter Fan Company 3 • Assembling and Hanging the Fan (Low Profile Only) You can assemble your fan for standard or angled mounting as directed in these installation instructions.

Owner's Manual
Page 10
... the green ground wire (grounded) from the ceiling plate and the green ground wire from the fan CAUTION: Be sure no bare wire or wire strands are not included. Wire Connector 10 45037-01 • 06/06/11 • Hunter Fan Company Connect the remaining wires as follows: Dual Switch ...Wiring: • The black wire (ungrounded) from the ceiling to the black wire (ungrounded) from the fan • The black/white wire (ungrounded) from the fan to the wire (ungrounded) for the wall ...
... the green ground wire (grounded) from the ceiling plate and the green ground wire from the fan CAUTION: Be sure no bare wire or wire strands are not included. Wire Connector 10 45037-01 • 06/06/11 • Hunter Fan Company Connect the remaining wires as follows: Dual Switch ...Wiring: • The black wire (ungrounded) from the ceiling to the black wire (ungrounded) from the fan • The black/white wire (ungrounded) from the fan to the wire (ungrounded) for the wall ...
Owner's Manual
Page 15
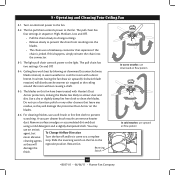
... cloth to the light. Slide the reversing switch on electrical power to attract dust and dirt. 8 • Operating and Cleaning Your Ceiling Fan 8-1. Do not use a soft brush or lint-free cloth to prevent the chain from recoiling into the connector. 8-3. Remove surface smudges...and let it come to cool the room with Hunter's Dust Armor protection, making the blades less likely to the fan. 8-2. For cleaning finishes, use a furniture polish or any other cleaners that separates if the chain is jerked. Ceiling fans work best by blowing air downward (counterclockwise blade ...
... cloth to the light. Slide the reversing switch on electrical power to attract dust and dirt. 8 • Operating and Cleaning Your Ceiling Fan 8-1. Do not use a soft brush or lint-free cloth to prevent the chain from recoiling into the connector. 8-3. Remove surface smudges...and let it come to cool the room with Hunter's Dust Armor protection, making the blades less likely to the fan. 8-2. For cleaning finishes, use a furniture polish or any other cleaners that separates if the chain is jerked. Ceiling fans work best by blowing air downward (counterclockwise blade ...
Parts Guide
Page 1
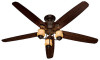
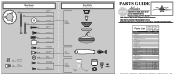
... INSTRUCTIONS. Parts List Item Name Hanging System Kit Ceiling Plate Canopy Canopy Trim Ring Hanger Ball / Downrod... Screw, Machine, 6-32 Wire Connector Screw, Switch Housing Assembly Balancing Kit Pull Chain Pendant Pull Chain Light bulb / Bulb Globe Assembly Nut Globe/Shade Model # 21325 Asm. If parts are included in the box. Hardware (Drawn to Scale) x 1 x 2 x 4 x 2 x 3 x 4 x 1 x 4...98856-00-860 1 07570-01 1 74393-08 1 63756-11 3 66763-01 3 75642-02 3 88715-01 Hunter Fan Company • 2500 Frisco Avenue • Memphis, TN 38114 • www.hunterfan.com • 98000-01...
... INSTRUCTIONS. Parts List Item Name Hanging System Kit Ceiling Plate Canopy Canopy Trim Ring Hanger Ball / Downrod... Screw, Machine, 6-32 Wire Connector Screw, Switch Housing Assembly Balancing Kit Pull Chain Pendant Pull Chain Light bulb / Bulb Globe Assembly Nut Globe/Shade Model # 21325 Asm. If parts are included in the box. Hardware (Drawn to Scale) x 1 x 2 x 4 x 2 x 3 x 4 x 1 x 4...98856-00-860 1 07570-01 1 74393-08 1 63756-11 3 66763-01 3 75642-02 3 88715-01 Hunter Fan Company • 2500 Frisco Avenue • Memphis, TN 38114 • www.hunterfan.com • 98000-01...


