
User Manual
Page 3
Instruction about the 'WEEE' Symbol This product should not be disposed with other apparatus. • Note Indicates additional information to make the user aware of possible problems and information of any importance to help understand, use and maintain the installation. No user serviceable parts inside ... indicates important instructions accompanying the product. This product should not be mixed with other types of wastes and recycle it responsibly to qualified service personnel. GB2 User's Manual This symbol indicates dangerous voltage inside . Refer servicing to promote...
Instruction about the 'WEEE' Symbol This product should not be disposed with other apparatus. • Note Indicates additional information to make the user aware of possible problems and information of any importance to help understand, use and maintain the installation. No user serviceable parts inside ... indicates important instructions accompanying the product. This product should not be mixed with other types of wastes and recycle it responsibly to qualified service personnel. GB2 User's Manual This symbol indicates dangerous voltage inside . Refer servicing to promote...
User Manual
Page 6
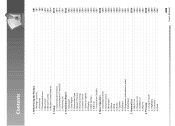
... Remote Control Batteries GB14 2. Installation Wizard GB22 3.1 Language GB22 3.2 Time Region GB22 3.3 Connection Type GB23 3.4 Default Channels GB23 3.5 Antenna Setting GB24 3.6 Channel Search GB24 3.7 Software Update GB25 3.8 Display GB25 3.9 HDD Partition GB26 3.10 Result GB26 3.11 Installation Checklist GB27 4. Channel List GB34 5.1 My TV List GB34 5.2 Favourite List GB36 5.3 Satellite List GB36 5.4 Pay-TV GB37 6. Basic Operation GB28 4.1 Switching Channel GB28 4.2 Volume Control GB28 4.3 Resolution GB28 4.4 Sleep GB29 4.5 Wide GB29 4.6 Audio GB30 4.7 Subtitle...
... Remote Control Batteries GB14 2. Installation Wizard GB22 3.1 Language GB22 3.2 Time Region GB22 3.3 Connection Type GB23 3.4 Default Channels GB23 3.5 Antenna Setting GB24 3.6 Channel Search GB24 3.7 Software Update GB25 3.8 Display GB25 3.9 HDD Partition GB26 3.10 Result GB26 3.11 Installation Checklist GB27 4. Channel List GB34 5.1 My TV List GB34 5.2 Favourite List GB36 5.3 Satellite List GB36 5.4 Pay-TV GB37 6. Basic Operation GB28 4.1 Switching Channel GB28 4.2 Volume Control GB28 4.3 Resolution GB28 4.4 Sleep GB29 4.5 Wide GB29 4.6 Audio GB30 4.7 Subtitle...

User Manual
Page 7
... GB80 10.4 Network GB81 11. Specification GB104 14.5 Glossary GB106 14.6 Service and Support GB109 14.7 Remote Control Code List GB111 14.8 OPEN SOURCE SOFTWARE NOTICE GB123 14.8 OPEN SOURCE SOFTWARE NOTICE GB124 GB6 User's Manual Media List GB82 11.1 Video GB82 11.2 Radio GB86 11.3 Music GB88 11.4 Photo GB90 12. Software Update GB98 13.1 OTA (Over the Air GB98 14. Appendix GB99 14.1 Menu Map GB99...
... GB80 10.4 Network GB81 11. Specification GB104 14.5 Glossary GB106 14.6 Service and Support GB109 14.7 Remote Control Code List GB111 14.8 OPEN SOURCE SOFTWARE NOTICE GB123 14.8 OPEN SOURCE SOFTWARE NOTICE GB124 GB6 User's Manual Media List GB82 11.1 Video GB82 11.2 Radio GB86 11.3 Music GB88 11.4 Photo GB90 12. Software Update GB98 13.1 OTA (Over the Air GB98 14. Appendix GB99 14.1 Menu Map GB99...

User Manual
Page 11
...) Connects to the TV using a VCR SCART cable. 6. HDMI Connects to the TV or VCR using a TV SCART cable. 5. SPDIF Connects to the TV using a component cable. 10. LNB 1 IN, LNB 2 IN Connects a satellite antenna cable. Before Using the Product 1.4 Rear Panel 57 1 2 34 5 6 7 8 9 10 11 12 13 1. TV SCART Connects to the audio system using an RCA cable. 9. AUDIO Connects to the USB memory or external HDD. 12. USB Host Connects to the TV or VCR using an S/PDIF cable. (digital audio) 13. GB10 User's Manual 1. ETHERNET Ethernet port (for changing video. (default...
...) Connects to the TV using a VCR SCART cable. 6. HDMI Connects to the TV or VCR using a TV SCART cable. 5. SPDIF Connects to the TV using a component cable. 10. LNB 1 IN, LNB 2 IN Connects a satellite antenna cable. Before Using the Product 1.4 Rear Panel 57 1 2 34 5 6 7 8 9 10 11 12 13 1. TV SCART Connects to the audio system using an RCA cable. 9. AUDIO Connects to the USB memory or external HDD. 12. USB Host Connects to the TV or VCR using an S/PDIF cable. (digital audio) 13. GB10 User's Manual 1. ETHERNET Ethernet port (for changing video. (default...
User Manual
Page 16
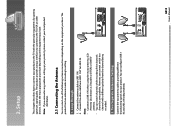
... recorded. 2. GB15 User's Manual However, you have . 2. Connect the antenna cable to a channel with the particular equipments for gaining optimum signal quality. Setup This chapter describes how to connect your product to your local product distributor. 2.1 Connecting the Antenna You can configure LNB 1 IN and LNB 2 IN independently. Two Separate Antennas Setting Connect the two antenna cables providing different broadcasting signals to the TV with a different polarity from LNB 1 OUT to the TV, VCR...
... recorded. 2. GB15 User's Manual However, you have . 2. Connect the antenna cable to a channel with the particular equipments for gaining optimum signal quality. Setup This chapter describes how to connect your product to your local product distributor. 2.1 Connecting the Antenna You can configure LNB 1 IN and LNB 2 IN independently. Two Separate Antennas Setting Connect the two antenna cables providing different broadcasting signals to the TV with a different polarity from LNB 1 OUT to the TV, VCR...

User Manual
Page 25
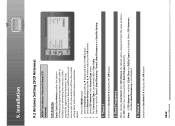
... the OK button. 3. Installation Wizard 3.5 Antenna Setting Antenna Setting allows you cannot find the required LNB frequency from the list, select User Define and manually enter the frequency using the NUMERIC(0-9) buttons and press the OK button. • When using Universal LNB, select Universal. Satellite: Select the satellite and press the OK button. 2. LNB Power: Select the required LNB power. GB24 User's Manual Note: • If you to four satellites. 8. You can add up to configure the antenna setting parameters. 1. To stop the channel search, select...
... the OK button. 3. Installation Wizard 3.5 Antenna Setting Antenna Setting allows you cannot find the required LNB frequency from the list, select User Define and manually enter the frequency using the NUMERIC(0-9) buttons and press the OK button. • When using Universal LNB, select Universal. Satellite: Select the satellite and press the OK button. 2. LNB Power: Select the required LNB power. GB24 User's Manual Note: • If you to four satellites. 8. You can add up to configure the antenna setting parameters. 1. To stop the channel search, select...

User Manual
Page 28
... User's Manual Is the product connected to operate channel search even when you may not have selected default channels. Is the power cord plugged in operation mode (not Standby mode)? Have you have completed the following steps. In this case, you can use the installation menu to search for more channels. • Be sure to your TV? Is the product in the wall outlet? Is the power switch located at...
... User's Manual Is the product connected to operate channel search even when you may not have selected default channels. Is the power cord plugged in operation mode (not Standby mode)? Have you have completed the following steps. In this case, you can use the installation menu to search for more channels. • Be sure to your TV? Is the product in the wall outlet? Is the power switch located at...
User Manual
Page 69
... enter the Band Frequency directly. Tuner 2 Select from User Band 1-8 and press the OK button. 2. GB68 User's Manual 9. Select Antenna Setting using the / button and press the OK button. 3. Band Frequency When selecting User Band 1-8 in the Antenna Type menu. 5. The Connection Type is displayed. Select the value and press the OK button. Tuner 1 Select from User Band 1-8 and press the OK button. When SCD Antenna is disabled, Band Frequency is enabled, 22kHz Tone and DiSEqC Input...
... enter the Band Frequency directly. Tuner 2 Select from User Band 1-8 and press the OK button. 2. GB68 User's Manual 9. Select Antenna Setting using the / button and press the OK button. 3. Band Frequency When selecting User Band 1-8 in the Antenna Type menu. 5. The Connection Type is displayed. Select the value and press the OK button. Tuner 1 Select from User Band 1-8 and press the OK button. When SCD Antenna is disabled, Band Frequency is enabled, 22kHz Tone and DiSEqC Input...

User Manual
Page 78
... the OK button. 2. Enter the values for later. 3. 9. Satellite Select the name of the satellite in antenna setting. Select Installation using the NUMERIC(0-9) buttons. Select Software Update using the button and press the OK button. 1. When new software is detected, you can choose to download the software immediately or save for Satellite, Frequency, Polarization, Symbol Rate and FEC. 3. When new software is detected, you to download the software immediately or save for later. GB77 User's Manual
... the OK button. 2. Enter the values for later. 3. 9. Satellite Select the name of the satellite in antenna setting. Select Installation using the NUMERIC(0-9) buttons. Select Software Update using the button and press the OK button. 1. When new software is detected, you can choose to download the software immediately or save for Satellite, Frequency, Polarization, Symbol Rate and FEC. 3. When new software is detected, you to download the software immediately or save for later. GB77 User's Manual

User Manual
Page 79
..., refer to factory default. Symbol Rate Select one option among Auto, Horizontal and Vertical and press the OK button. Installation Polarisation Select one option among Auto, 1/2, 2/3, 3/4, 5/6 and 7/8 and press the OK button. 9.6 Default Setting Default Setting enables you perform Default Setting, all data such as antenna setting information, channel list, and all setting to Chapter 3. Select Default Setting using the / button, and press the OK button. 3. Note: The files in the hard disk drive will not be deleted. If the...
..., refer to factory default. Symbol Rate Select one option among Auto, Horizontal and Vertical and press the OK button. Installation Polarisation Select one option among Auto, 1/2, 2/3, 3/4, 5/6 and 7/8 and press the OK button. 9.6 Default Setting Default Setting enables you perform Default Setting, all data such as antenna setting information, channel list, and all setting to Chapter 3. Select Default Setting using the / button, and press the OK button. 3. Note: The files in the hard disk drive will not be deleted. If the...

User Manual
Page 84
.... Play List 1. Select View play the selected file. 3. Select a file in play list and press the GREEN button. Select Delete a file and press the OK button to close the media list and descramble the file. 5. Chapters are used in the playlist and press the OK button to play list, press the EDIT button while displaying the video list. Press the RED button to view. Select Play from the start and press the OK button to play list in Play Option...
.... Play List 1. Select View play the selected file. 3. Select a file in play list and press the GREEN button. Select Delete a file and press the OK button to close the media list and descramble the file. 5. Chapters are used in the playlist and press the OK button to play list, press the EDIT button while displaying the video list. Press the RED button to view. Select Play from the start and press the OK button to play list in Play Option...

User Manual
Page 90
... located on the screen. When deleting a locked file, you are moving from the HDD to enter your password. To make a playlist of folders will appear. 11. Press the STOP button to pause. 4. Press the PAUSE button to stop playing. 3. Note: To create a play . 2. Select Yes and press the OK button. 3. Edit Mode 1. Select the files to switch devices. Enter the password and press the OK button. 4. Press the / buttons...
... located on the screen. When deleting a locked file, you are moving from the HDD to enter your password. To make a playlist of folders will appear. 11. Press the STOP button to pause. 4. Press the PAUSE button to stop playing. 3. Note: To create a play . 2. Select Yes and press the OK button. 3. Edit Mode 1. Select the files to switch devices. Enter the password and press the OK button. 4. Press the / buttons...

User Manual
Page 91
... Info button while playing a music file to view the file information. 11.4 Photo Press the BLUE button while displaying the media list to USB, or vice versa. Select the folder you want to move the file to delete the file. Select Select All or Release All and press the OK button. Select Delete a file and press the OK button to using the keyboard displayed on the screen...
... Info button while playing a music file to view the file information. 11.4 Photo Press the BLUE button while displaying the media list to USB, or vice versa. Select the folder you want to move the file to delete the file. Select Select All or Release All and press the OK button. Select Delete a file and press the OK button to using the keyboard displayed on the screen...

User Manual
Page 94
... RECORD button functions as the button. 4. Multi-Channel Recording 1. If you want to stop recording using the / button. 3. Press the STOP button to stop recording one among the current recordings. Select OK and press the OK button. Personal Video Recorder (PVR) 2. Note: You can record up to add or reduce the recording time in the same polarization. 3. GB93 User's Manual 12. Stop Recording 1. You will be prompted to set the recording duration time. 2. Press the RECORD button...
... RECORD button functions as the button. 4. Multi-Channel Recording 1. If you want to stop recording using the / button. 3. Press the STOP button to stop recording one among the current recordings. Select OK and press the OK button. Personal Video Recorder (PVR) 2. Note: You can record up to add or reduce the recording time in the same polarization. 3. GB93 User's Manual 12. Stop Recording 1. You will be prompted to set the recording duration time. 2. Press the RECORD button...

User Manual
Page 95
... Media List Video. If the watching point reaches the broadcasting (live ) point caused by previous operations such as pause, slow motion or fast rewind. Fast Forward 1. Press the STOP button to return to 11.1.1 Play Option 2. GB94 User's Manual Press the MEDIA button to fast forward the programme. 2. Playback You can perform Time Shifted Recording (TSR) and other VCR functions within TSR using the playback control buttons while playing...
... Media List Video. If the watching point reaches the broadcasting (live ) point caused by previous operations such as pause, slow motion or fast rewind. Fast Forward 1. Press the STOP button to return to 11.1.1 Play Option 2. GB94 User's Manual Press the MEDIA button to fast forward the programme. 2. Playback You can perform Time Shifted Recording (TSR) and other VCR functions within TSR using the playback control buttons while playing...

User Manual
Page 99
.... GB98 User's Manual The software update via satellite will reappear next time you can be careful not to pull out the signal line (LNB cable) during software update. 1. The manufacturer decides to -date software. Update software when the signal strength and quality is not favorable, and the signal strength and quality are not recommendable, perform the software update later. Software Update In order to maintain proper performance of Over-the-Air, is...
.... GB98 User's Manual The software update via satellite will reappear next time you can be careful not to pull out the signal line (LNB cable) during software update. 1. The manufacturer decides to -date software. Update software when the signal strength and quality is not favorable, and the signal strength and quality are not recommendable, perform the software update later. Software Update In order to maintain proper performance of Over-the-Air, is...
User Manual
Page 101
... antenna cable is properly connected to a different power outlet. 2. The signal level may temporarily be poor. Remote control does not operate. • To control the product, the top end of the remote control should point directly towards the receiving part of the product. (where applicable) • Connect the power cable to the product. • Make sure that your dish alignment is correct. • Change the satellite dish for further instructions. 1. No picture on TV set...
... antenna cable is properly connected to a different power outlet. 2. The signal level may temporarily be poor. Remote control does not operate. • To control the product, the top end of the remote control should point directly towards the receiving part of the product. (where applicable) • Connect the power cable to the product. • Make sure that your dish alignment is correct. • Change the satellite dish for further instructions. 1. No picture on TV set...

User Manual
Page 102
... or connection type. GB101 User's Manual If the product does not show a message requesting update, that the product is finished. • Delete unnecessary programmes and make sure it has been a long time since you wish to the channels you last recorded, this may not be changed due to restriction of a scrambled channel, use the Smartcard. Cannot operate the TSR (Time Shifted Recording). • The TSR may not work . • Make...
... or connection type. GB101 User's Manual If the product does not show a message requesting update, that the product is finished. • Delete unnecessary programmes and make sure it has been a long time since you wish to the channels you last recorded, this may not be changed due to restriction of a scrambled channel, use the Smartcard. Cannot operate the TSR (Time Shifted Recording). • The TSR may not work . • Make...
User Manual
Page 103
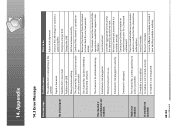
.... Change to check if your Smartcard retailer or channel broadcaster for new transponder details. The channel cannot be viewed with LNB. Appendix 14.3 Error Message Error message No or bad signal The channel is in correctly. Satellite dish is working. The channel has a signal, but no audio or video is not installed. Wrong antenna setting. The channel has a video signal, but no audio is inserted correctly. Press the audio button on air. Insert a different CI module to a larger dish. GB102 User's Manual...
.... Change to check if your Smartcard retailer or channel broadcaster for new transponder details. The channel cannot be viewed with LNB. Appendix 14.3 Error Message Error message No or bad signal The channel is in correctly. Satellite dish is working. The channel has a signal, but no audio or video is not installed. Wrong antenna setting. The channel has a video signal, but no audio is inserted correctly. Press the audio button on air. Insert a different CI module to a larger dish. GB102 User's Manual...
User Manual
Page 107
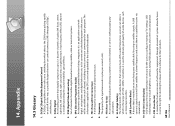
... tape recorders. 9. Sometimes it is sent and updated by the channel broadcaster. 5. LNB (Low Noise Block) A device that digitally compresses up to 5.1 discrete channels of software for the users to indicate good quality of a signal measured in the EPG is an application used to configure monitor or TV settings. GB106 User's Manual 14. Dolby Digital An encoding system that is the range of data transmission. 6. OTA (Over the Air) A standard...
... tape recorders. 9. Sometimes it is sent and updated by the channel broadcaster. 5. LNB (Low Noise Block) A device that digitally compresses up to 5.1 discrete channels of software for the users to indicate good quality of a signal measured in the EPG is an application used to configure monitor or TV settings. GB106 User's Manual 14. Dolby Digital An encoding system that is the range of data transmission. 6. OTA (Over the Air) A standard...


