
User Manual
Page 6
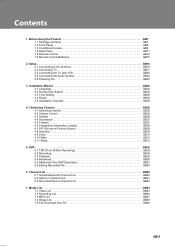
.../Advanced Channel List GB40 6.2 Option in Channel List GB41 6.3 Recorded Files in -Picture) Screen GB29 4.8 Help Box GB30 4.9 Zoom GB31 4.10 Wide GB31 4.11 Sleep GB31 5. Installation Wizard GB24 3.1 Language GB24 3.2 Humax Auto Search GB24 3.3 Time Setting GB25 3.4 Result GB25 3.5 Installation ...in Channel List GB42 7. Media List GB43 7.1 Video List GB43 7.2 Recording List GB46 7.3 MP3 List GB47 7.4 Image List GB48 7.5 File Download from PC GB49 Setup GB16 2.1 Connecting to the Antenna GB16 2.2 Connecting TV GB17 2.3 Connecting the TV and VCR GB20 2.4 Connecting the...
.../Advanced Channel List GB40 6.2 Option in Channel List GB41 6.3 Recorded Files in -Picture) Screen GB29 4.8 Help Box GB30 4.9 Zoom GB31 4.10 Wide GB31 4.11 Sleep GB31 5. Installation Wizard GB24 3.1 Language GB24 3.2 Humax Auto Search GB24 3.3 Time Setting GB25 3.4 Result GB25 3.5 Installation ...in Channel List GB42 7. Media List GB43 7.1 Video List GB43 7.2 Recording List GB46 7.3 MP3 List GB47 7.4 Image List GB48 7.5 File Download from PC GB49 Setup GB16 2.1 Connecting to the Antenna GB16 2.2 Connecting TV GB17 2.3 Connecting the TV and VCR GB20 2.4 Connecting the...

User Manual
Page 48
... select repeatedly. ** Note: • All features are similar to display the media list. 3. Repeat Play the file you want using the button and press the OK button to 7.5 File Download from PC. For more information, refer to play mode in the folder randomly. For more information about the edit mode, refer to display...
... select repeatedly. ** Note: • All features are similar to display the media list. 3. Repeat Play the file you want using the button and press the OK button to 7.5 File Download from PC. For more information, refer to play mode in the folder randomly. For more information about the edit mode, refer to display...
User Manual
Page 49
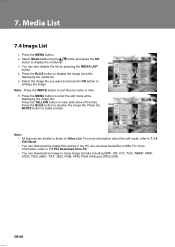
... while displaying the media list. 5. For more information about the edit mode, refer to 7.5 File Download from PC. • You can also display the list by name or time. ** ** 6. Select the image file you want and press the OK button to enter the edit mode while displaying the image list.... Press the MENU button to enlarge the image. For more information, refer to 7.1.4 Edit Mode. • You can download the image files stored in many image formats including BMP, GIF, ICO, TGA, WBMP, WMF, JPEG, PNG, MNG, TIFF, JBIG, PNM, PPM, PGM, RAS...
... while displaying the media list. 5. For more information about the edit mode, refer to 7.5 File Download from PC. • You can also display the list by name or time. ** ** 6. Select the image file you want and press the OK button to enter the edit mode while displaying the image list.... Press the MENU button to enlarge the image. For more information, refer to 7.1.4 Edit Mode. • You can download the image files stored in many image formats including BMP, GIF, ICO, TGA, WBMP, WMF, JPEG, PNG, MNG, TIFF, JBIG, PNM, PPM, PGM, RAS...
User Manual
Page 50
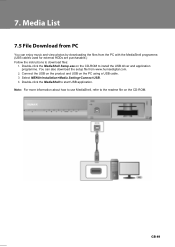
Double-click the MediaShell Setup.exe on the CD-ROM to the readme file on the PC using a USB cable. 3. You can enjoy music and view photos by downloading the files from www.humaxdigital.com. 2. Select MENU>Installation>Media Setting>Connect USB. 4. Double-click the MediaShell to start USB application. ** Note: ... to install the USB driver and application programme. Connect the USB on the product and USB on the CD-ROM. ** You can also download the setup file from the PC with the MediaShell programme. (USB cables used for external HDDs are purchasable.) Follow the instructions to...
Double-click the MediaShell Setup.exe on the CD-ROM to the readme file on the PC using a USB cable. 3. You can enjoy music and view photos by downloading the files from www.humaxdigital.com. 2. Select MENU>Installation>Media Setting>Connect USB. 4. Double-click the MediaShell to start USB application. ** Note: ... to install the USB driver and application programme. Connect the USB on the product and USB on the CD-ROM. ** You can also download the setup file from the PC with the MediaShell programme. (USB cables used for external HDDs are purchasable.) Follow the instructions to...

User Manual
Page 60
Connect the USB device from PC or the readme file on the CD-ROM. button and press the OK Note: For more information about how to use MediaShell programme to download the files from the PC. 1. button and press the ** Note: If you select Enable, the HDD performance will be optimised frequently. You can use MediaShell, refer to 7.5 File Download from the product to select Enable/Disable. Select Connect USB using the USB cable. 2. Select Auto Optimise HDD using the button to the PC using the button.
Connect the USB device from PC or the readme file on the CD-ROM. button and press the OK Note: For more information about how to use MediaShell programme to download the files from the PC. 1. button and press the ** Note: If you select Enable, the HDD performance will be optimised frequently. You can use MediaShell, refer to 7.5 File Download from the product to select Enable/Disable. Select Connect USB using the USB cable. 2. Select Auto Optimise HDD using the button to the PC using the button.
User Manual
Page 79
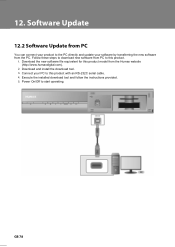
Download the new software file equivalent for this product. 1. Power On/Off to start operating. ** Connect your software by transferring the new software from the Humax website (http://www.humaxdigital.com). 2. Download and install the download tool. 3. Follow these steps to download new software from PC to this product model from the PC. Execute the installed download tool and follow the instructions provided. 5. You can connect your product to the PC directly and update your PC to this product with an RS-232C serial cable. 4.
Download the new software file equivalent for this product. 1. Power On/Off to start operating. ** Connect your software by transferring the new software from the Humax website (http://www.humaxdigital.com). 2. Download and install the download tool. 3. Follow these steps to download new software from PC to this product model from the PC. Execute the installed download tool and follow the instructions provided. 5. You can connect your product to the PC directly and update your PC to this product with an RS-232C serial cable. 4.

