
User Manual
Page 3
...injury. ** 2. Refer servicing to make the user aware of possible problems and information of the purchase contract. Business users: Contact your supplier and check the terms and conditions of any importance to help understand, use, and maintain the installation. ** 4. This will...local government office for details of where and how they can take this item for disposal. ** This product should not be mixed with other types of wastes and recycle it responsibly to promote the sustainable reuse of electric shock or personal injury. This symbol indicates important instructions...
...injury. ** 2. Refer servicing to make the user aware of possible problems and information of the purchase contract. Business users: Contact your supplier and check the terms and conditions of any importance to help understand, use, and maintain the installation. ** 4. This will...local government office for details of where and how they can take this item for disposal. ** This product should not be mixed with other types of wastes and recycle it responsibly to promote the sustainable reuse of electric shock or personal injury. This symbol indicates important instructions...
User Manual
Page 6
... in -Picture) Screen GB29 4.8 Help Box GB30 4.9 Zoom GB31 4.10 Wide GB31 4.11 Sleep GB31 5. Media List GB43 7.1 Video List GB43 7.2 Recording List GB46 7.3 MP3 List GB47 7.4 Image List GB48 7.5 File Download from PC GB49 Setup GB16 2.1 Connecting to the Antenna GB16 2.2 Connecting TV GB17 2.3 Connecting the TV and VCR GB20 2.4 Connecting the Audio System GB22 2.5 Powering On GB23 3. Installation Wizard GB24 3.1 Language GB24 3.2 Humax Auto Search GB24 3.3 Time Setting GB25 3.4 Result GB25 3.5 Installation Checklist GB25 4.1 Switching Channel GB26 4.1 Switching Channel...
... in -Picture) Screen GB29 4.8 Help Box GB30 4.9 Zoom GB31 4.10 Wide GB31 4.11 Sleep GB31 5. Media List GB43 7.1 Video List GB43 7.2 Recording List GB46 7.3 MP3 List GB47 7.4 Image List GB48 7.5 File Download from PC GB49 Setup GB16 2.1 Connecting to the Antenna GB16 2.2 Connecting TV GB17 2.3 Connecting the TV and VCR GB20 2.4 Connecting the Audio System GB22 2.5 Powering On GB23 3. Installation Wizard GB24 3.1 Language GB24 3.2 Humax Auto Search GB24 3.3 Time Setting GB25 3.4 Result GB25 3.5 Installation Checklist GB25 4.1 Switching Channel GB26 4.1 Switching Channel...
User Manual
Page 7
....4 Channel Search GB65 10.5 Status GB73 10.6 Default Setting GB75 11. Software Update GB77 12.1 OTA (Over the Air GB77 12.2 Software Update from PC GB78 13. TV Guide GB50 8.1 Viewing TV Guide GB50 8.2 Style GB52 8.3 Find GB53 8.4 Schedule GB54 8.5 Group GB56 8.6 Humax EPG GB56 9. Appendix GB79 13.1 Menu Map GB79 13.2 Trouble Shooting GB80 13.3 Error Message GB82 13.4 Specification GB83 13.5 Glossary GB85 13.6 Service and Support GB86...
....4 Channel Search GB65 10.5 Status GB73 10.6 Default Setting GB75 11. Software Update GB77 12.1 OTA (Over the Air GB77 12.2 Software Update from PC GB78 13. TV Guide GB50 8.1 Viewing TV Guide GB50 8.2 Style GB52 8.3 Find GB53 8.4 Schedule GB54 8.5 Group GB56 8.6 Humax EPG GB56 9. Appendix GB79 13.1 Menu Map GB79 13.2 Trouble Shooting GB80 13.3 Error Message GB82 13.4 Specification GB83 13.5 Glossary GB85 13.6 Service and Support GB86...

User Manual
Page 9
TV/RADIO BUTTON Switches between operation and standby modes. ** 2. STOP BUTTON Stops recording. ** 4. USB DEVICE Connect to change without notice. STANDBY BUTTON Switches between TV and radio modes. ** 7. PAUSE BUTTON Pauses programme. ** 6. CH-/CH+ BUTTON Moves the TV/radio channel up or down. 8. SMARTCARD SLOT A slot for a Smartcard ** 10.CI-MODULE SLOT A slot for two CI-Modules ** Note: The front of the product is subject to the USB port of PC. ** 9. ** 1. RECORD BUTTON Records programme. ** 3. PLAY BUTTON Plays programme. ** 5.
TV/RADIO BUTTON Switches between operation and standby modes. ** 2. STOP BUTTON Stops recording. ** 4. USB DEVICE Connect to change without notice. STANDBY BUTTON Switches between TV and radio modes. ** 7. PAUSE BUTTON Pauses programme. ** 6. CH-/CH+ BUTTON Moves the TV/radio channel up or down. 8. SMARTCARD SLOT A slot for a Smartcard ** 10.CI-MODULE SLOT A slot for two CI-Modules ** Note: The front of the product is subject to the USB port of PC. ** 9. ** 1. RECORD BUTTON Records programme. ** 3. PLAY BUTTON Plays programme. ** 5.
User Manual
Page 12
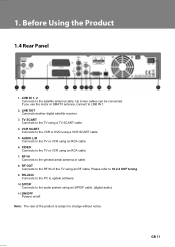
... digital satellite receiver. ** 3. ** 1. Up to LNB IN 1. ** 2. TV SCART Connects to the audio system using a VCR SCART cable. ** 5. RS-232C Connects to the PC to update software. ** 10.S/PDIF Connects to the TV using an RCA cable. ** 6. RF IN Connects to the satellite antenna cable. LNB IN 1, 2 Connects to the general aerial antenna or cable. ** 8. Please refer to change without notice. VCR SCART Connects to the VCR or DVD using an S/PDIF cable. (digital audio) ** 11.ON/OFF Powers on/off. ** Note: The rear...
... digital satellite receiver. ** 3. ** 1. Up to LNB IN 1. ** 2. TV SCART Connects to the audio system using a VCR SCART cable. ** 5. RS-232C Connects to the PC to update software. ** 10.S/PDIF Connects to the TV using an RCA cable. ** 6. RF IN Connects to the satellite antenna cable. LNB IN 1, 2 Connects to the general aerial antenna or cable. ** 8. Please refer to change without notice. VCR SCART Connects to the VCR or DVD using an S/PDIF cable. (digital audio) ** 11.ON/OFF Powers on/off. ** Note: The rear...
User Manual
Page 17
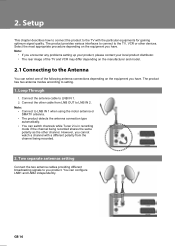
... broadcasting signals to the TV, VCR or other channel. You can switch channels while Tuner 2 is in recording mode if the channel being recorded. Note: • If you encounter any problems setting up your product, please contact your local product distributor. • The rear image of the following antenna connections depending on the equipment you have . The product has two antenna modes according to LNB IN 1. 2. Connect the antenna cable to setting...
... broadcasting signals to the TV, VCR or other channel. You can switch channels while Tuner 2 is in recording mode if the channel being recorded. Note: • If you encounter any problems setting up your product, please contact your local product distributor. • The rear image of the following antenna connections depending on the equipment you have . The product has two antenna modes according to LNB IN 1. 2. Connect the antenna cable to setting...
User Manual
Page 25
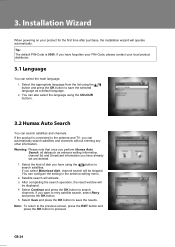
... your PIN-Code, please contact your product for the first time after purchase, the installation wizard will activate. 3. You can select the main language. ** 1. Note: To return to the previous screen, press the EXIT button and press the OK button to search satellites. Satellite search will operate automatically. Select Continue and press the OK button to save the selected language as antenna setting information, channel list and Smartcard information you have using...
... your PIN-Code, please contact your product for the first time after purchase, the installation wizard will activate. 3. You can select the main language. ** 1. Note: To return to the previous screen, press the EXIT button and press the OK button to search satellites. Satellite search will operate automatically. Select Continue and press the OK button to save the selected language as antenna setting information, channel list and Smartcard information you have using...
User Manual
Page 26
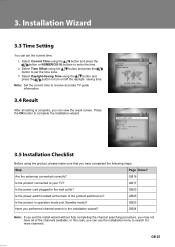
... performed channel search in the installation wizard? You can set the time zone. Select Daylight-Saving Time using the button and press the button or NUMERIC(0-9) buttons to enter the time. 2. GB23 Is the power switch located at the back of the channels available. GB16 Is the product connected to receive accurate TV guide information. GB23 Is the product in the wall outlet? saving time. GB17 Is the power cord plugged in operation mode...
... performed channel search in the installation wizard? You can set the time zone. Select Daylight-Saving Time using the button and press the button or NUMERIC(0-9) buttons to enter the time. 2. GB23 Is the power switch located at the back of the channels available. GB16 Is the product connected to receive accurate TV guide information. GB23 Is the product in the wall outlet? saving time. GB17 Is the power cord plugged in operation mode...
User Manual
Page 27
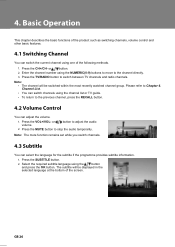
... subtitle if the programme provides subtitle information. 1. Press the VOL+/VOL- The subtitle will be displayed in the selected language at the bottom of the screen. or button. 2. Press the MUTE button to adjust the audio 2. You can adjust the volume. 1. Select the required subtitle language using the channel list or TV guide. • To return to the channel directly. 3. Note: The mute function remains set while you switch channels. Channel List...
... subtitle if the programme provides subtitle information. 1. Press the VOL+/VOL- The subtitle will be displayed in the selected language at the bottom of the screen. or button. 2. Press the MUTE button to adjust the audio 2. You can adjust the volume. 1. Select the required subtitle language using the channel list or TV guide. • To return to the channel directly. 3. Note: The mute function remains set while you switch channels. Channel List...
User Manual
Page 28
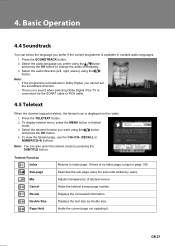
... to change the audio immediately. 3. Holds the current page not updating it. You can also enter the teletext mode by users. If there is displayed on the i-plate. 1. Displays the text size as double size. Press the SOUNDTRACK button. 2. button 4. When the channel supports teletext, the teletext icon is no sound when selecting Dolby Digital if the TV is connected via the SCART cable or RCA cable. Hides the...
... to change the audio immediately. 3. Holds the current page not updating it. You can also enter the teletext mode by users. If there is displayed on the i-plate. 1. Displays the text size as double size. Press the SOUNDTRACK button. 2. button 4. When the channel supports teletext, the teletext icon is no sound when selecting Dolby Digital if the TV is connected via the SCART cable or RCA cable. Hides the...
User Manual
Page 47
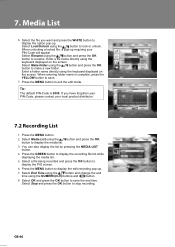
... . 7. Enter a file name directly using the button and press the OK button to lock or unlock. Press the MENU button. 2. Select Media List using the keyboard displayed on the screen. Select Lock/Unlock using the keyboard displayed on the screen. Enter a folder name directly using the button to display the media list. 3. Press the MENU button to display the PIG screen. 6. Select a file being recorded and press the OK button to exit the edit mode. Select End Time using the button and change the end time using the button...
... . 7. Enter a file name directly using the button and press the OK button to lock or unlock. Press the MENU button. 2. Select Media List using the keyboard displayed on the screen. Select Lock/Unlock using the keyboard displayed on the screen. Enter a folder name directly using the button to display the media list. 3. Press the MENU button to display the PIG screen. 6. Select a file being recorded and press the OK button to exit the edit mode. Select End Time using the button and change the end time using the button...
User Manual
Page 49
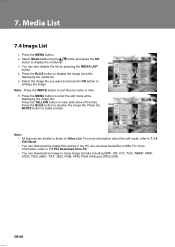
... view slide show of Video List. You can also display the list by name or time. ** ** 6. Press the BLUE button to display the media list. 3. Select Media List using the button and press the OK button to rename the image file. Select the image file you want and press the OK button to make a folder. Press the WHITE button to enlarge the image. For more information, refer to 7.1.4 Edit Mode...
... view slide show of Video List. You can also display the list by name or time. ** ** 6. Press the BLUE button to display the media list. 3. Select Media List using the button and press the OK button to rename the image file. Select the image file you want and press the OK button to make a folder. Press the WHITE button to enlarge the image. For more information, refer to 7.1.4 Edit Mode...
User Manual
Page 50
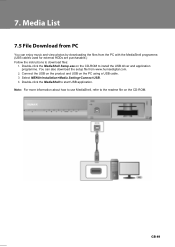
... the PC using a USB cable. 3. You can enjoy music and view photos by downloading the files from www.humaxdigital.com. 2. Select MENU>Installation>Media Setting>Connect USB. 4. You can also download the setup file from the PC with the MediaShell programme. (USB cables used for external HDDs are purchasable.) Follow the instructions to download files: 1. Double-click the MediaShell Setup.exe on the CD-ROM to install the USB driver and application...
... the PC using a USB cable. 3. You can enjoy music and view photos by downloading the files from www.humaxdigital.com. 2. Select MENU>Installation>Media Setting>Connect USB. 4. You can also download the setup file from the PC with the MediaShell programme. (USB cables used for external HDDs are purchasable.) Follow the instructions to download files: 1. Double-click the MediaShell Setup.exe on the CD-ROM to install the USB driver and application...
User Manual
Page 62
... OK button. 1. Adjust fine tuning setting. Select TV Standard using the RF cable, you must tune the TV to select an option. Note: If the product is connected to the TV using the button to select an option. 2. Pillar Box, Full, Auto button and press the Note: You can choose the Dolby Digital audio stream whenever possible by selecting ON in Dolby Digital. Select TV SCART/ VCR SCART/ Audio Output/ Dolby Digital/ Screen Ratio using the button and...
... OK button. 1. Adjust fine tuning setting. Select TV Standard using the RF cable, you must tune the TV to select an option. Note: If the product is connected to the TV using the button to select an option. 2. Pillar Box, Full, Auto button and press the Note: You can choose the Dolby Digital audio stream whenever possible by selecting ON in Dolby Digital. Select TV SCART/ VCR SCART/ Audio Output/ Dolby Digital/ Screen Ratio using the button and...
User Manual
Page 63
... channel is switched. Select Screen Saver using the button to set the automatic display time of OSD (On Screen Display) and press the button to select an option. 2. Press the OK button again to return to 0, the info. Box Display Time using the button and press the button to change the default skin. Box Display Time is set the transparency of the information box everytime the channel is switched. ** 3. Select OSD Skin using the button to set to the menu. 5. button. Select Info. Press the OK button...
... channel is switched. Select Screen Saver using the button to set the automatic display time of OSD (On Screen Display) and press the button to select an option. 2. Press the OK button again to return to 0, the info. Box Display Time using the button and press the button to change the default skin. Box Display Time is set the transparency of the information box everytime the channel is switched. ** 3. Select OSD Skin using the button to set to the menu. 5. button. Select Info. Press the OK button...
User Manual
Page 68
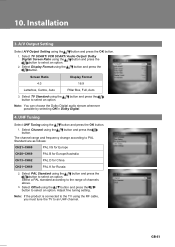
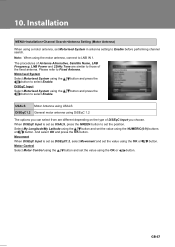
.... Motor Control Select Motor Control using the button and set the value using the NUMERIC(0-9) buttons or button. Motorised System Select Motorised System using the button to set the position. Movement When DiSEqC Input is set as DiSEqC1.2, select Movement and set the value using the OK or button. Note: When using the motor antenna, connect to Enable before performing channel search. MENU>Installation>Channel Search>Antenna Setting (Motor Antenna) ** When using a motor antenna, set Motorised System in antenna setting to LNB IN 1. button and...
.... Motor Control Select Motor Control using the button and set the value using the NUMERIC(0-9) buttons or button. Motorised System Select Motorised System using the button to set the position. Movement When DiSEqC Input is set as DiSEqC1.2, select Movement and set the value using the OK or button. Note: When using the motor antenna, connect to Enable before performing channel search. MENU>Installation>Channel Search>Antenna Setting (Motor Antenna) ** When using a motor antenna, set Motorised System in antenna setting to LNB IN 1. button and...
User Manual
Page 78
... be received). The equipment must be tuned properly to the same antenna equivalent to that if normal loader software is essential to pull out the signal line (LNB cable) during software update. Caution: • It may not be careful to keep the power on and the power cord plugged in during software update. In order to maintain proper performance of software through a broadcast system. Visit the Humax...
... be received). The equipment must be tuned properly to the same antenna equivalent to that if normal loader software is essential to pull out the signal line (LNB cable) during software update. Caution: • It may not be careful to keep the power on and the power cord plugged in during software update. In order to maintain proper performance of software through a broadcast system. Visit the Humax...
User Manual
Page 81
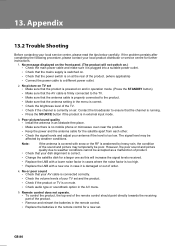
... product. (where applicable) • Connect the power cable to the product. • Make sure that the antenna setting in the remote control for further instructions. 1. Remote control does not operate. • To control the product, the top end of the remote control should point directly towards the receiving part of the product. • Remove and reinsert the batteries in the remote control. • Replace the batteries in the menu is correct. • Check...
... product. (where applicable) • Connect the power cable to the product. • Make sure that the antenna setting in the remote control for further instructions. 1. Remote control does not operate. • To control the product, the top end of the remote control should point directly towards the receiving part of the product. • Remove and reinsert the batteries in the remote control. • Replace the batteries in the menu is correct. • Check...
User Manual
Page 83
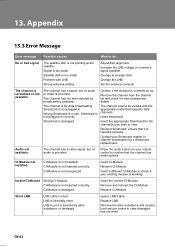
... CI-Module. Satellite dish is not installed. Change to view. Insert CI-Module. Audio not available. LNB In port is not recognized. Replace LNB. Change the LNB. Remove the channel from the channel list and check for a Smartcard replacement. Remove the alien substance and contact local service center in correctly. Insert Smartcard. Wrong antenna setting. CI-Module is inserted by broadcasting company. Set the antenna correctly. The channel has a signal, but no audio or video is not plugged...
... CI-Module. Satellite dish is not installed. Change to view. Insert CI-Module. Audio not available. LNB In port is not recognized. Replace LNB. Change the LNB. Remove the channel from the channel list and check for a Smartcard replacement. Remove the alien substance and contact local service center in correctly. Insert Smartcard. Wrong antenna setting. CI-Module is inserted by broadcasting company. Set the antenna correctly. The channel has a signal, but no audio or video is not plugged...
User Manual
Page 86
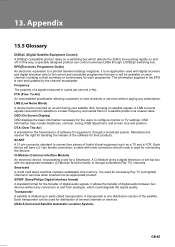
... satellite to a lower frequency and sends them to decrypt scrambled (Pay TV) channels. Frequency The property of software for distribution of digital audio signals. FTA (Free- OSD (On Screen Display) OSD displays the basic information necessary for the transmission of a signal measured in parts called transponders. OTA (Over The Air) A standard for the users to a printed television listings magazine; EPG(Electronic Programme Guide) An electronic equivalent to configure monitor or TV settings...
... satellite to a lower frequency and sends them to decrypt scrambled (Pay TV) channels. Frequency The property of software for distribution of digital audio signals. FTA (Free- OSD (On Screen Display) OSD displays the basic information necessary for the transmission of a signal measured in parts called transponders. OTA (Over The Air) A standard for the users to a printed television listings magazine; EPG(Electronic Programme Guide) An electronic equivalent to configure monitor or TV settings...


