
User Manual
Page 7
... or Change Subtitle 4.5 Change Audio options 4.6 Programme Information (I- plate) 4.7 Option List 5. PIP and Time Shifted Recording 5.1 Picture-in-Picture (PIP) Screen 5.2 Time Shifted Recording (TSR) 6. Setup 2.1 Connecting Aerial 2.2 Powering On 3. Recording and Playback 6.1 Instant Recording 6.2 Recording schedule 6.3 Programme Playback 6.4 Editing Recorded Programmes 6.5 MP3 6.6 Digital Album 6.7 Checking Hard Disk Drive 7. Before Using the Product 1.1 Package Contents 1.2 Front...
... or Change Subtitle 4.5 Change Audio options 4.6 Programme Information (I- plate) 4.7 Option List 5. PIP and Time Shifted Recording 5.1 Picture-in-Picture (PIP) Screen 5.2 Time Shifted Recording (TSR) 6. Setup 2.1 Connecting Aerial 2.2 Powering On 3. Recording and Playback 6.1 Instant Recording 6.2 Recording schedule 6.3 Programme Playback 6.4 Editing Recorded Programmes 6.5 MP3 6.6 Digital Album 6.7 Checking Hard Disk Drive 7. Before Using the Product 1.1 Package Contents 1.2 Front...

User Manual
Page 10
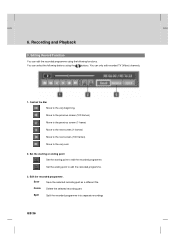
** 1.2 Front Panel ** ** 1. USB DEVICE ** Connect to the PC port. 9. PLAY Button ** Plays programme. 5. PAUSE Button ** Pauses programme. 6. SOURCE Button ** Selects the input source between Operation and Standby modes. 2. CH-/CH+ ** Moves the TV/Radio channel up/down. 8. GB 9 STOP Button ** Stops recording. 4. CAM SLOT ** To be used with a CA Module and smartcard for Pay TV channels. STANDBY Button ** Switches between TV and the product. 7. RECORD Button ** Records programme. 3.
** 1.2 Front Panel ** ** 1. USB DEVICE ** Connect to the PC port. 9. PLAY Button ** Plays programme. 5. PAUSE Button ** Pauses programme. 6. SOURCE Button ** Selects the input source between Operation and Standby modes. 2. CH-/CH+ ** Moves the TV/Radio channel up/down. 8. GB 9 STOP Button ** Stops recording. 4. CAM SLOT ** To be used with a CA Module and smartcard for Pay TV channels. STANDBY Button ** Switches between TV and the product. 7. RECORD Button ** Records programme. 3.

User Manual
Page 13
...** Enters a TV/Radio channel number or menu option number. ** 3. PLAY Play at high speed. PLAY LIST Displays the recorded programme list. OPT+ Displays the channel attributes whilst watching a programme. PLAYBACK CONTROL BUTTONS ** a. e. i. GB 12 Each time... you press this button the rewind speed is increased d. PAUSE Pauses the live programme. 5. RECORD Records a programme. l. FAST REWIND Rewinds at high speed. h. SOUNDTRACK Displays the Soundtrack options. ARROW BUTTONS ** Changes the channel or navigates ...
...** Enters a TV/Radio channel number or menu option number. ** 3. PLAY Play at high speed. PLAY LIST Displays the recorded programme list. OPT+ Displays the channel attributes whilst watching a programme. PLAYBACK CONTROL BUTTONS ** a. e. i. GB 12 Each time... you press this button the rewind speed is increased d. PAUSE Pauses the live programme. 5. RECORD Records a programme. l. FAST REWIND Rewinds at high speed. h. SOUNDTRACK Displays the Soundtrack options. ARROW BUTTONS ** Changes the channel or navigates ...

User Manual
Page 22
... Level - Displayed only when there is provided. 4. Displayed only when the programme has Dolby Digital soundtrack. Next programme Information: displayed if next programme information is recording. Note: The programme information will only be displayed when supplied by pressing the i button while watching a programme. Icons Displayed only if this programme is displayed...
... Level - Displayed only when there is provided. 4. Displayed only when the programme has Dolby Digital soundtrack. Next programme Information: displayed if next programme information is recording. Note: The programme information will only be displayed when supplied by pressing the i button while watching a programme. Icons Displayed only if this programme is displayed...

User Manual
Page 26
... the channel list, soundtrack and detail information. Press the SWAP PIP button on the main screen. 1. PIP and Time Shifted Recording ** 5.1 Picture-in the following cases: 1. This function is not available while recording. • Only one scrambled (Pay TV) channel can watch 2 channels at the same time. Note: You cannot use the...
... the channel list, soundtrack and detail information. Press the SWAP PIP button on the main screen. 1. PIP and Time Shifted Recording ** 5.1 Picture-in the following cases: 1. This function is not available while recording. • Only one scrambled (Pay TV) channel can watch 2 channels at the same time. Note: You cannot use the...
User Manual
Page 27
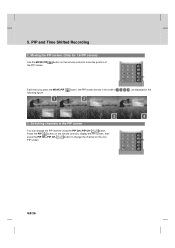
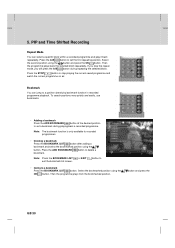
Press the PIP button on the remote control to move the position of , as displayed in the PIP screen You can change the channel on the only PIP screen. button on the remote control to change the PIP channel using the PIP CH+/PIP CH- button to display the PIP screen, then press the PIP CH+/PIP CH- 5. button, the PIP screen moves in the order of Each time you press the MOVE PIP following figure. GB 26 Moving the PIP screen. (Only for 1:6 PIP screen) Use the MOVE PIP the PIP screen. PIP and Time Shifted Recording ** 2. button. Switching channels in the 3.
Press the PIP button on the remote control to move the position of , as displayed in the PIP screen You can change the channel on the only PIP screen. button on the remote control to change the PIP channel using the PIP CH+/PIP CH- button to display the PIP screen, then press the PIP CH+/PIP CH- 5. button, the PIP screen moves in the order of Each time you press the MOVE PIP following figure. GB 26 Moving the PIP screen. (Only for 1:6 PIP screen) Use the MOVE PIP the PIP screen. PIP and Time Shifted Recording ** 2. button. Switching channels in the 3.
User Manual
Page 28
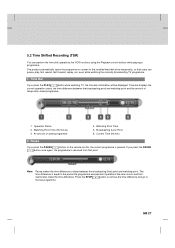
... from that users can perform the time shift operations like slow motion and fast rewind also make the time difference. Watching Point Time 5. ** 5.2 Time Shifted Recording (TSR) You can pause, play, fast rewind, fast forward, replay, etc. If you press the PLAY button while watching TV, the time bar information will...
... from that users can perform the time shift operations like slow motion and fast rewind also make the time difference. Watching Point Time 5. ** 5.2 Time Shifted Recording (TSR) You can pause, play, fast rewind, fast forward, replay, etc. If you press the PLAY button while watching TV, the time bar information will...
User Manual
Page 29
... to the Next Scene Press the FAST FORWARD button on the remote controller to adjust the recording end time. While the time shift operation records the programme temporarily, this record operation records the programme permanently so you reach the start point while rewinding, the programme is automatically played... at normal speed from that point. 4. If you press the BACK or EXIT button after changing the Record End Time, you press the PLAY button, the fast forward operation stops and the programme is played at any time. You can ...
... to the Next Scene Press the FAST FORWARD button on the remote controller to adjust the recording end time. While the time shift operation records the programme temporarily, this record operation records the programme permanently so you reach the start point while rewinding, the programme is automatically played... at normal speed from that point. 4. If you press the BACK or EXIT button after changing the Record End Time, you press the PLAY button, the fast forward operation stops and the programme is played at any time. You can ...
User Manual
Page 31
... the current programme on air. ** Bookmark You can select a specific block within a recorded programme and play it back repeatedly. button and press the GB 30 5. PIP and Time Shifted Recording ** Repeat Mode You can jump to set the first repeating position. To search positions ... press the OK button. Then the programme plays back the selected block repeatedly. If you will press the A-B button during playing back a recorded programme. Press the ADD BOOKMARK button to set a bookmark during repeating the selected block. Press the A-B button to delete a bookmark. Select...
... the current programme on air. ** Bookmark You can select a specific block within a recorded programme and play it back repeatedly. button and press the GB 30 5. PIP and Time Shifted Recording ** Repeat Mode You can jump to set the first repeating position. To search positions ... press the OK button. Then the programme plays back the selected block repeatedly. If you will press the A-B button during playing back a recorded programme. Press the ADD BOOKMARK button to set a bookmark during repeating the selected block. Press the A-B button to delete a bookmark. Select...
User Manual
Page 32
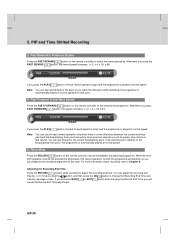
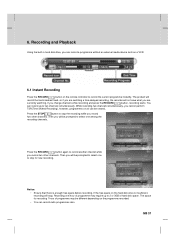
... to 2 or 3GB of programme may be prompted to record the current programme instantly. While recording two channels simultaneously, you can record a programme without an external media device such as a VCR. ** 6.1 Instant Recording Press the RECORD button on air can record radio programmes also. Then you record two other channels. If the free space on the programme...
... to 2 or 3GB of programme may be prompted to record the current programme instantly. While recording two channels simultaneously, you can record a programme without an external media device such as a VCR. ** 6.1 Instant Recording Press the RECORD button on air can record radio programmes also. Then you record two other channels. If the free space on the programme...
User Manual
Page 33
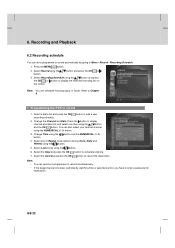
... desired channel using the button and the OK button. Programming the PVR to cancel the reservation. Select Lock mode using the button. Select Record using the button. 6. Change the Channel and Date. Change Time using the button. 5. button and the NUMERICAL (0~9) 4. Recording Schedule. 1. button and press the OK or 3. You can schedule recoding...
... desired channel using the button and the OK button. Programming the PVR to cancel the reservation. Select Lock mode using the button. Select Record using the button. 6. Change the Channel and Date. Change Time using the button. 5. button and the NUMERICAL (0~9) 4. Recording Schedule. 1. button and press the OK or 3. You can schedule recoding...

User Manual
Page 34
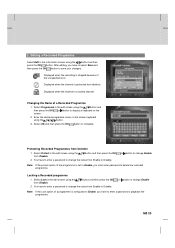
...also select your desired channel using the button and the NUMERICAL (0~9) button. 5. Select the Save and press the OK button to edit the reserved recording schedule. 2. Change the Time using the NUMERICAL (0~9) button. 4. Select Delete using the button and press the OK button to edit the reserved ...item using the button and the OK button. ** 2. GB 33 Select Edit using the button and press the OK button to playback the recorded programme. Change the Lock mode using the button. Change the Repeat mode using the button. 7. Change the Channel and Date. Press the button...
...also select your desired channel using the button and the NUMERICAL (0~9) button. 5. Select the Save and press the OK button to edit the reserved recording schedule. 2. Change the Time using the NUMERICAL (0~9) button. 4. Select Delete using the button and press the OK button to edit the reserved ...item using the button and the OK button. ** 2. GB 33 Select Edit using the button and press the OK button to playback the recorded programme. Change the Lock mode using the button. Change the Repeat mode using the button. 7. Change the Channel and Date. Press the button...
User Manual
Page 35
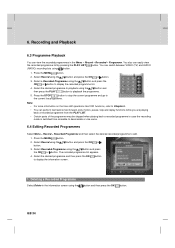
... the OK or button to edit. 1. Recorded Programme and then select the desired recorded programme to display the recorded programme list. 4. Select Record using the button and press the OK or button. button and press the OK or 3. The recorded programme list appears. 4. Select the desired...press the OK or button. 3. GB 34 Recording and Playback ** 6.3 Programme Playback You can easily view the recorded programme list by pressing the PLAY LIST button. You also can view the recorded programmes in case the recording mode is switched from scramble to display the information...
... the OK or button to edit. 1. Recorded Programme and then select the desired recorded programme to display the recorded programme list. 4. Select Record using the button and press the OK or button. button and press the OK or 3. The recorded programme list appears. 4. Select the desired...press the OK or button. 3. GB 34 Recording and Playback ** 6.3 Programme Playback You can easily view the recorded programme list by pressing the PLAY LIST button. You also can view the recorded programmes in case the recording mode is switched from scramble to display the information...
User Manual
Page 36
... to change the status from Disable. Select Protect in the edit screen using the from Enable to save your changes. ** Displayed when the recording is stopped because of the unexpected error. ** ** Displayed when the channel is configured to Enable, you must enter password to change the ... OK from deletion. ** ** Displayed when the channel is set to Enable, you have to enter a password to Disable. ** 2. Editing a Recorded Programme Select Edit in the edit screen using the button and then press the OK button. Select Programme in the information screen using the button...
... to change the status from Disable. Select Protect in the edit screen using the from Enable to save your changes. ** Displayed when the recording is stopped because of the unexpected error. ** ** Displayed when the channel is configured to Enable, you must enter password to change the ... OK from deletion. ** ** Displayed when the channel is set to Enable, you have to enter a password to Disable. ** 2. Editing a Recorded Programme Select Edit in the edit screen using the button and then press the OK button. Select Programme in the information screen using the button...
User Manual
Page 37
... the ** buttons. Recording and Playback ** 3. Editing Record Function You can only edit recorded TV (Video) channels. ** 1. Save ** Delete ** Split ** Save the selected recording part as a different file. ** Delete the selected recording part. ** Split the recorded programme into separate recordings ** GB 36 Set... the starting or ending point Set the starting point to edit the recorded programme. ** ** ** ** Set the ending point to the very end. ** 2. Edit the recorded programme. You can select the following functions. Control the Bar Move to the very ...
... the ** buttons. Recording and Playback ** 3. Editing Record Function You can only edit recorded TV (Video) channels. ** 1. Save ** Delete ** Split ** Save the selected recording part as a different file. ** Delete the selected recording part. ** Split the recorded programme into separate recordings ** GB 36 Set... the starting or ending point Set the starting point to edit the recorded programme. ** ** ** ** Set the ending point to the very end. ** 2. Edit the recorded programme. You can select the following functions. Control the Bar Move to the very ...

User Manual
Page 38
... the part to edit by frame. 3. Select Save and press the OK button to enter the function screen. 2. ** • Save 1. In the Recorded Programme menu, press the OPT+ button to save the selected part. ** • Delete 1. Move the editing part using the buttons and select the starting... or ending point using the buttons. 4. In the Recorded Programme menu, press the OPT+ button to enter the function screen. 2. Move the editing part using the buttons and select the starting or ending point...
... the part to edit by frame. 3. Select Save and press the OK button to enter the function screen. 2. ** • Save 1. In the Recorded Programme menu, press the OPT+ button to save the selected part. ** • Delete 1. Move the editing part using the buttons and select the starting... or ending point using the buttons. 4. In the Recorded Programme menu, press the OPT+ button to enter the function screen. 2. Move the editing part using the buttons and select the starting or ending point...

User Manual
Page 39
... button to stop the current music. Playing a MP3 Select the desired music to 11.3 File Download from PC. MP3. 1. button and press the OK or 3. Record - For more information, refer to playback using the button and then press the PLAY or OK button. GB 38 Select...
... button to stop the current music. Playing a MP3 Select the desired music to 11.3 File Download from PC. MP3. 1. button and press the OK or 3. Record - For more information, refer to playback using the button and then press the PLAY or OK button. GB 38 Select...

User Manual
Page 40
Press the MENU button. 2. Select Record using the button. Move the previous or next screen using the button. GB 39 The digital album list appears. 1. Downloading Photos You can view or ... show. button and press the OK or 3. ** 6.6 Digital Album You can download photos (only JPEG files) stored on the computer via Universal Serial Bus (USB). Record - Select Digital Album using the button and then press the OK button to Exit the menu and return the current programme. 2. Note: • Press the...
Press the MENU button. 2. Select Record using the button. Move the previous or next screen using the button. GB 39 The digital album list appears. 1. Downloading Photos You can view or ... show. button and press the OK or 3. ** 6.6 Digital Album You can download photos (only JPEG files) stored on the computer via Universal Serial Bus (USB). Record - Select Digital Album using the button and then press the OK button to Exit the menu and return the current programme. 2. Note: • Press the...
User Manual
Page 41
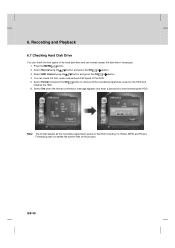
... disk drive and can check the free space of the HDD. 5. button to start formatting the HDD. ** Note: The format deletes all the recorded programmes saved on the HDD including TV, Radio, MP3s and Photos. 6. Select Yes when the format confirmation message appears and enter a password to ...format (erase) the disk drive if necessary. 1. Press the MENU button. 2. Formatting does not delete the system files of the product. Select Record using the button and press the OK or button. 4. Select Format and press the OK initialise the HDD. GB 40 Select HDD Control using the...
... disk drive and can check the free space of the HDD. 5. button to start formatting the HDD. ** Note: The format deletes all the recorded programmes saved on the HDD including TV, Radio, MP3s and Photos. 6. Select Yes when the format confirmation message appears and enter a password to ...format (erase) the disk drive if necessary. 1. Press the MENU button. 2. Formatting does not delete the system files of the product. Select Record using the button and press the OK or button. 4. Select Format and press the OK initialise the HDD. GB 40 Select HDD Control using the...
User Manual
Page 49
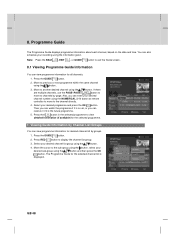
... the selected programme. 1. Note: Press the BACK , EXIT , or GUIDE button to exit the Guide screen. 8.1 Viewing Programme Guide Information You can also schedule your recording using the NUMERICAL (0-9) button at remote controller to move to previous or next programme within the same channel using the button. Select your desired sub...
... the selected programme. 1. Note: Press the BACK , EXIT , or GUIDE button to exit the Guide screen. 8.1 Viewing Programme Guide Information You can also schedule your recording using the NUMERICAL (0-9) button at remote controller to move to previous or next programme within the same channel using the button. Select your desired sub...

