
User Manual
Page 4
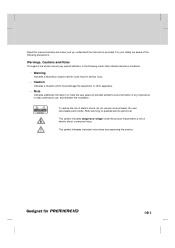
... to the following marks that presents a risk of electric shock, do not remove cover(or back). ** Read this manual carefully and make the user aware of possible problems and information of any importance to help understand, use, and maintain the installation. ** To reduce the risk of electric shock or personal injury. ** This symbol indicates important instructions accompanying the product.
... to the following marks that presents a risk of electric shock, do not remove cover(or back). ** Read this manual carefully and make the user aware of possible problems and information of any importance to help understand, use, and maintain the installation. ** To reduce the risk of electric shock or personal injury. ** This symbol indicates important instructions accompanying the product.

User Manual
Page 5
... local power company. Do not place the product on top of any maintenance or installation procedures. ** 2. Disconnect the product from any object, and do so can fall. CONNECTION TO THE TV ** Disconnect the product from the mains before connecting or disconnecting the cable from the wall outlet before you have followed the manufacturer's instructions for the satellite dish. ** 10.LOCATION...
... local power company. Do not place the product on top of any maintenance or installation procedures. ** 2. Disconnect the product from any object, and do so can fall. CONNECTION TO THE TV ** Disconnect the product from the mains before connecting or disconnecting the cable from the wall outlet before you have followed the manufacturer's instructions for the satellite dish. ** 10.LOCATION...

User Manual
Page 7
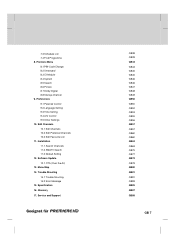
... GB35 GB35 GB36 ** GB36 GB36 Premiere-Provided Features 5.1 Option Channels 5.2 Options (PREMIERE DIREKT) 6. Contents ** 1. Before Using the Product 1.1 Package Contents 1.2 Front Panel 1.3 Conditional Access 1.4 Rear Panel 1.5 Remote Control 2. Basic Operation 4.1 Switching Channel 4.2 Volume Control 4.3 Lip-Sync 4.4 Resolution 4.5 Option List 4.6 Programme Information (i- Installation Wizard 3.1 Language 3.2 Video Output 3.3 Search Channel 3.4 Software Update 4. Setup 2.1 Using HDMI Connector 2.2 Using DVI Connector 2.3 Using Component Cable 2.4 Using Scart Cable 2.5 Powering On 3.
... GB35 GB35 GB36 ** GB36 GB36 Premiere-Provided Features 5.1 Option Channels 5.2 Options (PREMIERE DIREKT) 6. Contents ** 1. Before Using the Product 1.1 Package Contents 1.2 Front Panel 1.3 Conditional Access 1.4 Rear Panel 1.5 Remote Control 2. Basic Operation 4.1 Switching Channel 4.2 Volume Control 4.3 Lip-Sync 4.4 Resolution 4.5 Option List 4.6 Programme Information (i- Installation Wizard 3.1 Language 3.2 Video Output 3.3 Search Channel 3.4 Software Update 4. Setup 2.1 Using HDMI Connector 2.2 Using DVI Connector 2.3 Using Component Cable 2.4 Using Scart Cable 2.5 Powering On 3.
User Manual
Page 8
... GB50 ** GB50 GB52 GB53 GB55 GB56 GB57 ** GB57 GB60 GB60 GB63 ** GB63 GB75 GB77 GB78 ** GB78 GB80 ** GB81 ** GB81 GB83 GB85 ** GB87 ** GB89 ** GB 7 ** 7.3 Schedule List 7.4 Find Programme 8. Installation 11.1 Search Channels 11.2 SMATV Search 11.3 Default Setting 12. Menu Map 14. Preferences 9.1 Parental Control 9.2 Language Setting 9.3 Time Setting 9.4 A/V Control 9.5 Other Settings 10. Premiere Menu 8.1 PIN-Code Change 8.2 Smartcard 8.3 CI-Module 8.4 System 8.5 Search 8.6 Picture 8.7 Dolby Digital 8.8 Startup-Channel 9.
... GB50 ** GB50 GB52 GB53 GB55 GB56 GB57 ** GB57 GB60 GB60 GB63 ** GB63 GB75 GB77 GB78 ** GB78 GB80 ** GB81 ** GB81 GB83 GB85 ** GB87 ** GB89 ** GB 7 ** 7.3 Schedule List 7.4 Find Programme 8. Installation 11.1 Search Channels 11.2 SMATV Search 11.3 Default Setting 12. Menu Map 14. Preferences 9.1 Parental Control 9.2 Language Setting 9.3 Time Setting 9.4 A/V Control 9.5 Other Settings 10. Premiere Menu 8.1 PIN-Code Change 8.2 Smartcard 8.3 CI-Module 8.4 System 8.5 Search 8.6 Picture 8.7 Dolby Digital 8.8 Startup-Channel 9.

User Manual
Page 9
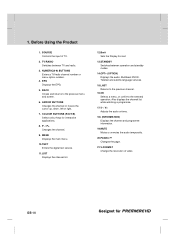
Before Using the Product ** This chapter provides detailed instructions on the product and its accessories. 1.1 Package Contents Please check all package contents before using your product. ** ** Remote Control ** SCART-Cable User's Manual HDMI-Cable Batteries ** Note: • Defaults may vary according to area. 1. Always keep the battery inserted in the remote control. • Package contents may occur if the remote control is left without battery for a long time. GB 8
Before Using the Product ** This chapter provides detailed instructions on the product and its accessories. 1.1 Package Contents Please check all package contents before using your product. ** ** Remote Control ** SCART-Cable User's Manual HDMI-Cable Batteries ** Note: • Defaults may vary according to area. 1. Always keep the battery inserted in the remote control. • Package contents may occur if the remote control is left without battery for a long time. GB 8

User Manual
Page 13
...USB Host ** Connects to a VCR SCART cable. 6. VCR SCART ** Connects to a USB cable. 4. S/PDIF ** Outputs the digital audio signals(S/PDIF). 10.RS-232C ** Connects to the PC to another digital receiver. ** 3. LNB OUT ** Connects to update the software programme of the product. 11.ON/OFF ** Powers on/off. VIDEO ** Connects to the TV or VCR and outputs audio signals. 7. GB 12 AUDIO L/R ** Connects to the TV or VCR and outputs video signals. (using HDMI Connector. 9. LNB IN ** Connects to the TV using RCA and component connector) 8. HDMI ** Connects to the satellite antenna...
...USB Host ** Connects to a VCR SCART cable. 6. VCR SCART ** Connects to a USB cable. 4. S/PDIF ** Outputs the digital audio signals(S/PDIF). 10.RS-232C ** Connects to the PC to another digital receiver. ** 3. LNB OUT ** Connects to update the software programme of the product. 11.ON/OFF ** Powers on/off. VIDEO ** Connects to the TV or VCR and outputs audio signals. 7. GB 12 AUDIO L/R ** Connects to the TV or VCR and outputs video signals. (using HDMI Connector. 9. LNB IN ** Connects to the TV using RCA and component connector) 8. HDMI ** Connects to the satellite antenna...
User Manual
Page 15
...(0-9) BUTTONS ** Enters a TV/radio channel number or menu option number. 4. Also displays the channel list while watching a programme. ** 17.V- / V+ ** Adjusts the audio volume. ** 18.i (INFORMATION) ** Displays the channel and programme information. ** 19.MUTE ** Mutes or unmutes the audio temporarily. ** 20.PAGE ** Changes the page. ** 21.V-FORMAT ** Change the resolution of TV. ** 2. SOURCE ** Controls the input of video. ** GB 14 TV/RADIO ** Switches between operation and standby modes. ** 14.OPT+ (OPTION) ** Displays the audio, Multifeed, NVOD, Teletext and subtitle language services...
...(0-9) BUTTONS ** Enters a TV/radio channel number or menu option number. 4. Also displays the channel list while watching a programme. ** 17.V- / V+ ** Adjusts the audio volume. ** 18.i (INFORMATION) ** Displays the channel and programme information. ** 19.MUTE ** Mutes or unmutes the audio temporarily. ** 20.PAGE ** Changes the page. ** 21.V-FORMAT ** Change the resolution of TV. ** 2. SOURCE ** Controls the input of video. ** GB 14 TV/RADIO ** Switches between operation and standby modes. ** 14.OPT+ (OPTION) ** Displays the audio, Multifeed, NVOD, Teletext and subtitle language services...

User Manual
Page 16
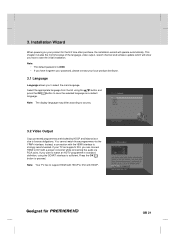
... encounter any problems setting up your product, please contact your product to connect your local product distributor. 2.1 Using HDMI Connector The HDMI connection is recommended for gaining optimum signal quality. Setup ** This chapter describes how to the TV with the HDMI cable as follows. ** GB 15 In case the TV has a HDMI input connector, a special all-digital interface that provides the highest picture quality, connect the product...
... encounter any problems setting up your product, please contact your product to connect your local product distributor. 2.1 Using HDMI Connector The HDMI connection is recommended for gaining optimum signal quality. Setup ** This chapter describes how to the TV with the HDMI cable as follows. ** GB 15 In case the TV has a HDMI input connector, a special all-digital interface that provides the highest picture quality, connect the product...
User Manual
Page 22
... the list using the SCART interface is sufficient. If your local product distributor. 3.1 Language Language allows you want to support HDMI with HDCP or DVI with a proper converter while connecting the audio via the YPbPr interface. 3. This chapter includes the first time setup of the language, video output, search channel and software update which will operate automatically. You cannot watch an HDTV programme in standard definition, using the button and...
... the list using the SCART interface is sufficient. If your local product distributor. 3.1 Language Language allows you want to support HDMI with HDCP or DVI with a proper converter while connecting the audio via the YPbPr interface. 3. This chapter includes the first time setup of the language, video output, search channel and software update which will operate automatically. You cannot watch an HDTV programme in standard definition, using the button and...

User Manual
Page 24
... button. 9. When channel search is detected, you want to download the software immediately or save for later. You can view the result screen. Please wait while the search continues. The 22kHz tone value will be disabled. 3.4 Software Update Software Update displays the software version and lets you cannot find the required LNB frequency from the list, select User Define and manually enter the frequency using the NUMERIC(0-9) buttons and press the OK button. • When using universal LNB...
... button. 9. When channel search is detected, you want to download the software immediately or save for later. You can view the result screen. Please wait while the search continues. The 22kHz tone value will be disabled. 3.4 Software Update Software Update displays the software version and lets you cannot find the required LNB frequency from the list, select User Define and manually enter the frequency using the NUMERIC(0-9) buttons and press the OK button. • When using universal LNB...

User Manual
Page 25
... switch channels using one of the product such as switching channel, volume control, lip-sync, option list and programme information. Press the MUTE button for each channel. ** Note: Lip-Sync is activated only when the programme is broadcast in Dolby Digital . Press the V-/V+ button to adjust the audio volume. 1. Adjust the Lip-Sync and save the setting for 3 seconds. 2. GB 24 4. Basic Operation ** This chapter describes the basic functions...
... switch channels using one of the product such as switching channel, volume control, lip-sync, option list and programme information. Press the MUTE button for each channel. ** Note: Lip-Sync is activated only when the programme is broadcast in Dolby Digital . Press the V-/V+ button to adjust the audio volume. 1. Adjust the Lip-Sync and save the setting for 3 seconds. 2. GB 24 4. Basic Operation ** This chapter describes the basic functions...

User Manual
Page 65
If the required satellite is used or two antennas are connected to the 22KHz tone switch box. Select LNB Frequency using the OK or button. Select one option among Universal, 9750, 10600, 5150, 11475 and User Define using the OK or button. 3. Select Enable/Disable using the button. 2. Select 22KHz Tone using the button. 2. "Only for LNB cable over 60m, Set LNB power High." Enable Dual LNB is not available in use. ** DiSEqC Input 1. If the required value does...
If the required satellite is used or two antennas are connected to the 22KHz tone switch box. Select LNB Frequency using the OK or button. Select one option among Universal, 9750, 10600, 5150, 11475 and User Define using the OK or button. 3. Select Enable/Disable using the button. 2. Select 22KHz Tone using the button. 2. "Only for LNB cable over 60m, Set LNB power High." Enable Dual LNB is not available in use. ** DiSEqC Input 1. If the required value does...

User Manual
Page 66
...antenna in Antenna Setting mode. 2. "Only for LNB cable over 60m, Set LNB power High." Press the OPT+ button to switch to Motor before motor antenna setting. • LNB Frequency 1. Select LNB Frequency using the button. 2. If the required value does not exist, select User Define and enter the LNB frequency directly. ** • LNB Voltage 1. Select LNB Voltage using the button. 2. Select one option among Universal, 9750, 10600, 5150, 11475 and User Define using a motor antenna, set the motor type before performing channel search. 1. Motor Antenna When using...
...antenna in Antenna Setting mode. 2. "Only for LNB cable over 60m, Set LNB power High." Press the OPT+ button to switch to Motor before motor antenna setting. • LNB Frequency 1. Select LNB Frequency using the button. 2. If the required value does not exist, select User Define and enter the LNB frequency directly. ** • LNB Voltage 1. Select LNB Voltage using the button. 2. Select one option among Universal, 9750, 10600, 5150, 11475 and User Define using a motor antenna, set the motor type before performing channel search. 1. Motor Antenna When using...
User Manual
Page 76
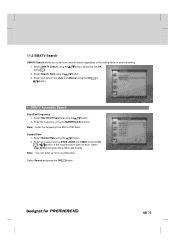
... button. Note: Enter the frequency from Auto and Manual using the button. Note: You can enter up to perform channel search regardless of the setting value in antenna setting. 1. SMATV Automatic Search Start/End Frequency 1. button, and press the OK 2. Select Search Type using the NUMERIC(0-9) buttons. Enter the frequency using the button. 3. Select one option from 950 to 2150 MHz. ** Symbol Rate 1. If the required value does not exist, select User Define and enter the symbol rate directly...
... button. Note: Enter the frequency from Auto and Manual using the button. Note: You can enter up to perform channel search regardless of the setting value in antenna setting. 1. SMATV Automatic Search Start/End Frequency 1. button, and press the OK 2. Select Search Type using the NUMERIC(0-9) buttons. Enter the frequency using the button. 3. Select one option from 950 to 2150 MHz. ** Symbol Rate 1. If the required value does not exist, select User Define and enter the symbol rate directly...

User Manual
Page 78
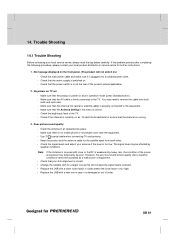
... press the OK button to restore all user configured data will be deleted. 1. You will be prompted to enter your password again before starting to load default setting. ** 11.3 Default Setting Default Setting enables you to restore the product to the factory default. ** Warning: Please note that once you perform Default Setting, all data such as antenna setting information, channel list, and all setting to factory default. When default setting is 0000. ** GB 77 Enter the password to proceed. 6. Select Installation using the button.
... press the OK button to restore all user configured data will be deleted. 1. You will be prompted to enter your password again before starting to load default setting. ** 11.3 Default Setting Default Setting enables you to restore the product to the factory default. ** Warning: Please note that once you perform Default Setting, all data such as antenna setting information, channel list, and all setting to factory default. When default setting is 0000. ** GB 77 Enter the password to proceed. 6. Select Installation using the button.

User Manual
Page 79
... the product. Scheduling operation cannot work during software update. The software update via satellite system will not activate while software update takes place. Caution: • Please be received). GB 78 The equipment must be updated or operate properly after software update. ** 2. Update software when the signal strength quality is simply an alternative method for their products by beaming the latest software versions over the air via a designated antenna system. 3. However, the...
... the product. Scheduling operation cannot work during software update. The software update via satellite system will not activate while software update takes place. Caution: • Please be received). GB 78 The equipment must be updated or operate properly after software update. ** 2. Update software when the signal strength quality is simply an alternative method for their products by beaming the latest software versions over the air via a designated antenna system. 3. However, the...
User Manual
Page 82
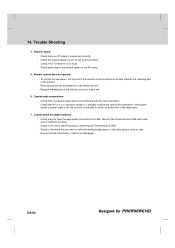
... sound and picture quality due to remove the cable from each other. - Check the main power cable and make sure it is on at the rear of the TV. - Check the signal levels and adjust your local product distributor or service centre for a larger one in operation mode (press Standby button). - No message displayed on .) - Make sure that the antenna line (aerial or satellite cable) is firmly connected to ensure that your local service...
... sound and picture quality due to remove the cable from each other. - Check the main power cable and make sure it is on at the rear of the TV. - Check the signal levels and adjust your local product distributor or service centre for a larger one in operation mode (press Standby button). - No message displayed on .) - Make sure that the antenna line (aerial or satellite cable) is firmly connected to ensure that your local service...
User Manual
Page 83
... the power switch or power outlet is connected correctly. - Check in the remote control for a new set and the product. - No/poor sound - Check that you wish to switch on mute. - Check audio type or soundtrack option in the remote control. - Cannot make sure it initializes correctly. - Reinsert the Smartcard and CAM and make reservations. - To control the equipment, the top end of the remote control should point directly towards the receiving part...
... the power switch or power outlet is connected correctly. - Check in the remote control for a new set and the product. - No/poor sound - Check that you wish to switch on mute. - Check audio type or soundtrack option in the remote control. - Cannot make sure it initializes correctly. - Reinsert the Smartcard and CAM and make reservations. - To control the equipment, the top end of the remote control should point directly towards the receiving part...
User Manual
Page 84
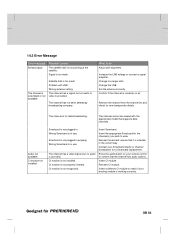
... the appropriate model that supports data channels. What to a larger dish. Change to do Adjust dish alignment. Change the LNB. Set the antenna correctly. Confirm if the channel is currently on your remote control to confirm that it is in properly. Remove the channel from the channel list and check for data broadcasting. CI module not installed. Wrong Smartcard is inserted in the correct way. Press the audio button on air. Insert a different...
... the appropriate model that supports data channels. What to a larger dish. Change to do Adjust dish alignment. Change the LNB. Set the antenna correctly. Confirm if the channel is currently on your remote control to confirm that it is in properly. Remove the channel from the channel list and check for data broadcasting. CI module not installed. Wrong Smartcard is inserted in the correct way. Press the audio button on air. Insert a different...
User Manual
Page 88
... products. ** LNB (Low Noise Block) A device that supports standard, enhanced, or high-definition video, plus multi-channel digital audio on each program. GB 87 Sometimes it is an application used to configure monitor or TV settings. Glossary ** DiSEqC (Digital Satellite Equipment Control) A DiSEqC compatible product relies on a switching box which is mounted on an arm facing your satellite dish, focusing on and off. This is sent and updated by the channel broadcaster. ** Frequency The...
... products. ** LNB (Low Noise Block) A device that supports standard, enhanced, or high-definition video, plus multi-channel digital audio on each program. GB 87 Sometimes it is an application used to configure monitor or TV settings. Glossary ** DiSEqC (Digital Satellite Equipment Control) A DiSEqC compatible product relies on a switching box which is mounted on an arm facing your satellite dish, focusing on and off. This is sent and updated by the channel broadcaster. ** Frequency The...


