

User Manual
Page 1
HD Digital Receiver User's Manual The default password is 0000.
HD Digital Receiver User's Manual The default password is 0000.
User Manual
Page 11
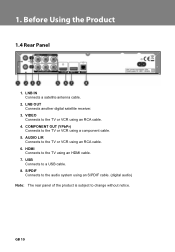
VIDEO Connects to the TV or VCR using an RCA cable. 4. COMPONENT OUT (YPbPr) Connects to the TV or VCR using a component cable. 5. AUDIO L/R Connects to change without notice. S/PDIF Connects to the audio system using an S/PDIF cable. (digital audio) ** Note: The rear panel of the product is subject to the TV or VCR using an HDMI cable. 7. LNB OUT Connects another digital satellite receiver. 3. HDMI Connects to a USB cable. 8. ** 1. USB Connects to the TV using an RCA cable. 6. LNB IN Connects a satellite antenna cable. 2.
VIDEO Connects to the TV or VCR using an RCA cable. 4. COMPONENT OUT (YPbPr) Connects to the TV or VCR using a component cable. 5. AUDIO L/R Connects to change without notice. S/PDIF Connects to the audio system using an S/PDIF cable. (digital audio) ** Note: The rear panel of the product is subject to the TV or VCR using an HDMI cable. 7. LNB OUT Connects another digital satellite receiver. 3. HDMI Connects to a USB cable. 8. ** 1. USB Connects to the TV using an RCA cable. 6. LNB IN Connects a satellite antenna cable. 2.
User Manual
Page 14
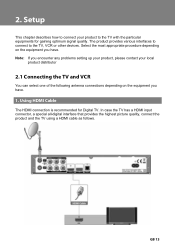
... procedure depending on the equipment you have. ** Note: If you have. In case the TV has a HDMI input connector, a special all-digital interface that provides the highest picture quality, connect the product and the TV using a HDMI cable as follows. The product provides various interfaces to ...connect to the TV with the particular equipments for Digital TV. The HDMI connection is recommended for gaining optimum signal quality. This chapter describes how to connect your local product distributor You can...
... procedure depending on the equipment you have. ** Note: If you have. In case the TV has a HDMI input connector, a special all-digital interface that provides the highest picture quality, connect the product and the TV using a HDMI cable as follows. The product provides various interfaces to ...connect to the TV with the particular equipments for Digital TV. The HDMI connection is recommended for gaining optimum signal quality. This chapter describes how to connect your local product distributor You can...
User Manual
Page 15
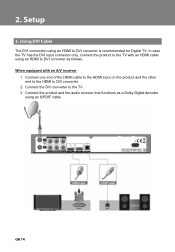
The DVI connection using an HDMI to DVI converter. 2. Connect one end of the HDMI cable to the HDMI input on the product and the other end to the HDMI to DVI converter is recommended for Digital TV. Connect the DVI converter to DVI converter as a Dolby Digital decoder using an HDMI to the TV. 3. When equipped with an HDMI cable using an S/PDIF cable. In case the TV has the DVI input connector only, connect the product to the TV with an A/V receiver 1. Connect the product and the audio receiver that functions as follows.
The DVI connection using an HDMI to DVI converter. 2. Connect one end of the HDMI cable to the HDMI input on the product and the other end to the HDMI to DVI converter is recommended for Digital TV. Connect the DVI converter to DVI converter as a Dolby Digital decoder using an HDMI to the TV. 3. When equipped with an HDMI cable using an S/PDIF cable. In case the TV has the DVI input connector only, connect the product to the TV with an A/V receiver 1. Connect the product and the audio receiver that functions as follows.

User Manual
Page 17
Connect the product and the TV using a component cable as a Dolby Digital decoder using an RCA cable (Audio L/R). • 1-2 Connect the product and the audio receiver that functions as follows. You can either: • 1-1 Connect the product and the TV using an S/PDIF cable. ** The component connection is recommended for Digital TV.
Connect the product and the TV using a component cable as a Dolby Digital decoder using an RCA cable (Audio L/R). • 1-2 Connect the product and the audio receiver that functions as follows. You can either: • 1-1 Connect the product and the TV using an S/PDIF cable. ** The component connection is recommended for Digital TV.
User Manual
Page 27
Age Limit, Change Password, Installation Lock Menu Language, Subtitle Display, Subtitle Font Country, GMT Offset, Daylight Saving Time, Power ON, Power On Channel, Power OFF Audio Output, Dolby Digital Auto Selection, Lip-Sync, Screen Ratio, Display Format, Letter and Pillar Box Colour Info Display Time, OSD Transparency In this chapter you can set parental control, language setting, time setting, A/V setting and other configuration items to keep limitations where you want them for the viewers.
Age Limit, Change Password, Installation Lock Menu Language, Subtitle Display, Subtitle Font Country, GMT Offset, Daylight Saving Time, Power ON, Power On Channel, Power OFF Audio Output, Dolby Digital Auto Selection, Lip-Sync, Screen Ratio, Display Format, Letter and Pillar Box Colour Info Display Time, OSD Transparency In this chapter you can set parental control, language setting, time setting, A/V setting and other configuration items to keep limitations where you want them for the viewers.

User Manual
Page 36
Memory Flash Memory RAM EEPROM Audio/Video/Data In/Out Video Audio Data Port USB Power Supply Input Voltage Type Power Consumption Protection Physical Speci cation Size Weight (Net) Operating Temp Storage Humidity 16MB 128MB 8KB RCA-Type(CVBS), YPbPr(RCA), HDMI Audio L/R, S/PDIF(Digital Audio Output) USB 2.0 Host (5 V 100mA Max.) AC 90-250V a.c., 50/60Hz SMPS Max. 32W Separate internal fuse. The input should be protected against lightning. 280mm × 45mm × 200mm 1.5Kg 0 ºC to +45 ºC -10 ºC to +70 ºC
Memory Flash Memory RAM EEPROM Audio/Video/Data In/Out Video Audio Data Port USB Power Supply Input Voltage Type Power Consumption Protection Physical Speci cation Size Weight (Net) Operating Temp Storage Humidity 16MB 128MB 8KB RCA-Type(CVBS), YPbPr(RCA), HDMI Audio L/R, S/PDIF(Digital Audio Output) USB 2.0 Host (5 V 100mA Max.) AC 90-250V a.c., 50/60Hz SMPS Max. 32W Separate internal fuse. The input should be protected against lightning. 280mm × 45mm × 200mm 1.5Kg 0 ºC to +45 ºC -10 ºC to +70 ºC


