
User Manual
Page 3
... important instructions accompanying the product. Notice ** Read this manual carefully and make the user aware of possible problems and information of any importance to help the user to understand, to use . ** Warnings, Cautions and Notes Throughout the whole manual, pay special attention to the following marks that presents a risk of electric shock, do not remove cover (or back). No user serviceable parts inside...
... important instructions accompanying the product. Notice ** Read this manual carefully and make the user aware of possible problems and information of any importance to help the user to understand, to use . ** Warnings, Cautions and Notes Throughout the whole manual, pay special attention to the following marks that presents a risk of electric shock, do not remove cover (or back). No user serviceable parts inside...
User Manual
Page 6
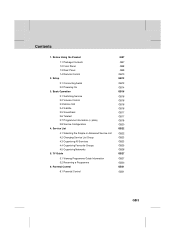
...) 3.8 Service Configuration 4. Setup 2.1 Connecting Aerial 2.2 Powering On 3. Basic Operation 3.1 Switching Service 3.2 Volume Control 3.3 Motion Still 3.4 Subtitle 3.5 Soundtrack 3.6 Teletext 3.7 Programme Information (i- Parental Control 6.1 Parental Control GB7 ** GB7 GB8 GB9 GB10 GB12 ** GB12 GB14 GB16 ** GB16 GB16 GB16 GB16 GB17 GB17 GB18 GB20 GB22 ** GB22 GB23 GB23 GB25 GB26 GB27 ** GB27 GB30 GB31 ** GB31 GB 5 TV Guide 5.1 Viewing Programme Guide Information 5.2 Reserving a Programme 6. Service List 4.1 Selecting the Simple or Advanced Service List 4.2 Changing Service List...
...) 3.8 Service Configuration 4. Setup 2.1 Connecting Aerial 2.2 Powering On 3. Basic Operation 3.1 Switching Service 3.2 Volume Control 3.3 Motion Still 3.4 Subtitle 3.5 Soundtrack 3.6 Teletext 3.7 Programme Information (i- Parental Control 6.1 Parental Control GB7 ** GB7 GB8 GB9 GB10 GB12 ** GB12 GB14 GB16 ** GB16 GB16 GB16 GB16 GB17 GB17 GB18 GB20 GB22 ** GB22 GB23 GB23 GB25 GB26 GB27 ** GB27 GB30 GB31 ** GB31 GB 5 TV Guide 5.1 Viewing Programme Guide Information 5.2 Reserving a Programme 6. Service List 4.1 Selecting the Simple or Advanced Service List 4.2 Changing Service List...

User Manual
Page 10
AUDIO L/R ** Connects to your TV or VCR and output video signals. ** 5. VIDEO ** Connects to your TV or VCR. ** 3. RS-232 C ** Connects to your TV or VCR and output audio signals. ** 4. TV / VCR ** Connects a RF signal from the product to update software. GB 9 ** 1.3 Rear Panel ** 1. ANTENNA IN ** Connects a aerial to a ANTENNA input jack on your PC to RF(ANT) input jack on the product. ** 2.
AUDIO L/R ** Connects to your TV or VCR and output video signals. ** 5. VIDEO ** Connects to your TV or VCR. ** 3. RS-232 C ** Connects to your TV or VCR and output audio signals. ** 4. TV / VCR ** Connects a RF signal from the product to update software. GB 9 ** 1.3 Rear Panel ** 1. ANTENNA IN ** Connects a aerial to a ANTENNA input jack on your PC to RF(ANT) input jack on the product. ** 2.
User Manual
Page 12
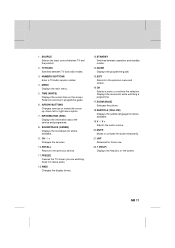
...the previous menu and screen. ** 16.OK ** Selects a menu or confirms the selection. INFORMATION (RED) ** Displays the information about the service and programme. ** 8. Reserves services in programme guide. ** 6. ARROW BUTTONS ** Changes services or moves the cursor up, down, left or right menu option. ** 7. NUMERIC BUTTONS ** Enter a TV/radio service number. ** 4. Displays the service list while watching a programme. ** 17.ZOOM (BLUE) ** Enlarges the picture. ** 18.SUBTITLE (YELLOW) ** Displays the subtitle language list where available. ** 19.V - / V + ** Adjusts the audio volume...
...the previous menu and screen. ** 16.OK ** Selects a menu or confirms the selection. INFORMATION (RED) ** Displays the information about the service and programme. ** 8. Reserves services in programme guide. ** 6. ARROW BUTTONS ** Changes services or moves the cursor up, down, left or right menu option. ** 7. NUMERIC BUTTONS ** Enter a TV/radio service number. ** 4. Displays the service list while watching a programme. ** 17.ZOOM (BLUE) ** Enlarges the picture. ** 18.SUBTITLE (YELLOW) ** Displays the subtitle language list where available. ** 19.V - / V + ** Adjusts the audio volume...
User Manual
Page 17
...: You can switch the current service using the service list or programme guide. Basic Operation ** This chapter describes functions such as switching service, volume control and basic features for watching programmes. 3.1 Switching Service You can select a default subtitle language in MENU-Installation-System Setting-Language Setting-Subtitle Language. Press the CH-/CH+ or button. 2. Enter the service number using the button and press the OK button. Press the TV/RADIO button to the previous service. Service List and 5. Press the V-/V+ 2. button to pause...
...: You can switch the current service using the service list or programme guide. Basic Operation ** This chapter describes functions such as switching service, volume control and basic features for watching programmes. 3.1 Switching Service You can select a default subtitle language in MENU-Installation-System Setting-Language Setting-Subtitle Language. Press the CH-/CH+ or button. 2. Enter the service number using the button and press the OK button. Press the TV/RADIO button to the previous service. Service List and 5. Press the V-/V+ 2. button to pause...
User Manual
Page 18
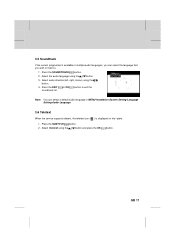
... to listen to exit the soundtrack list. Select Teletext using the button. 3. Press the SUBTITLE button. ) is available in multiple audio languages, you can select a default audio language in MENU-Installation-System Setting-Language Setting-Audio Language. ** 3.6 Teletext When the service supports teletext, the teletext icon ( ** 1. ** 3.5 Soundtrack If the current programme is displayed on the i-plate. 2. Select audio direction(left, right, stereo) using the button. 4. Press the EXIT or OK button to . 1. GB...
... to listen to exit the soundtrack list. Select Teletext using the button. 3. Press the SUBTITLE button. ) is available in multiple audio languages, you can select a default audio language in MENU-Installation-System Setting-Language Setting-Audio Language. ** 3.6 Teletext When the service supports teletext, the teletext icon ( ** 1. ** 3.5 Soundtrack If the current programme is displayed on the i-plate. 2. Select audio direction(left, right, stereo) using the button. 4. Press the EXIT or OK button to . 1. GB...

User Manual
Page 21
... Operation ** 3.8 Service Configuration You can add a service to watch a programme. Select Simple or Advanced using the button. 4. Also, you must enter the PIN code to multiple Favourite groups. ** 1. Locking/Unlocking a Service You can add current service to display the service list. 4. button and press 3. Press the MENU to display the service configuration when the service list is displayed. ** Note: • Press the OK button while watching a programme to exit the service configuration screen. 1. Then the following functions in the service configuration list...
... Operation ** 3.8 Service Configuration You can add a service to watch a programme. Select Simple or Advanced using the button. 4. Also, you must enter the PIN code to multiple Favourite groups. ** 1. Locking/Unlocking a Service You can add current service to display the service list. 4. button and press 3. Press the MENU to display the service configuration when the service list is displayed. ** Note: • Press the OK button while watching a programme to exit the service configuration screen. 1. Then the following functions in the service configuration list...
User Manual
Page 23
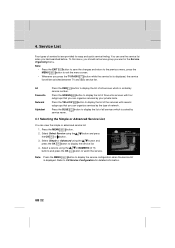
Service List ** Four types of service list are provided for detailed information. button to display the list of network. Note: Press the MENU button to 3.8 Service Configuration for easy and quick service finding. Refer to display the service configuration when the service list is sorted by your private taste. Note: • Press the EXIT button to save the changes and return to the previous menu, press the MENU button to display the service list. 4. Press the MENU button. 2. button and press 3. Select a service using the...
Service List ** Four types of service list are provided for detailed information. button to display the list of network. Note: Press the MENU button to 3.8 Service Configuration for easy and quick service finding. Refer to display the service configuration when the service list is sorted by your private taste. Note: • Press the EXIT button to save the changes and return to the previous menu, press the MENU button to display the service list. 4. Press the MENU button. 2. button and press 3. Select a service using the...

User Manual
Page 28
... CH-/CH+ button and press the OK button. 3. GB 27 Press the GUIDE button or select the TV Guide main on the now, next or weekly mode. 5.1 Viewing Programme Guide Information You can view the programme information for desired service list by now or next time. 1. 5. Note: Press the GUIDE button to display the programme list for selected service is displayed. TV Guide ** The TV guide displays the programme information. Press the GREEN button to exit the guide screen.
... CH-/CH+ button and press the OK button. 3. GB 27 Press the GUIDE button or select the TV Guide main on the now, next or weekly mode. 5.1 Viewing Programme Guide Information You can view the programme information for desired service list by now or next time. 1. 5. Note: Press the GUIDE button to display the programme list for selected service is displayed. TV Guide ** The TV guide displays the programme information. Press the GREEN button to exit the guide screen.

User Manual
Page 33
...+ ) This programme contains the strong violent contents. Select Old PIN Code using the button and enter a PIN code using the button. 2. Therefore, programmes are blocked for children under the age of 18. P (Pre-school) This programme is no block All programmes can change the current PIN code into new one. 1. Parental Control ** 1. no age limitation. M (Mature Audience 15+) Programmes are blocked without considering the age level. C (Children's) This programme...
...+ ) This programme contains the strong violent contents. Select Old PIN Code using the button and enter a PIN code using the button. 2. Therefore, programmes are blocked for children under the age of 18. P (Pre-school) This programme is no block All programmes can change the current PIN code into new one. 1. Parental Control ** 1. no age limitation. M (Mature Audience 15+) Programmes are blocked without considering the age level. C (Children's) This programme...

User Manual
Page 34
... can set the language for menu, audio and subtitle. 1. button and press the OK 1. Select a language using the OK button. Press the MENU button. 2. button and press the GB 33 7. button and press the 3. Press the button to your preference. 1. Select an item using the the OK button. Installation ** 7.1 System Setting You can set the system according to display the available language list. 3. Select System Setting using the button. Select Menu/Audio/Subtitle Language using the button. 2.
... can set the language for menu, audio and subtitle. 1. button and press the OK 1. Select a language using the OK button. Press the MENU button. 2. button and press the GB 33 7. button and press the 3. Press the button to your preference. 1. Select an item using the the OK button. Installation ** 7.1 System Setting You can set the system according to display the available language list. 3. Select System Setting using the button. Select Menu/Audio/Subtitle Language using the button. 2.

User Manual
Page 35
... 1 hour. Select Disabled not to set the Wakeup Time. ** • Wakeup Service No. Select Current Time/Region/Wakeup Time/Wakeup Service No./Sleep Time using the standardized information of the current service. GB 34 The best way is set automatically whenever GMT offset changes. ** • Region You can set the service number when the product is automatically powered off. Select Disabled not to set the Sleep Time. Installation ** 2. 7. The current time is what...
... 1 hour. Select Disabled not to set the Wakeup Time. ** • Wakeup Service No. Select Current Time/Region/Wakeup Time/Wakeup Service No./Sleep Time using the standardized information of the current service. GB 34 The best way is set automatically whenever GMT offset changes. ** • Region You can set the service number when the product is automatically powered off. Select Disabled not to set the Sleep Time. Installation ** 2. 7. The current time is what...

User Manual
Page 36
Select Audio Output/Screen Mode/Display Format using the button. 2. Press the button to set each item. ** • Audio Output Set the audio mode which is set to 16:9 , you can select one option among 16:9 Letter-box, 14:9 Letter-box and 4:3 Center. Select 4:3 or 16:9. ** • Display Format You can set the aspect ratio of your TV which is set audio or video output. 1. If the screen mode is output from Pillar-box and Full. GB 35 A/V Output Setting You can set to...
Select Audio Output/Screen Mode/Display Format using the button. 2. Press the button to set each item. ** • Audio Output Set the audio mode which is set to 16:9 , you can select one option among 16:9 Letter-box, 14:9 Letter-box and 4:3 Center. Select 4:3 or 16:9. ** • Display Format You can set the aspect ratio of your TV which is set audio or video output. 1. If the screen mode is output from Pillar-box and Full. GB 35 A/V Output Setting You can set to...

User Manual
Page 37
... you switch the service. ** • Changing to reserved service. A message display in the screen. Box Display Time/Changing to keep viewing the current service. Select one option from Auto and Manual mode for changing to Reserved Service Select one option among Opaque, 25, 50, 75 and Transparent. GB 36 Box Display Time You can set the duration during which the information box is more transparent. Press the OK button to view the reserved service or press the EXIT button to Reserved Service using the button. 2. Installation ** 4.
... you switch the service. ** • Changing to reserved service. A message display in the screen. Box Display Time/Changing to keep viewing the current service. Select one option from Auto and Manual mode for changing to Reserved Service Select one option among Opaque, 25, 50, 75 and Transparent. GB 36 Box Display Time You can set the duration during which the information box is more transparent. Press the OK button to view the reserved service or press the EXIT button to Reserved Service using the button. 2. Installation ** 4.

User Manual
Page 38
... start or end channel number. 3. Select Channel/Frequency/Mode/Guard Interval or Network Search using the button. 2. button and press the 3. button and 4. Automatic Search If the product is connected to ask PIN code, enter the PIN code using the OK button. Custom Search You can automatically search services without entering any other information. 1. The default PIN code is displayed to the aerial and television, you can search services manually by searching parameters, if you know the service information. ** 7.2 Service Searching 1. Select Installation using...
... start or end channel number. 3. Select Channel/Frequency/Mode/Guard Interval or Network Search using the button. 2. button and press the 3. button and 4. Automatic Search If the product is connected to ask PIN code, enter the PIN code using the OK button. Custom Search You can automatically search services without entering any other information. 1. The default PIN code is displayed to the aerial and television, you can search services manually by searching parameters, if you know the service information. ** 7.2 Service Searching 1. Select Installation using...

User Manual
Page 40
... the most up-to pull out the signal line (co-axial cable) during software update. Update software when the signal strength and quality is not equipped, the product may not be updated or operate properly after software update. ** 2. If the power is a standard for their products by beaming the latest software versions over the air via aerial will not activate while software update takes place. • It may be...
... the most up-to pull out the signal line (co-axial cable) during software update. Update software when the signal strength and quality is not equipped, the product may not be updated or operate properly after software update. ** 2. If the power is a standard for their products by beaming the latest software versions over the air via aerial will not activate while software update takes place. • It may be...

User Manual
Page 41
... PIN code, enter the PIN code using the OK button. Press the MENU button. 2. Select Installation using the button. Select Channel/Frequency/Mode/Guard Interval and press the OK software. Note: How to setting parameters in Custom Search. When prompting message is displayed to set parameters in STB Upgrade is completed. A message will display and press the OK button to return to the STB upgrade menu. 8. Select STB Upgrade using the NUMERIC (0~9) buttons. The default PIN code is displayed whether or not new software exist. Please wait until the upgraded...
... PIN code, enter the PIN code using the OK button. Press the MENU button. 2. Select Installation using the button. Select Channel/Frequency/Mode/Guard Interval and press the OK software. Note: How to setting parameters in Custom Search. When prompting message is displayed to set parameters in STB Upgrade is completed. A message will display and press the OK button to return to the STB upgrade menu. 8. Select STB Upgrade using the NUMERIC (0~9) buttons. The default PIN code is displayed whether or not new software exist. Please wait until the upgraded...

User Manual
Page 42
... product into your computer. 3. Power On/Off to start operating. ** GB 41 Download new software file equivalent for this product with RS-232C serial cable. 4. Execute the installed download tool and then follow the instructions of download tool. 5. Follow these steps to download new software from the PC. ** 8.2 Software Update from PC You can connect the product to the PC directly and upgrade your software by transferring the new software from PC. 1.
... product into your computer. 3. Power On/Off to start operating. ** GB 41 Download new software file equivalent for this product with RS-232C serial cable. 4. Execute the installed download tool and then follow the instructions of download tool. 5. Follow these steps to download new software from the PC. ** 8.2 Software Update from PC You can connect the product to the PC directly and upgrade your software by transferring the new software from PC. 1.
User Manual
Page 47
... 46 Check if the service is connected correctly. - Install the antenna in the remote control. - Check audio type or soundtrack option in external input mode. 3. No message displayed on the front panel. (The product will not switch on TV set - To control the product, the top end of the remote control should point directly towards the receiving part of the TV. - Make sure that the service is in the AV menu. 5. Use the appropriate antenna capable of the...
... 46 Check if the service is connected correctly. - Install the antenna in the remote control. - Check audio type or soundtrack option in external input mode. 3. No message displayed on the front panel. (The product will not switch on TV set - To control the product, the top end of the remote control should point directly towards the receiving part of the TV. - Make sure that the service is in the AV menu. 5. Use the appropriate antenna capable of the...
User Manual
Page 51
... of the software for their products. ** Service A channel to which a receiver or TV is tuned to. ** Signal Strength An on-screen graphic menu that displays how strong the digital signal you are receiving is shrunk to fit the screen, leaving blank space on the top and bottom. ** OSD (On Screen Display) OSD displays the basic information necessary for the users to configure monitor or TV settings. To connect a two devices cable will...
... of the software for their products. ** Service A channel to which a receiver or TV is tuned to. ** Signal Strength An on-screen graphic menu that displays how strong the digital signal you are receiving is shrunk to fit the screen, leaving blank space on the top and bottom. ** OSD (On Screen Display) OSD displays the basic information necessary for the users to configure monitor or TV settings. To connect a two devices cable will...


