
User Manual
Page 2
... install, use and to maintain the installation. ** Copyright © 2005 HUMAX Corporation ** Not to be able to change without HUMAX's prior consent in writing except approval of ownership of copyright and copyright law. ** The information in this user manual next to your product for purchasing a HUMAX Digital Satellite Receiver. Throughout the whole manual, Note mark indicates additional information of operating product to make the user aware of possible problems...
... install, use and to maintain the installation. ** Copyright © 2005 HUMAX Corporation ** Not to be able to change without HUMAX's prior consent in writing except approval of ownership of copyright and copyright law. ** The information in this user manual next to your product for purchasing a HUMAX Digital Satellite Receiver. Throughout the whole manual, Note mark indicates additional information of operating product to make the user aware of possible problems...
User Manual
Page 4
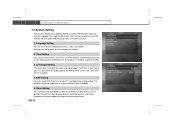
** 1. Setup 2.1 Connecting Antenna/TV 2.2 Connecting Hi-Fi System 2.3 Powering On 3. Before Using the Product 1.1 Package Contents 1.2 Front Panel 1.3 Rear Panel 1.4 Remote Controller 2. Installation 3.1 Selecting Language 3.2 Searching Services 3.3 Default Setting 4. Basic Operation 4.1 Viewing Programme 4.2 Changing Language 4.3 Teletext 4.4 Setting Property of Service GB5 ** GB5 GB6 GB7 GB8 GB10 ** GB10 GB11 GB12 GB13 ** GB13 GB13 GB20 GB21 ** GB21 GB22 GB22 GB23 GB 3
** 1. Setup 2.1 Connecting Antenna/TV 2.2 Connecting Hi-Fi System 2.3 Powering On 3. Before Using the Product 1.1 Package Contents 1.2 Front Panel 1.3 Rear Panel 1.4 Remote Controller 2. Installation 3.1 Selecting Language 3.2 Searching Services 3.3 Default Setting 4. Basic Operation 4.1 Viewing Programme 4.2 Changing Language 4.3 Teletext 4.4 Setting Property of Service GB5 ** GB5 GB6 GB7 GB8 GB10 ** GB10 GB11 GB12 GB13 ** GB13 GB13 GB20 GB21 ** GB21 GB22 GB22 GB23 GB 3

User Manual
Page 8
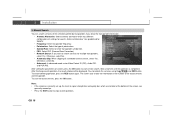
RF IN ** Connect a general aerial antenna with the cable jacks to the RF input jack on your TV. ** 7. RF OUT ** Connect a RF signal from the product to your TV or VCR and output Audio signals. ** 5. GB 7 RS-232C ** Connects to your PC to your TV or VCR and output Video signals. ** 6. ** 1.3 Rear Panel ** ** 1. AUDIO L/R ** Connects to update product's software programme. ** 4. LNB OUT ** Connect other digital satellite receiver. ** 3. LNB IN ** Connects a satellite antenna cable. ** 2. VIDEO ** Connects to RF input jack on the product.
RF IN ** Connect a general aerial antenna with the cable jacks to the RF input jack on your TV. ** 7. RF OUT ** Connect a RF signal from the product to your TV or VCR and output Audio signals. ** 5. GB 7 RS-232C ** Connects to your PC to your TV or VCR and output Video signals. ** 6. ** 1.3 Rear Panel ** ** 1. AUDIO L/R ** Connects to update product's software programme. ** 4. LNB OUT ** Connect other digital satellite receiver. ** 3. LNB IN ** Connects a satellite antenna cable. ** 2. VIDEO ** Connects to RF input jack on the product.

User Manual
Page 9
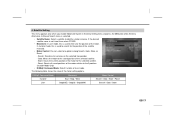
...MENU ** Displays the main menu. ** 5. WHITE ** Displays the current time on the screen. i (INFORMATION) - ** 1.4 Remote Controller GB 8 1. ARROW BUTTONS ** Change services or move the cursor to 7.2 System Setting. ** 6. TIME - GREEN ** Displays the soundtrack list where available. SOURCE ** Selects the input source between TV and Radio modes. ** 3. To set the current time, refer to the up, down, left or right menu option. ** 7. RED ** Displays the information about the service and programme. ** 8. NUMERICAL BUTTONS ** Enters a TV/Radio service number or menu option number...
...MENU ** Displays the main menu. ** 5. WHITE ** Displays the current time on the screen. i (INFORMATION) - ** 1.4 Remote Controller GB 8 1. ARROW BUTTONS ** Change services or move the cursor to 7.2 System Setting. ** 6. TIME - GREEN ** Displays the soundtrack list where available. SOURCE ** Selects the input source between TV and Radio modes. ** 3. To set the current time, refer to the up, down, left or right menu option. ** 7. RED ** Displays the information about the service and programme. ** 8. NUMERICAL BUTTONS ** Enters a TV/Radio service number or menu option number...

User Manual
Page 10
** 9. Play the audio continuously. ** 12. STANDBY ** Switches between Operation and Standby modes. ** 14. That is, volumes on the screen. FREEZE ** Freezes the TV screen you are watching. EXIT ** Returns to the previous screen. ** 11. Displays the service list during watching a programme. 17. BLUE ** Enlarges the picture. ** 18. GB 9 WIDE ** Changes the Display Format. ** 13. GUIDE ** Displays the Programme Guide. ** 15. V - / V + ** Adjusts the audio volume. ** 20. UHF ** Displays the UHF menu. ** 22. ? (HELP) ** Displays the Property of Service. ** ** COLOUR...
** 9. Play the audio continuously. ** 12. STANDBY ** Switches between Operation and Standby modes. ** 14. That is, volumes on the screen. FREEZE ** Freezes the TV screen you are watching. EXIT ** Returns to the previous screen. ** 11. Displays the service list during watching a programme. 17. BLUE ** Enlarges the picture. ** 18. GB 9 WIDE ** Changes the Display Format. ** 13. GUIDE ** Displays the Programme Guide. ** 15. V - / V + ** Adjusts the audio volume. ** 20. UHF ** Displays the UHF menu. ** 22. ? (HELP) ** Displays the Property of Service. ** ** COLOUR...

User Manual
Page 11
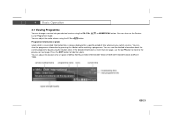
.... Connect AUDIO L/R on the product to AUDIO IN L/R on the product. 2. Connect an Antenna to LNB IN on the TV using the RCA cable. 3. GB 10 ** This chapter describes how to set up the product, please contact your case. Note: If you must disconnect all the equipment from their power sources. Connect VIDEO on the product to VIDEO IN on your local product distributor. 2.1 Connecting Antenna...
.... Connect AUDIO L/R on the product to AUDIO IN L/R on the product. 2. Connect an Antenna to LNB IN on the TV using the RCA cable. 3. GB 10 ** This chapter describes how to set up the product, please contact your case. Note: If you must disconnect all the equipment from their power sources. Connect VIDEO on the product to VIDEO IN on your local product distributor. 2.1 Connecting Antenna...

User Manual
Page 14
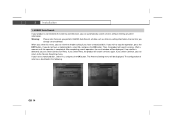
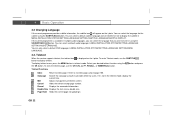
...menu screen. You can easily navigate the menu using the following procedure is HUMAX Auto Search. Select your Pin Code using the NUMERICAL button. Note: Some menu items are access controlled. Press the MENU button to enter the Pin Code. The default Pin Code is automatically displayed. Select your product for the first time after purchasing, the Selecting Language screen is set to the sub-menu. 4. GB 13 For information about it, refer to 3.2 Searching Services. 3.2 Searching Services To search services, go to Service Searching menu (MENU-INSTALLATION-SERVICE SEARCHING...
...menu screen. You can easily navigate the menu using the following procedure is HUMAX Auto Search. Select your Pin Code using the NUMERICAL button. Note: Some menu items are access controlled. Press the MENU button to enter the Pin Code. The default Pin Code is automatically displayed. Select your product for the first time after purchasing, the Selecting Language screen is set to the sub-menu. 4. GB 13 For information about it, refer to 3.2 Searching Services. 3.2 Searching Services To search services, go to Service Searching menu (MENU-INSTALLATION-SERVICE SEARCHING...
User Manual
Page 15
... as Antenna setting information channel lists you have a motorized dish, select Yes, and press the OK button. If no satellite is connected to the antenna and television, you can view the window asking if you have a motorized dish, select No, and press the OK button. HUMAX Auto Search If your product is detected, you can return to stop the operation, press the EXIT button. If you can automatically search services without entering...
... as Antenna setting information channel lists you have a motorized dish, select Yes, and press the OK button. If no satellite is connected to the antenna and television, you can view the window asking if you have a motorized dish, select No, and press the OK button. HUMAX Auto Search If your product is detected, you can return to stop the operation, press the EXIT button. If you can automatically search services without entering...
User Manual
Page 16
... are using DiSEqC (Digital Satellite Equipment Control) switch to connect multiple antennas or LNBs, select DiSEqC input to connect to search services. ** • Antenna Alternative: Select antenna alternative which has different combinations of the LNB. • 22KHz Tone: When using the 22HKz tone switch, select Enabled. When Motorised System is set antenna and LNB information to antenna or LNB. • Motorised System: When using the keyboard displayed on the screen. • LNB Frequency: Select the L.O (Local Oscillator) Frequency of settings for...
... are using DiSEqC (Digital Satellite Equipment Control) switch to connect multiple antennas or LNBs, select DiSEqC input to connect to search services. ** • Antenna Alternative: Select antenna alternative which has different combinations of the LNB. • 22KHz Tone: When using the 22HKz tone switch, select Enabled. When Motorised System is set antenna and LNB information to antenna or LNB. • Motorised System: When using the keyboard displayed on the screen. • LNB Frequency: Select the L.O (Local Oscillator) Frequency of settings for...
User Manual
Page 17
.... • Press the EXIT button to start service search. GB 16 ** 3. Otherwise, select No. • Advanced: In advanced mode, enter Video Packet ID (PID), Audio PID, and PCR PID. Otherwise, select No. • Automatic Skip: When skipping all scrambled service search, select Yes. The screen also shows the information of the number of the found services, press the OK button. ** Note: • If the antenna is correctly set up, the level...
.... • Press the EXIT button to start service search. GB 16 ** 3. Otherwise, select No. • Advanced: In advanced mode, enter Video Packet ID (PID), Audio PID, and PCR PID. Otherwise, select No. • Automatic Skip: When skipping all scrambled service search, select Yes. The screen also shows the information of the number of the found services, press the OK button. ** Note: • If the antenna is correctly set up, the level...
User Manual
Page 18
... enable Motorised System in Antenna Setting menu and press the OK button while Antenna Alternative in Manual Search menu is used to search for the position of the motor. Reset: Resets all saved positions of the motor setting options. ** DiSEqC Command Mode Movement Motor Control Installer East / Stop / West Search / Goto / Store / Reset User Stop(60E) ~Stop(0) ~Stop(60W) Search / Goto / Store GB 17 ** 4. The following table shows the value of the...
... enable Motorised System in Antenna Setting menu and press the OK button while Antenna Alternative in Manual Search menu is used to search for the position of the motor. Reset: Resets all saved positions of the motor setting options. ** DiSEqC Command Mode Movement Motor Control Installer East / Stop / West Search / Goto / Store / Reset User Stop(60E) ~Stop(0) ~Stop(60W) Search / Goto / Store GB 17 ** 4. The following table shows the value of the...

User Manual
Page 19
... the best position of the dish. The level of signal strength and quality bar at the Motor Antenna, set DiSEqC Command Mode to Installer, set the maximum for each satellite manually, select your desired value. You can save the position. ** To initialise satellite position saved at the bottom of the screen will see a warning message. The motor starts moving. The motor will move...
... the best position of the dish. The level of signal strength and quality bar at the Motor Antenna, set DiSEqC Command Mode to Installer, set the maximum for each satellite manually, select your desired value. You can save the position. ** To initialise satellite position saved at the bottom of the screen will see a warning message. The motor starts moving. The motor will move...

User Manual
Page 21
GB 20 After completing the default setting, the Selecting Language screen will be displayed. ** 3.3 Default Setting You can restore the product to the factory settings except customised password. For more information, refer to 3.1 Selecting Language. ** Warning: Please note that once you perform Default Setting, all data will be restored to the factory settings using the Default Setting menu (MENU-INSTALLATION-DEFAULT SETTING).
GB 20 After completing the default setting, the Selecting Language screen will be displayed. ** 3.3 Default Setting You can restore the product to the factory settings except customised password. For more information, refer to 3.1 Selecting Language. ** Warning: Please note that once you perform Default Setting, all data will be restored to the factory settings using the Default Setting menu (MENU-INSTALLATION-DEFAULT SETTING).
User Manual
Page 22
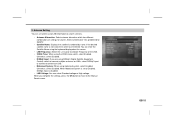
... always displayed for a specific period of i-plate in MENU-INSTALLATION-SYSTEM SETTING-OTHER SETTING-INFO.BOX DISPLAY TIME. ** GB 21 You can also use the button to move to hide the i-plate. You can change a service into your desired service using the V-/V+ or button. ** Programme Information (i-plate) ** i-plate which is also called Information Box is more than one page, use the Service List or Programme Guide. ** 4.1 Viewing Programme You can adjust the duration time of time whenever you switch services.
... always displayed for a specific period of i-plate in MENU-INSTALLATION-SYSTEM SETTING-OTHER SETTING-INFO.BOX DISPLAY TIME. ** GB 21 You can also use the button to move to hide the i-plate. You can change a service into your desired service using the V-/V+ or button. ** Programme Information (i-plate) ** i-plate which is also called Information Box is more than one page, use the Service List or Programme Guide. ** 4.1 Viewing Programme You can adjust the duration time of time whenever you switch services.
User Manual
Page 23
You can select a default audio language in MENU-INSTALLATION-SYSTEM SETTING-LANGUAGE SETTING-SUBTITLE LANGUAGE/SUBTITLE DISPLAY. You can select a default subtitle language and set whether or not to display the subtitle in MENU-INSTALLATION-SYSTEM SETTING-LANGUAGE SETTING-AUDIO LANGUAGE. You can select the language that you wish to index page. To enter Teletext mode, use the CH-/CH+, , RECALL, or NUMERICAL button. ** Teletext Functions ** Index Return to listen in MENU-INSTALLATION-SYSTEM SETTING-LANGUAGE SETTING-MENU LANGUAGE. 4.3. If...
You can select a default audio language in MENU-INSTALLATION-SYSTEM SETTING-LANGUAGE SETTING-SUBTITLE LANGUAGE/SUBTITLE DISPLAY. You can select a default subtitle language and set whether or not to display the subtitle in MENU-INSTALLATION-SYSTEM SETTING-LANGUAGE SETTING-AUDIO LANGUAGE. You can select the language that you wish to index page. To enter Teletext mode, use the CH-/CH+, , RECALL, or NUMERICAL button. ** Teletext Functions ** Index Return to listen in MENU-INSTALLATION-SYSTEM SETTING-LANGUAGE SETTING-MENU LANGUAGE. 4.3. If...

User Manual
Page 24
... the MENU button while the service list is as follows: 1. After setting property of Service You can lock, unlock and skip delete the current service while watching a programme. ** 4.4 Setting Property of a service, press the OK button to save the changes. The operation is displayed. 3. Note: • In case of unlocking a service, you should enter the Pin Code to view the service. • You will not be prompted to enter your desired item (Favourites/Lock or Unlock/Skip/Delete) using...
... the MENU button while the service list is as follows: 1. After setting property of Service You can lock, unlock and skip delete the current service while watching a programme. ** 4.4 Setting Property of a service, press the OK button to save the changes. The operation is displayed. 3. Note: • In case of unlocking a service, you should enter the Pin Code to view the service. • You will not be prompted to enter your desired item (Favourites/Lock or Unlock/Skip/Delete) using...

User Manual
Page 30
.... • Press the YELLOW button to display the reserved programme list. • Press the BLUE button to display the simple Guide. In addition, it . This is also called Quick Guide. ** GB 29 You can navigate the guide using MENU-TV GUIDE. viewing programmes in Now, Next, Weekly, or Quick mode - to search your desired programme and to display the programme list for all services, based on date and time.
.... • Press the YELLOW button to display the reserved programme list. • Press the BLUE button to display the simple Guide. In addition, it . This is also called Quick Guide. ** GB 29 You can navigate the guide using MENU-TV GUIDE. viewing programmes in Now, Next, Weekly, or Quick mode - to search your desired programme and to display the programme list for all services, based on date and time.
User Manual
Page 33
... channel range and frequency change to display the subtitle. 2. And you can set whether or not to the reserved service. GB 32 ** 7.2 System Setting The System Setting menu (MENU-INSTALLATION-SYSTEM SETTING) lets you set the Wakeup time and Sleep time, the product is turned on or off everyday. ** 3. A/V Output Setting This menu lets you set language, time, audio/video output, UHF tuning, transparency of OSD, duration time of i-plate and switching mode to your TV and adjust fine tuning setting...
... channel range and frequency change to display the subtitle. 2. And you can set whether or not to the reserved service. GB 32 ** 7.2 System Setting The System Setting menu (MENU-INSTALLATION-SYSTEM SETTING) lets you set the Wakeup time and Sleep time, the product is turned on or off everyday. ** 3. A/V Output Setting This menu lets you set language, time, audio/video output, UHF tuning, transparency of OSD, duration time of i-plate and switching mode to your TV and adjust fine tuning setting...

User Manual
Page 37
... serial cable. 4. If you to this product model from our website into your computer (http://www.humaxdigital.com). 2. The software update menu allows you would like to download new software from the PC. Follow these steps to update software, select Yes, and press the OK button. Download and install download tool from our website into two ways, automatic detection and using software update menu (MENU-INSTALLATION-STATUS-STB UPGRADE). ** The product cannot work...
... serial cable. 4. If you to this product model from our website into your computer (http://www.humaxdigital.com). 2. The software update menu allows you would like to download new software from the PC. Follow these steps to update software, select Yes, and press the OK button. Download and install download tool from our website into two ways, automatic detection and using software update menu (MENU-INSTALLATION-STATUS-STB UPGRADE). ** The product cannot work...

User Manual
Page 38
... service centre. ** 1. Make sure that the antenna line is off. ** GB 37 Check the volume level of TV. - If the product does not work normally after completing the following instructions. No picture - Check the brightness level of the TV and product. - Make sure there is firmly connected to the TV. - Replace the LNB with the remote controller, its emitting part should directly point towards its receiving part...
... service centre. ** 1. Make sure that the antenna line is off. ** GB 37 Check the volume level of TV. - If the product does not work normally after completing the following instructions. No picture - Check the brightness level of the TV and product. - Make sure there is firmly connected to the TV. - Replace the LNB with the remote controller, its emitting part should directly point towards its receiving part...


