

User Manual
Page 3
... with international safety standards. Use a light damp cloth (no objects filled with SABS 061. ** GB 3 ** ** ** ** ** ** ** EARTHING ** The LNB cable must comply with liquids, such as vase, should not be placed on the marking label. CONNECTION TO THE SATELLITE DISH LNB ** Disconnect the receiver from the mains before connecting or disconnecting the cable from the satellite dish. CONNECTION TO THE TV ** Disconnect the receiver from the mains...
... with international safety standards. Use a light damp cloth (no objects filled with SABS 061. ** GB 3 ** ** ** ** ** ** ** EARTHING ** The LNB cable must comply with liquids, such as vase, should not be placed on the marking label. CONNECTION TO THE SATELLITE DISH LNB ** Disconnect the receiver from the mains before connecting or disconnecting the cable from the satellite dish. CONNECTION TO THE TV ** Disconnect the receiver from the mains...

User Manual
Page 5
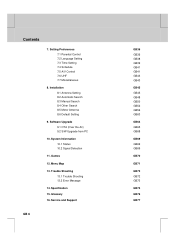
Before Using the Receiver ** 1.1 Package Contents 1.2 Front Panel 1.3 Rear Panel 1.4 Remote Control 2. plate) 4.7 Option List 5. Basic Operation ** ** 4.1 Switching Channel 4.2 Volume Control 4.3 Motion Still 4.4 Change the Subtitle Language 4.5 Change a Audio Language 4.6 Programme Information (I- Channel List ** 5.1 Displaying and Switching Channel List 5.2 Changing Channel List Group 5.3 Edit Channels 5.4 Edit Favourite Channels 5.5 Channel Change Mode 6. Installation Wizard ** 3.1 Language 3.2 Area Setting 3.3 Antenna Setting 3.4 Automatic Search 3.5 Time Setting 4. ...
Before Using the Receiver ** 1.1 Package Contents 1.2 Front Panel 1.3 Rear Panel 1.4 Remote Control 2. plate) 4.7 Option List 5. Basic Operation ** ** 4.1 Switching Channel 4.2 Volume Control 4.3 Motion Still 4.4 Change the Subtitle Language 4.5 Change a Audio Language 4.6 Programme Information (I- Channel List ** 5.1 Displaying and Switching Channel List 5.2 Changing Channel List Group 5.3 Edit Channels 5.4 Edit Favourite Channels 5.5 Channel Change Mode 6. Installation Wizard ** 3.1 Language 3.2 Area Setting 3.3 Antenna Setting 3.4 Automatic Search 3.5 Time Setting 4. ...
User Manual
Page 6
... Air) 9.2 S/W Upgrade from PC 10. Trouble Shooting 13.1 Trouble Shooting 13.2 Error Message 14. Service and Support ** GB 6 ** ** ** ** ** ** GB36 ** GB36 GB38 GB39 GB41 GB41 GB43 GB43 GB45 ** GB45 GB48 GB50 GB52 GB56 GB63 GB64 ** GB65 ** GB68 GB69 ** GB69 GB69 GB70 GB71 GB72 ** GB72 GB73 GB74 GB76 GB77 ** ** ** Games ** 12. Installation 8.1 Antenna Setting 8.2 Automatic Search 8.3 Manual Search 8.4 Other Search 8.5 Motor Antenna 8.6 Default Setting 9. Glossary 16. Menu Map ** 13. ** ** ** Contents ** 7. System Information...
... Air) 9.2 S/W Upgrade from PC 10. Trouble Shooting 13.1 Trouble Shooting 13.2 Error Message 14. Service and Support ** GB 6 ** ** ** ** ** ** GB36 ** GB36 GB38 GB39 GB41 GB41 GB43 GB43 GB45 ** GB45 GB48 GB50 GB52 GB56 GB63 GB64 ** GB65 ** GB68 GB69 ** GB69 GB69 GB70 GB71 GB72 ** GB72 GB73 GB74 GB76 GB77 ** ** ** Games ** 12. Installation 8.1 Antenna Setting 8.2 Automatic Search 8.3 Manual Search 8.4 Other Search 8.5 Motor Antenna 8.6 Default Setting 9. Glossary 16. Menu Map ** 13. ** ** ** Contents ** 7. System Information...
User Manual
Page 15
... button to change the setting. Select DiSEqC switch. Select DiSEqC item using the button, and press the OK or button to display LNB Frequency List. Set the LNB Frequency value Press the OK or button to display DiSEqC Switch List. ** Select DiSEqC Switch using the NUMERICAL (0~9) button, and then press the OK button. Otherwise, select Disable. 4. When you cannot find the LNB Frequency value from the list, select User Define, manually enter the frequency using the button and then press the ** OK button. 5. Set...
... button to change the setting. Select DiSEqC switch. Select DiSEqC item using the button, and press the OK or button to display LNB Frequency List. Set the LNB Frequency value Press the OK or button to display DiSEqC Switch List. ** Select DiSEqC Switch using the NUMERICAL (0~9) button, and then press the OK button. Otherwise, select Disable. 4. When you cannot find the LNB Frequency value from the list, select User Define, manually enter the frequency using the button and then press the ** OK button. 5. Set...

User Manual
Page 17
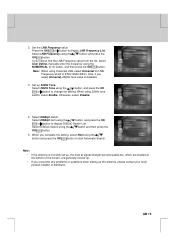
... information. 4.2 Volume Control 1. button to switch between TV channel and Radio channel. Press the TV/RADIO button to display the subtitle language 2. Language Setting Subtitle Language. ** GB 17 ** ** ** ** ** ** ** Press the SUBTITLE list. Press the CH-/CH+ button. 2. Then the subtitle will be displayed in the selected language at remote controller to Chapter 5 and 6 for watching programmes. 4.1 Switching Channel You can select a default subtitle language by selecting MENU - Note: You can switch the current channel using the NUMERICAL (0~9) buttons...
... information. 4.2 Volume Control 1. button to switch between TV channel and Radio channel. Press the TV/RADIO button to display the subtitle language 2. Language Setting Subtitle Language. ** GB 17 ** ** ** ** ** ** ** Press the SUBTITLE list. Press the CH-/CH+ button. 2. Then the subtitle will be displayed in the selected language at remote controller to Chapter 5 and 6 for watching programmes. 4.1 Switching Channel You can select a default subtitle language by selecting MENU - Note: You can switch the current channel using the NUMERICAL (0~9) buttons...

User Manual
Page 18
... a specific period of time whenever you select Dolby by selecting MENU - Audio Language. • If you switch channels. Audio Priority, Dolby Digital programme is automatically broadcasted with Dolby digital audio without considering Default audio language. ** ** ** 4.6 Program Information (i-plate) Programme information is Dolby digital one, you cannot set the audio direction such as following on the screen. ** ** GB 18 ** ** ** ** ** ** ** Select your desired default audio language by pressing the i button while watching a programme. Select Audio Direction...
... a specific period of time whenever you select Dolby by selecting MENU - Audio Language. • If you switch channels. Audio Priority, Dolby Digital programme is automatically broadcasted with Dolby digital audio without considering Default audio language. ** ** ** 4.6 Program Information (i-plate) Programme information is Dolby digital one, you cannot set the audio direction such as following on the screen. ** ** GB 18 ** ** ** ** ** ** ** Select your desired default audio language by pressing the i button while watching a programme. Select Audio Direction...

User Manual
Page 32
... following message will be displayed. When reservation has been completed, the is repeated. 4. If the channel is locked, parental controlled or restricted by selecting the scheduled programme and pressing the OK button. 1. Now Moves to the next programme or 30 minutes after . 5. Select and press the OK button to display Time Bar. 3. button. ** ** ** ** ** 6. Press the Green button to exit the Time Bar. Note: Guide provides programme information...
... following message will be displayed. When reservation has been completed, the is repeated. 4. If the channel is locked, parental controlled or restricted by selecting the scheduled programme and pressing the OK button. 1. Now Moves to the next programme or 30 minutes after . 5. Select and press the OK button to display Time Bar. 3. button. ** ** ** ** ** 6. Press the Green button to exit the Time Bar. Note: Guide provides programme information...

User Manual
Page 42
... option among CVBS/S-Video using the button, and press the OK or button. 2. If the Screen Ratio is set to '16:9', you can set VCR-SCART Output. 1. Note: If 2 options are provided, you can switch the option at a time using the button, and press the OK or button. 2. Select Display Format using the OK button. If the Screen Ratio is switched between 4:3 and 16:9. 4. Select TV Standard using the button, and press the OK AUTO The TV supports...
... option among CVBS/S-Video using the button, and press the OK or button. 2. If the Screen Ratio is set to '16:9', you can set VCR-SCART Output. 1. Note: If 2 options are provided, you can switch the option at a time using the button, and press the OK or button. 2. Select Display Format using the OK button. If the Screen Ratio is switched between 4:3 and 16:9. 4. Select TV Standard using the button, and press the OK AUTO The TV supports...
User Manual
Page 45
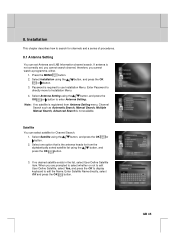
... sorted satellite list using the or button. Press the MENU button. 2. Note: If no desired satellite exists in the list, select User Define Satellite item. button, and press the OK or 2. Select one option that is not correctly set Antenna and LNB Information channel search. If antenna is the antenna heads for Channel Search. 1. Enter Satellite Name directly, select OK and press the OK button. ** GB 45 ** ** ** ** ** ** ** When you cannot watch a programme, either. 1. Enter Password to directly move to use Installation Menu. Password is...
... sorted satellite list using the or button. Press the MENU button. 2. Note: If no desired satellite exists in the list, select User Define Satellite item. button, and press the OK or 2. Select one option that is not correctly set Antenna and LNB Information channel search. If antenna is the antenna heads for Channel Search. 1. Enter Satellite Name directly, select OK and press the OK button. ** GB 45 ** ** ** ** ** ** ** When you cannot watch a programme, either. 1. Enter Password to directly move to use Installation Menu. Password is...

User Manual
Page 46
... selected User Define, enter LNB Frequency value directly, and press the OK button ** Note: If you can enter LNB Frequency. 1. Select whether or not to the 22kHz tone switch box. Installation ** Satellite Alternative You can select whether or not to Enable, Channel Search is not used or 2 antennas are connected to use 22KHz Tone. 1. button, and press 2. Disable Does not search the selected satellite. Select 22kHz Tone using the antenna headed for the selected satellite. 1. button, Enable...
... selected User Define, enter LNB Frequency value directly, and press the OK button ** Note: If you can enter LNB Frequency. 1. Select whether or not to the 22kHz tone switch box. Installation ** Satellite Alternative You can select whether or not to Enable, Channel Search is not used or 2 antennas are connected to use 22KHz Tone. 1. button, and press 2. Disable Does not search the selected satellite. Select 22kHz Tone using the antenna headed for the selected satellite. 1. button, Enable...

User Manual
Page 47
... antenna and receiver is close, the LNB may be careful. 1. Standard If the distance between antenna and receiver is ** within 60m High If the distance between antenna and receiver is supplied to confirm. If you change the setting value to High a message will prompt you to LNB. ** GB 47 ** ** ** ** ** ** ** Please be damaged. Select the DiSEqC Swtich using the button, and press the OK or button. Select DiSEqC Input using...
... antenna and receiver is close, the LNB may be careful. 1. Standard If the distance between antenna and receiver is ** within 60m High If the distance between antenna and receiver is supplied to confirm. If you change the setting value to High a message will prompt you to LNB. ** GB 47 ** ** ** ** ** ** ** Please be damaged. Select the DiSEqC Swtich using the button, and press the OK or button. Select DiSEqC Input using...

User Manual
Page 55
... or button. 3. Select one option among Auto, 1/2, 2/3, 3/4, 5/6, 7/8, and press the OK button. ** Search You can run Multiple Manual Search. Set the selected item. button, and press the OK or 2. Note: Settings for Satellite, Search Type, and Channel Type are the same as those of Manual Search. The next procedures are the same as those of Automatic Search. This function is useful when repeating Manual Search. 1. ** ** ** ** ** ** ** FEC 1. Select one option among Satellite, Edit TP List, Search Type, Channel Type using the button. Refer...
... or button. 3. Select one option among Auto, 1/2, 2/3, 3/4, 5/6, 7/8, and press the OK button. ** Search You can run Multiple Manual Search. Set the selected item. button, and press the OK or 2. Note: Settings for Satellite, Search Type, and Channel Type are the same as those of Manual Search. The next procedures are the same as those of Automatic Search. This function is useful when repeating Manual Search. 1. ** ** ** ** ** ** ** FEC 1. Select one option among Satellite, Edit TP List, Search Type, Channel Type using the button. Refer...

User Manual
Page 56
... button to save before Channel Search. 1. Select Yes and press the OK button to confirm to add a new Transponder data. 3. Select Antenna Setting using the or button. Select a specific TP from the Transponder list, press the OK button, select Edit, and then press the OK button to switch into Motor Antenna Menu. ** ** GB 56 ** ** ** ** ** ** ** Note: When you select Default List and press OK , Transponder list display. ** ** 8.5 Motor Antenna ** If you use Motor Antenna, which is operated...
... button to save before Channel Search. 1. Select Yes and press the OK button to confirm to add a new Transponder data. 3. Select Antenna Setting using the or button. Select a specific TP from the Transponder list, press the OK button, select Edit, and then press the OK button to switch into Motor Antenna Menu. ** ** GB 56 ** ** ** ** ** ** ** Note: When you select Default List and press OK , Transponder list display. ** ** 8.5 Motor Antenna ** If you use Motor Antenna, which is operated...
User Manual
Page 63
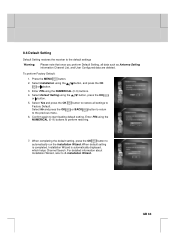
... ** Select Installation using the or button. button to restore all data such as Antenna Setting information Channel List, and User Configured data are deleted. When completing the default setting, press the OK button to the default settings Warning: Please note that once you perform Default Setting, all settings to or BACK button to 3. button, press the OK 5. ** ** ** ** ** ** ** 8.6 Default Setting Default Setting restores the receiver to automatically run the Installation Wizard. To perform Factory Default: 1. Enter PIN using the NUMERICAL (0~9) buttons to perform...
... ** Select Installation using the or button. button to restore all data such as Antenna Setting information Channel List, and User Configured data are deleted. When completing the default setting, press the OK button to the default settings Warning: Please note that once you perform Default Setting, all settings to or BACK button to 3. button, press the OK 5. ** ** ** ** ** ** ** 8.6 Default Setting Default Setting restores the receiver to automatically run the Installation Wizard. To perform Factory Default: 1. Enter PIN using the NUMERICAL (0~9) buttons to perform...
User Manual
Page 64
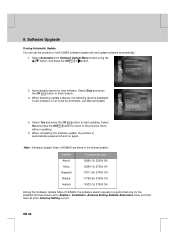
... the air via antenna systems. Note that the quality of receiving signal strength is simply an alternative method for downloading software versions. If the weather is not so good that OTA is not recommendable, perform the software upgrade later. ** ** ** Caution: • Please be updated or work after software update. 2. Software Upgrade ** In order to maintain proper performance of software versions may be tuned properly to keep the power...
... the air via antenna systems. Note that the quality of receiving signal strength is simply an alternative method for downloading software versions. If the weather is not so good that OTA is not recommendable, perform the software upgrade later. ** ** ** Caution: • Please be updated or work after software update. 2. Software Upgrade ** In order to maintain proper performance of software versions may be tuned properly to keep the power...
User Manual
Page 66
..., use Manual Update. 4. Select Yes and press the OK button to find HUMAX software update site and update software automatically. 1. Satellite Transponder data Astra1 12669 (V) 22000 5/6 Sirius 12054 (V) 27500 3/4 Hispasat 11811 (H) 27500 3/4 Nilesat 11765 (H) 27500 3/4 Hotbird 11623 (V) 27500 3/4 ** Among the Software Update Sites of HUMAX, the software search operation is automatically powered off and on again. ** Note: Software Update Sites of HUMAX are listed in Installation -Antenna Setting-Satellite Alternative menu and that have all other Antenna Setting correct...
..., use Manual Update. 4. Select Yes and press the OK button to find HUMAX software update site and update software automatically. 1. Satellite Transponder data Astra1 12669 (V) 22000 5/6 Sirius 12054 (V) 27500 3/4 Hispasat 11811 (H) 27500 3/4 Nilesat 11765 (H) 27500 3/4 Hotbird 11623 (V) 27500 3/4 ** Among the Software Update Sites of HUMAX, the software search operation is automatically powered off and on again. ** Note: Software Update Sites of HUMAX are listed in Installation -Antenna Setting-Satellite Alternative menu and that have all other Antenna Setting correct...

User Manual
Page 67
... not found in which provides update software. Enter Transponder Frequency in the List, select User Define and enter manually. 5. Refer to the previous menu. 9. Please wait until it is provided. 3. It is automatically powered off and on again. ** GB 67 ** ** ** ** ** ** ** ** ** ** ** ** ** ** Manual Update You can perform Manual Update only if you know which satellite has new software and the Transponder information correctly. 1. Select Search and Press the OK button to start with Antenna Setting. 2.
... not found in which provides update software. Enter Transponder Frequency in the List, select User Define and enter manually. 5. Refer to the previous menu. 9. Please wait until it is provided. 3. It is automatically powered off and on again. ** GB 67 ** ** ** ** ** ** ** ** ** ** ** ** ** ** Manual Update You can perform Manual Update only if you know which satellite has new software and the Transponder information correctly. 1. Select Search and Press the OK button to start with Antenna Setting. 2.

User Manual
Page 72
... Remote controller. 6. Install the antenna in Operation Mode. - Remote controller does not operate ** - Check whether it it is plugged into bigger one with other . - Change satellite dish into a suitable power outlet. - Press the Audio button to the equipment. - Reservation is On. 2. ** ** ** ** ** 13. No picture ** - Make sure that Antenna line is no power. ** - Make sure the receiving level, and adjust antenna if the level is off. ** GB 72 ** ** ** ** ** ** ** No or poor sound ** - Check whether the power switch...
... Remote controller. 6. Install the antenna in Operation Mode. - Remote controller does not operate ** - Check whether it it is plugged into bigger one with other . - Change satellite dish into a suitable power outlet. - Press the Audio button to the equipment. - Reservation is On. 2. ** ** ** ** ** 13. No picture ** - Make sure that Antenna line is no power. ** - Make sure the receiving level, and adjust antenna if the level is off. ** GB 72 ** ** ** ** ** ** ** No or poor sound ** - Check whether the power switch...

User Manual
Page 73
... Audio. ** LNB short LNB cable is not pointing at the satellite. ** ** ** ** ** ** ** 13.2 Error Message Error message Possible causes What to do No or bad signal The satellite dish is shorten. LNB In Port is not deleted by alien substance or damaged. Adjust dish. ** Increase the LNB voltage or connect a signal amplifier. Change to a large dish. The channel has signal, but no Audio. Remove the alien substance and contact local service center if it is not available. Replace LNB. Wrong antenna setting. Change...
... Audio. ** LNB short LNB cable is not pointing at the satellite. ** ** ** ** ** ** ** 13.2 Error Message Error message Possible causes What to do No or bad signal The satellite dish is shorten. LNB In Port is not deleted by alien substance or damaged. Adjust dish. ** Increase the LNB voltage or connect a signal amplifier. Change to a large dish. The channel has signal, but no Audio. Remove the alien substance and contact local service center if it is not available. Replace LNB. Wrong antenna setting. Change...

User Manual
Page 76
... possible to let a DiSEqC compatible receiver send a signal over the RF cable to a switching device to high frequency. It outputs audio signals directly as stereo tape recorder. ** LNB (Low Noise Block) An electronic unit mounted on a different frequency. ** GB 76 ** ** ** ** ** ** ** Glossary ** DiSEqC (Digital Satellite Equipment Control) A standard through satellite system. ** ** SCART A 21-pin connector used to indicate good quality of an audio device such as digital audio signals without additional payments to a service provider. ** Hi-Fi...
... possible to let a DiSEqC compatible receiver send a signal over the RF cable to a switching device to high frequency. It outputs audio signals directly as stereo tape recorder. ** LNB (Low Noise Block) An electronic unit mounted on a different frequency. ** GB 76 ** ** ** ** ** ** ** Glossary ** DiSEqC (Digital Satellite Equipment Control) A standard through satellite system. ** ** SCART A 21-pin connector used to indicate good quality of an audio device such as digital audio signals without additional payments to a service provider. ** Hi-Fi...


