

User Manual
Page 9
... Favourite Channels 5.5 Channel Change Mode GB12 ** GB12 GB13 GB14 GB15 GB19 ** GB19 GB22 GB24 GB25 ** GB25 GB25 GB26 GB27 GB27 GB28 ** GB28 GB28 GB28 GB28 GB29 GB29 GB31 GB34 ** GB34 GB35 GB35 GB39 GB42 GB 8 Basic Operation 4.1 Switching Channel 4.2 Volume Control 4.3 Motion Still 4.4 Change the Subtitle Language 4.5 Change a Audio Language 4.6 Program Information (I- Installation Wizard 3.1 Language 3.2 Area Setting 3.3 Antenna Setting 3.4 Automatic Search 3.5 Time Setting 4. Contents ** STB 1. Setup 2.1 Connecting the Antenna for STB 2.2 Connecting for DVD player 2.3 Powering On...
... Favourite Channels 5.5 Channel Change Mode GB12 ** GB12 GB13 GB14 GB15 GB19 ** GB19 GB22 GB24 GB25 ** GB25 GB25 GB26 GB27 GB27 GB28 ** GB28 GB28 GB28 GB28 GB29 GB29 GB31 GB34 ** GB34 GB35 GB35 GB39 GB42 GB 8 Basic Operation 4.1 Switching Channel 4.2 Volume Control 4.3 Motion Still 4.4 Change the Subtitle Language 4.5 Change a Audio Language 4.6 Program Information (I- Installation Wizard 3.1 Language 3.2 Area Setting 3.3 Antenna Setting 3.4 Automatic Search 3.5 Time Setting 4. Contents ** STB 1. Setup 2.1 Connecting the Antenna for STB 2.2 Connecting for DVD player 2.3 Powering On...

User Manual
Page 11
... GB88 GB89 GB89 GB90 GB90 GB91 GB91 GB91 GB92 GB92 GB92 GB93 ** GB93 GB93 GB94 GB95 GB96 GB96 GB97 GB97 GB97 GB98 GB98 GB 10 Playing a DVD-VIDEO Disc 2.1 Playing a title 2.2 General Information 2.3 Search 2.4 Skipping Chapter 2.5 Repeat Mode 2.6 Repeat a section of disc 2.7 Fast Playing 2.8 Slow Motion 2.9 Zooming in and out 2.10 Subtitle/Audio 2.11 Listening Mode 2.12 Time display 2.13 Angle 3. Contents ** DVD Player 1. Getting Started 2.
... GB88 GB89 GB89 GB90 GB90 GB91 GB91 GB91 GB92 GB92 GB92 GB93 ** GB93 GB93 GB94 GB95 GB96 GB96 GB97 GB97 GB97 GB98 GB98 GB 10 Playing a DVD-VIDEO Disc 2.1 Playing a title 2.2 General Information 2.3 Search 2.4 Skipping Chapter 2.5 Repeat Mode 2.6 Repeat a section of disc 2.7 Fast Playing 2.8 Slow Motion 2.9 Zooming in and out 2.10 Subtitle/Audio 2.11 Listening Mode 2.12 Time display 2.13 Angle 3. Contents ** DVD Player 1. Getting Started 2.

User Manual
Page 15
... 9. VCR SCART ** Connects a VCR SCART cable. ** 7. COMPONENT SELECT ** RGB If you select RGB, you can connect to upgrade product's software programme. ** 3. AUDIO L/R ** Connects to your PC to video, audio L and R. VIDEO ** Connects to your receiver to a TV or VCR that accepts S-Video input. ** 4. GB 14 YPbPr If you select YPbPr, you can connect your receiver to a TV or VCR that accepts high-quality video input. 5. LNB IN ** Connects a satellite antenna cable. ** 2. S-VIDEO ** Connect your TV or VCR and output Video signals. ** 8. S/PDIF ** Outputs the digital audio...
... 9. VCR SCART ** Connects a VCR SCART cable. ** 7. COMPONENT SELECT ** RGB If you select RGB, you can connect to upgrade product's software programme. ** 3. AUDIO L/R ** Connects to your PC to video, audio L and R. VIDEO ** Connects to your receiver to a TV or VCR that accepts S-Video input. ** 4. GB 14 YPbPr If you select YPbPr, you can connect your receiver to a TV or VCR that accepts high-quality video input. 5. LNB IN ** Connects a satellite antenna cable. ** 2. S-VIDEO ** Connect your TV or VCR and output Video signals. ** 8. S/PDIF ** Outputs the digital audio...

User Manual
Page 17
.../RADIO ** Switches between STB and DVD. ** 3. SUBTITLE ** Changes the subtitle language in STB. ** 12. GUIDE ** Displays the Programme Guide. ** 21. 1. Before Using the Receiver ** STB 1. OPT+ (OPTION) ** Displays the channel attributes during watching a programme. ** 10. EXIT ** Exits the main menu or Guide screen. ** 16. SOURCE ** Selects the input source between Operation and Standby modes. ** 14. And displays the channel list during watching a programme. ** 8. GAME ** Displays the Game. ** 17. NUMERICAL BUTTONS ** Enters a TV/Radio channel number or menu option number...
.../RADIO ** Switches between STB and DVD. ** 3. SUBTITLE ** Changes the subtitle language in STB. ** 12. GUIDE ** Displays the Programme Guide. ** 21. 1. Before Using the Receiver ** STB 1. OPT+ (OPTION) ** Displays the channel attributes during watching a programme. ** 10. EXIT ** Exits the main menu or Guide screen. ** 16. SOURCE ** Selects the input source between Operation and Standby modes. ** 14. And displays the channel list during watching a programme. ** 8. GAME ** Displays the Game. ** 17. NUMERICAL BUTTONS ** Enters a TV/Radio channel number or menu option number...

User Manual
Page 19
...forward slow playback when playing a DVD. ** (Stop) ** Stop play mode. ** REPEAT MODE ** Change repeat mode. ** MARKER ** Mark any point in a DVD during playback. ** AB ** Repeat between STB and DVD. ** 3. STANDBY ** Switches between TV and satellite receiver. ** 2. SOURCE ** Selects the input source between Operation and Standby modes. ** 13. DISC MENU ** Displays the main disc menu. ** Note: This part explains DVD function only. DVD/DTV ** Change mode between A and B in DVD. ** 11. DVD FUNCTION BUTTONS ** TITLE/ALBUM ** Displays the title menu. ** PROGRAMME ** Edit playlist...
...forward slow playback when playing a DVD. ** (Stop) ** Stop play mode. ** REPEAT MODE ** Change repeat mode. ** MARKER ** Mark any point in a DVD during playback. ** AB ** Repeat between STB and DVD. ** 3. STANDBY ** Switches between TV and satellite receiver. ** 2. SOURCE ** Selects the input source between Operation and Standby modes. ** 13. DISC MENU ** Displays the main disc menu. ** Note: This part explains DVD function only. DVD/DTV ** Change mode between A and B in DVD. ** 11. DVD FUNCTION BUTTONS ** TITLE/ALBUM ** Displays the title menu. ** PROGRAMME ** Edit playlist...

User Manual
Page 24
** ** 2. Connect the audio left and right channel sockets on the player rear panel to the corresponding connector on your TV or Stereo system. ** GB 23 Connection with a S-Video socket. 1. Connect the S-video connector on the rear of the player to the corresponding sockets on the TV using the S-Video cable. 2. If you enjoy the highest quality , connect to a TV with S-Video cable ** First, you set the SCART Output as S-Video in 5.4 .
** ** 2. Connect the audio left and right channel sockets on the player rear panel to the corresponding connector on your TV or Stereo system. ** GB 23 Connection with a S-Video socket. 1. Connect the S-video connector on the rear of the player to the corresponding sockets on the TV using the S-Video cable. 2. If you enjoy the highest quality , connect to a TV with S-Video cable ** First, you set the SCART Output as S-Video in 5.4 .

User Manual
Page 29
... display the subtitle language 2. button to adjust the audio volume. 2. Note: You can switch the current channel using the channel list or programme guide. Subtitle Language. Basic Operation ** This chapter describes functions such as switching channel, volume control, and basic features for watching programmes. 4.1 Switching Channel You can select a default subtitle language by selecting MENU - Note: You can select the language for more information. 4.2 Volume Control 1. Note: • The mute function keeps enabled while you can switch channel using...
... display the subtitle language 2. button to adjust the audio volume. 2. Note: You can switch the current channel using the channel list or programme guide. Subtitle Language. Basic Operation ** This chapter describes functions such as switching channel, volume control, and basic features for watching programmes. 4.1 Switching Channel You can select a default subtitle language by selecting MENU - Note: You can select the language for more information. 4.2 Volume Control 1. Note: • The mute function keeps enabled while you can switch channel using...

User Manual
Page 35
... channel using NUMERICAL (0~9) button to change the channel. Option in Channel List to display the channel list. 2. GB 34 Channel List ** 5 types of channel search. 5.1 Displaying and Switching Channel List You can organise channels by channel name. TV The list of channel search. Satellite The lists of channels classified by satellites.The number of subgroup is decided by the result of all Radio channels with 5 subgroups that you press the TV/ RADIO button while the channel list is sorted by channel number, the other channel on the channel list. 1. button...
... channel using NUMERICAL (0~9) button to change the channel. Option in Channel List to display the channel list. 2. GB 34 Channel List ** 5 types of channel search. 5.1 Displaying and Switching Channel List You can organise channels by channel name. TV The list of channel search. Satellite The lists of channels classified by satellites.The number of subgroup is decided by the result of all Radio channels with 5 subgroups that you press the TV/ RADIO button while the channel list is sorted by channel number, the other channel on the channel list. 1. button...

User Manual
Page 44
... desired channel number using the button. 4. 6. If there are multiple channels, use PAGE-/PAGE+ button to move to other desired channel using the button. 3. Press the Red button to view detailed information for all channels. 1. Also, you can watch the programme if it is the future programme. 5. Program Guide ** The Programme Guide displays programme information about each channel, based on air, or you can view programme information for selected channel list is on the date and time...
... desired channel number using the button. 4. 6. If there are multiple channels, use PAGE-/PAGE+ button to move to other desired channel using the button. 3. Press the Red button to view detailed information for all channels. 1. Also, you can watch the programme if it is the future programme. 5. Program Guide ** The Programme Guide displays programme information about each channel, based on air, or you can view programme information for selected channel list is on the date and time...

User Manual
Page 45
.... 3. If the channel is locked, parental controlled or restricted by selecting the scheduled programme and pressing the OK button. 1. GB 44 6. Press the GUIDE button. 2. Day Moves to 2 hours after . Reserving a Recording ** You can quickly search for your Password. Program Guide ** 2. Select the desired programme and press the OK button. When reservation has been completed, the is located. Select the each button using the Time bar. 1. Moves...
.... 3. If the channel is locked, parental controlled or restricted by selecting the scheduled programme and pressing the OK button. 1. GB 44 6. Press the GUIDE button. 2. Day Moves to 2 hours after . Reserving a Recording ** You can quickly search for your Password. Program Guide ** 2. Select the desired programme and press the OK button. When reservation has been completed, the is located. Select the each button using the Time bar. 1. Moves...

User Manual
Page 47
... Time using the NUMERICAL (0~9) button. Change the Repeat mode using the button. 5. Select the Save and press the OK button to cancel the editing. 7. Press the Yellow button to add a new watching schedule. 1. The options are Once, Daily, and Weekly. 4. Change the Lock mode using the button. GB 46 Program Guide ** 6.3 Viewing Reserved Programme You can add or edit watching-reserved programme by schedule screen. 1. Select a blank list and press the OK button to display the Schedule screen...
... Time using the NUMERICAL (0~9) button. Change the Repeat mode using the button. 5. Select the Save and press the OK button to cancel the editing. 7. Press the Yellow button to add a new watching schedule. 1. The options are Once, Daily, and Weekly. 4. Change the Lock mode using the button. GB 46 Program Guide ** 6.3 Viewing Reserved Programme You can add or edit watching-reserved programme by schedule screen. 1. Select a blank list and press the OK button to display the Schedule screen...

User Manual
Page 58
... search channel, therefore, you cannot watch a programme, either. 1. Select the satellite that is not available. If antenna is not correctly set Antenna and LNB Information for from Antenna Setting menu, Channel Search such as Automatic Search, Manual Search, Multiple Manual Search, Advanced Search is the antenna heads for channel search. Note: If no satellite is required to enter Antenna Setting. Press the MENU button. 2. Select Installation using the button button, and press the OK or 2. Password is registered from the alphabetically sorted satellite list using the button...
... search channel, therefore, you cannot watch a programme, either. 1. Select the satellite that is not available. If antenna is not correctly set Antenna and LNB Information for from Antenna Setting menu, Channel Search such as Automatic Search, Manual Search, Multiple Manual Search, Advanced Search is the antenna heads for channel search. Note: If no satellite is required to enter Antenna Setting. Press the MENU button. 2. Select Installation using the button button, and press the OK or 2. Password is registered from the alphabetically sorted satellite list using the button...

User Manual
Page 64
Note: Horizontal outputs 18V, and Vertical outputs 13V through LNB line. • Select Symbol Rate (ks/s) and press the OK or button to reset. 3. If the Level is close to 0, please try to select one Symbol Rate value from Satellite channel magazine, Satellite channel related home pages, news release and home page of other transponder. 1. Network Search ** If your desired transponder provides the information of broadcasting company...
Note: Horizontal outputs 18V, and Vertical outputs 13V through LNB line. • Select Symbol Rate (ks/s) and press the OK or button to reset. 3. If the Level is close to 0, please try to select one Symbol Rate value from Satellite channel magazine, Satellite channel related home pages, news release and home page of other transponder. 1. Network Search ** If your desired transponder provides the information of broadcasting company...
User Manual
Page 69
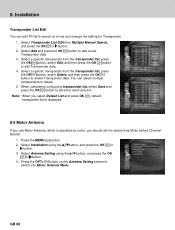
8. Press the OPT+ button on the Antenna Setting screen to add a new Transponder data. 3. Select Add and press the OK button to switch into Motor Antenna Menu. Select a specific transponder from the transponder list, press the OK button, select Edit, and then press the OK button to edit Transponder data. 4. Select Installation using the or button. GB 68 Installation ** Transponder List Edit You can select multiple transponders to search at a time and change the setting for Transponder...
8. Press the OPT+ button on the Antenna Setting screen to add a new Transponder data. 3. Select Add and press the OK button to switch into Motor Antenna Menu. Select a specific transponder from the transponder list, press the OK button, select Edit, and then press the OK button to edit Transponder data. 4. Select Installation using the or button. GB 68 Installation ** Transponder List Edit You can select multiple transponders to search at a time and change the setting for Transponder...

User Manual
Page 70
... button. ** ** 1. Set LNB Frequency. ** • Select LNB Frequency using the or button. Select Motor Kind using the button, and press the OK or button to Installaion - Set LNB Voltage Refer to select Motor Type. ** DiSEqC 1.2 General Motor Antenna using the button. • When completing setting, press the OK button. 6. The distance between antenna and receiver is not in the list, enter LNB Frequency value using the button. • When completing setting, press the OK button. button, and press the • Enter...
... button. ** ** 1. Set LNB Frequency. ** • Select LNB Frequency using the or button. Select Motor Kind using the button, and press the OK or button to Installaion - Set LNB Voltage Refer to select Motor Type. ** DiSEqC 1.2 General Motor Antenna using the button. • When completing setting, press the OK button. 6. The distance between antenna and receiver is not in the list, enter LNB Frequency value using the button. • When completing setting, press the OK button. button, and press the • Enter...
User Manual
Page 77
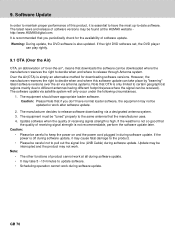
... of software versions may be received). Software Update ** In order to maintain proper performance of this software update can play rightly. 9.1 OTA (Over the Air) OTA, an abbreviation of receiving signal strength is high. 9. Caution: Please Note that the quality of "over the air via antenna systems. Note that the manufacturer uses. 4. If the right DVD software set, the DVD player can take 5 ~10 minutes to keep the power on...
... of software versions may be received). Software Update ** In order to maintain proper performance of this software update can play rightly. 9.1 OTA (Over the Air) OTA, an abbreviation of receiving signal strength is high. 9. Caution: Please Note that the quality of "over the air via antenna systems. Note that the manufacturer uses. 4. If the right DVD software set, the DVD player can take 5 ~10 minutes to keep the power on...

User Manual
Page 79
... the Software Update Sites of HUMAX are listed in Installation - Select Yes and press the OK button to start updating. When detecting update software, the following table. Satellite Alternative menu and that have all other Antenna Setting correct. When completing the software update, the product is not found by Automatic, use Manual Update. 4. Antenna Setting - Automatically search for the satellites that have been set to the previous menu without updating. GB 78 If new software is automatically powered off...
... the Software Update Sites of HUMAX are listed in Installation - Select Yes and press the OK button to start updating. When detecting update software, the following table. Satellite Alternative menu and that have all other Antenna Setting correct. When completing the software update, the product is not found by Automatic, use Manual Update. 4. Antenna Setting - Automatically search for the satellites that have been set to the previous menu without updating. GB 78 If new software is automatically powered off...
User Manual
Page 80
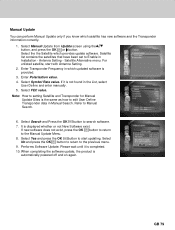
... satellite has new software and the Transponder information correctly. 1. Satellite Alternative menu. Enter Polarisation value. 4. Select Manual Update from Update screen using the button, and press the OK or button. ** ** Manual Update You can perform Manual Update only if you know which provides update software. Antenna Setting - For unlisted satellite, start updating. Select Yes and press the OK button to search software. 7. Select No and press the OK button to return to edit User Define Transponder data in which updated software is automatically powered...
... satellite has new software and the Transponder information correctly. 1. Satellite Alternative menu. Enter Polarisation value. 4. Select Manual Update from Update screen using the button, and press the OK or button. ** ** Manual Update You can perform Manual Update only if you know which provides update software. Antenna Setting - For unlisted satellite, start updating. Select Yes and press the OK button to search software. 7. Select No and press the OK button to return to edit User Define Transponder data in which updated software is automatically powered...
User Manual
Page 109
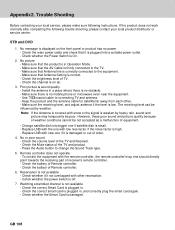
... power - Appendix2. Make sure that Antenna line is displayed on air. 3. Poor picture & sound quality - Use 75 coaxial cable to change the Sound Track type. 5. Note: If the Antenna is covered with snow or the signal is correct. - Press the Audio button to connecting TV and antenna. - To control the equipment with low nise factor if the noise factor is plugged into bigger one if satellite dish is damaged or out of receiver's remote controller. - Watching...
... power - Appendix2. Make sure that Antenna line is displayed on air. 3. Poor picture & sound quality - Use 75 coaxial cable to change the Sound Track type. 5. Note: If the Antenna is covered with snow or the signal is correct. - Press the Audio button to connecting TV and antenna. - To control the equipment with low nise factor if the noise factor is plugged into bigger one if satellite dish is damaged or out of receiver's remote controller. - Watching...
User Manual
Page 111
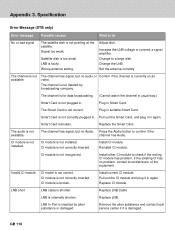
.... Specification ** Error Message (STB only) Error message Possible causes What to check if the exiting CI module has problem. The channel is currently on air video. Smart Card is broken. CI module is not correctly plugged in . Remove the alien substance and contact local service center if it in Smart Card. The audio is damaged. Pull out the CI module and plug it is not available. Replace LNB. Replace LNB Cable. Install other...
.... Specification ** Error Message (STB only) Error message Possible causes What to check if the exiting CI module has problem. The channel is currently on air video. Smart Card is broken. CI module is not correctly plugged in . Remove the alien substance and contact local service center if it in Smart Card. The audio is damaged. Pull out the CI module and plug it is not available. Replace LNB. Replace LNB Cable. Install other...


