

User Manual
Page 1
Standardlösenordet är 0000. Oletusavauskoodi on 0000. Digital Cable Receiver Kaapeliverkon digisovitin Digital-tvmottagare User's Manual Användarmanual CXHD-5000C The default password is 0000.
Standardlösenordet är 0000. Oletusavauskoodi on 0000. Digital Cable Receiver Kaapeliverkon digisovitin Digital-tvmottagare User's Manual Användarmanual CXHD-5000C The default password is 0000.
User Manual
Page 2
Copyright (Copyright © 2009 HUMAX Corporation) Not to safely install, use and maintain the product at maximum performance. Please read this user's manual carefully to be able to be copied, used or translated in this user's manual is a trademark of copyright and copyright law. The ... warranty does not cover parts which may become defective due to change without HUMAX's prior consent in this user's manual next to your product for purchasing a HUMAX product. Keep this manual. GB1 User's Manual Notice Thank you for future reference. Dolby and the double-D symbol are ...
Copyright (Copyright © 2009 HUMAX Corporation) Not to safely install, use and maintain the product at maximum performance. Please read this user's manual carefully to be able to be copied, used or translated in this user's manual is a trademark of copyright and copyright law. The ... warranty does not cover parts which may become defective due to change without HUMAX's prior consent in this user's manual next to your product for purchasing a HUMAX product. Keep this manual. GB1 User's Manual Notice Thank you for future reference. Dolby and the double-D symbol are ...
User Manual
Page 3
GB2 User's Manual Refer servicing to qualified service personnel. This symbol indicates important instructions accompanying the product. Please separate this from uncontrolled waste disposal. • Domestic users: Please ... recycling. • Business users: Contact your supplier and check the terms and conditions of the purchase contract. Notice Warnings, Cautions and Notes Throughout the whole manual, pay special attention to the following marks that presents a risk of electric shock or personal injury.
GB2 User's Manual Refer servicing to qualified service personnel. This symbol indicates important instructions accompanying the product. Please separate this from uncontrolled waste disposal. • Domestic users: Please ... recycling. • Business users: Contact your supplier and check the terms and conditions of the purchase contract. Notice Warnings, Cautions and Notes Throughout the whole manual, pay special attention to the following marks that presents a risk of electric shock or personal injury.
User Manual
Page 4
... is adequate ventilation and that the product has 10 cm clearance from the mains before you start any cables. 8. Failure to the product. 7. GB3 User's Manual Please read the following safety precautions carefully. LIQUID • The product should be left uncovered to allow proper airflow into the wall outlet. LOCATION •...
... is adequate ventilation and that the product has 10 cm clearance from the mains before you start any cables. 8. Failure to the product. 7. GB3 User's Manual Please read the following safety precautions carefully. LIQUID • The product should be left uncovered to allow proper airflow into the wall outlet. LOCATION •...

User Manual
Page 5
... power cord in additional damage to lightning and power-surges. 11. Warning 1. This will prevent damage to the unit due to the unit. GB4 User's Manual
... power cord in additional damage to lightning and power-surges. 11. Warning 1. This will prevent damage to the unit due to the unit. GB4 User's Manual
User Manual
Page 6
... GB28 5.2 Favourite List GB30 5.3 HD List GB30 5.4 History List GB31 6. TV Guide GB32 6.1 Table Guide GB32 6.2 List Guide GB33 6.3 Schedule GB33 6.4 Find GB35 GB5 User's Manual Installation Wizard GB20 3.1 Language GB20 3.2 Search Channels GB20 3.3 Display GB21 3.4 Result GB21 3.5 Installation Checklist GB22 4. Setup GB14 2.1 Using HDMI Cable GB14 2.2 Using DVI Converter GB15...
... GB28 5.2 Favourite List GB30 5.3 HD List GB30 5.4 History List GB31 6. TV Guide GB32 6.1 Table Guide GB32 6.2 List Guide GB33 6.3 Schedule GB33 6.4 Find GB35 GB5 User's Manual Installation Wizard GB20 3.1 Language GB20 3.2 Search Channels GB20 3.3 Display GB21 3.4 Result GB21 3.5 Installation Checklist GB22 4. Setup GB14 2.1 Using HDMI Cable GB14 2.2 Using DVI Converter GB15...
User Manual
Page 7
... GB55 12.3 Error Message GB56 12.4 Specification GB57 12.5 Glossary GB59 12.6 Service and Support GB60 12.7 OPEN SOURCE SOFTWARE NOTICE GB62 GB6 User's Manual Preferences GB36 7.1 Parental Control GB36 7.2 Language Setting GB37 7.3 Time Setting GB39 7.4 A/V Setting GB40 7.5 Other Settings GB42 8. Software Update GB53 11.1...Edit Channels GB43 8.1 Edit Channel List GB43 8.2 Edit Favourite List GB45 8.3 Display History List GB46 9. Installation GB47 9.1 Automatic Search GB47 9.2 Manual Search GB48 9.3 Software Update GB49 9.4 Default Setting GB49 10. Contents 7.
... GB55 12.3 Error Message GB56 12.4 Specification GB57 12.5 Glossary GB59 12.6 Service and Support GB60 12.7 OPEN SOURCE SOFTWARE NOTICE GB62 GB6 User's Manual Preferences GB36 7.1 Parental Control GB36 7.2 Language Setting GB37 7.3 Time Setting GB39 7.4 A/V Setting GB40 7.5 Other Settings GB42 8. Software Update GB53 11.1...Edit Channels GB43 8.1 Edit Channel List GB43 8.2 Edit Favourite List GB45 8.3 Display History List GB46 9. Installation GB47 9.1 Automatic Search GB47 9.2 Manual Search GB48 9.3 Software Update GB49 9.4 Default Setting GB49 10. Contents 7.

User Manual
Page 8
Before Using the Product This chapter provides detail instructions on the product and its accessories. 1.1 Package Contents Please check all package contents before using your product. 1. GB7 User's Manual Remote Control Batteries User's Manual User's Manual SCART Cable RF Cable HDMI Cable Note: • Faults may vary according to area. Always keep the battery inserted in the remote control. • Package contents may occur if the remote control is left without battery for a long time.
Before Using the Product This chapter provides detail instructions on the product and its accessories. 1.1 Package Contents Please check all package contents before using your product. 1. GB7 User's Manual Remote Control Batteries User's Manual User's Manual SCART Cable RF Cable HDMI Cable Note: • Faults may vary according to area. Always keep the battery inserted in the remote control. • Package contents may occur if the remote control is left without battery for a long time.
User Manual
Page 9
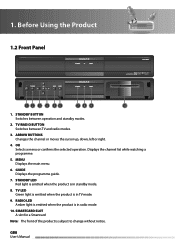
... is emitted when the product is in standby mode. 8. RADIO LED Amber light is emitted when the product is in radio mode. 10. GB8 User's Manual TV/RADIO BUTTON Switches between operation and standby modes. 2. MENU Displays the main menu. 6. SMARTCARD SLOT A slot for a Smartcard Note: The front of the product...
... is emitted when the product is in standby mode. 8. RADIO LED Amber light is emitted when the product is in radio mode. 10. GB8 User's Manual TV/RADIO BUTTON Switches between operation and standby modes. 2. MENU Displays the main menu. 6. SMARTCARD SLOT A slot for a Smartcard Note: The front of the product...

User Manual
Page 10
... colour) facing downwards. 3. Before Using the Product 1.3 Conditional Access Although some TV and radio services are free to expose the card slot. 2. e Smartcard GB9 User's Manual Notic Inserting the Smartcard The Smartcard looks similar to .
... colour) facing downwards. 3. Before Using the Product 1.3 Conditional Access Although some TV and radio services are free to expose the card slot. 2. e Smartcard GB9 User's Manual Notic Inserting the Smartcard The Smartcard looks similar to .

User Manual
Page 11
... TV or VCR using an RF cable. 3. COMPONENT(YPbPr) Connects to the RF IN of the product is subject to change without notice. GB10 User's Manual 1. HDMI Connects to the TV or VCR using an HDMI cable. 6. AUDIO Connects to the TV using an RCA cable. 11. VCR SCART Connects to...
... TV or VCR using an RF cable. 3. COMPONENT(YPbPr) Connects to the RF IN of the product is subject to change without notice. GB10 User's Manual 1. HDMI Connects to the TV or VCR using an HDMI cable. 6. AUDIO Connects to the TV using an RCA cable. 11. VCR SCART Connects to...

User Manual
Page 12
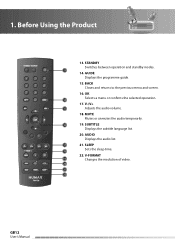
... is subject to change without notice. Before Using the Product 1.5 Remote Control 1 2 3 4 5 6 7 8 9 10 11 12 1. i (INFORMATION) Displays the channel and programme information. 11. GB11 User's Manual TV/RADIO Switches between the teletext and TV modes. 12. ARROW BUTTONS Navigates through the menu options. 7.
... is subject to change without notice. Before Using the Product 1.5 Remote Control 1 2 3 4 5 6 7 8 9 10 11 12 1. i (INFORMATION) Displays the channel and programme information. 11. GB11 User's Manual TV/RADIO Switches between the teletext and TV modes. 12. ARROW BUTTONS Navigates through the menu options. 7.
User Manual
Page 13
Before Using the Product 13. STANDBY Switches between operation and standby modes. 13 14. MUTE Mutes or unmutes the audio temporarily. 16 19. V-FORMAT 19 Changes the resolution of video. 20 21 22 GB12 User's Manual BACK Closes and returns to the previous menu and screen. 16. GUIDE Displays the programme guide. 15. V-/V+ 15 Adjusts the audio volume. 18. OK Selects a menu or confirms the selected operation. 14 17. AUDIO Displays the audio list. 17 21. SLEEP Sets the sleep time. 18 22. SUBTITLE Displays the subtitle language list. 20. 1.
Before Using the Product 13. STANDBY Switches between operation and standby modes. 13 14. MUTE Mutes or unmutes the audio temporarily. 16 19. V-FORMAT 19 Changes the resolution of video. 20 21 22 GB12 User's Manual BACK Closes and returns to the previous menu and screen. 16. GUIDE Displays the programme guide. 15. V-/V+ 15 Adjusts the audio volume. 18. OK Selects a menu or confirms the selected operation. 14 17. AUDIO Displays the audio list. 17 21. SLEEP Sets the sleep time. 18 22. SUBTITLE Displays the subtitle language list. 20. 1.
User Manual
Page 14
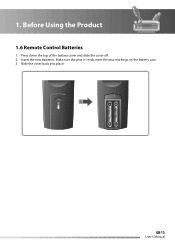
Make sure the plus (+) ends meet the plus markings on the battery case. 3. GB13 User's Manual Insert the new batteries. Press down the top of the battery cover and slide the cover off. 2. Slide the cover back into place. Before Using the Product 1.6 Remote Control Batteries 1. iˆ››Œ™ 1.
Make sure the plus (+) ends meet the plus markings on the battery case. 3. GB13 User's Manual Insert the new batteries. Press down the top of the battery cover and slide the cover off. 2. Slide the cover back into place. Before Using the Product 1.6 Remote Control Batteries 1. iˆ››Œ™ 1.
User Manual
Page 15
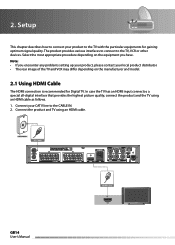
... product distributor. • The rear image of the TV and VCR may differ depending on the equipment you have. Cable Outlet RF Cable GB14 User's Manual HDMI Cable HDMI 2. Connect the product and TV using an HDMI cable as follows. 1. Connect your product to the TV, VCR or other devices. Select...
... product distributor. • The rear image of the TV and VCR may differ depending on the equipment you have. Cable Outlet RF Cable GB14 User's Manual HDMI Cable HDMI 2. Connect the product and TV using an HDMI cable as follows. 1. Connect your product to the TV, VCR or other devices. Select...

User Manual
Page 16
... the HDMI input on the product and the other end to the HDMI to the CABLE IN. 2. Cable Outlet RF Cable HDMI Cable GB15 User's Manual Setup 2.2 Using DVI Converter The DVI connection using an S/PDIF cable. Connect your CATV line to DVI converter. 3. Connect the DVI converter to the TV...
... the HDMI input on the product and the other end to the HDMI to the CABLE IN. 2. Cable Outlet RF Cable HDMI Cable GB15 User's Manual Setup 2.2 Using DVI Converter The DVI connection using an S/PDIF cable. Connect your CATV line to DVI converter. 3. Connect the DVI converter to the TV...
User Manual
Page 17
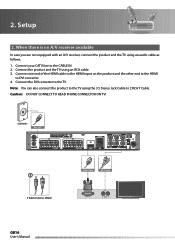
... TV using an audio cable as follows. 1. Caution: DO NOT CONNECT TO HEAD PHONE CONNECTOR ON TV! Cable Outlet RF Cable HDMI Cable GB16 User's Manual Note: You can also connect the product to the TV using the 3.5 Stereo Jack Cable to the CABLE IN. 2. Connect your CATV line to 2 RCA...
... TV using an audio cable as follows. 1. Caution: DO NOT CONNECT TO HEAD PHONE CONNECTOR ON TV! Cable Outlet RF Cable HDMI Cable GB16 User's Manual Note: You can also connect the product to the TV using the 3.5 Stereo Jack Cable to the CABLE IN. 2. Connect your CATV line to 2 RCA...

User Manual
Page 18
... and the Dolby Digital decoder using the component cable. Cable Outlet RF Cable COMPONENT Cable RCA Cable S/PDIF Cable COMPONENT IN L AUDIO R S/PDIF GB17 User's Manual Connect the product and the TV using a component cable. Connect your CATV line to the CABLE IN. 2. Connect the product and the TV using a component...
... and the Dolby Digital decoder using the component cable. Cable Outlet RF Cable COMPONENT Cable RCA Cable S/PDIF Cable COMPONENT IN L AUDIO R S/PDIF GB17 User's Manual Connect the product and the TV using a component cable. Connect your CATV line to the CABLE IN. 2. Connect the product and the TV using a component...
User Manual
Page 19
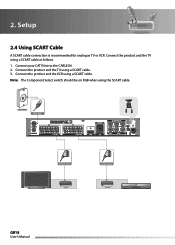
Connect your CATV line to the CABLE IN. 2. Cable Outlet RF Cable SCART Cable TV SCART SCART Cable VCR SCART GB18 User's Manual Note: The Component Select switch should be on RGB when using a SCART cable as follows. 1. Connect the product and the TV using the SCART cable. Connect the product and the VCR using a SCART cable. 3. Setup 2.4 Using SCART Cable A SCART cable connection is recommended for analogue TV or VCR. Connect the product and the TV using a SCART cable. 2.
Connect your CATV line to the CABLE IN. 2. Cable Outlet RF Cable SCART Cable TV SCART SCART Cable VCR SCART GB18 User's Manual Note: The Component Select switch should be on RGB when using a SCART cable as follows. 1. Connect the product and the TV using the SCART cable. Connect the product and the VCR using a SCART cable. 3. Setup 2.4 Using SCART Cable A SCART cable connection is recommended for analogue TV or VCR. Connect the product and the TV using a SCART cable. 2.

User Manual
Page 20
GB19 User's Manual Setup 2.5 Powering On 1. Power on by pressing the STANDBY button of the remote control or the STANDBY button at the front of the product to a wall outlet. 2. 2. Connect the power cord of the product.
GB19 User's Manual Setup 2.5 Powering On 1. Power on by pressing the STANDBY button of the remote control or the STANDBY button at the front of the product to a wall outlet. 2. 2. Connect the power cord of the product.


