

User Manual
Page 1
Oletusavauskoodi on 0000. Digital Cable Receiver Kaapeliverkon digisovitin Digital-tvmottagare User's Manual Användarmanual CXHD-5000C The default password is 0000. Standardlösenordet är 0000.
Oletusavauskoodi on 0000. Digital Cable Receiver Kaapeliverkon digisovitin Digital-tvmottagare User's Manual Användarmanual CXHD-5000C The default password is 0000. Standardlösenordet är 0000.
User Manual
Page 2
...8226; Nagravision is a registered trademark of KUDELSKI S.A. • Conax is subject to be copied, used or translated in this user's manual is a trademark of copyright and copyright law. Dolby and the double-D symbol are trademarks of the information contained in part or whole ...without notice. Please read this user's manual carefully to change without HUMAX's prior consent in this manual. Copyright (Copyright © 2009 HUMAX Corporation) Not to be able to your product for purchasing a HUMAX product.
...8226; Nagravision is a registered trademark of KUDELSKI S.A. • Conax is subject to be copied, used or translated in this user's manual is a trademark of copyright and copyright law. Dolby and the double-D symbol are trademarks of the information contained in part or whole ...without notice. Please read this user's manual carefully to change without HUMAX's prior consent in this manual. Copyright (Copyright © 2009 HUMAX Corporation) Not to be able to your product for purchasing a HUMAX product.
User Manual
Page 3
... will prevent possible harm to the environment or human health from other commercial wastes for disposal. Notice Warnings, Cautions and Notes Throughout the whole manual, pay special attention to the following marks that presents a risk of electric shock or personal injury. Please separate this item for details of ...• Business users: Contact your supplier and check the terms and conditions of electric shock, do not remove cover (or back). GB2 User's Manual This symbol indicates dangerous voltage inside . Meaning of Symbols To reduce the risk of the purchase contract.
... will prevent possible harm to the environment or human health from other commercial wastes for disposal. Notice Warnings, Cautions and Notes Throughout the whole manual, pay special attention to the following marks that presents a risk of electric shock or personal injury. Please separate this item for details of ...• Business users: Contact your supplier and check the terms and conditions of electric shock, do not remove cover (or back). GB2 User's Manual This symbol indicates dangerous voltage inside . Meaning of Symbols To reduce the risk of the purchase contract.
User Manual
Page 4
... similar surface. • If you place the product on top of the product must be hazardous or cause damage to dust the product. 5. GB3 User's Manual Safety Warning This product has been manufactured to the appliance. In addition, no solvents) to the product. 7. ATTACHMENTS • Do not use any cables. 8. CONNECTION...
... similar surface. • If you place the product on top of the product must be hazardous or cause damage to dust the product. 5. GB3 User's Manual Safety Warning This product has been manufactured to the appliance. In addition, no solvents) to the product. 7. ATTACHMENTS • Do not use any cables. 8. CONNECTION...

User Manual
Page 5
... when defective, serious damage can touch dangerous voltage points or damage parts. 12. Warning 1. If you continue to use the product when it . GB4 User's Manual REPLACEMENT of PARTS • When replacement of time. To avoid electrical shock; • Do not open the main body. • Do not insert metal or...
... when defective, serious damage can touch dangerous voltage points or damage parts. 12. Warning 1. If you continue to use the product when it . GB4 User's Manual REPLACEMENT of PARTS • When replacement of time. To avoid electrical shock; • Do not open the main body. • Do not insert metal or...
User Manual
Page 6
... Component Cable GB17 2.4 Using SCART Cable GB18 2.5 Powering On GB19 3. TV Guide GB32 6.1 Table Guide GB32 6.2 List Guide GB33 6.3 Schedule GB33 6.4 Find GB35 GB5 User's Manual Installation Wizard GB20 3.1 Language GB20 3.2 Search Channels GB20 3.3 Display GB21 3.4 Result GB21 3.5 Installation Checklist GB22 4. Basic Operation GB23 4.1 Switching Channel GB23 4.2 Volume Control GB23 4.3 Resolution...
... Component Cable GB17 2.4 Using SCART Cable GB18 2.5 Powering On GB19 3. TV Guide GB32 6.1 Table Guide GB32 6.2 List Guide GB33 6.3 Schedule GB33 6.4 Find GB35 GB5 User's Manual Installation Wizard GB20 3.1 Language GB20 3.2 Search Channels GB20 3.3 Display GB21 3.4 Result GB21 3.5 Installation Checklist GB22 4. Basic Operation GB23 4.1 Switching Channel GB23 4.2 Volume Control GB23 4.3 Resolution...
User Manual
Page 7
... Shooting GB55 12.3 Error Message GB56 12.4 Specification GB57 12.5 Glossary GB59 12.6 Service and Support GB60 12.7 OPEN SOURCE SOFTWARE NOTICE GB62 GB6 User's Manual Edit Channels GB43 8.1 Edit Channel List GB43 8.2 Edit Favourite List GB45 8.3 Display History List GB46 9. Installation GB47 9.1 Automatic Search GB47...
... Shooting GB55 12.3 Error Message GB56 12.4 Specification GB57 12.5 Glossary GB59 12.6 Service and Support GB60 12.7 OPEN SOURCE SOFTWARE NOTICE GB62 GB6 User's Manual Edit Channels GB43 8.1 Edit Channel List GB43 8.2 Edit Favourite List GB45 8.3 Display History List GB46 9. Installation GB47 9.1 Automatic Search GB47...

User Manual
Page 8
1. GB7 User's Manual Remote Control Batteries User's Manual User's Manual SCART Cable RF Cable HDMI Cable Note: • Faults may vary according to area. Always keep the battery inserted in the remote control. • Package contents may occur if the remote control is left without battery for a long time. Before Using the Product This chapter provides detail instructions on the product and its accessories. 1.1 Package Contents Please check all package contents before using your product.
1. GB7 User's Manual Remote Control Batteries User's Manual User's Manual SCART Cable RF Cable HDMI Cable Note: • Faults may vary according to area. Always keep the battery inserted in the remote control. • Package contents may occur if the remote control is left without battery for a long time. Before Using the Product This chapter provides detail instructions on the product and its accessories. 1.1 Package Contents Please check all package contents before using your product.

User Manual
Page 9
... is emitted when the product is in TV mode. 9. 1. ARROW BUTTONS Changes the channel or moves the cursor up, down, left or right. 4. GB8 User's Manual TV/RADIO BUTTON Switches between operation and standby modes. 2. Displays the channel list while watching a programme. 5. Before Using the Product 1.2 Front Panel 1 2 3 4 56 789 10...
... is emitted when the product is in TV mode. 9. 1. ARROW BUTTONS Changes the channel or moves the cursor up, down, left or right. 4. GB8 User's Manual TV/RADIO BUTTON Switches between operation and standby modes. 2. Displays the channel list while watching a programme. 5. Before Using the Product 1.2 Front Panel 1 2 3 4 56 789 10...

User Manual
Page 10
... Smartcard horizontally with the electronic chip (small square-shaped, gold in colour) facing downwards. 3. 1. Inserting the Smartcard The Smartcard looks similar to . e Smartcard GB9 User's Manual Notic Open the right-hand flap on a subscription basis and can be enjoyed via a Conditional Access component. The Conditional Access component is inserted into the...
... Smartcard horizontally with the electronic chip (small square-shaped, gold in colour) facing downwards. 3. 1. Inserting the Smartcard The Smartcard looks similar to . e Smartcard GB9 User's Manual Notic Open the right-hand flap on a subscription basis and can be enjoyed via a Conditional Access component. The Conditional Access component is inserted into the...

User Manual
Page 11
... IN of the product is subject to the TV or VCR using a component cable. 9. ETHERNET Ethernet port (for changing video. (default: YPbPr) 12. GB10 User's Manual AUDIO Connects to change without notice. 1. COMPONENT(YPbPr) Connects to the TV using an RCA cable. 10. CABLE IN Connects a network cable. 2. HDMI Connects to...
... IN of the product is subject to the TV or VCR using a component cable. 9. ETHERNET Ethernet port (for changing video. (default: YPbPr) 12. GB10 User's Manual AUDIO Connects to change without notice. 1. COMPONENT(YPbPr) Connects to the TV using an RCA cable. 10. CABLE IN Connects a network cable. 2. HDMI Connects to...

User Manual
Page 12
... subject to change without notice. EXIT Exits all On-Screen Display (OSD) screens. 6. TV/RADIO Switches between the teletext and TV modes. 12. GB11 User's Manual ARROW BUTTONS Navigates through the menu options. 7. TEXT Switches between TV and radio modes. 3. NUMERIC(0-9) BUTTONS Enters a TV/radio channel number or menu option number...
... subject to change without notice. EXIT Exits all On-Screen Display (OSD) screens. 6. TV/RADIO Switches between the teletext and TV modes. 12. GB11 User's Manual ARROW BUTTONS Navigates through the menu options. 7. TEXT Switches between TV and radio modes. 3. NUMERIC(0-9) BUTTONS Enters a TV/radio channel number or menu option number...

User Manual
Page 13
STANDBY Switches between operation and standby modes. 13 14. OK Selects a menu or confirms the selected operation. 14 17. SUBTITLE Displays the subtitle language list. 20. BACK Closes and returns to the previous menu and screen. 16. GUIDE Displays the programme guide. 15. SLEEP Sets the sleep time. 18 22. AUDIO Displays the audio list. 17 21. MUTE Mutes or unmutes the audio temporarily. 16 19. V-FORMAT 19 Changes the resolution of video. 20 21 22 GB12 User's Manual Before Using the Product 13. V-/V+ 15 Adjusts the audio volume. 18. 1.
STANDBY Switches between operation and standby modes. 13 14. OK Selects a menu or confirms the selected operation. 14 17. SUBTITLE Displays the subtitle language list. 20. BACK Closes and returns to the previous menu and screen. 16. GUIDE Displays the programme guide. 15. SLEEP Sets the sleep time. 18 22. AUDIO Displays the audio list. 17 21. MUTE Mutes or unmutes the audio temporarily. 16 19. V-FORMAT 19 Changes the resolution of video. 20 21 22 GB12 User's Manual Before Using the Product 13. V-/V+ 15 Adjusts the audio volume. 18. 1.

User Manual
Page 14
Before Using the Product 1.6 Remote Control Batteries 1. Make sure the plus (+) ends meet the plus markings on the battery case. 3. Slide the cover back into place. GB13 User's Manual Insert the new batteries. iˆ››Œ™ 1. Press down the top of the battery cover and slide the cover off. 2.
Before Using the Product 1.6 Remote Control Batteries 1. Make sure the plus (+) ends meet the plus markings on the battery case. 3. Slide the cover back into place. GB13 User's Manual Insert the new batteries. iˆ››Œ™ 1. Press down the top of the battery cover and slide the cover off. 2.
User Manual
Page 15
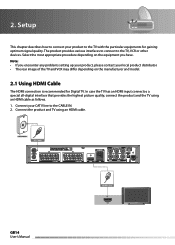
... depending on the manufacturer and model. 2.1 Using HDMI Cable The HDMI connection is recommended for gaining optimum signal quality. Cable Outlet RF Cable GB14 User's Manual HDMI Cable HDMI Note: • If you encounter any problems setting up your product, please contact your local product distributor. • The rear image of...
... depending on the manufacturer and model. 2.1 Using HDMI Cable The HDMI connection is recommended for gaining optimum signal quality. Cable Outlet RF Cable GB14 User's Manual HDMI Cable HDMI Note: • If you encounter any problems setting up your product, please contact your local product distributor. • The rear image of...

User Manual
Page 16
... the HDMI input on the product and the other end to the HDMI to the CABLE IN. 2. Cable Outlet RF Cable HDMI Cable GB15 User's Manual
... the HDMI input on the product and the other end to the HDMI to the CABLE IN. 2. Cable Outlet RF Cable HDMI Cable GB15 User's Manual
User Manual
Page 17
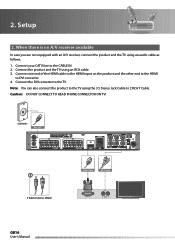
... you are not equipped with an A/V receiver, connect the product and the TV using an RCA cable. 3. Cable Outlet RF Cable HDMI Cable GB16 User's Manual Connect your CATV line to the TV. Setup 2. Connect the product and the TV using an audio cable as follows. 1. Connect the DVI converter to...
... you are not equipped with an A/V receiver, connect the product and the TV using an RCA cable. 3. Cable Outlet RF Cable HDMI Cable GB16 User's Manual Connect your CATV line to the TV. Setup 2. Connect the product and the TV using an audio cable as follows. 1. Connect the DVI converter to...

User Manual
Page 18
... product and the Dolby Digital decoder using a component cable. Cable Outlet RF Cable COMPONENT Cable RCA Cable S/PDIF Cable COMPONENT IN L AUDIO R S/PDIF GB17 User's Manual Connect your CATV line to the CABLE IN. 2. 2.
... product and the Dolby Digital decoder using a component cable. Cable Outlet RF Cable COMPONENT Cable RCA Cable S/PDIF Cable COMPONENT IN L AUDIO R S/PDIF GB17 User's Manual Connect your CATV line to the CABLE IN. 2. 2.
User Manual
Page 19
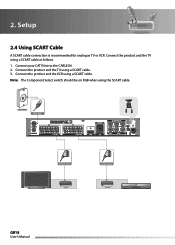
Connect the product and the TV using a SCART cable. Cable Outlet RF Cable SCART Cable TV SCART SCART Cable VCR SCART GB18 User's Manual 2. Connect the product and the VCR using a SCART cable. 3. Setup 2.4 Using SCART Cable A SCART cable connection is recommended for analogue TV or VCR. Connect your CATV line to the CABLE IN. 2. Note: The Component Select switch should be on RGB when using a SCART cable as follows. 1. Connect the product and the TV using the SCART cable.
Connect the product and the TV using a SCART cable. Cable Outlet RF Cable SCART Cable TV SCART SCART Cable VCR SCART GB18 User's Manual 2. Connect the product and the VCR using a SCART cable. 3. Setup 2.4 Using SCART Cable A SCART cable connection is recommended for analogue TV or VCR. Connect your CATV line to the CABLE IN. 2. Note: The Component Select switch should be on RGB when using a SCART cable as follows. 1. Connect the product and the TV using the SCART cable.

User Manual
Page 20
Power on by pressing the STANDBY button of the remote control or the STANDBY button at the front of the product to a wall outlet. 2. GB19 User's Manual 2. Setup 2.5 Powering On 1. Connect the power cord of the product.
Power on by pressing the STANDBY button of the remote control or the STANDBY button at the front of the product to a wall outlet. 2. GB19 User's Manual 2. Setup 2.5 Powering On 1. Connect the power cord of the product.


