
User Manual
Page 1
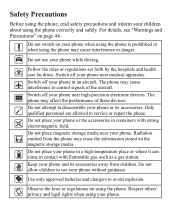
...Before using the phone, read safety precautions and inform your phone or its accessories away from the phone may erase the information stored on using the phone. Switch off your phone while driving. Do not place your phone near high-precision electronic devices. The phone may affect the...children to disassemble your children about using the phone correctly and safely. Do not use your phone. Follow the rules or regulations set forth by the hospitals and health care facilities. Keep your phone. Switch off your phone or the accessories in containers with flammable ...
...Before using the phone, read safety precautions and inform your phone or its accessories away from the phone may erase the information stored on using the phone. Switch off your phone while driving. Do not place your phone near high-precision electronic devices. The phone may affect the...children to disassemble your children about using the phone correctly and safely. Do not use your phone. Follow the rules or regulations set forth by the hospitals and health care facilities. Keep your phone. Switch off your phone or the accessories in containers with flammable ...
User Manual
Page 4
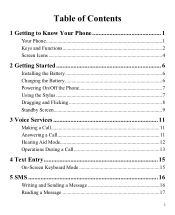
Table of Contents 1 Getting to Know Your Phone 1 Your Phone 1 Keys and Functions 2 Screen Icons 4 2 Getting Started 6 Installing the Battery 6 Charging the Battery 6 Powering On/Off the Phone 7 Using the Stylus 7 Dragging and Flicking 8 Standby Screen 9 3 Voice Services 11 Making a Call 11 Answering a Call 11 Hearing Aid Mode 12 Operations During a Call 13 4 Text Entry 15 On-Screen Keyboard Mode 15 5 SMS 16 Writing and Sending a Message 16 Reading a Message 17 i
Table of Contents 1 Getting to Know Your Phone 1 Your Phone 1 Keys and Functions 2 Screen Icons 4 2 Getting Started 6 Installing the Battery 6 Charging the Battery 6 Powering On/Off the Phone 7 Using the Stylus 7 Dragging and Flicking 8 Standby Screen 9 3 Voice Services 11 Making a Call 11 Answering a Call 11 Hearing Aid Mode 12 Operations During a Call 13 4 Text Entry 15 On-Screen Keyboard Mode 15 5 SMS 16 Writing and Sending a Message 16 Reading a Message 17 i
User Manual
Page 6
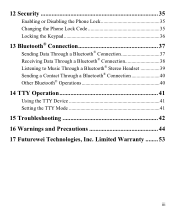
12 Security 35 Enabling or Disabling the Phone Lock 35 Changing the Phone Lock Code 35 Locking the Keypad 36 13 Bluetooth® Connection 37 Sending Data Through a Bluetooth® Connection 37 Receiving Data Through a Bluetooth® Connection ...
12 Security 35 Enabling or Disabling the Phone Lock 35 Changing the Phone Lock Code 35 Locking the Keypad 36 13 Bluetooth® Connection 37 Sending Data Through a Bluetooth® Connection 37 Receiving Data Through a Bluetooth® Connection ...
User Manual
Page 7
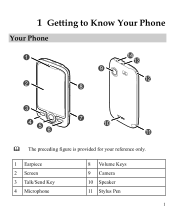
1 Getting to Know Your Phone Your Phone 1 14 13 9 12 2 8 3 4 56 7 10 11 The preceding figure is provided for your reference only. 1 Earpiece 2 Screen 3 Talk/Send Key 4 Microphone 8 Volume Keys 9 Camera 10 Speaker 11 Stylus Pen 1
1 Getting to Know Your Phone Your Phone 1 14 13 9 12 2 8 3 4 56 7 10 11 The preceding figure is provided for your reference only. 1 Earpiece 2 Screen 3 Talk/Send Key 4 Microphone 8 Volume Keys 9 Camera 10 Speaker 11 Stylus Pen 1
User Manual
Page 8
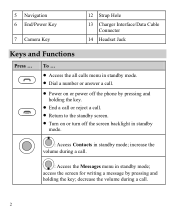
... or answer a call . 2 To ... Access the all calls menu in standby mode; increase the volume during a call . Power on or power off the phone by pressing and holding the key. End a call or reject a call. Return to the standby screen. Turn on or turn off the...
... or answer a call . 2 To ... Access the all calls menu in standby mode; increase the volume during a call . Power on or power off the phone by pressing and holding the key. End a call or reject a call. Return to the standby screen. Turn on or turn off the...
User Manual
Page 10
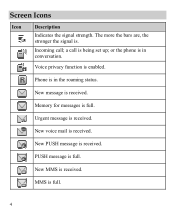
The more the bars are, the stronger the signal is received. or the phone is in the roaming status. New message is . Memory for messages is received. Urgent message is full. MMS is received. Phone is being set up; New voice mail is full. 4 PUSH message is received. a call ; New MMS is full. Voice privacy function is received. Incoming call is in conversation. New PUSH message is enabled. Screen Icons Icon Description Indicates the signal strength.
The more the bars are, the stronger the signal is received. or the phone is in the roaming status. New message is . Memory for messages is received. Urgent message is full. MMS is received. Phone is being set up; New voice mail is full. 4 PUSH message is received. a call ; New MMS is full. Voice privacy function is received. Incoming call is in conversation. New PUSH message is enabled. Screen Icons Icon Description Indicates the signal strength.
User Manual
Page 11
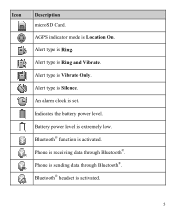
Icon Description microSD Card. Alert type is Vibrate Only. Alert type is Ring and Vibrate. An alarm clock is activated. Bluetooth® function is set. Phone is receiving data through Bluetooth®. AGPS indicator mode is activated. 5 Indicates the battery power level. Phone is Ring. Bluetooth® headset is Location On. Battery power level is Silence. Alert type is extremely low. Alert type is sending data through Bluetooth®.
Icon Description microSD Card. Alert type is Vibrate Only. Alert type is Ring and Vibrate. An alarm clock is activated. Bluetooth® function is set. Phone is receiving data through Bluetooth®. AGPS indicator mode is activated. 5 Indicates the battery power level. Phone is Ring. Bluetooth® headset is Location On. Battery power level is Silence. Alert type is extremely low. Alert type is sending data through Bluetooth®.
User Manual
Page 12
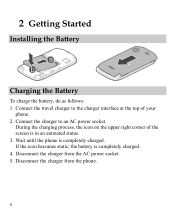
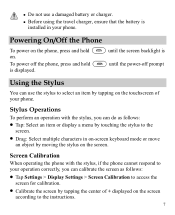
During the charging process, the icon on the upper right corner of your phone. 2. Wait until the phone is in an animated status. 3. Disconnect the charger from the AC power socket. 5. Connect the travel charger to an AC power socket. Connect the charger to the charger interface at the top of the screen is completely charged. Disconnect the charger from the phone. 6 If the icon becomes static, the battery is completely charged. 4. 2 Getting Started Installing the Battery Charging the Battery To charge the battery, do as follows: 1.
During the charging process, the icon on the upper right corner of your phone. 2. Wait until the phone is in an animated status. 3. Disconnect the charger from the AC power socket. 5. Connect the travel charger to an AC power socket. Connect the charger to the charger interface at the top of the screen is completely charged. Disconnect the charger from the phone. 6 If the icon becomes static, the battery is completely charged. 4. 2 Getting Started Installing the Battery Charging the Battery To charge the battery, do as follows: 1.
User Manual
Page 13
... in on-screen keyboard mode or move an object by moving the stylus on the screen according to the instructions. 7 Screen Calibration When operating the phone with the stylus, you can calibrate the screen as follows: Tap: Select an item or display a menu by touching the stylus to ...select an item by tapping the center of your phone. To power off prompt Using the Stylus You can do as follows: Tap Settings > Display Settings > Screen Calibration to access the screen for...
... in on-screen keyboard mode or move an object by moving the stylus on the screen according to the instructions. 7 Screen Calibration When operating the phone with the stylus, you can calibrate the screen as follows: Tap: Select an item or display a menu by touching the stylus to ...select an item by tapping the center of your phone. To power off prompt Using the Stylus You can do as follows: Tap Settings > Display Settings > Screen Calibration to access the screen for...
User Manual
Page 14
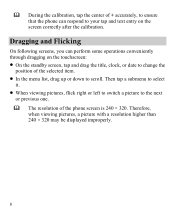
... to select it. When viewing pictures, flick right or left to switch a picture to the next or previous one. The resolution of the phone screen is 240 × 320. Therefore, when viewing pictures, a picture with a resolution higher than 240 × 320 may be displayed improperly. 8 Dragging and Flicking On... item. In the menu list, drag up or down to scroll. During the calibration, tap the center of + accurately, to ensure that the phone can perform some operations conveniently through dragging on the screen correctly after the calibration.
... to select it. When viewing pictures, flick right or left to switch a picture to the next or previous one. The resolution of the phone screen is 240 × 320. Therefore, when viewing pictures, a picture with a resolution higher than 240 × 320 may be displayed improperly. 8 Dragging and Flicking On... item. In the menu list, drag up or down to scroll. During the calibration, tap the center of + accurately, to ensure that the phone can perform some operations conveniently through dragging on the screen correctly after the calibration.
User Manual
Page 17
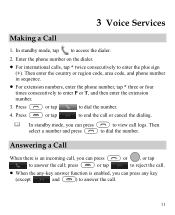
...(except and ) to answer the call logs. Answering a Call When there is enabled, you can press to answer the call. 11 Enter the phone number on the dialer. For international calls, tap * twice consecutively to dial the number. Then select a number and press to enter ...can press to enter P or T, and then enter the extension number. 3. Then enter the country or region code, area code, and phone number in sequence. For extension numbers, enter the phone number, tap * three or four times consecutively to view call ; 3 Voice Services Making a Call 1.
...(except and ) to answer the call logs. Answering a Call When there is enabled, you can press to answer the call. 11 Enter the phone number on the dialer. For international calls, tap * twice consecutively to dial the number. Then select a number and press to enter ...can press to enter P or T, and then enter the extension number. 3. Then enter the country or region code, area code, and phone number in sequence. For extension numbers, enter the phone number, tap * three or four times consecutively to view call ; 3 Voice Services Making a Call 1.

User Manual
Page 18
... the T-Coil function is enabled. After the T-Coil function is enabled, ensure that Bluetooth® is properly connected to the phone, the phone answers the call . 12 Then your phone can set the any-key answer function in the Settings > Call Settings > Answer Mode, and set the headset auto-answer function in...
... the T-Coil function is enabled. After the T-Coil function is enabled, ensure that Bluetooth® is properly connected to the phone, the phone answers the call . 12 Then your phone can set the any-key answer function in the Settings > Call Settings > Answer Mode, and set the headset auto-answer function in...
User Manual
Page 21
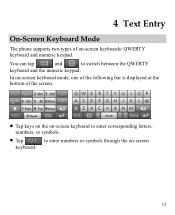
4 Text Entry On-Screen Keyboard Mode The phone supports two types of the screen. Tap keys on the on-screen keyboard to enter corresponding letters, numbers, or symbols. Tap to switch between the QWERTY keyboard and the numeric keypad. In on-screen keyboard mode, one of the following bar is displayed at the bottom of on -screen keyboard. 15 You can tap and to enter numbers or symbols through the on -screen keyboards: QWERTY keyboard and numeric keypad.
4 Text Entry On-Screen Keyboard Mode The phone supports two types of the screen. Tap keys on the on-screen keyboard to enter corresponding letters, numbers, or symbols. Tap to switch between the QWERTY keyboard and the numeric keypad. In on-screen keyboard mode, one of the following bar is displayed at the bottom of on -screen keyboard. 15 You can tap and to enter numbers or symbols through the on -screen keyboards: QWERTY keyboard and numeric keypad.
User Manual
Page 22
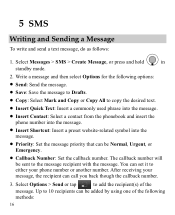
Write a message and then select Options for the following methods: 16 After receiving your phone number or another number. Select Messages > SMS > Create Message, or press and hold in standby mode. 2. The callback number will be added by ...desired text. Insert Quick Text: Insert a commonly used phrase into the message. Insert Contact: Select a contact from the phonebook and insert the phone number into the message. Insert Shortcut: Insert a preset website-related symbol into the message. Priority: Set the message priority that can call you...
Write a message and then select Options for the following methods: 16 After receiving your phone number or another number. Select Messages > SMS > Create Message, or press and hold in standby mode. 2. The callback number will be added by ...desired text. Insert Quick Text: Insert a commonly used phrase into the message. Insert Contact: Select a contact from the phonebook and insert the phone number into the message. Insert Shortcut: Insert a preset website-related symbol into the message. Priority: Set the message priority that can call you...
User Manual
Page 23
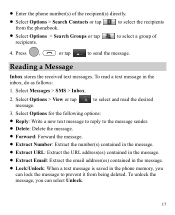
... Options > View or tap message. To unlock the message, you can lock the message to select and read a text message in the phone memory, you can select Unlock. 17 Select Options for the following options: Reply: Write a new text message to reply to select... the recipients Select Options > Search Groups or tap recipients. Enter the phone number(s) of 4. Reading a Message Inbox stores the received text messages. to send the message. to the message sender. Delete: Delete the message...
... Options > View or tap message. To unlock the message, you can lock the message to select and read a text message in the phone memory, you can select Unlock. 17 Select Options for the following options: Reply: Write a new text message to reply to select... the recipients Select Options > Search Groups or tap recipients. Enter the phone number(s) of 4. Reading a Message Inbox stores the received text messages. to send the message. to the message sender. Delete: Delete the message...
User Manual
Page 24
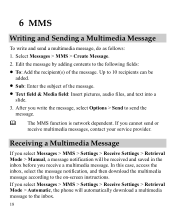
... send the message. The MMS function is network dependent. Receiving a Multimedia Message If you select Messages > MMS > Settings > Receive Settings > Retrieval Mode > Automatic, the phone will be added. Sub: Enter the subject of the message. Edit the message by adding contents to the on-screen instructions.
... send the message. The MMS function is network dependent. Receiving a Multimedia Message If you select Messages > MMS > Settings > Receive Settings > Retrieval Mode > Automatic, the phone will be added. Sub: Enter the subject of the message. Edit the message by adding contents to the on-screen instructions.
User Manual
Page 28
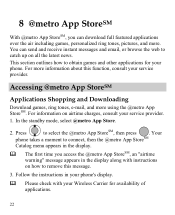
... your Wireless Carrier for your service provider. 1. For more using the @metro App StoreSM. For information on airtime charges, consult your phone. Accessing @metro App StoreSM Applications Shopping and Downloading Download games, ring tones, e-mail, and more information about this message. 3. Press...8 @metro App StoreSM With @metro App StoreSM, you access the @metro App StoreSM, an "airtime warning" message appears in your phone's display. Please check with instructions on how to remove this function, consult your service provider. This section outlines how to select...
... your Wireless Carrier for your service provider. 1. For more using the @metro App StoreSM. For information on airtime charges, consult your phone. Accessing @metro App StoreSM Applications Shopping and Downloading Download games, ring tones, e-mail, and more information about this message. 3. Press...8 @metro App StoreSM With @metro App StoreSM, you access the @metro App StoreSM, an "airtime warning" message appears in your phone's display. Please check with instructions on how to remove this function, consult your service provider. This section outlines how to select...

User Manual
Page 30
... buy an app you buy new and exciting, visit the @metro App StoreSM. It usually expires after a certain period of time or a number of your phone is designed to demonstrate the app's main features. Press to select the desired Help subject. 4. What do I pay When you will be charged for the...
... buy an app you buy new and exciting, visit the @metro App StoreSM. It usually expires after a certain period of time or a number of your phone is designed to demonstrate the app's main features. Press to select the desired Help subject. 4. What do I pay When you will be charged for the...
User Manual
Page 32
... Alarm Clock 1. Select On to disable all alarm clocks. 26 You can select the days on . 9 Alarm Clock After an alarm clock is enabled, the phone notifies you at a preset time if the phone is powered on which an alarm clock needs to repeat from the seven days in a week.
... Alarm Clock 1. Select On to disable all alarm clocks. 26 You can select the days on . 9 Alarm Clock After an alarm clock is enabled, the phone notifies you at a preset time if the phone is powered on which an alarm clock needs to repeat from the seven days in a week.
User Manual
Page 35
You can perform the following operations: Tap to set the phone to repeat all songs in order or to shuffle songs. Tap Tap to pause the song; You can perform the following operations: ... a song. 5 Tap Tap to play songs in a playlist, to repeat the current song, or not to repeat songs. 2 Tap to set the phone to play the previous track. to switch between the settings of a song.
You can perform the following operations: Tap to set the phone to repeat all songs in order or to shuffle songs. Tap Tap to pause the song; You can perform the following operations: ... a song. 5 Tap Tap to play songs in a playlist, to repeat the current song, or not to repeat songs. 2 Tap to set the phone to play the previous track. to switch between the settings of a song.


