
User Manual
Page 4
... Installation 2 Making a Call 4 Dial-up Access 4 Restoring the Factory Defaults 5 Using the Management Page 6 Management Page Overview 6 Viewing Configuration Info 6 Quick Setup 7 Configuring Your Computer 10 Wireless Configuration 10 Configuring the PC Network 11 Advanced Settings 12 Overview 12 System Management 12 SIM Settings 13 Mobile Network Settings 14 Dial-up Settings 15 DHCP Settings 16 Clip Settings 17 WLAN Settings 17 Security Settings 21 Firewall Switch 21 LAN MAC Filter 21 LAN IP Filter 21 Virtual Server 22 DMZ Settings 23 UPnP Settings 23 Remote Management...
... Installation 2 Making a Call 4 Dial-up Access 4 Restoring the Factory Defaults 5 Using the Management Page 6 Management Page Overview 6 Viewing Configuration Info 6 Quick Setup 7 Configuring Your Computer 10 Wireless Configuration 10 Configuring the PC Network 11 Advanced Settings 12 Overview 12 System Management 12 SIM Settings 13 Mobile Network Settings 14 Dial-up Settings 15 DHCP Settings 16 Clip Settings 17 WLAN Settings 17 Security Settings 21 Firewall Switch 21 LAN MAC Filter 21 LAN IP Filter 21 Virtual Server 22 DMZ Settings 23 UPnP Settings 23 Remote Management...
User Manual
Page 8
... to log in the address bar. 2 Select a user type, enter the password, and then click Login. • Admin: This user type is authorized to the antenna internal and uninstall the external antenna. The default password is admin. • User: This user type is user. Logging In to the Management Page Note You can choose whether to access the Internet as web browsing, and receiving or sending emails. Making a Call Internal/External Aerial switch Dial-up Access By default, the device dials...
... to log in the address bar. 2 Select a user type, enter the password, and then click Login. • Admin: This user type is authorized to the antenna internal and uninstall the external antenna. The default password is admin. • User: This user type is user. Logging In to the Management Page Note You can choose whether to access the Internet as web browsing, and receiving or sending emails. Making a Call Internal/External Aerial switch Dial-up Access By default, the device dials...
User Manual
Page 9
... access the Internet. Accessing the Internet 1 Click Connection. If you are restored to view the current network connection status. 3 Wait for several minutes. Restoring the Factory Defaults If you need to reconstruct the network or you forget the changes of some parameters, you are unavailable. • The SIM card is Manual, click Connect / Disconnect to connect to enter the PIN code, enter the correct one. Reset Reset: Press and hold it to restore factory defaults and reconfigure the device...
... access the Internet. Accessing the Internet 1 Click Connection. If you are restored to view the current network connection status. 3 Wait for several minutes. Restoring the Factory Defaults If you need to reconstruct the network or you forget the changes of some parameters, you are unavailable. • The SIM card is Manual, click Connect / Disconnect to connect to enter the PIN code, enter the correct one. Reset Reset: Press and hold it to restore factory defaults and reconfigure the device...

User Manual
Page 10
Advanced Configures the advanced settings. Logout Log out of the device. WAN The PPP dial-up The PPP dial-up connection is connection is unavailable. The WCDMA network is not established. Device Status The following table shows the main operations in the management page. SIG The signal strength from weak to the network. Item Description Basic Status Displays the parameter configuration status of the management page. Item Green icon Red icon SIM...
Advanced Configures the advanced settings. Logout Log out of the device. WAN The PPP dial-up The PPP dial-up connection is connection is unavailable. The WCDMA network is not established. Device Status The following table shows the main operations in the management page. SIG The signal strength from weak to the network. Item Description Basic Status Displays the parameter configuration status of the management page. Item Green icon Red icon SIM...
User Manual
Page 11
... the maximum idle time, the device disconnects the Internet connection. • Manual: The device connects to the Internet after you click Connect on the advanced status page. When the duration of no data is transmitted. • On Demand: The device automatically connects to the Internet when data transmission exists. Configuring WLAN Settings (Name) SSID: Enter a name for obtaining the access point name (APN) and IP address. To ensure the WLAN security, do not use the quick setup wizard to configure...
... the maximum idle time, the device disconnects the Internet connection. • Manual: The device connects to the Internet after you click Connect on the advanced status page. When the duration of no data is transmitted. • On Demand: The device automatically connects to the Internet when data transmission exists. Configuring WLAN Settings (Name) SSID: Enter a name for obtaining the access point name (APN) and IP address. To ensure the WLAN security, do not use the quick setup wizard to configure...
User Manual
Page 12
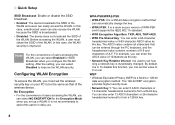
... a more secure version of the WLAN. Quick Setup SSID Broadcast: Enable or disable the SSID broadcast. • Enabled: The device broadcasts the SSID of the wireless device. Note For the convenience of users accessing the WLAN, you can set how long a network key is 0. For example, you can select Enabled for the Encryption Mode when you must obtain the SSID of WPA-PSK and it is dynamically changed. The 128-bit WEP encryption provides higher security level. • Network Key 1: You can also enter 13 ASCII...
... a more secure version of the WLAN. Quick Setup SSID Broadcast: Enable or disable the SSID broadcast. • Enabled: The device broadcasts the SSID of the wireless device. Note For the convenience of users accessing the WLAN, you can set how long a network key is 0. For example, you can select Enabled for the Encryption Mode when you must obtain the SSID of WPA-PSK and it is dynamically changed. The 128-bit WEP encryption provides higher security level. • Network Key 1: You can also enter 13 ASCII...

User Manual
Page 14
... the WLAN adapter user guide provided by the manufacturer. • For the encryption configurations, see "Configuring WLAN Encryption". • For SSID parameters configuration, see "Configuring WLAN Settings". 2 Click Show Wireless Networks to display the wireless network connection list. 3 Select the network connection that supports the IEEE 802.11 b/g protocol. • If the encryption function is enabled, you need to configure them as an example to describe how to configure your PC to connect to connect your PC can skip this part.
... the WLAN adapter user guide provided by the manufacturer. • For the encryption configurations, see "Configuring WLAN Encryption". • For SSID parameters configuration, see "Configuring WLAN Settings". 2 Click Show Wireless Networks to display the wireless network connection list. 3 Select the network connection that supports the IEEE 802.11 b/g protocol. • If the encryption function is enabled, you need to configure them as an example to describe how to configure your PC to connect to connect your PC can skip this part.
User Manual
Page 15
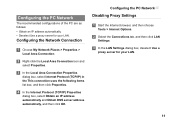
Configuring the PC Network Disabling Proxy Settings 1 Start the Internet browser, and then choose Tools > Internet Options. 2 Select the Connections tab, and then click LAN Settings. 3 In the LAN Settings dialog box, deselect Use a proxy server for your LAN. 11 Configuring the Network Connection 1 Choose My Network Places > Properties > Local Area Connection. 2 Right-click the Local Area Connection icon and select Properties. 3 In the Local Area Connection Properties dialog box, select Internet Protocol (TCP...
Configuring the PC Network Disabling Proxy Settings 1 Start the Internet browser, and then choose Tools > Internet Options. 2 Select the Connections tab, and then click LAN Settings. 3 In the LAN Settings dialog box, deselect Use a proxy server for your LAN. 11 Configuring the Network Connection 1 Choose My Network Places > Properties > Local Area Connection. 2 Right-click the Local Area Connection icon and select Properties. 3 In the Local Area Connection Properties dialog box, select Internet Protocol (TCP...
User Manual
Page 16
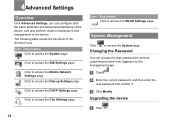
.... 12 Icon Description Click to access the System page. 4Advanced Settings Overview Click Advanced Settings, you can change the login password to prevent unauthorized users from logging in to the management page. 1 Click . 2 Enter the current password, and then enter the new password and confirm it. 3 Click Modify. Click to access the Mobile Network Settings page. Click to access the SIM Settings page. Click to the device. The following table shows...
.... 12 Icon Description Click to access the System page. 4Advanced Settings Overview Click Advanced Settings, you can change the login password to prevent unauthorized users from logging in to the management page. 1 Click . 2 Enter the current password, and then enter the new password and confirm it. 3 Click Modify. Click to access the Mobile Network Settings page. Click to access the SIM Settings page. Click to the device. The following table shows...
User Manual
Page 17
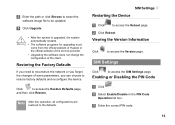
... website of the service provider. • Upgrading the software does not change the configuration of some parameters, you can choose to restore factory defaults and reconfigure the device. Enabling or Disabling the PIN Code 1 Click . 2 Select Enable/Disable in the PIN Code Operation list box. 3 Enter the correct PIN code. 13 2 Enter the path or click Browse to select the software image file to access the Reboot page. 2 Click Reboot. Restoring the Factory Defaults If you need to reconstruct the network...
... website of the service provider. • Upgrading the software does not change the configuration of some parameters, you can choose to restore factory defaults and reconfigure the device. Enabling or Disabling the PIN Code 1 Click . 2 Select Enable/Disable in the PIN Code Operation list box. 3 Enter the correct PIN code. 13 2 Enter the path or click Browse to select the software image file to access the Reboot page. 2 Click Reboot. Restoring the Factory Defaults If you need to reconstruct the network...
User Manual
Page 18
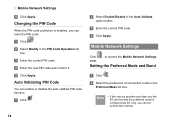
... button. 3 Enter the current PIN code. 4 Click Apply. Note • If the service provider provides only the 2G service and the preferred mode is enabled, you cannot access the Internet. 14 Mobile Network Settings Click page. to access the Mobile Network Settings Setting the Preferred Mode and Band 1 Click . 2 Select the preference of connection mode in the PIN Code Operation list box. 3 Enter the current PIN code. 4 Enter the new PIN code and confirm it. 5 Click Apply. Auto Validating PIN Code You can reset...
... button. 3 Enter the current PIN code. 4 Click Apply. Note • If the service provider provides only the 2G service and the preferred mode is enabled, you cannot access the Internet. 14 Mobile Network Settings Click page. to access the Mobile Network Settings Setting the Preferred Mode and Band 1 Click . 2 Select the preference of connection mode in the PIN Code Operation list box. 3 Enter the current PIN code. 4 Enter the new PIN code and confirm it. 5 Click Apply. Auto Validating PIN Code You can reset...

User Manual
Page 20
... device. DHCP Settings Click to access the DHCP Settings page, you need to set the mode for assigning IP addresses in a single data frame. • PPP Max Dial Time: Set the maximum waiting time when connecting to be deleted in the Profile List drop-down list. 2 Click Delete. If you are using the DHCP server, you can set the maximum number of bytes encapsulated in a LAN. Managing the Profile List Click to access the Profile Settings page. ◆ Creating a Profile 1 Enter...
... device. DHCP Settings Click to access the DHCP Settings page, you need to set the mode for assigning IP addresses in a single data frame. • PPP Max Dial Time: Set the maximum waiting time when connecting to be deleted in the Profile List drop-down list. 2 Click Delete. If you are using the DHCP server, you can set the maximum number of bytes encapsulated in a LAN. Managing the Profile List Click to access the Profile Settings page. ◆ Creating a Profile 1 Enter...

User Manual
Page 21
The minimum range is a single IP address. • DHCP Lease Time: The DHCP server automatically assigns an IP address to each device connected to another device. Thus, the IP address is used to access the Clip Settings page. 2 Select Clip Mode. 3 Click Apply. If the device is disconnected from 192.168.1.2 to access the WLAN Settings page. Note • The Start IP Address must be smaller than or equal to enable or disable the WLAN. 3 Click...
The minimum range is a single IP address. • DHCP Lease Time: The DHCP server automatically assigns an IP address to each device connected to another device. Thus, the IP address is used to access the Clip Settings page. 2 Select Clip Mode. 3 Click Apply. If the device is disconnected from 192.168.1.2 to access the WLAN Settings page. Note • The Start IP Address must be smaller than or equal to enable or disable the WLAN. 3 Click...
User Manual
Page 22
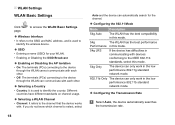
... a WLAN Channel • Channel: It refers to identify the country. WLAN Settings WLAN Basic Settings Click page. to access the WLAN Basic Settings ◆ Wireless Interface • It refers to the SSID and MAC address, and is used to the channel that the device works with devices conforming to the IEEE 802.11b standards, select this mode. 54g LRS If the device has difficulties in the low performance 802.11b standard network mode. ◆ Configuring...
... a WLAN Channel • Channel: It refers to identify the country. WLAN Settings WLAN Basic Settings Click page. to access the WLAN Basic Settings ◆ Wireless Interface • It refers to the SSID and MAC address, and is used to the channel that the device works with devices conforming to the IEEE 802.11b standards, select this mode. 54g LRS If the device has difficulties in the low performance 802.11b standard network mode. ◆ Configuring...
User Manual
Page 23
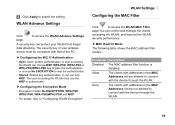
...WLAN. WLAN Settings Configuring the MAC Filter Click to access the WLAN MAC Filter page.You can choose WEP, WPA-PSK, WPA2-PSK or WPA-PSK|WPA2-PSK key to pass the authentication or choose No ENCRYPTION to connect with the device through the WLAN. 19 WLAN Advance Settings Click page. 2 Click Apply to "Configuring WLAN Encryption". It can protect your wireless device must use only WEP. to access the WLAN Advance Settings A security key can use the WEP to authenticate. ◆ Configuring the Encryption Mode • Encryption modes: No ENCRYPTION, WPA-PSK, WPA2-PSK, WPA...
...WLAN. WLAN Settings Configuring the MAC Filter Click to access the WLAN MAC Filter page.You can choose WEP, WPA-PSK, WPA2-PSK or WPA-PSK|WPA2-PSK key to pass the authentication or choose No ENCRYPTION to connect with the device through the WLAN. 19 WLAN Advance Settings Click page. 2 Click Apply to "Configuring WLAN Encryption". It can protect your wireless device must use only WEP. to access the WLAN Advance Settings A security key can use the WEP to authenticate. ◆ Configuring the Encryption Mode • Encryption modes: No ENCRYPTION, WPA-PSK, WPA2-PSK, WPA...
User Manual
Page 24
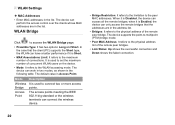
... remote bridges that the client (PC) supports the Short type, the WLAN can have a better performance if it is used to connect two or more access Bridge points. The default value is used to set the maximum number of concurrent WLAN users on the device. • Mode: It refers to the WLAN accessing mode. When it is Short. • MAX Associations Limit: It refers to the maximum number of connections. The device supports the point-to-multipoint (PTM) bridge mode. • Peer MAC Address...
... remote bridges that the client (PC) supports the Short type, the WLAN can have a better performance if it is used to connect two or more access Bridge points. The default value is used to set the maximum number of concurrent WLAN users on the device. • Mode: It refers to the WLAN accessing mode. When it is Short. • MAX Associations Limit: It refers to the maximum number of connections. The device supports the point-to-multipoint (PTM) bridge mode. • Peer MAC Address...

User Manual
Page 25
... when the Enable the firewall check box is selected, the other options as the Physical Address. 1 Click . 2 Select LAN MAC Filter Mode. 3 Enter the MAC addresses of the clients and click Apply. 5Security Settings Click Security. A common method to specify the Media Access Control (MAC) address. LAN IP Filter You can configure the advanced security settings. The command window is to restrict network access is displayed, enter ipconfig/ all, and then press Enter. Firewall Switch Your device has a true firewall that controls the...
... when the Enable the firewall check box is selected, the other options as the Physical Address. 1 Click . 2 Select LAN MAC Filter Mode. 3 Enter the MAC addresses of the clients and click Apply. 5Security Settings Click Security. A common method to specify the Media Access Control (MAC) address. LAN IP Filter You can configure the advanced security settings. The command window is to restrict network access is displayed, enter ipconfig/ all, and then press Enter. Firewall Switch Your device has a true firewall that controls the...
User Manual
Page 26
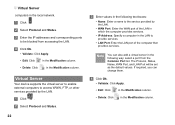
... service provided by the LAN. • WAN Port: Enter the WAN port of the computer that provides services. Virtual Server computers in the local network. 1 Click . 2 Select Protocol and Status. 3 Enter the IP addresses and corresponding ports to be set as the default values. The Protocol, Status, Name, WAN Port, and LAN Port will be blocked from the Common Port list. If required, you can also add a virtual server in the Modification column. Note You can change...
... service provided by the LAN. • WAN Port: Enter the WAN port of the computer that provides services. Virtual Server computers in the local network. 1 Click . 2 Select Protocol and Status. 3 Enter the IP addresses and corresponding ports to be set as the default values. The Protocol, Status, Name, WAN Port, and LAN Port will be blocked from the Common Port list. If required, you can also add a virtual server in the Modification column. Note You can change...
User Manual
Page 27
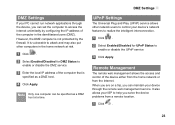
... as a DMZ host at risk. 1 Click . 2 Select Enabled/Disabled for UPnP Status to enable or disable the UPnP service 3 Click Apply. It is vulnerable to access the Internet unlimitedly by the firewall. DMZ Settings If your PC cannot run network applications through the remote web management service. Remote Management The remote web management allows the access and control of the computer in the home network at a time. Note Only one computer can maintain your device through the device, you can set the...
... as a DMZ host at risk. 1 Click . 2 Select Enabled/Disabled for UPnP Status to enable or disable the UPnP service 3 Click Apply. It is vulnerable to access the Internet unlimitedly by the firewall. DMZ Settings If your PC cannot run network applications through the remote web management service. Remote Management The remote web management allows the access and control of the computer in the home network at a time. Note Only one computer can maintain your device through the device, you can set the...

User Manual
Page 29
... driver of the Ethernet interfaces blinks, the corresponding Ethernet interface is normally connected. For information about network mode, see "Configuring PPP Profile Settings" for details. 6 If the DHCP service is disabled and the PC obtains the IP address dynamically, the PC also cannot access the Internet. What to do if a PC in the WLAN cannot access the WLAN? 1 If interferences or shields near the device exist, you can change the mode to manually assign an IP address...
... driver of the Ethernet interfaces blinks, the corresponding Ethernet interface is normally connected. For information about network mode, see "Configuring PPP Profile Settings" for details. 6 If the DHCP service is disabled and the PC obtains the IP address dynamically, the PC also cannot access the Internet. What to do if a PC in the WLAN cannot access the WLAN? 1 If interferences or shields near the device exist, you can change the mode to manually assign an IP address...


