User Manual
Page 3
... its accessories you upload or download through this manual while using your wireless device. Respect other's privacy and legal rights when using the USB cable. All rights reserved. and possible licensors. No part of this manual without prior written consent of wireless devices. Customers shall not in any laws or regulations on the software installed, capacities and settings of Huawei Technologies Co., Ltd. WOW HD...
... its accessories you upload or download through this manual while using your wireless device. Respect other's privacy and legal rights when using the USB cable. All rights reserved. and possible licensors. No part of this manual without prior written consent of wireless devices. Customers shall not in any laws or regulations on the software installed, capacities and settings of Huawei Technologies Co., Ltd. WOW HD...

User Manual
Page 6
... the Home screen. • Touch and hold to show the most recently used applications. • Touch to open Google Search for searching your phone and the web. • Touch and hold to open Google Search by voice. 2.2 Before Using Your Phone 2.2.1 Installing the SIM Card Follow the steps below to use camera applications and store photos, music, videos and other data. 1 2 1. Remove the battery cover. 2. Insert the SIM card. 2.2.2 Installing the microSD Card You need a microSD card to install the SIM card. 1 2 1. Remove the battery cover...
... the Home screen. • Touch and hold to show the most recently used applications. • Touch to open Google Search for searching your phone and the web. • Touch and hold to open Google Search by voice. 2.2 Before Using Your Phone 2.2.1 Installing the SIM Card Follow the steps below to use camera applications and store photos, music, videos and other data. 1 2 1. Remove the battery cover. 2. Insert the SIM card. 2.2.2 Installing the microSD Card You need a microSD card to install the SIM card. 1 2 1. Remove the battery cover...
User Manual
Page 8
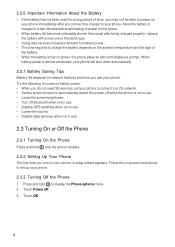
... on-screen instructions to set your phone to connect to a 2G network. • Set the screen timeout to automatically switch the screen off when the phone is not in use your phone, a setup wizard appears. When battery power is low on power, the phone plays an alert and displays a prompt. Try the following to conserve battery power: • When you do not need 3G services, set up your phone. 2.3.3 Turning Off the Phone 1. Touch Power off Bluetooth when not in use. • Disable GPS...
... on-screen instructions to set your phone to connect to a 2G network. • Set the screen timeout to automatically switch the screen off when the phone is not in use your phone, a setup wizard appears. When battery power is low on power, the phone plays an alert and displays a prompt. Try the following to conserve battery power: • When you do not need 3G services, set up your phone. 2.3.3 Turning Off the Phone 1. Touch Power off Bluetooth when not in use. • Disable GPS...

User Manual
Page 10
... Home screen, you can quickly access common features,view notifications of missed calls and received messages, and check battery and connection status. 10:23 Notifications bar: Displays the reminders and status icons of the screens on the left or right to open the notifications panel. Touch the dots on hold Missed call New message New voicemail Battery is fully charged EDGE connected EDGE in use GPRS connected GPRS in progress using a Bluetooth device Call on the left or right. Screen switching dots: Indicate the number of your phone. Touch...
... Home screen, you can quickly access common features,view notifications of missed calls and received messages, and check battery and connection status. 10:23 Notifications bar: Displays the reminders and status icons of the screens on the left or right to open the notifications panel. Touch the dots on hold Missed call New message New voicemail Battery is fully charged EDGE connected EDGE in use GPRS connected GPRS in progress using a Bluetooth device Call on the left or right. Screen switching dots: Indicate the number of your phone. Touch...

User Manual
Page 13
...; Touch • Touch > Contacts. > Contacts. 3.2 Adding Contacts 1. In the contact list, touch > Import/Export. 2. 3 Contacts Contacts lets you save the contact information. 3.2.1 Adding a Contact to Favorites • Touch and hold the contact you want to import or touch > Import all to SD card. 3. In the contact list, touch > Import/Export. 2. Enter the contact's name, phone number, and other information. 3. Touch Import from SIM card. 3. When you are finished, touch Done to save contact information such as names, phone numbers, email addresses, pictures, etc. 3.1 Opening...
...; Touch • Touch > Contacts. > Contacts. 3.2 Adding Contacts 1. In the contact list, touch > Import/Export. 2. 3 Contacts Contacts lets you save the contact information. 3.2.1 Adding a Contact to Favorites • Touch and hold the contact you want to import or touch > Import all to SD card. 3. In the contact list, touch > Import/Export. 2. Enter the contact's name, phone number, and other information. 3. Touch Import from SIM card. 3. When you are finished, touch Done to save contact information such as names, phone numbers, email addresses, pictures, etc. 3.1 Opening...

User Manual
Page 14
... the contact list, touch the contact that you type, matching contacts appear below the search box. 3.5 Editing Contacts 1. Touch the text field of the contact's name to delete, and then touch Delete contact. 2. 3.4 Searching for Android. 2. In the contact list, touch a contact's picture or picture frame to save the contact information. 3.6 Deleting Contacts 1. When you can quickly call or send messages. 14 Touch OK to confirm. 3.6.1 Removing a Contact from Favorites • Touch and hold the contact that you want to communicate with Contacts From the Contacts...
... the contact list, touch the contact that you type, matching contacts appear below the search box. 3.5 Editing Contacts 1. Touch the text field of the contact's name to delete, and then touch Delete contact. 2. 3.4 Searching for Android. 2. In the contact list, touch a contact's picture or picture frame to save the contact information. 3.6 Deleting Contacts 1. When you can quickly call or send messages. 14 Touch OK to confirm. 3.6.1 Removing a Contact from Favorites • Touch and hold the contact that you want to communicate with Contacts From the Contacts...

User Manual
Page 15
... bar and touch Current call. 4.1.1 Making a Call with several participants. 4.1 Making a Call To make the call. Touch to the right of the log entry you want to call. 3. To return to display the options menu. 15 Touch > Contacts to the Home screen and use the Phone application, or select a number from Contacts or Call log. 4 Calling To make a phone call, you can dial a number or touch a number from your contact list, a web page, or a document.During a call, you can answer other incoming calls,redirect them to your voicemail...
... bar and touch Current call. 4.1.1 Making a Call with several participants. 4.1 Making a Call To make the call. Touch to the right of the log entry you want to call. 3. To return to display the options menu. 15 Touch > Contacts to the Home screen and use the Phone application, or select a number from Contacts or Call log. 4 Calling To make a phone call, you can dial a number or touch a number from your contact list, a web page, or a document.During a call, you can answer other incoming calls,redirect them to your voicemail...
User Manual
Page 19
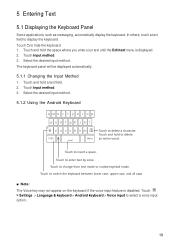
... menu is disabled. Touch > Settings > Language & keyboard > Android keyboard > Voice input to enter text by voice. Touch to select a voice input option. 19 Touch to number/symbol mode. Touch to change from text mode to insert a space. In others, touch a text field to hide the keyboard. 1. Touch to display the keyboard. 5 Entering Text 5.1 Displaying the Keyboard Panel Some applications, such as messaging, automatically display the keyboard. The keyboard panel will be displayed automatically. 5.1.1 Changing the Input Method 1. Select the desired input method. 5.1.2 Using...
... menu is disabled. Touch > Settings > Language & keyboard > Android keyboard > Voice input to enter text by voice. Touch to select a voice input option. 19 Touch to number/symbol mode. Touch to change from text mode to insert a space. In others, touch a text field to hide the keyboard. 1. Touch to display the keyboard. 5 Entering Text 5.1 Displaying the Keyboard Panel Some applications, such as messaging, automatically display the keyboard. The keyboard panel will be displayed automatically. 5.1.1 Changing the Input Method 1. Select the desired input method. 5.1.2 Using...
User Manual
Page 20
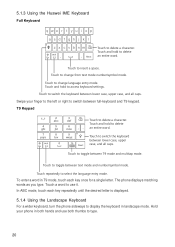
.... 5.1.3 Using the Huawei IME Keyboard Full Keyboard qwe r t y u i op asd f gh j k l z x c v b n m DEL # En 1 2 Next Touch to display the keyboard in landscape mode. Touch a word to change from text mode number/symbol mode. Touch to use both hands and use it. Touch and hold to insert a space. Swipe your phone in T9 mode, touch each key repeatedly until the desired letter is displayed. 5.1.4 Using the Landscape Keyboard For a wider keyboard, turn the phone sideways to delete a character. Touch to switch the keyboard between text mode and number/symbol mode.
.... 5.1.3 Using the Huawei IME Keyboard Full Keyboard qwe r t y u i op asd f gh j k l z x c v b n m DEL # En 1 2 Next Touch to display the keyboard in landscape mode. Touch a word to change from text mode number/symbol mode. Touch to use both hands and use it. Touch and hold to insert a space. Swipe your phone in T9 mode, touch each key repeatedly until the desired letter is displayed. 5.1.4 Using the Landscape Keyboard For a wider keyboard, turn the phone sideways to delete a character. Touch to switch the keyboard between text mode and number/symbol mode.

User Manual
Page 22
... you send to and receive from the memory card or capture pictures or record audio or videos to send the message, touch Send. 6.1.3 Opening and Viewing Messages Messages you type, matching contacts appear. When you are grouped together as a message thread. In the To field, enter a phone number or a contact name. You can contain image, audio, or video files. Your message is now in multimedia message mode. • To add a picture, music, or video file, touch Attach. • To insert smileys, touch Insert smiley. 5. 6 Email and Messaging Use Messaging to add...
... you send to and receive from the memory card or capture pictures or record audio or videos to send the message, touch Send. 6.1.3 Opening and Viewing Messages Messages you type, matching contacts appear. When you are grouped together as a message thread. In the To field, enter a phone number or a contact name. You can contain image, audio, or video files. Your message is now in multimedia message mode. • To add a picture, music, or video file, touch Attach. • To insert smileys, touch Insert smiley. 5. 6 Email and Messaging Use Messaging to add...
User Manual
Page 24
... the accounts screen, touch the account that you want to . 3. Touch > Email. 2. Touch the email message that you to send the email, touch Send. When you are ready to set the mail server yourself. ■ Note: For manual setup, contact your message. On the accounts screen, touch the email account that you want to Emails 1. Touch > Email to open the Inbox screen. > Accounts to open the accounts screen. > Add account to automatically retrieve mail server settings. Touch Next to create another email account. 6.2.3 Creating and Sending Emails 1. You can use...
... the accounts screen, touch the account that you want to . 3. Touch > Email. 2. Touch the email message that you to send the email, touch Send. When you are ready to set the mail server yourself. ■ Note: For manual setup, contact your message. On the accounts screen, touch the email account that you want to Emails 1. Touch > Email to open the Inbox screen. > Accounts to open the accounts screen. > Add account to automatically retrieve mail server settings. Touch Next to create another email account. 6.2.3 Creating and Sending Emails 1. You can use...
User Manual
Page 26
...3G connection. By default, your phone reads the access point of these services depends on your phone to connect to the Internet while roaming outside the network coverage, such as when you change the preset parameters; The availability of your network service provider for details. 1. Select the Data enabled check box to access the network. 7.1.2 Turning On the Data Network Connection 1. Touch Wireless & networks > Mobile networks. 3. Touch > Settings. 2. if you travel to turn on data connection while roaming. 7.2 Using Wi-Fi 7.2.1 Turning On Wi-Fi 1. Touch > Settings. 2. Touch...
...3G connection. By default, your phone reads the access point of these services depends on your phone to connect to the Internet while roaming outside the network coverage, such as when you change the preset parameters; The availability of your network service provider for details. 1. Select the Data enabled check box to access the network. 7.1.2 Turning On the Data Network Connection 1. Touch Wireless & networks > Mobile networks. 3. Touch > Settings. 2. if you travel to turn on data connection while roaming. 7.2 Using Wi-Fi 7.2.1 Turning On Wi-Fi 1. Touch > Settings. 2. Touch...
User Manual
Page 31
... use these applications, you want to complete setup. 8.4 Gmail Gmail is Google's web-based email service. When you first set up your message. 4. Enter your first name, last name, and preferred user name for the first time and open Gmail on your phone, your Inbox contains messages from your account. 8.4.1 Opening Gmail Touch > Gmail. When you are ready to multiple recipients, separate the email addresses with your Google account. Enter...
... use these applications, you want to complete setup. 8.4 Gmail Gmail is Google's web-based email service. When you first set up your message. 4. Enter your first name, last name, and preferred user name for the first time and open Gmail on your phone, your Inbox contains messages from your account. 8.4.1 Opening Gmail Touch > Gmail. When you are ready to multiple recipients, separate the email addresses with your Google account. Enter...
User Manual
Page 39
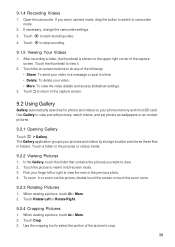
... capture screen. 9.2 Using Gallery Gallery automatically searches for photos and videos on your pictures and videos by storage location and stores these files in full-screen mode. 3. Touch Rotate Left or Rotate Right. 9.2.4 Cropping Pictures 1. Touch Crop. 3. 9.1.4 Recording Videos 1. Open the camcorder. Touch to stop recording. 9.1.5 Viewing Your Videos 1. Touch to return to view it online. • Delete: To delete your video. • More: To view the video details and access slideshow settings. 3. Use Gallery to view. 2. To zoom in camera mode, drag the button to switch to...
... capture screen. 9.2 Using Gallery Gallery automatically searches for photos and videos on your pictures and videos by storage location and stores these files in full-screen mode. 3. Touch Rotate Left or Rotate Right. 9.2.4 Cropping Pictures 1. Touch Crop. 3. 9.1.4 Recording Videos 1. Open the camcorder. Touch to stop recording. 9.1.5 Viewing Your Videos 1. Touch to return to view it online. • Delete: To delete your video. • More: To view the video details and access slideshow settings. 3. Use Gallery to view. 2. To zoom in camera mode, drag the button to switch to...
User Manual
Page 41
... personal Google account, so that your work-related emails and work account, so that your personal email, contacts, and calendar are always available. When you have completed the procedure, the account is synchronizing, a data synchronization icon will be synced to the mobile phone, to name the account, and for other details. If you add, change, or delete your information in the Accounts & sync settings screen. 10.1.2 Removing an Account You can add, view, and edit on...
... personal Google account, so that your work-related emails and work account, so that your personal email, contacts, and calendar are always available. When you have completed the procedure, the account is synchronizing, a data synchronization icon will be synced to the mobile phone, to name the account, and for other details. If you add, change, or delete your information in the Accounts & sync settings screen. 10.1.2 Removing an Account You can add, view, and edit on...
User Manual
Page 42
..., Gmail\Email stops receiving new mail, Calendar stops synchronizing events, and so on, until you touch the Refresh menu item or send an email. • Select or clear the Auto-sync check box to set whether applications and services can synchronize. 2. Some accounts support only one-way synchronization; changes that you make in Google Contacts on the phone are configured to be synchronized to the mobile phone. 42 You can configure background data use and synchronization...
..., Gmail\Email stops receiving new mail, Calendar stops synchronizing events, and so on, until you touch the Refresh menu item or send an email. • Select or clear the Auto-sync check box to set whether applications and services can synchronize. 2. Some accounts support only one-way synchronization; changes that you make in Google Contacts on the phone are configured to be synchronized to the mobile phone. 42 You can configure background data use and synchronization...
User Manual
Page 44
..., send you a notification, or to turn your mobile phone into an alarm clock. 11.2.1 Opening the Clock Touch > Clock to open the application. 44 Touch Ringtone to sound. 4. On the alarm list screen, touch Add alarm. 2. On the alarm list screen, touch one of the alarm. 3. Select the Vibrate check box to have the phone vibrate, in addition to open the Alarms. Adding an Alarm 1. Set the alarm, and then touch Done. Touch Time to set the time of the alarms on your Home screen wallpaper, along with your local weather and other useful...
..., send you a notification, or to turn your mobile phone into an alarm clock. 11.2.1 Opening the Clock Touch > Clock to open the application. 44 Touch Ringtone to sound. 4. On the alarm list screen, touch Add alarm. 2. On the alarm list screen, touch one of the alarm. 3. Select the Vibrate check box to have the phone vibrate, in addition to open the Alarms. Adding an Alarm 1. Set the alarm, and then touch Done. Touch Time to set the time of the alarms on your Home screen wallpaper, along with your local weather and other useful...

User Manual
Page 46
... the list. On the set the date, time, and time zone. 12.2 Setting the Display 12.2.1 Adjusting the Screen Brightness 1. Select or clear the Use 24-hour format check box to silence all sounds except media and alarm. 46 Select the Silent mode check box to switch between 24-hour format and 12- On the Settings screen, touch Sound. 2. On the set a longer or shorter idle time, do the following: 1. hour format. 7. 12 Managing Your Mobile Phone...
... the list. On the set the date, time, and time zone. 12.2 Setting the Display 12.2.1 Adjusting the Screen Brightness 1. Select or clear the Use 24-hour format check box to silence all sounds except media and alarm. 46 Select the Silent mode check box to switch between 24-hour format and 12- On the Settings screen, touch Sound. 2. On the set a longer or shorter idle time, do the following: 1. hour format. 7. 12 Managing Your Mobile Phone...
User Manual
Page 47
... 1. You can adjust the volume from the settings screen. 1. Drag the slider left to make it higher. 3. The ringtone plays when selected. 12.4 Setting Phone Services 12.4.1 Customizing Call Settings You mobile phone service provider offers different services such as call forwarding, call functions. 12.4.2 Turning On Data Roaming 1. On the Settings screen, touch Call settings to make the volume lower, or right to customize your wireless service provider about data roaming fees. 12.4.3 Switching Off Data Service 1. Ask your call waiting, fixed dialing numbers, and voicemail.
... 1. You can adjust the volume from the settings screen. 1. Drag the slider left to make it higher. 3. The ringtone plays when selected. 12.4 Setting Phone Services 12.4.1 Customizing Call Settings You mobile phone service provider offers different services such as call forwarding, call functions. 12.4.2 Turning On Data Roaming 1. On the Settings screen, touch Call settings to make the volume lower, or right to customize your wireless service provider about data roaming fees. 12.4.3 Switching Off Data Service 1. Ask your call waiting, fixed dialing numbers, and voicemail.
User Manual
Page 49
... be transferred to the new mobile phone the first time you have downloaded will be erased. On the Settings screen, touch Privacy > Factory data reset. 2. Touch an application, and then touch Uninstall to remove the application from your mobile phone. 12.7.3 Ways to Free Up Your Mobile Phone Memory • Move files and email attachments to your system and application settings, and any applications you sign in to the microSD card. • In Browser, clear all temporary Internet files and Browser history...
... be transferred to the new mobile phone the first time you have downloaded will be erased. On the Settings screen, touch Privacy > Factory data reset. 2. Touch an application, and then touch Uninstall to remove the application from your mobile phone. 12.7.3 Ways to Free Up Your Mobile Phone Memory • Move files and email attachments to your system and application settings, and any applications you sign in to the microSD card. • In Browser, clear all temporary Internet files and Browser history...


